1. Introduction
This manual provides detailed instructions for the safe and effective use of your Ykall WG-ZYY Airbrush Kit. Please read this manual thoroughly before operating the device and retain it for future reference. This portable airbrush kit is designed for various applications including art painting, cake decoration, makeup, beauty hydration, nail art, handicrafts, model coloring, and body paint.
2. Package Contents
Verify that all items listed below are included in your package:
- 1 x Airbrush
- 1 x Mini Compressor (integrated with airbrush)
- 1 x Extension Tube
- 1 x Liquid Extraction Dropper
- 1 x 0.3mm Nozzle (pre-installed or replaceable)
- 5 x Spray Gun Cleaner
- 5 x Wash Needles
- 1 x 20CC Plastic Cup
- 1 x 40CC Plastic Cup
- 1 x Type-C Charging Cable
- 1 x User Manual

Image: Overview of the Ykall Airbrush Kit package contents, including the airbrush, compressor, cups, cleaning tools, and charging cable.
3. Product Overview
Familiarize yourself with the main components of your airbrush kit:

Image: The Ykall Airbrush Kit showing the handheld airbrush gun attached to the mini compressor, along with various accessories like the coiled air hose, dropper, and cleaning brushes.

Image: Detailed diagram of the airbrush gun, labeling components such as the fluid cup cover, 9cc fluid cup, trigger, hose connection, 0.3mm needle, pen tube, fluid nozzle, and nozzle cap.
4. Setup
4.1 Charging the Compressor
Before first use, fully charge the airbrush compressor. Connect the provided Type-C charging cable to the charging port on the compressor and to a suitable USB power source. The charging indicator light will be red during charging and turn green when fully charged. Do not use the airbrush while it is charging.
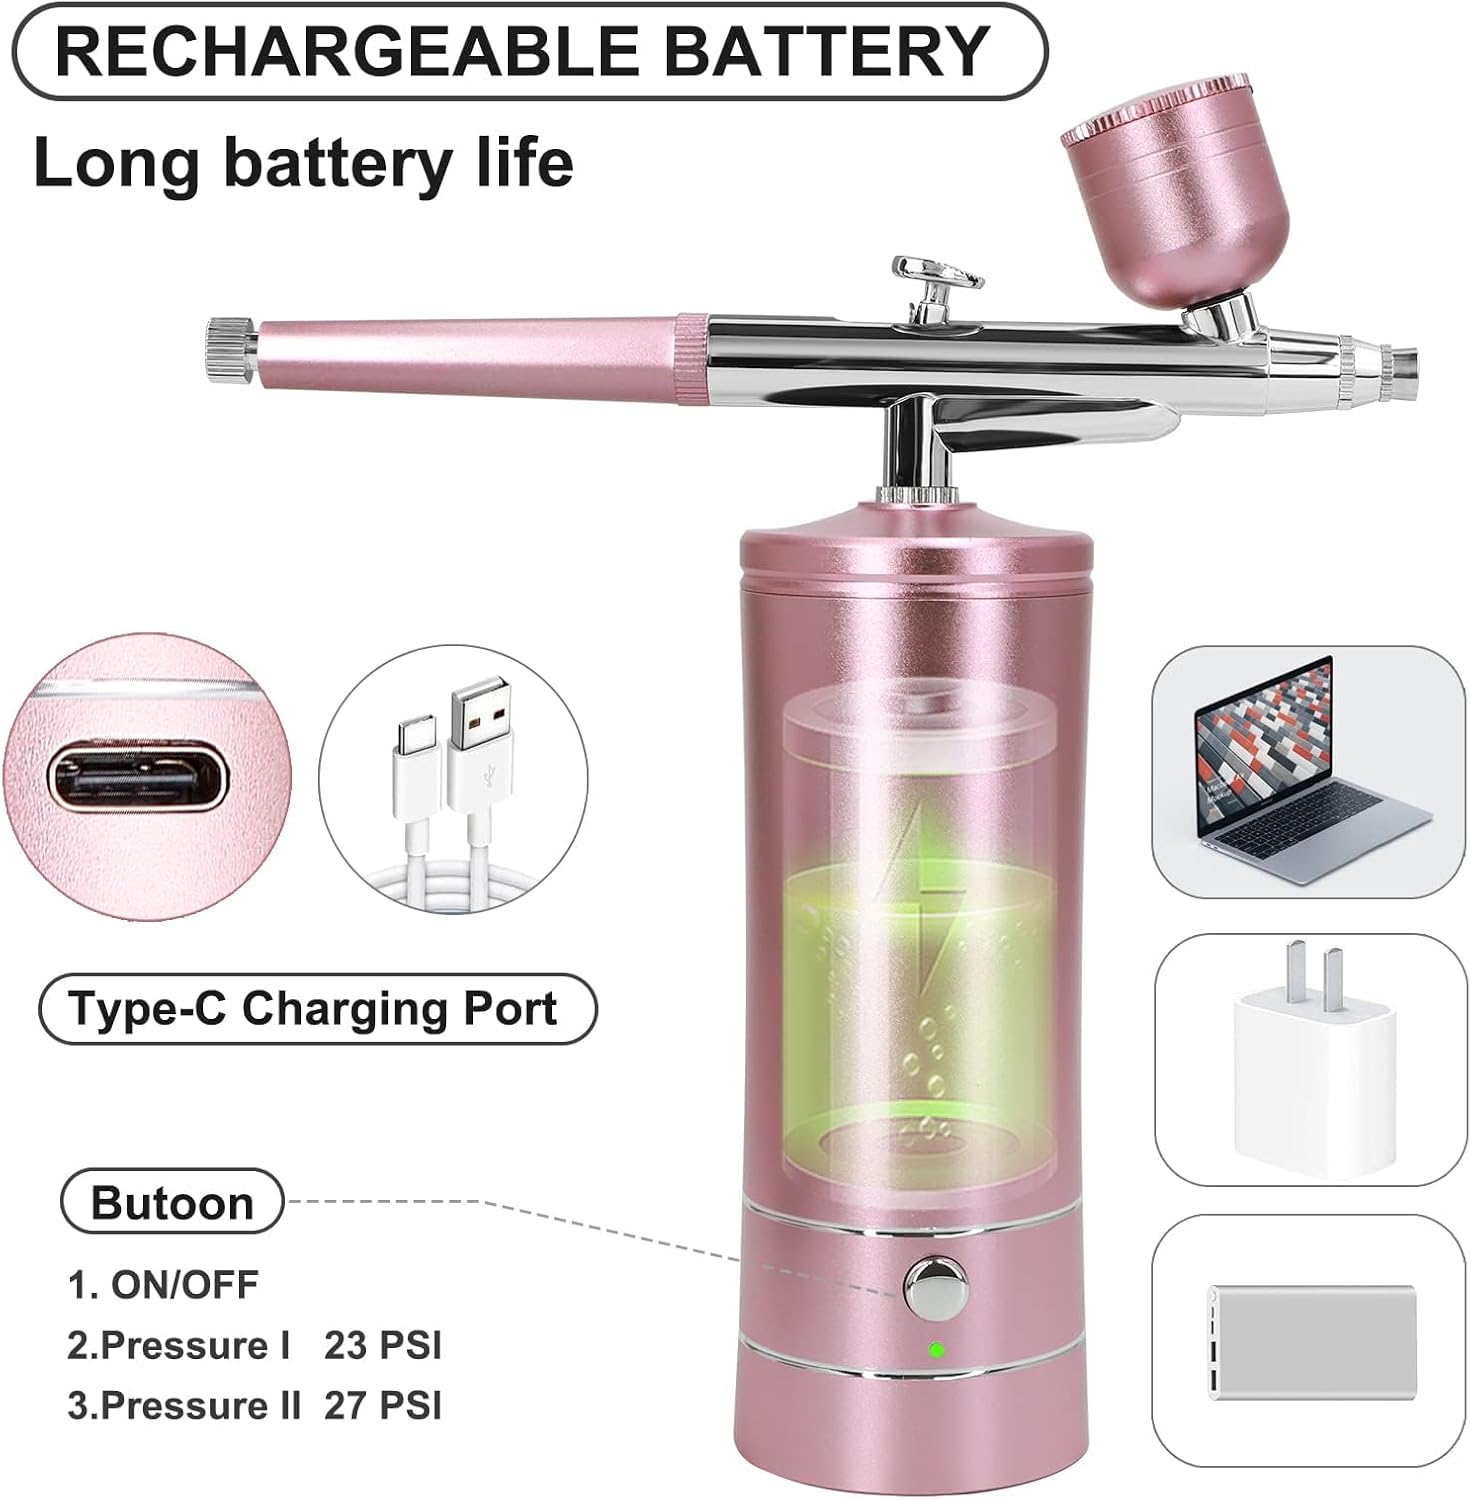
Image: Diagram illustrating the Type-C charging port on the airbrush compressor and its rechargeable battery feature.
4.2 Assembling the Airbrush
- Screw the airbrush gun onto the top of the mini compressor. Ensure it is securely tightened.
- Alternatively, for extended reach, connect the airbrush gun to the compressor using the provided extension tube (air hose).

Image: The airbrush gun connected to the compressor via a coiled extension tube, demonstrating a flexible setup for various painting angles.
4.3 Preparing and Filling Paint/Liquid
- Dilute your paint or liquid appropriately. Thick paint or liquid may clog the airbrush. Water-based liquids may not require dilution, but solvent-based paints need a thinner.
- Use the liquid extraction dropper to carefully fill the desired fluid cup (20CC or 40CC) with the prepared paint/liquid.
- Attach the filled fluid cup to the airbrush gun.

Image: Diagram showing how to inject water or paint into the airbrush cup and adjust the spray size.
Video: This video demonstrates the unboxing, assembly, and initial use of the Ykall Airbrush Kit, including filling the cup and basic spraying.
5. Operating Instructions
5.1 Powering On and Adjusting Airflow
- Short press the ON/OFF switch on the compressor to turn it on. The airbrush will begin to produce airflow.
- The compressor offers two pressure settings: 23PSI and 27PSI. Press the ON/OFF button again to switch between these settings.
- Adjust the airflow regulator on the airbrush gun by screwing it to control the spray amount and fineness.
5.2 Spraying Technique
- Align the airbrush with the area to be sprayed, maintaining a distance of 2-3cm.
- Gently pull the trigger backwards to release the atomized paint.
- Move the airbrush back and forth evenly to achieve desired coverage.
Video: This video demonstrates the operational steps and usage of the Ykall Airbrush Kit, including assembly, filling, and spraying techniques.
5.3 Applications
The Ykall Airbrush Kit is versatile and can be used for:
- Tattoos
- Art Painting
- Cake Decoration
- Makeup and Beauty Hydration
- Nail Art
- Handicrafts
- Model Coloring
- Body Paint

Image: A collage showcasing various applications of the airbrush kit, including painting shoes, models, cakes, nail art, and artistic makeup.
6. Maintenance and Cleaning
Proper cleaning is crucial for the longevity and performance of your airbrush kit. Clean the airbrush immediately after each use, especially if you will not be using it for more than ten minutes, to prevent blockages.
6.1 Routine Cleaning
- Empty any remaining fluid from the cup.
- Wash the fluid cup thoroughly with water or an appropriate solvent using a brush.
- Refill the cup with water or solvent. Block the needle cover with a finger and spray. This allows air to flow backward into the nozzle, cleaning out any remaining paint.
- Dry the airbrush to prevent stains or rust.
6.2 Deep Cleaning
For thorough cleaning or if the nozzle is blocked:
- Disassemble the airbrush gun, carefully removing the nozzle, needle, and fluid cup.
- Use the provided spray gun cleaners and wash needles to clean all internal parts, especially the nozzle and fluid passages.
- Clean with alcohol or a suitable detergent if paint is stubborn.
- Reassemble the airbrush once all parts are clean and dry.
7. Troubleshooting
If you encounter issues with your airbrush kit, refer to the following common problems and solutions:
- Airbrush not spraying liquid: This may be due to the fluid control knob being too tight or the nozzle being blocked. Try adjusting the fluid control knob or cleaning the nozzle with alcohol or detergent.
- Paint spattering: Ensure paint is properly diluted. If the paint or liquid is too thick, dilute it with water or appropriate thinner.
- Compressor not working: Check if the battery is fully charged. Ensure the ON/OFF switch is pressed correctly.
- Clogging: Always thin paint correctly. Clean the airbrush cavity, nozzle, and liquid cup thoroughly after each use.
8. Specifications
- Brand:
- Ykall
- Model Name:
- WG-ZYY
- Color:
- Pink
- Material:
- Metal
- Item Weight:
- 1 Pounds
- Product Dimensions:
- 6.3"W x 5.9"H
- Power Source:
- Battery Powered
- Maximum Pressure:
- 23PSI~27PSI
- Air Flow:
- 6-8L
- Nozzle Tip:
- 0.3mm
- Tank Volume:
- 40 Milliliters (with additional 20CC and 40CC plastic cups)
- Battery Life:
- More than 60 minutes continuous use (when fully charged)
9. Safety Information
Please observe the following safety precautions:
- Use in a well-ventilated area.
- Avoid inhaling paint mist.
- Keep away from eyes and skin.
- Do not use while charging.
- Clean thoroughly after use to prevent clogging.
- Keep out of reach of children.
10. Warranty and Support
This product comes with a standard manufacturer's warranty. For any issues, questions, or support needs, please contact Ykall customer service. Refer to the contact information provided in your original purchase documentation or on the manufacturer's website.