1. Introduction
The Hiwonder xArm ESP32 Robotic Arm is an open-source robot designed for education and development, supporting MicroPython programming. It features an ESP32 main control system, allowing for Wi-Fi and Bluetooth wireless communication. The modular design includes an ESP32 core board and a multi-functional expansion board with on-board servo ports, a buzzer, LED, and USB interface. It also provides several expansion interfaces for connecting various sensors and actuating modules, enabling secondary development.
This robotic arm utilizes intelligent serial bus servos for high precision, feedback functions, and convenient wiring, reducing friction. The base servo is upgraded to a 25KG torque servo, allowing the arm to grab objects weighing over 500g with steady movement. Multiple control methods are supported, including APP, mouse, handle, wireless glove, synchronization controller, and Bluetooth group control.
2. What's Included
The assembled Hiwonder xArm ESP32 Robotic Arm package typically includes the following components:
- Robotic arm (assembled)
- 7.5V adapter
- PS2 handle
- Handle receiver
- USB cable
- Screwdriver

Figure 2.1: Contents of the assembled robotic arm package, including the arm, power adapter, PS2 handle, receiver, USB cable, and screwdriver.
3. Product Structure and Components
The xArm ESP32 Robotic Arm is constructed with durable metal brackets and intelligent bus servos, ensuring stability and precision. Key components include:
- Mechanic Gripper: The end effector for grasping objects.
- LX-15D Bus Servo: Used for various joints, offering high precision.
- LX-225 Bus Servo: A higher torque servo, typically used at the base for increased stability and load capacity.
- ID1 Servo: Another type of intelligent bus servo.
- Metal Bracket: Provides the structural integrity of the arm.
- ESP32 Open-Source Controller: The brain of the robot, supporting MicroPython programming.
- Metal Rotational Station: The base mechanism allowing for rotational movement.
- Metal Plate: The main base for stability.
- Suction Cup: Provides grip to the surface for stable operation.

Figure 3.1: Detailed view of the xArm ESP32 Robotic Arm's structure, highlighting its main components.
4. Setup and Initial Operation
To begin using your Hiwonder xArm ESP32 Robotic Arm, follow these steps for initial setup and power-up:
- Place the robotic arm on a stable, flat surface. Ensure the suction cups are engaged for maximum stability.
- Connect the 7.5V power adapter to the robotic arm's power input port.
- Plug the power adapter into a suitable electrical outlet. The arm will perform an initial calibration sequence.
- For programming or advanced control, connect the robotic arm to your computer using the provided USB cable.
Video 4.1: This video provides an overview of the Hiwonder xArm ESP32 Robotic Arm, demonstrating its metal body, intelligent bus servos, ESP32 controller, MicroPython programming capabilities, various powerful functions including sensor integration (color recognition, IR detection, ultrasonic ranging, touch detection, joystick control, knob control), and different control methods (Wonderbot APP, one-to-one, group, synchronization controller, wireless handle, mouse control), and action programming methods (PC software, Wonderbot APP, synchronization controller).
5. Programming and Control
5.1 MicroPython Programming
The xArm ESP32 supports MicroPython programming, offering an intuitive Python editor. When connected, the open-source code on the device is automatically displayed, allowing for easy editing, downloading, and running of programs. The editor supports common ESP32 command code completion, batch commenting with shortcut keys, and grammar checks.

Figure 5.1: Screenshot of the xArm (V2.8) PC Software interface, demonstrating the MicroPython programming environment.
5.2 Control Methods
The xArm ESP32 offers a variety of control methods for versatile operation:
5.2.1 APP Control (Wonderbot APP)
Control the robotic arm wirelessly using the dedicated Wonderbot APP on your smartphone. This allows for intuitive movement and function control.

Figure 5.2: The top image shows the robotic arm being controlled via a synchronization controller, while the bottom image illustrates control through the Wonderbot APP on a smartphone.
5.2.2 Mouse, Wireless Handle, and Somatronic Gloves Control
Beyond the APP, the arm can be controlled using a standard mouse, a wireless handle (like the included PS2 handle), or specialized somatronic gloves for more immersive interaction.
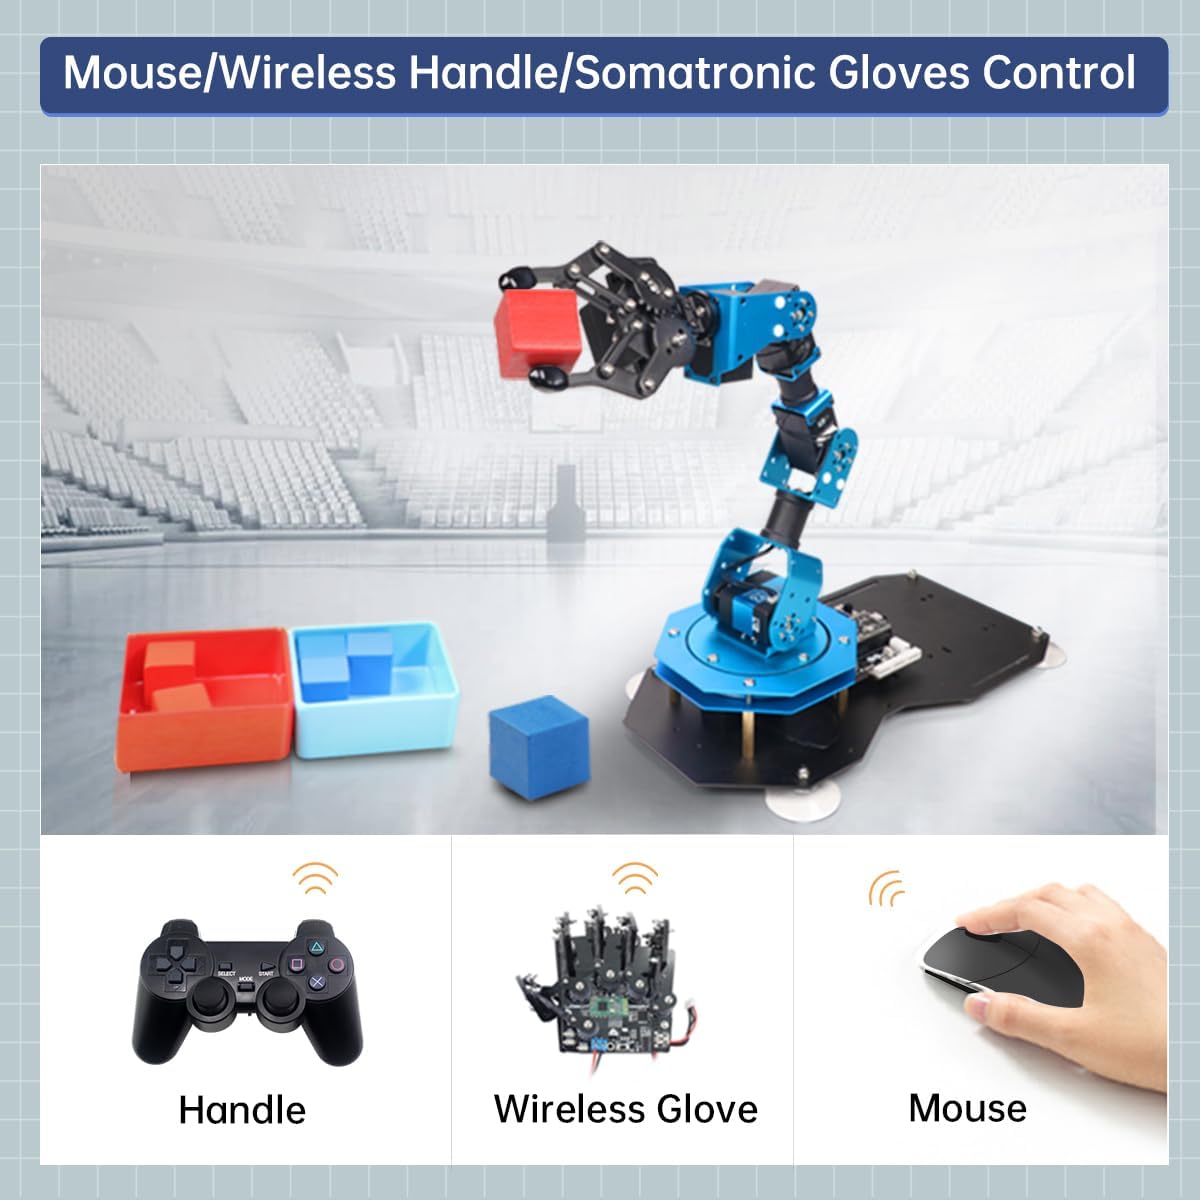
Figure 5.3: Demonstrates various control methods for the xArm ESP32, including a handle, wireless glove, and mouse.
5.2.3 Synchronization Controller Control
Achieve precise, real-time control by physically manipulating a second robotic arm (synchronization controller) which mirrors its movements to the xArm ESP32.
5.2.4 Bluetooth Group Control
Control multiple xArm ESP32 units simultaneously using Bluetooth group control, ideal for coordinated tasks or educational demonstrations involving several robots.

Figure 5.4: Shows multiple xArm ESP32 robotic arms operating together under group control, demonstrating synchronized movements.
5.3 Gripping Functions and Sensor Integration
The xArm ESP32 can be expanded with various sensors for advanced gripping and interaction with its environment:
- Color Recognition Gripping: Utilize a color sensor to identify and sort objects based on their color.
- IR Detection Gripping: An infrared obstacle avoidance sensor can detect objects, allowing the arm to pick them up or navigate around them.
- Ultrasonic Ranging Gripping: An ultrasonic sensor enables the arm to detect the distance to objects, facilitating precise gripping.
- Touch Detection Gripping: A touch sensor allows the arm to react upon physical contact, useful for delicate operations.
- Joystick Control Gripping: Control the arm's gripping actions using a joystick module for manual precision.
- Knob Control Gripping: A knob module can be used to fine-tune gripping force or position.
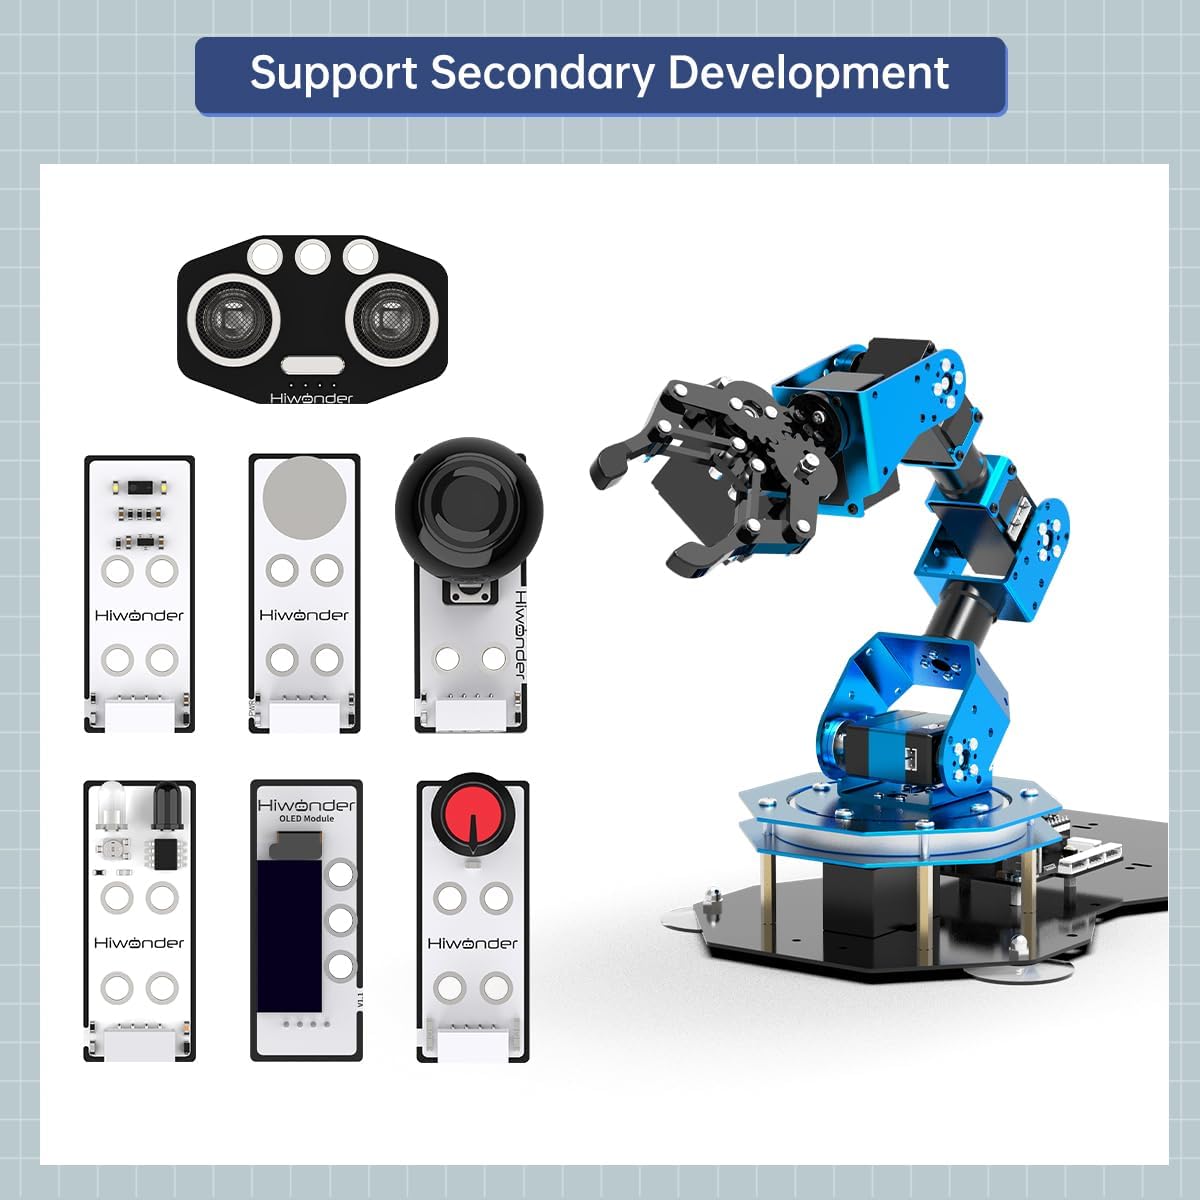
Figure 5.5: Illustrates the various sensor modules available for secondary development with the xArm ESP32, including ultrasonic, infrared, color, touch, joystick, and knob modules.
6. Specifications
| Attribute | Value |
|---|---|
| Product Dimensions | 10.9 x 6.1 x 16.77 inches |
| Item Weight | 4.8 pounds |
| ASIN | B0BP7KY2GP |
| Manufacturer Recommended Age | 15 years and up |
| Manufacturer | Hiwonder |
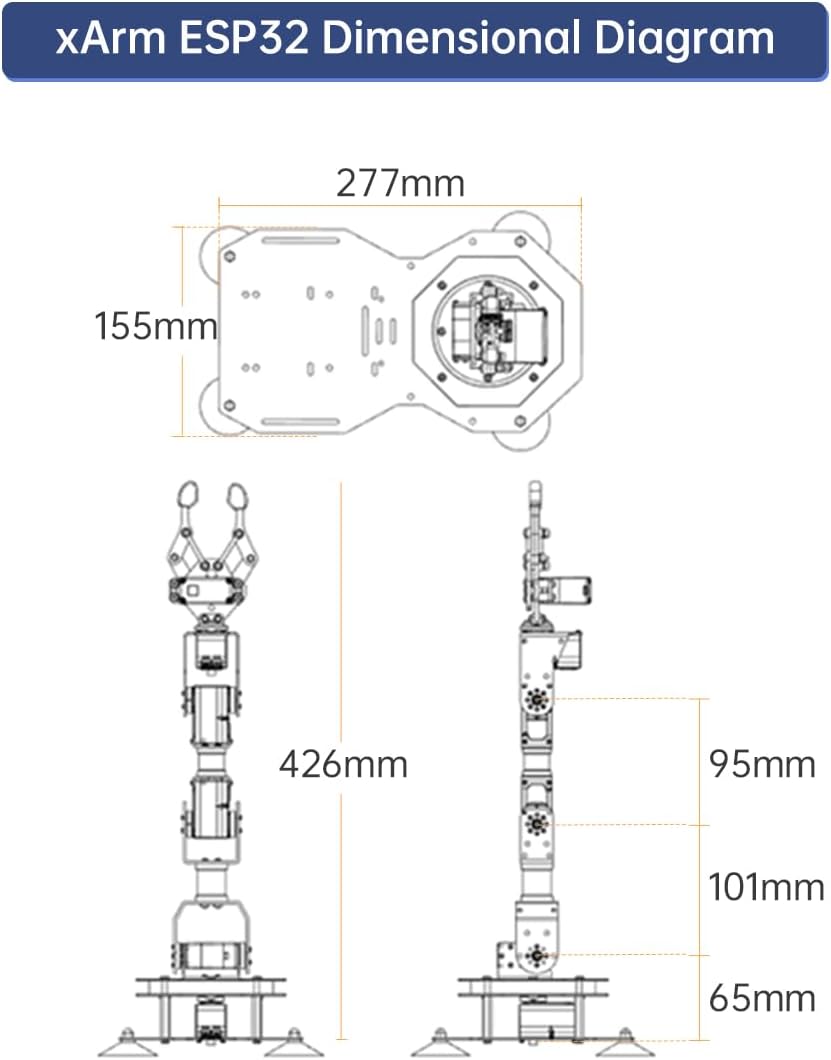
Figure 6.1: Dimensional diagram of the xArm ESP32, showing its height and base dimensions.
7. Maintenance
Proper maintenance ensures the longevity and optimal performance of your xArm ESP32 Robotic Arm:
- Cleaning: Regularly wipe down the arm with a soft, dry cloth to remove dust and debris. Avoid using harsh chemicals or abrasive materials.
- Joint Inspection: Periodically check all joints and connections for any looseness. Tighten screws as needed, but do not overtighten.
- Cable Management: Ensure all cables are neatly routed and not pinched or under tension to prevent damage.
- Software Updates: Check the official Hiwonder website or Wonderbot APP for any available firmware or software updates to ensure the arm operates with the latest features and bug fixes.
- Storage: When not in use, store the robotic arm in a clean, dry environment, away from extreme temperatures and direct sunlight.
8. Troubleshooting
If you encounter issues with your xArm ESP32, refer to the following common problems and solutions:
- Arm Not Responding:
- Ensure the power adapter is securely connected and the arm is receiving power.
- Check USB or Bluetooth connections if controlling via PC or APP.
- Restart the arm by disconnecting and reconnecting power.
- Servos Not Moving Smoothly or Making Noise:
- Verify that no physical obstructions are impeding the arm's movement.
- Check for loose screws at the servo joints.
- Ensure the arm is not overloaded beyond its specified gripping capacity (500g).
- Programming Errors:
- Double-check your MicroPython code for syntax errors.
- Ensure the correct COM port is selected when connecting via PC.
- Refer to the official Hiwonder programming tutorials and documentation for guidance.
- Connectivity Issues (Bluetooth/Wi-Fi):
- Ensure the arm's Bluetooth/Wi-Fi module is enabled.
- Check that your controlling device (smartphone/PC) has Bluetooth/Wi-Fi enabled and is within range.
- Try restarting both the arm and the controlling device.
9. Warranty and Support
The Hiwonder xArm ESP32 Robotic Arm comes with a standard manufacturer's warranty. For specific warranty details, including coverage period and terms, please refer to the documentation provided with your purchase or visit the official Hiwonder website.
For technical support, troubleshooting assistance, or inquiries regarding parts and accessories, please contact Hiwonder customer service through their official channels. You can often find support resources, FAQs, and community forums on the HIWONDER Store on Amazon or their dedicated support website.


