AMprime 11.26" Mirror Dash Cam With Carplay
AMprime 11.26" Mirror Dash Cam with Wireless Apple CarPlay & Android Auto User Manual
Model: 11.26" Mirror Dash Cam With Carplay
Brand: AMprime
1. Introduction
This manual provides detailed instructions for the installation, operation, and maintenance of your AMprime 11.26" Mirror Dash Cam. Please read this manual thoroughly before using the device to ensure proper functionality and safety.
Product Overview
The AMprime 11.26" Mirror Dash Cam is an advanced in-car entertainment and safety system, featuring a large touch screen, dual 1080P cameras, and seamless integration with Wireless Apple CarPlay and Android Auto. It offers enhanced driving experience with features like voice control, FM transmission, night vision, parking assistance, and loop recording.

Image: The AMprime 11.26 inch Mirror Dash Cam, showcasing its large display and included rear camera.
2. Package Contents
Please verify that all items listed below are included in your package:
- 1 x 11.26" Mirror Dash Cam Unit
- 1 x Pull Back Camera (Rear Camera)
- 1 x Power Cord (for cigarette lighter)
- 1 x Camera Extension Cord
- 1 x 3m AUX Cable
- 1 x Monitor Base
- 1 x User Manual
- 1 x Installation Tool
- Camera Accessories (e.g., screws, adhesive pads)

Image: All components included in the product package, such as the main unit, rear camera, various cables, and installation tools.
3. Setup and Installation
Follow these steps to properly install your Mirror Dash Cam:
- Mounting the Dash Cam: Securely attach the 11.26" Mirror Dash Cam over your existing rearview mirror using the provided straps or monitor base. Ensure it is firmly in place and does not obstruct your view.
- Connecting the Power: Connect the power cord to the Type-C port on the dash cam and plug the other end into your vehicle's cigarette lighter socket. For a cleaner installation, consider professional hardwiring.
- Connecting the Rear Camera: Route the camera extension cord from the main unit to the desired location for the rear camera (typically on the rear license plate or inside the rear window). Connect the rear camera to the extension cord and then plug the extension cord into the AV port on the main dash cam unit.
- Optional: 24H Parking Monitor Setup: For the 24-hour parking monitor function, a dedicated external power supply (hardwire kit) is required and is not included in the standard package. Install this kit according to its specific instructions.
- Initial Power On: Once all connections are made, start your vehicle. The dash cam should power on automatically.

Image: Visual guide demonstrating the straightforward installation of the mirror dash cam over the existing rearview mirror.

Image: Detailed view of the dash cam's ports, including AV, Type-C for power, TF card slot, AUX, and the power button.
4. Operating Instructions
4.1 Basic Functions
- Full HD Touch Screen: The 11.26-inch display is fully touch-sensitive for easy navigation.
- Dual 1080P Cameras: Equipped with 1080P front and rear cameras for comprehensive recording.
- WDR Technology: Wide Dynamic Range (WDR) technology enhances image clarity in varying light conditions, such as tunnels or bright sunlight, ensuring balanced exposure.
- Wide Field of View: The adjustable front camera and 170° rear camera cover a wide field of view, minimizing blind spots.

Image: The dash cam screen displaying both front and rear camera feeds, highlighting the clarity provided by WDR technology, especially in low-light conditions.
4.2 Wireless Apple CarPlay & Android Auto
Connect your iPhone or Android device wirelessly to the dash cam via Bluetooth and Wi-Fi to access familiar functions directly on the large screen.
- Connectivity: Enable Bluetooth and Wi-Fi on your smartphone and connect to the dash cam's network.
- Features: Once connected, you can use voice control, GPS navigation (e.g., Google Maps, Waze), listen to music, make phone calls, and utilize other compatible entertainment applications.
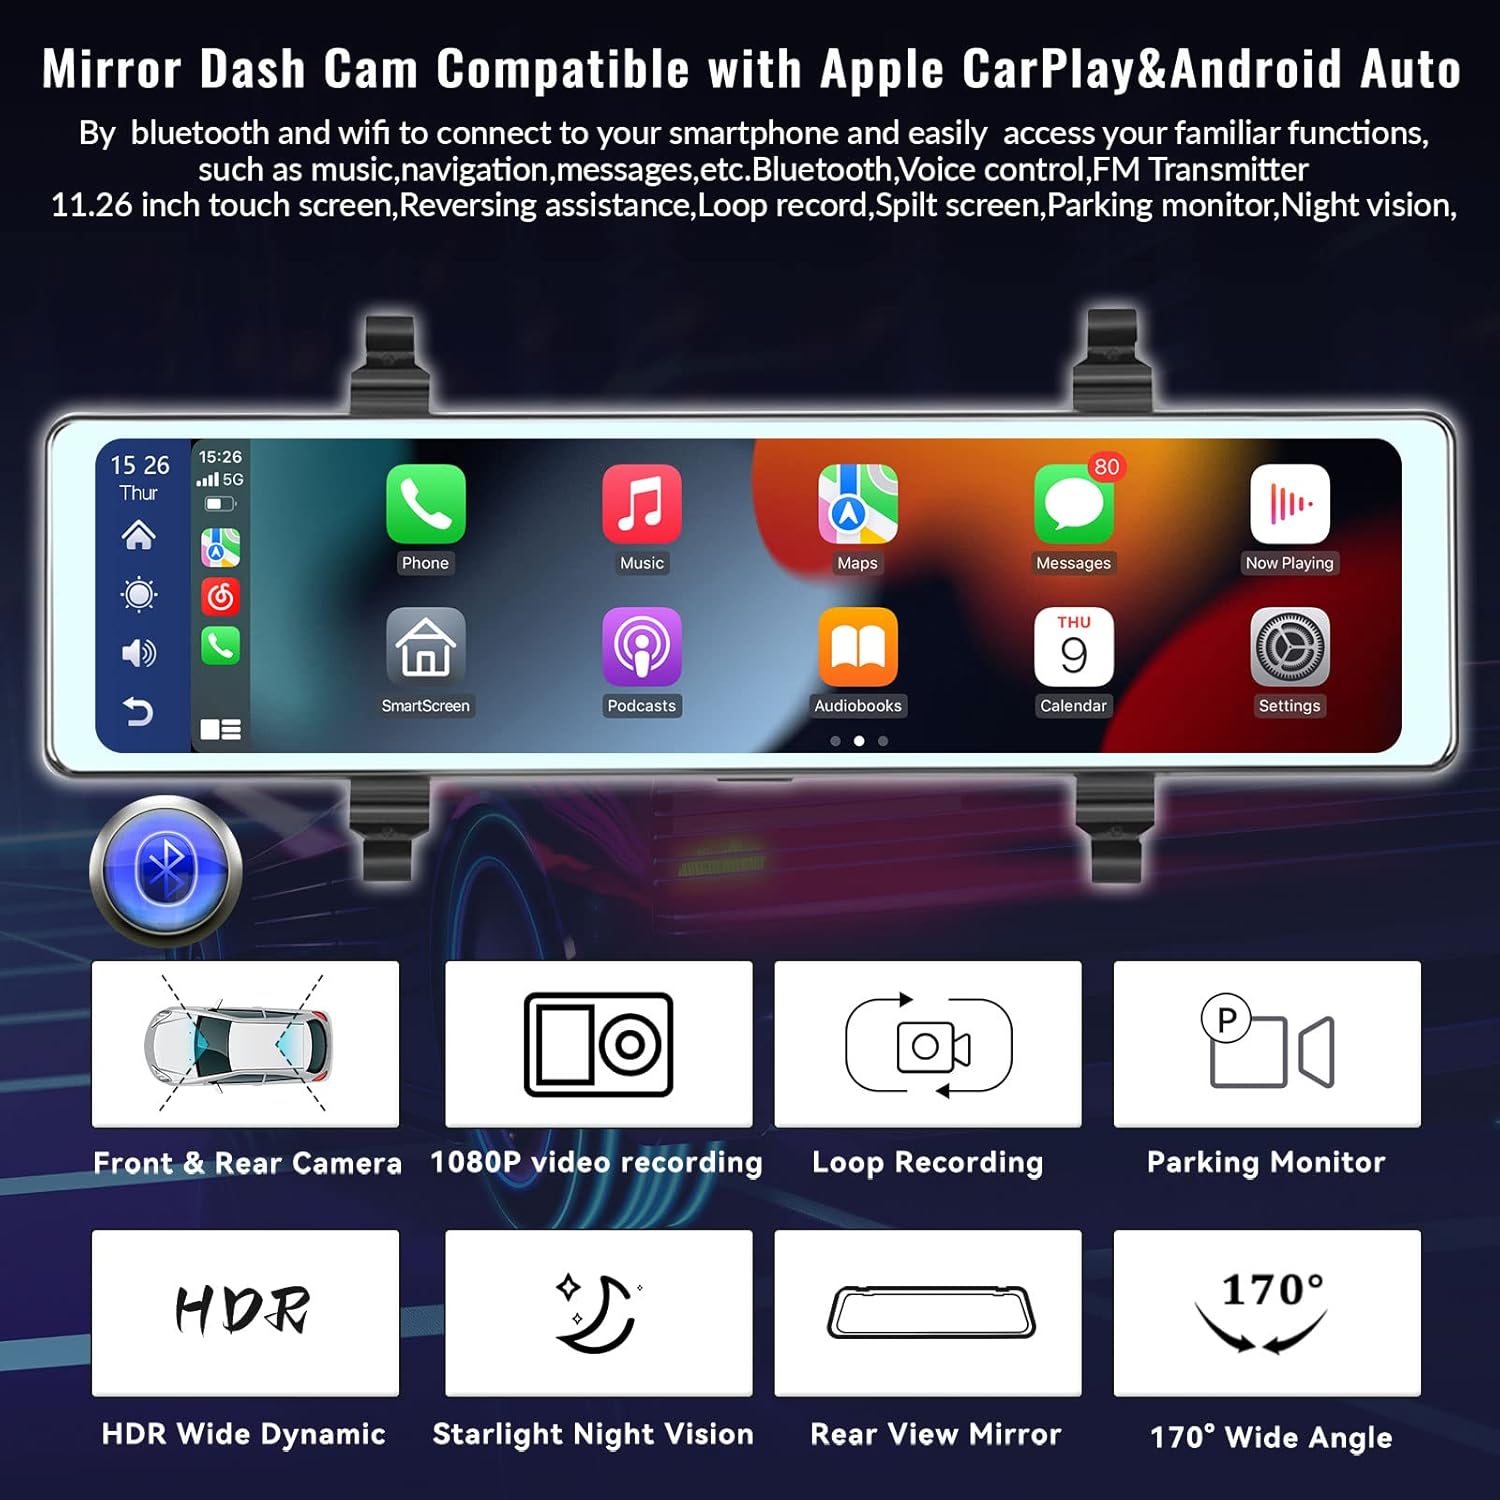
Image: The dash cam display showing the integration of Apple CarPlay and Android Auto, with icons for phone, music, maps, and messages.

Image: A visual representation of how the dash cam connects with smartphones for Apple CarPlay and Android Auto, enabling voice commands.
4.3 Intelligent Voice Control
The dash cam supports precise voice commands for hands-free operation, enhancing driving safety.
- Commands: Use fixed commands such as "Turn on the Screen," "Turn off the Screen," or "Turn on the Camera" to control the device without taking your hands off the wheel.

Image: A driver interacting with the dash cam using voice commands, illustrating the hands-free operation for functions like screen control and camera activation.
4.4 FM Transmitter & Bluetooth Music
Enjoy audio from your dash cam through your car's speaker system.
- FM Transmitter: Adjust the dash cam's FM frequency to match your car's FM radio frequency to transmit audio.
- Bluetooth Music: Connect your mobile phone via Bluetooth to make hands-free calls and play music through the dash cam. Select the "Bluetooth Music" option and use "BT Manage" to connect.

Image: An illustration demonstrating how the dash cam's FM transmitter function allows audio to be played through the car's built-in speaker system.
4.5 Reversing Assistance
The dash cam provides visual assistance when reversing your vehicle.
- Automatic Switch: When you shift your vehicle into "R" (Reverse) gear, the screen will automatically switch to the rear camera view.
- Reversing Line: A reversing line will appear on the screen to guide you. This line can be switched or adjusted for optimal parking assistance.

Image: The dash cam screen displaying the rear camera view with dynamic parking assistance lines, which can be adjusted for width and position.
4.6 Loop Recording & G-Sensor
Ensure continuous recording and protection of critical footage.
- Loop Recording: When the TF (microSD) card is full, the device will automatically overwrite the oldest unlocked files, ensuring continuous recording without manual intervention.
- G-Sensor (Emergency Locking): In the event of a sudden impact or collision, the built-in G-sensor will detect the event and automatically lock the current video file, preventing it from being overwritten.

Image: A graphic illustrating the concept of loop recording, where older footage is continuously overwritten by new recordings.

Image: A visual representation of the emergency locking feature, symbolized by a lock icon, which protects video footage during an impact.
4.7 24H Parking Monitor
Monitor your vehicle even when parked.
- External Power Required: This feature requires a dedicated external power supply (hardwire kit), which is not included.
- Customizable Monitoring: Once connected to an external power supply, you can set a specific time within a 24-hour period for the dash cam to monitor its surroundings while your vehicle is parked.

Image: An illustration depicting a car under surveillance, representing the 24-hour parking monitor feature of the dash cam.
5. Maintenance
To ensure the longevity and optimal performance of your AMprime Mirror Dash Cam, follow these maintenance guidelines:
- Cleaning the Screen and Lenses: Use a soft, lint-free cloth to gently wipe the screen and camera lenses. Avoid using abrasive cleaners or solvents that could damage the surfaces.
- TF Card Management: Regularly format the TF (microSD) card (at least once a month) to prevent data corruption and ensure smooth recording. Back up any important footage before formatting.
- Temperature Control: Avoid exposing the device to extreme temperatures for prolonged periods. High temperatures can affect battery life and electronic components.
- Cable Inspection: Periodically check all cables for any signs of wear, fraying, or damage. Replace damaged cables immediately to prevent electrical issues.
6. Troubleshooting
If you encounter any issues with your dash cam, refer to the following common problems and solutions:
| Problem | Possible Cause | Solution |
|---|---|---|
| Dash cam does not power on. | No power supply; loose connection; faulty power cord. | Check power cord connection to the dash cam and cigarette lighter. Ensure vehicle's power outlet is working. Try a different power source if available. |
| Screen is unresponsive or frozen. | Software glitch; temporary system error. | Press and hold the power button to force a restart. If unresponsive, disconnect power for a few minutes, then reconnect. |
| Rear camera image is reversed. | Incorrect setting for rear camera display. | Access the dash cam's settings menu and look for an option to "Flip Image" or "Mirror Image" for the rear camera. Adjust as needed. |
| Cannot connect to CarPlay/Android Auto. | Bluetooth/Wi-Fi issues; incompatible phone settings. | Ensure Bluetooth and Wi-Fi are enabled on your phone and the dash cam. Forget the device on both ends and try pairing again. Check phone's compatibility and software updates. |
| Recordings are not saving or are corrupted. | TF card full; faulty TF card; incorrect formatting. | Format the TF card regularly. Ensure you are using a high-speed (Class 10 or U3) TF card. Replace the TF card if issues persist. |
| Poor night vision quality from rear camera. | Environmental factors (e.g., bright headlights); inherent camera limitations. | While WDR technology improves low-light performance, extremely bright headlights from behind can still cause glare. This is a common characteristic of dash cams and not necessarily a defect. Ensure the lens is clean. |
7. Specifications
| Feature | Description |
|---|---|
| Product Dimensions | 11 x 2 x 4 inches |
| Item Weight | 2.35 pounds |
| Connectivity Technology | Bluetooth, Wireless |
| Video Capture Resolution | 1080p (Front and Rear) |
| Field Of View | 170 Degrees (Rear Camera) |
| Special Features | Loop Recording, Built-In Speaker, G-Sensor, Voice Control, Night Vision, Wireless Carplay & Android Auto, Reversing Assist, FM Transmitter, Bluetooth Music |
| Mounting Type | Rearview Mirror Mount |
| Included Components | Installation Tool, Power Cord, Camera Extension Cord, AUX Cable, Monitor Base, User Manual, Camera Accessories |
8. Warranty and Support
For any questions, technical assistance, or support regarding your AMprime Mirror Dash Cam, please contact our customer support team.
- Online Customer Support: AmprimeTechSupport@yeah.net
Please note that specific warranty details may vary. Refer to your purchase documentation or contact customer support for precise warranty terms and conditions.

Image: A customer support representative wearing a headset, ready to provide assistance.
Ask a question about this manual
Ask about setup, troubleshooting, compatibility, parts, safety, or missing instructions. Manuals+ will review the question and use this page’s manual context to help answer it.