Introduction
This manual provides detailed instructions for the installation, operation, and maintenance of your OOYCYOO 100A MPPT Solar Charge Controller. This controller is designed for 12V and 24V solar systems, featuring advanced MPPT tracking technology for high efficiency and multiple protection functions to ensure reliable performance.
Please read this manual thoroughly before using the product to ensure correct operation and to prevent damage.
Safety Instructions
- Ensure the battery voltage is sufficient for the controller to recognize the battery type before first installation.
- Connect the battery cable first to minimize loss.
- This regulator is suitable only for lead-acid batteries (OPEN, AGM, GEL). It is not suitable for nickel metal hydride, lithium ions, or other battery types.
- The charge regulator is only suitable for regulating solar modules. Never connect another charging source to the charge regulator.
- Always connect the battery first, then the solar panel, and finally the load. Reverse this order for disconnection.

Image: Excerpt from the user manual showing safety instructions, system connection, and display information.
Product Features
- Advanced MPPT Technology: Utilizes innovative Maximum Power Point Tracking (MPPT) technology for high tracking efficiency, up to 99%, potentially increasing efficiency by 20%-40% compared to standard PWM controllers.
- System Compatibility: Automatically detects and is compatible with both 12V and 24V battery systems.
- Multiple Intelligent Protections: Features built-in overcurrent, short circuit, reverse connection, open circuit, overcharge, and undervoltage protection. All protections offer automatic recovery without damaging the controller.
- Battery Undervoltage Protection: Automatically turns off the solar controller if battery voltage drops below 8V to protect battery lifespan.
- Multifunctional LCD Display: Provides real-time data display for battery voltage, solar panel charging current, discharge current, accumulated charge/discharge power, and various settings.
- Dual USB Outputs: Equipped with two USB ports (DC 5V, 2A total) for charging mobile devices.
- Load Control Modes: Supports manual load switching and various time-controlled load operation modes.
- Industrial-Grade Master Chip: Features 32AD sampling accuracy for precise monitoring of temperature, charging current, and discharge current.
- Automatic Temperature Compensation: Adjusts charging parameters based on ambient temperature.

Image: Visual representation of the controller's security protection features, including short-circuit, overload, overcharge, undervoltage, and overvoltage protection.
Setup and Installation
Wiring Sequence:
- Connect the Battery: First, connect the battery to the charge regulator (positive and negative terminals). Ensure correct polarity.
- Connect the Solar Panel: Next, connect the photovoltaic module (solar panel) to the regulator (positive and negative terminals). Ensure correct polarity.
- Connect the Load: Finally, connect the load to the charge regulator (positive and negative terminals). Ensure correct polarity.
Important: Always follow the reverse order when uninstalling: disconnect the load first, then the solar panel, and finally the battery.
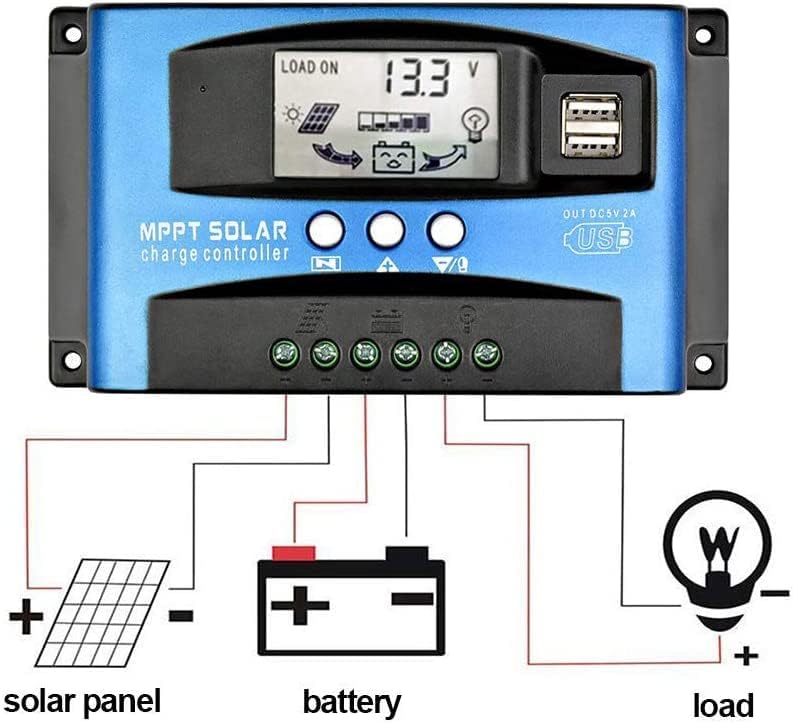
Image: Detailed wiring diagram showing how to connect the solar panel, battery, and load to the charge controller.

Image: Physical dimensions of the solar charge controller, showing length, width, and height in millimeters.
Operating Instructions
LCD Display and Button Functions:
The controller features an LCD screen that displays various real-time data and settings. There are three buttons below the screen:
- MENU Button: Press to switch between different display interfaces or to enter/exit setting mode.
- UP Button: Press to increase values or navigate up in menus.
- DOWN Button: Press to decrease values or navigate down in menus.
Display Information Cycle:
Press the MENU button to cycle through the following display interfaces:
- Battery Voltage (Main Interface): Displays the current battery voltage.
- Solar Panel Charging Current: Shows the current flowing from the solar panel to the battery.
- Load Discharge Current: Displays the current being drawn by the load.
- High Voltage Disconnection (HVD): The voltage at which charging stops to prevent overcharge.
- Accumulated Discharge Power (Ah): Total ampere-hours discharged from the battery.
- Accumulated Charging Power (Ah): Total ampere-hours charged into the battery.
- Low Voltage Reconnection (LVR): The voltage at which the load will reconnect after being disconnected due to low battery.
- Low Voltage Disconnection (LVD): The voltage at which the load will disconnect to protect the battery from over-discharge.
- Load Working Mode: Displays the current load control mode (e.g., 24H for continuous operation, timed modes).
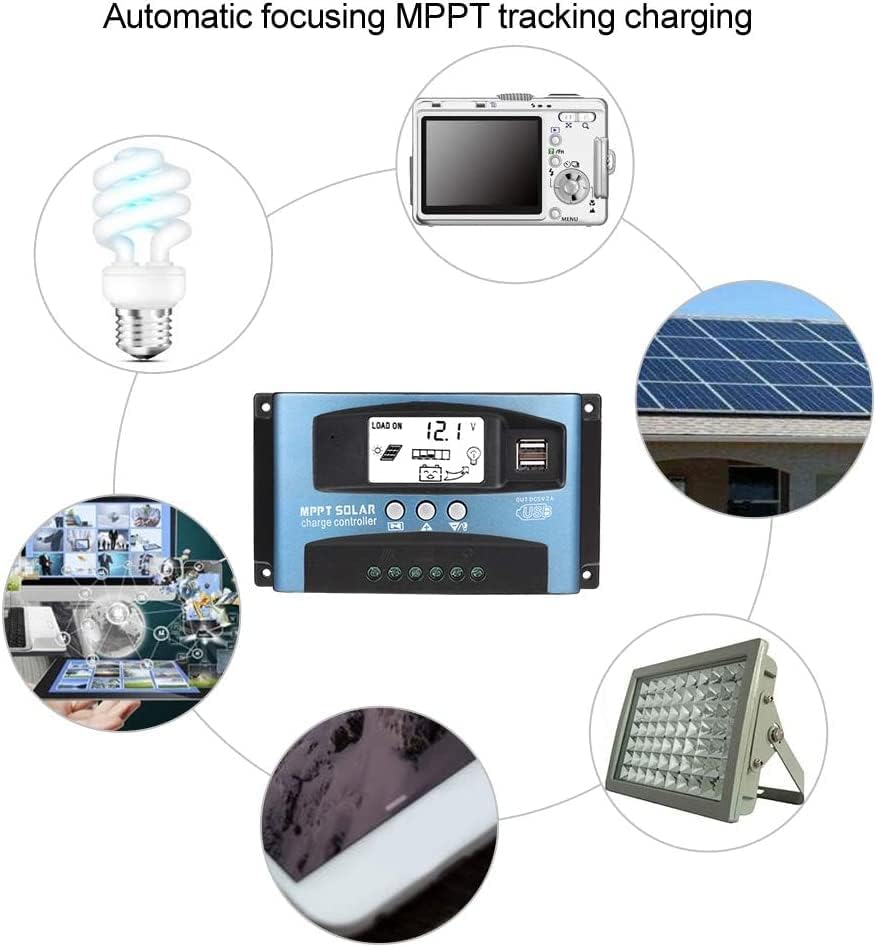
Image: Illustration of the automatic focusing MPPT tracking charging process and examples of devices that can be powered by the controller.
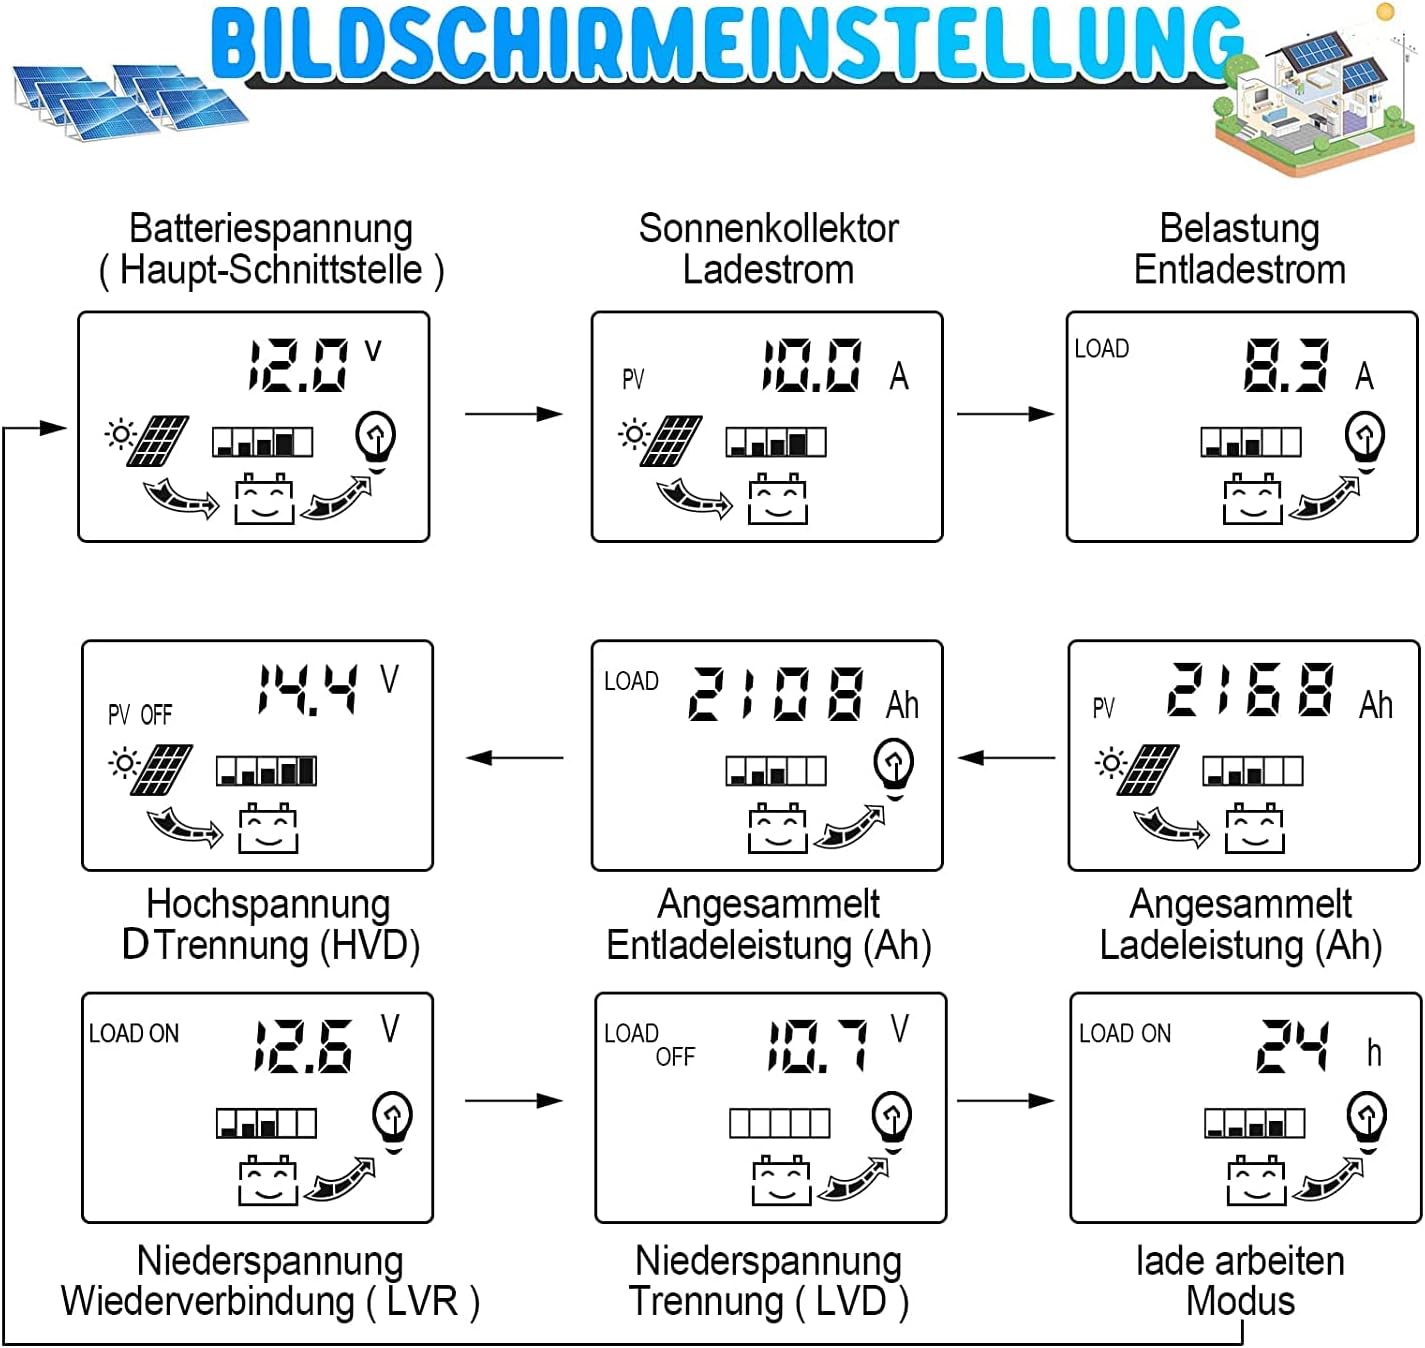
Image: Flowchart detailing the various screens and parameters accessible via the LCD display, including battery voltage, solar panel current, load current, and voltage settings.
Display and Settings
Parameter Adjustment:
To adjust parameters, press and hold the MENU button for 3 seconds to enter the settings menu. The current setting will flash. Use the UP and DOWN buttons to change the value, then press MENU again to confirm and move to the next parameter. To exit the settings menu, press and hold MENU for 3 seconds or wait for 10 seconds without input.
Note: The battery type default is 'b1' (lead-acid). While the manual mentions parameter adjustment, specific instructions for changing battery type (e.g., to 'b3' for LiFePO4) are not clearly detailed on the provided manual image. Ensure your battery type is compatible with the controller's default settings or consult the manufacturer for advanced configuration.
Load Control Modes:
- [24H]: Load output 24 hours (except for battery undervoltage).
- [1-19H]: Load on after sunset and closed after setting hours.
- [0H]: Dusk to dawn.
Factory Reset: To restore factory settings, press and hold the DOWN button for 5 seconds.
Manual Load Control: Press the UP button to manually turn the load on or off.
Maintenance
To ensure optimal performance and longevity of your OOYCYOO MPPT Solar Charge Controller, consider the following maintenance guidelines:
- Regular Inspection: Periodically check all wiring connections to ensure they are secure and free from corrosion.
- Cleanliness: Keep the controller clean and free from dust and debris. Use a dry cloth for cleaning.
- Ventilation: Ensure the controller is installed in a well-ventilated area to prevent overheating.
- Environmental Conditions: Avoid exposing the controller to extreme temperatures, direct sunlight, or moisture beyond its operating specifications.
- Battery Health: Monitor your battery's health and ensure it is compatible with the controller's charging parameters.
Troubleshooting
| Situation | Probable Cause | Solution |
|---|---|---|
| Charge icon not on when sunny | Solar panel opened or reversed | Reconnect |
| Load icon off | Mode setting wrong / Battery low | Set right / Recharge |
| Load icon slow flashing | Over load / Short circuit protection | Reduce load / Remove short circuit, 5 minutes to auto recovery |
| Power off | Battery too low / Reverse connection | Check battery / connection |
Image: Excerpt from the user manual showing common troubleshooting scenarios and their solutions.
Specifications
| Model | MPPT 100A |
| System Voltage | 12V/24V Auto |
| Maximum Power Current | 100A |
| Peak Power of Solar Panels (Max. Wp) | 1300W (12V) / 2600W (24V) |
| Battery Capacity Configuration | 400Ah |
| Battery Float Voltage | 13.8V (12V system) / 27.6V (24V system) |
| Battery Protection (Low Voltage) | 10.6V (12V system) / 21.2V (24V system) |
| Battery Recovery Voltage (Undervoltage) | 12.6V (12V system) / 25.2V (24V system) |
| System Load Loss | <= 13mA |
| Working Temperature | -10℃ to 60℃ |
| Storage Temperature | -30℃ to 70℃ |
| Working Humidity | <= 90%, no condensation |
| Temperature Compensation | -4mV/cell/℃ |
| Max Idle Voltage of Solar Panels | <= 48V |
| USB Output | 2-way USB output, 5V/2A (MAX) |
| Dimensions | 170mm x 95mm x 40mm (approx. 6.69 x 3.74 x 1.57 inches) |
| Weight | 9.9 ounces (approx. 280g) |
Note: Product specifications are subject to change without prior notice.
Warranty and Support
This OOYCYOO product comes with a 360-day satisfaction guarantee. If you encounter any issues or have questions regarding the product, please contact OOYCYOO customer support for assistance.
For further support, please refer to the official OOYCYOO store or contact the seller directly through your purchase platform.


