
Lumix GC GC758890545223
Lumix GC Carburetor Instruction Manual
For Predator 57064 Generator 1800/1400W 98CC
Model: GC758890545223
1. Introduction
This manual provides detailed instructions for the installation, operation, and maintenance of your new Lumix GC Carburetor. This carburetor is specifically designed as a replacement part for the Predator 57064 Generator, compatible with 1800W/1400W and 98CC models. Please read this manual thoroughly before installation and use to ensure proper function and safety.
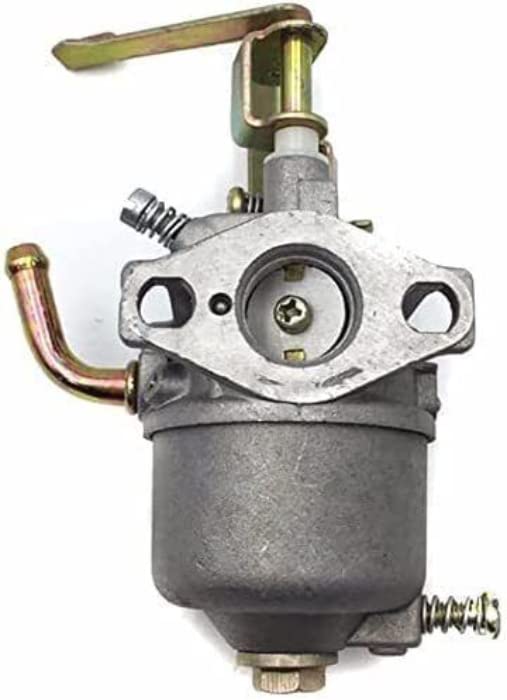
This image displays the Lumix GC Carburetor, a replacement part designed for the Predator 57064 Generator. The carburetor is shown from a front-side angle, highlighting its main body, fuel inlet, and throttle linkage.
2. Safety Information
Always observe the following safety precautions when handling or installing the carburetor:
- Ensure the generator is turned off and cooled down before beginning any work.
- Disconnect the spark plug wire to prevent accidental starting.
- Work in a well-ventilated area to avoid inhaling fuel fumes.
- Wear appropriate personal protective equipment, such as gloves and eye protection.
- Handle gasoline with extreme care. It is highly flammable.
- Keep children and pets away from the work area.
- If you are unsure about any step, consult a qualified technician.
3. Product Components
The Lumix GC Carburetor consists of several key components working together to regulate the fuel-air mixture for your generator's engine. Familiarize yourself with these parts:
- Main Body: The central housing of the carburetor.
- Fuel Inlet: Where the fuel line connects from the fuel tank.
- Air Intake: The opening where air enters the carburetor.
- Throttle Linkage/Lever: Controls the amount of air and fuel entering the engine.
- Choke Lever: Used to enrich the fuel mixture for cold starts.
- Float Bowl: Holds a small reservoir of fuel for immediate use.
- Mounting Holes: Used to secure the carburetor to the engine.
4. Setup and Installation
Follow these steps carefully to install your new carburetor:
- Preparation: Ensure the generator is off, cool, and the spark plug wire is disconnected. Place a drip pan beneath the carburetor to catch any spilled fuel.
- Drain Fuel: If necessary, drain any remaining fuel from the fuel tank and fuel lines.
- Remove Air Filter Assembly: Carefully remove the air filter housing and any associated ducting to gain access to the carburetor.
- Disconnect Fuel Line: Pinch off the fuel line and disconnect it from the old carburetor's fuel inlet.
- Disconnect Linkages: Detach the throttle and choke linkages from the old carburetor. Note their positions for reassembly.
- Remove Old Carburetor: Unscrew the mounting bolts that secure the old carburetor to the engine. Carefully remove the old carburetor and any gaskets.
- Install New Gaskets: Place new gaskets (not included, typically) on the engine mounting surface and the air filter side of the new carburetor.
- Mount New Carburetor: Position the new Lumix GC Carburetor onto the engine studs, ensuring the gaskets are properly seated. Secure it with the mounting bolts, tightening them evenly.
- Reconnect Linkages: Reattach the throttle and choke linkages to the new carburetor in their correct positions. Ensure they move freely.
- Reconnect Fuel Line: Connect the fuel line to the new carburetor's fuel inlet and remove the pinch.
- Reinstall Air Filter Assembly: Reattach the air filter housing and any other components removed earlier.
- Final Checks: Double-check all connections for tightness and ensure there are no fuel leaks. Reconnect the spark plug wire.
5. Operating Instructions
The carburetor's primary function is to mix air and fuel in the correct ratio for combustion. Once installed, the carburetor will function as part of your generator's fuel system. For specific generator starting and operating procedures, always refer to your Predator 57064 Generator's owner's manual.
Generally, ensure the fuel tank has fresh, clean gasoline. The choke lever on the carburetor may need to be engaged for cold starts and then gradually disengaged as the engine warms up. The throttle linkage will respond to the generator's speed control, adjusting the engine's RPM.
6. Maintenance
Proper maintenance of your carburetor ensures optimal performance and longevity of your generator. Regular checks are recommended:
- Fuel Quality: Always use fresh, clean, and appropriate fuel for your generator. Stale or contaminated fuel is a common cause of carburetor issues. Consider using a fuel stabilizer if the generator will be stored for extended periods.
- Fuel Filter: Regularly inspect and replace the generator's fuel filter (if equipped) to prevent debris from reaching the carburetor.
- Cleaning: If the carburetor becomes clogged due to fuel deposits, it may require cleaning. This typically involves disassembling the float bowl and jets and cleaning them with a carburetor cleaner. This task should be performed by someone familiar with small engine repair.
- Linkage Inspection: Periodically check that the throttle and choke linkages move freely and are not binding or corroded.
- Gasket Integrity: Inspect gaskets for signs of wear or damage. Worn gaskets can lead to air leaks and poor engine performance.
7. Troubleshooting
If your generator experiences issues after carburetor installation, consult the table below for common problems and potential solutions:
| Problem | Possible Cause | Solution |
|---|---|---|
| Engine will not start | No fuel reaching carburetor | Check fuel level, fuel line, and fuel filter. Ensure fuel valve is open. |
| Engine runs rough or stalls | Clogged carburetor jets | Clean carburetor jets. Use fresh fuel. |
| Fuel leak from carburetor | Damaged float, stuck needle valve, or worn gasket | Inspect float and needle valve. Replace float bowl gasket. |
| Engine lacks power | Improper fuel-air mixture | Ensure air filter is clean. Check for air leaks around carburetor gaskets. |
| Choke not working | Choke linkage disconnected or bent | Inspect and reattach choke linkage. |
If problems persist after attempting these solutions, it is recommended to consult a professional small engine mechanic.
8. Specifications
| Attribute | Detail |
|---|---|
| Brand | Lumix GC |
| Manufacturer | Lumix GC |
| Manufacturer Part Number | GC758890545223 |
| UPC | 758890545223 |
| Flange Type | Bolt On |
| Compatibility | Predator 57064 Generator 1800/1400W 98CC |
9. Warranty Information
This Lumix GC Carburetor is covered by the manufacturer's standard warranty against defects in materials and workmanship. Please retain your proof of purchase for warranty claims. For specific warranty terms and conditions, refer to the documentation provided with your purchase or contact the seller directly.
10. Support
For technical assistance, troubleshooting beyond this manual, or warranty inquiries, please contact the seller or manufacturer directly. Provide your product model number (GC758890545223) and purchase details when seeking support to expedite the process.
Ask a question about this manual
Ask about setup, troubleshooting, compatibility, parts, safety, or missing instructions. Manuals+ will review the question and use this page’s manual context to help answer it.