Introduction
This manual provides detailed instructions for the setup, operation, and maintenance of your KOSUMOSU 9.7-inch 3D LED Neon Digital Wall/Desk Clock. Please read this manual thoroughly before using the product to ensure proper function and longevity.
Safety Information
- Ensure the clock is powered by a 5V/1A AC adapter (not included). Using an incorrect power adapter may damage the device.
- Keep the device away from water and high humidity environments.
- Do not attempt to disassemble or repair the clock yourself. Contact customer service for assistance.
- Keep the remote control battery (CR2025) out of reach of children.
Package Contents
- KOSUMOSU 9.7-inch 3D LED Neon Digital Clock
- Remote Control (with CR2025 button battery)
- 3-meter USB Power Cable
- Desktop Bracket
- Wall Mounting Accessories (Dowel, Screws)
- User Manual (this document)
Setup
1. Power Connection
- Connect the provided 3-meter USB power cable to the clock's power input port.
- Plug the other end of the USB cable into a 5V/1A AC adapter (not included).
- Plug the AC adapter into a standard wall outlet. The clock will power on.
Note: The clock has a built-in super farad capacitor for time memory, providing approximately 2 hours of backup in case of power failure. This is not for regular power supply.
2. Remote Control Battery
The remote control comes with a CR2025 button battery pre-installed. If the remote does not respond, check or replace the battery.
3. Mounting Options

Image: Rear view of the KOSUMOSU 3D LED Neon Digital Clock, illustrating the wall mounting holes and the location of the function buttons. The image also displays product specifications.
- Desktop Placement: Attach the included desktop bracket to the bottom of the clock for stable placement on any flat surface.
- Wall Mounting: Use the provided screws and dowels to securely mount the clock on a wall. The clock features keyhole slots on the back for easy hanging.
Operating Instructions
The clock is primarily operated using the included remote control. There are also three function buttons on the back of the clock for basic adjustments.
Remote Control Functions

Image: The KOSUMOSU 3D LED Neon Digital Clock showing the time in vibrant colors, with its remote control positioned in front.
- SET: Enter/Exit setting mode.
- UP/DOWN Arrows: Adjust values during setting.
- 12/24H: Switch between 12-hour and 24-hour time formats.
- ALARM: Activate/Deactivate alarm, enter alarm setting mode.
- SNOOZE: Activate snooze function when alarm sounds.
- BRIGHT: Cycle through brightness levels (High/Medium/Low/Auto/Off).
- COLOR/MODE: Change display color modes (Neon, 7 separate colors, color gradient, custom).
- TEMP (℃/℉): Switch between Celsius and Fahrenheit temperature display.
- DATE: Display date, enter date setting mode.
Setting Time and Date
- Press the SET button on the remote. The hour digits will flash.
- Use the UP and DOWN arrows to adjust the hour.
- Press SET again to move to minutes, then adjust with UP/DOWN.
- Continue pressing SET to cycle through year, month, and day settings, adjusting each with UP/DOWN.
- Press SET one last time to exit setting mode.
- To switch between 12-hour and 24-hour format, press the 12/24H button.
Setting Alarm
- Press the ALARM button on the remote. The alarm hour digits will flash.
- Use UP/DOWN to set the alarm hour.
- Press ALARM again to set the alarm minutes, adjust with UP/DOWN.
- Press ALARM again to confirm and activate the alarm. An alarm icon will appear on the display.
- To deactivate the alarm, press ALARM again until the icon disappears.
- When the alarm sounds, press SNOOZE for an additional 5 minutes of sleep (up to 3 times).
Brightness Adjustment

Image: The KOSUMOSU 3D LED Neon Digital Clock illustrating its automatic dimming function via a built-in light sensor and remote control dimming with High, Medium, Low, and Off settings.
- Press the BRIGHT button on the remote to cycle through brightness levels: High, Medium, Low, Auto, and Off.
- Auto Dimming: When set to "Auto", the clock's built-in light sensor will automatically adjust the brightness across 8 levels based on ambient light conditions.
Color Modes

Image: The KOSUMOSU 3D LED Neon Digital Clock showcasing different custom color and neon light options, highlighting its multi-color LED capabilities.

Image: The KOSUMOSU 3D LED Neon Digital Clock illustrating how to switch between various colors using the remote control, showing different color displays for day and night.
Press the COLOR/MODE button on the remote to cycle through different display color options:
- Neon Light: Dynamic, flashing neon light effect.
- Color Gradient: Smooth transitions between colors.
- 7 Separate Colors: Static display of individual colors.
- Custom Color Option: Allows selection of a specific color.
Loop Display (Time, Date, Temperature)
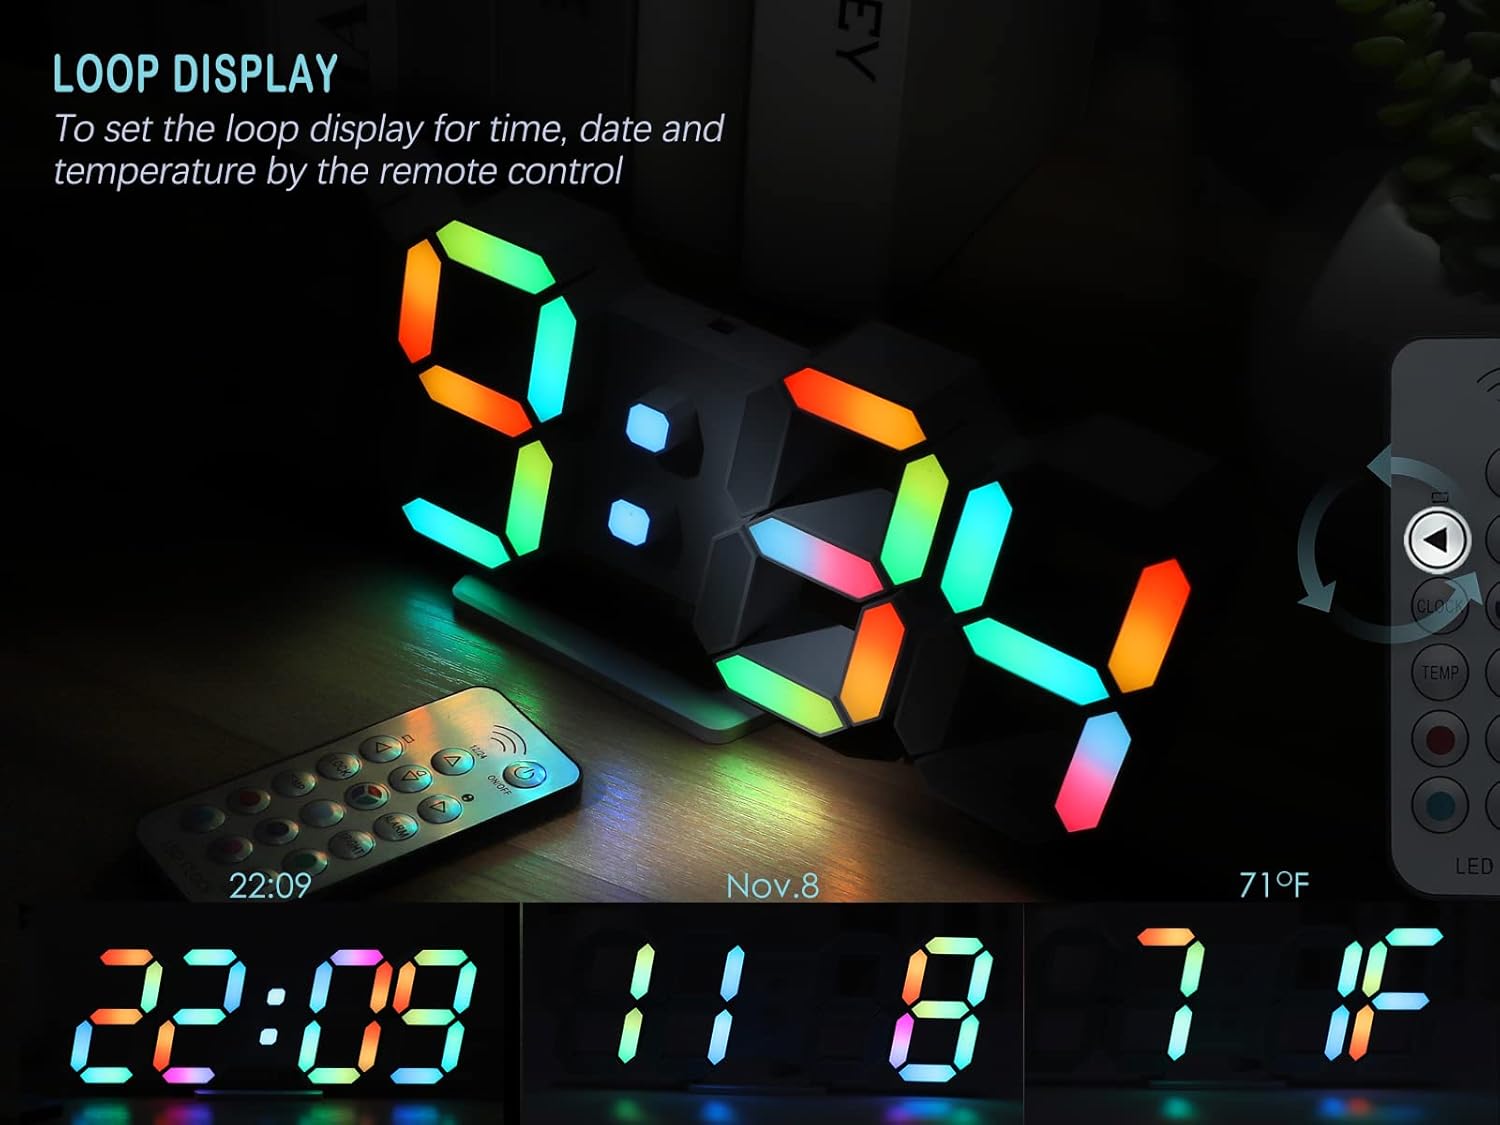
Image: The KOSUMOSU 3D LED Neon Digital Clock demonstrating its loop display feature, cycling through the current time, date (November 8th), and temperature (71°F).
To activate the loop display for time, date, and temperature, press the dedicated LOOP button on the remote control (if available, otherwise it cycles automatically after setting date/temp display). The clock will automatically cycle through these displays.
Maintenance
- Clean the clock surface with a soft, dry cloth. Do not use abrasive cleaners or solvents.
- Ensure the clock is unplugged before cleaning.
- Replace the remote control battery (CR2025) as needed.
Troubleshooting
| Problem | Possible Cause | Solution |
|---|---|---|
| Clock does not power on. | No power, faulty adapter, or loose connection. | Ensure the USB cable is securely connected and the 5V/1A AC adapter is plugged into a working outlet. Try a different adapter if available. |
| Remote control not working. | Remote battery is dead or incorrectly inserted. Obstruction between remote and clock. | Replace the CR2025 battery in the remote. Ensure there are no obstructions and point the remote directly at the clock. |
| Alarm does not sound. | Alarm is not activated or volume is too low (if adjustable). | Verify the alarm icon is displayed on the clock. Ensure the alarm time is set correctly. (Note: This model does not specify adjustable alarm volume). |
| Display is too bright/dim at night/day. | Brightness setting is not optimal. | Adjust brightness using the BRIGHT button on the remote. Set to "Auto" for automatic adjustment based on ambient light. |
Specifications
Image: A visual representation of the KOSUMOSU 3D LED Neon Digital Clock's dimensions and key specifications, including product weight, size, input voltage, and power supply requirements.
| Feature | Detail |
|---|---|
| Brand | KOSUMOSU |
| Model | 9.7IN Neon Clock-ACD210C |
| Product Dimensions | 24.64 x 3.81 x 9.91 cm (9.7 x 3.9 x 0.9 inches) |
| Product Weight | 154.22 g |
| Display Type | Digital LED (3D effect) |
| Power Source | Corded Electric (5V/1A AC adapter, not included) |
| USB Cable Length | 3 meters |
| Time Memory | Built-in super farad capacitor (approx. 2 hours) |
| Remote Control Battery | CR2025 (included) |
| Mounting Options | Table top, Wall mount |
| Special Features | Alarm with snooze, Auto Dimmable (8 levels), Remote Dimmable (High/Medium/Low/Off), RGB Neon Colors (7 colors, gradient, custom), Large Display, Time/Date/Temperature display. |
| Material | Plastic |
Warranty and Customer Support
The KOSUMOSU 9.7-inch 3D LED Neon Digital Wall/Desk Clock comes with a 2-year warranty.
If you encounter any quality issues or require assistance with product usage or settings, please contact KOSUMOSU customer service immediately. We are committed to providing support and will guide you through troubleshooting or arrange for a replacement if necessary.
For support, please refer to the contact information provided with your purchase or visit the official KOSUMOSU website.