1. Introduction
This manual provides instructions for the assembly, installation, operation, and maintenance of your Sysracks 15U Wall Mount Server Rack Cabinet, model SRW 15.600B. This cabinet is designed to house 19-inch IT infrastructure equipment such as servers, switches, routers, patch panels, and NAS storage in a secure and organized manner. Please read this manual thoroughly before beginning installation to ensure proper setup and safe operation.

Figure 1: Sysracks 15U Wall Mount Server Rack Cabinet
2. Safety Information
Observe the following safety precautions during assembly, installation, and operation:
- Always ensure the cabinet is securely mounted to a wall or placed on a stable, level surface.
- Do not exceed the maximum weight capacity of 180 pounds (60 kg).
- Use appropriate lifting techniques or assistance when moving the cabinet due to its weight (71 pounds empty).
- Ensure all electrical connections to the PDU are properly grounded and meet local electrical codes.
- Keep hands and tools clear of moving fan blades during operation.
- Only use the provided hardware or equivalent replacements for assembly and mounting.
3. Package Contents
Verify that all components are present before beginning assembly:
- Cabinet Frame Components (Top, Bottom, Side Panels, Front Door, Rear Panel)
- Vertical Mounting Rails (19-inch EIA-310 compliant)
- Rack-mount PDU (Power Distribution Unit)
- Cooling Fan (top-mounted)
- Vented Steel Shelves (2 included)
- Brush Cable Entry Panels
- Mounting Hardware Kit (bolts, nuts, screws, washers)
- Leveling Feet (4 included)
- Keys for Locking Mechanisms

Figure 2: Included Accessories
4. Assembly & Installation
The Sysracks 15U cabinet requires assembly. Follow these steps carefully. It is recommended to have assistance for certain steps.
4.1. Assembly Video Guide
Video 1: Sysracks SRW-Series Server Rack Cabinet Assembly Guide
This video provides a visual walkthrough of the assembly process. Refer to the detailed steps below for additional guidance.
4.2. Step-by-Step Assembly
- Frame Assembly: Join the side frames with the top and bottom covers to form the main cabinet structure. Use the appropriate screws from plastic bag #1.
- Rear Panel Installation: Install the rear panel using 4 x M4 self-tapping screws from plastic bag #5.
- Cable Entry Installation: Install the brush-type cable entries on the top and bottom panels using M6 bolts/nuts (2 bolts/nuts per entry) from plastic bag #2.
- Vertical Mounting Rails: Install the vertical mounting rails. The distance between the rails can be adjusted based on the depth of your equipment or the supplied shelves. Use M6 bolts/nuts from plastic bag #2 or the hardware set. Install shelves at the desired height.
- Side Panel Locking Mechanism: Install the locking mechanism for the side panels.
- Caster Installation: If using, install the casters on the bottom of the cabinet using M6 bolts and nuts. Alternatively, install the leveling feet.
- Front Door Installation: Install the front door locking mechanism. Use the plastic bushings (or adjustable washers if needed) when mounting the front door to ensure smooth operation.
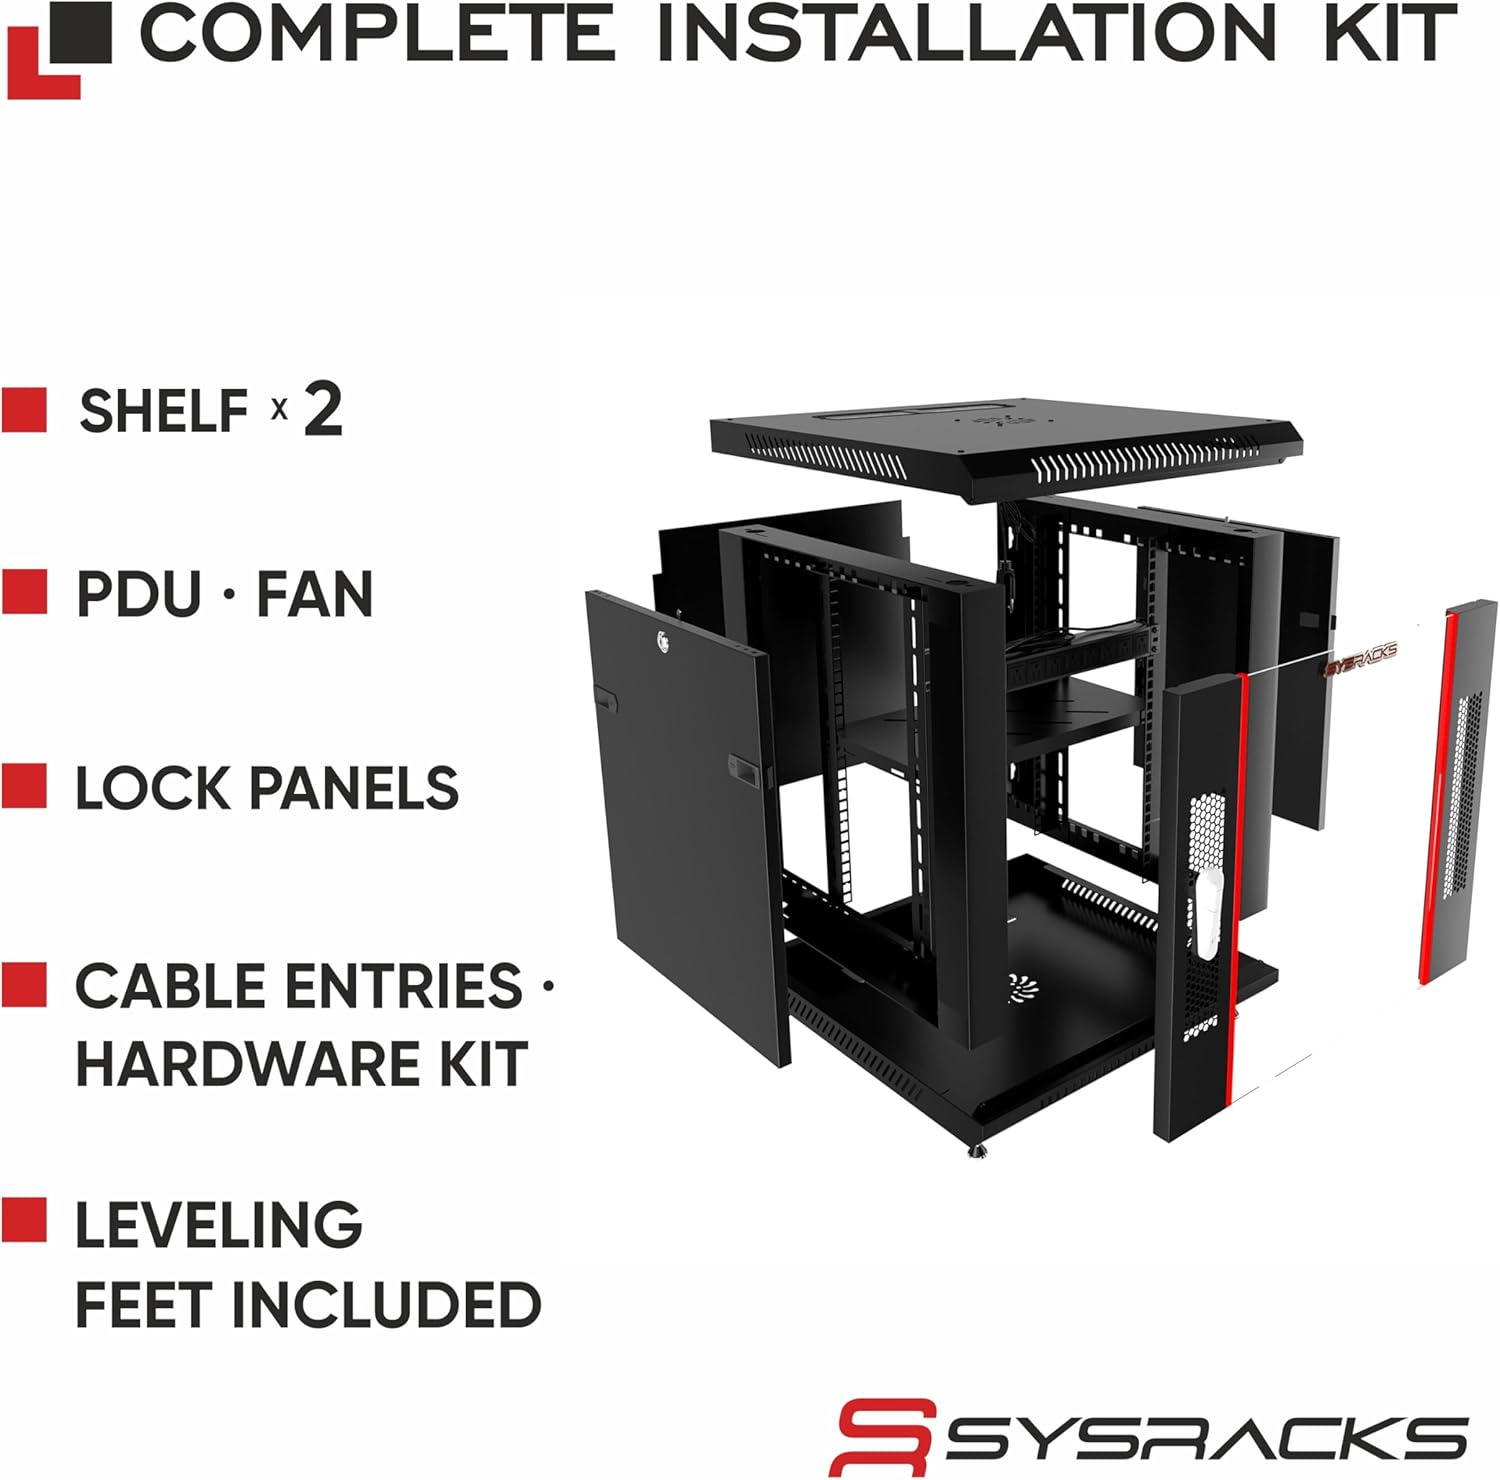
Figure 3: Complete Installation Kit Components
4.3. Wall Mounting
For wall mounting, ensure the wall structure can support the cabinet's weight plus the weight of all installed equipment (up to 180 lbs total). Use appropriate wall anchors and fasteners for your wall type. The cabinet features pre-drilled holes for secure attachment.
5. Operation
5.1. Cooling Fan
The cabinet includes a top-mounted cooling fan to assist with heat dissipation. Ensure the fan is connected to a power source. The ventilated structure and vented door also contribute to passive airflow.

Figure 4: Single Fan Cooling System
5.2. Power Distribution Unit (PDU)
The included rack-mount PDU provides multiple outlets for powering your IT equipment. Connect the PDU to a suitable power source. Ensure the total power draw of your equipment does not exceed the PDU's rated capacity.
5.3. Security
The tempered glass front door and removable side panels are equipped with locking mechanisms to secure your equipment. Use the provided keys to lock and unlock access.

Figure 5: Removable and Lockable Panels
6. Maintenance
- Cleaning: Wipe the exterior surfaces with a soft, damp cloth. Avoid abrasive cleaners. For the glass door, use a standard glass cleaner.
- Fan Inspection: Periodically check the cooling fan for dust accumulation and clear any obstructions to ensure optimal airflow.
- Hardware Check: Periodically inspect all bolts and screws to ensure they remain tight, especially after initial installation and equipment loading.
- Cable Management: Regularly organize cables to maintain proper airflow and prevent strain on connections.
7. Troubleshooting
- Overheating Equipment: Ensure the cooling fan is operational and not obstructed. Verify that the cabinet is not overloaded with equipment, restricting airflow. Consider ambient room temperature.
- Unstable Cabinet: Check that all leveling feet or casters are properly installed and adjusted. For wall-mounted units, confirm secure attachment to the wall studs.
- Door/Panel Not Closing Properly: Inspect hinges and locking mechanisms for any obstructions or misalignment. Adjust as necessary.
- Power Issues: Verify the PDU is correctly plugged into a working outlet. Check the PDU's circuit breaker if applicable.
8. Specifications
| Feature | Detail |
|---|---|
| Brand | Sysracks |
| Model Number | SRW 15.600B |
| Size | 15U |
| Product Dimensions (D x W x H) | 23.5"D x 23.5"W x 30"H (600mm D x 600mm W x 769mm H) |
| Usable Depth | 20" (508mm) |
| Material | Alloy Steel |
| Color | Black |
| Item Weight | 71 Pounds |
| Weight Capacity | Maximum 180 Pounds (60 kg) |
| Mounting Type | Wall Mount |
| Compatible Devices | Server, Switches, Routers, Patch Panels, NAS Storage, PoE Networking Equipment |
| Assembly Required | Yes |
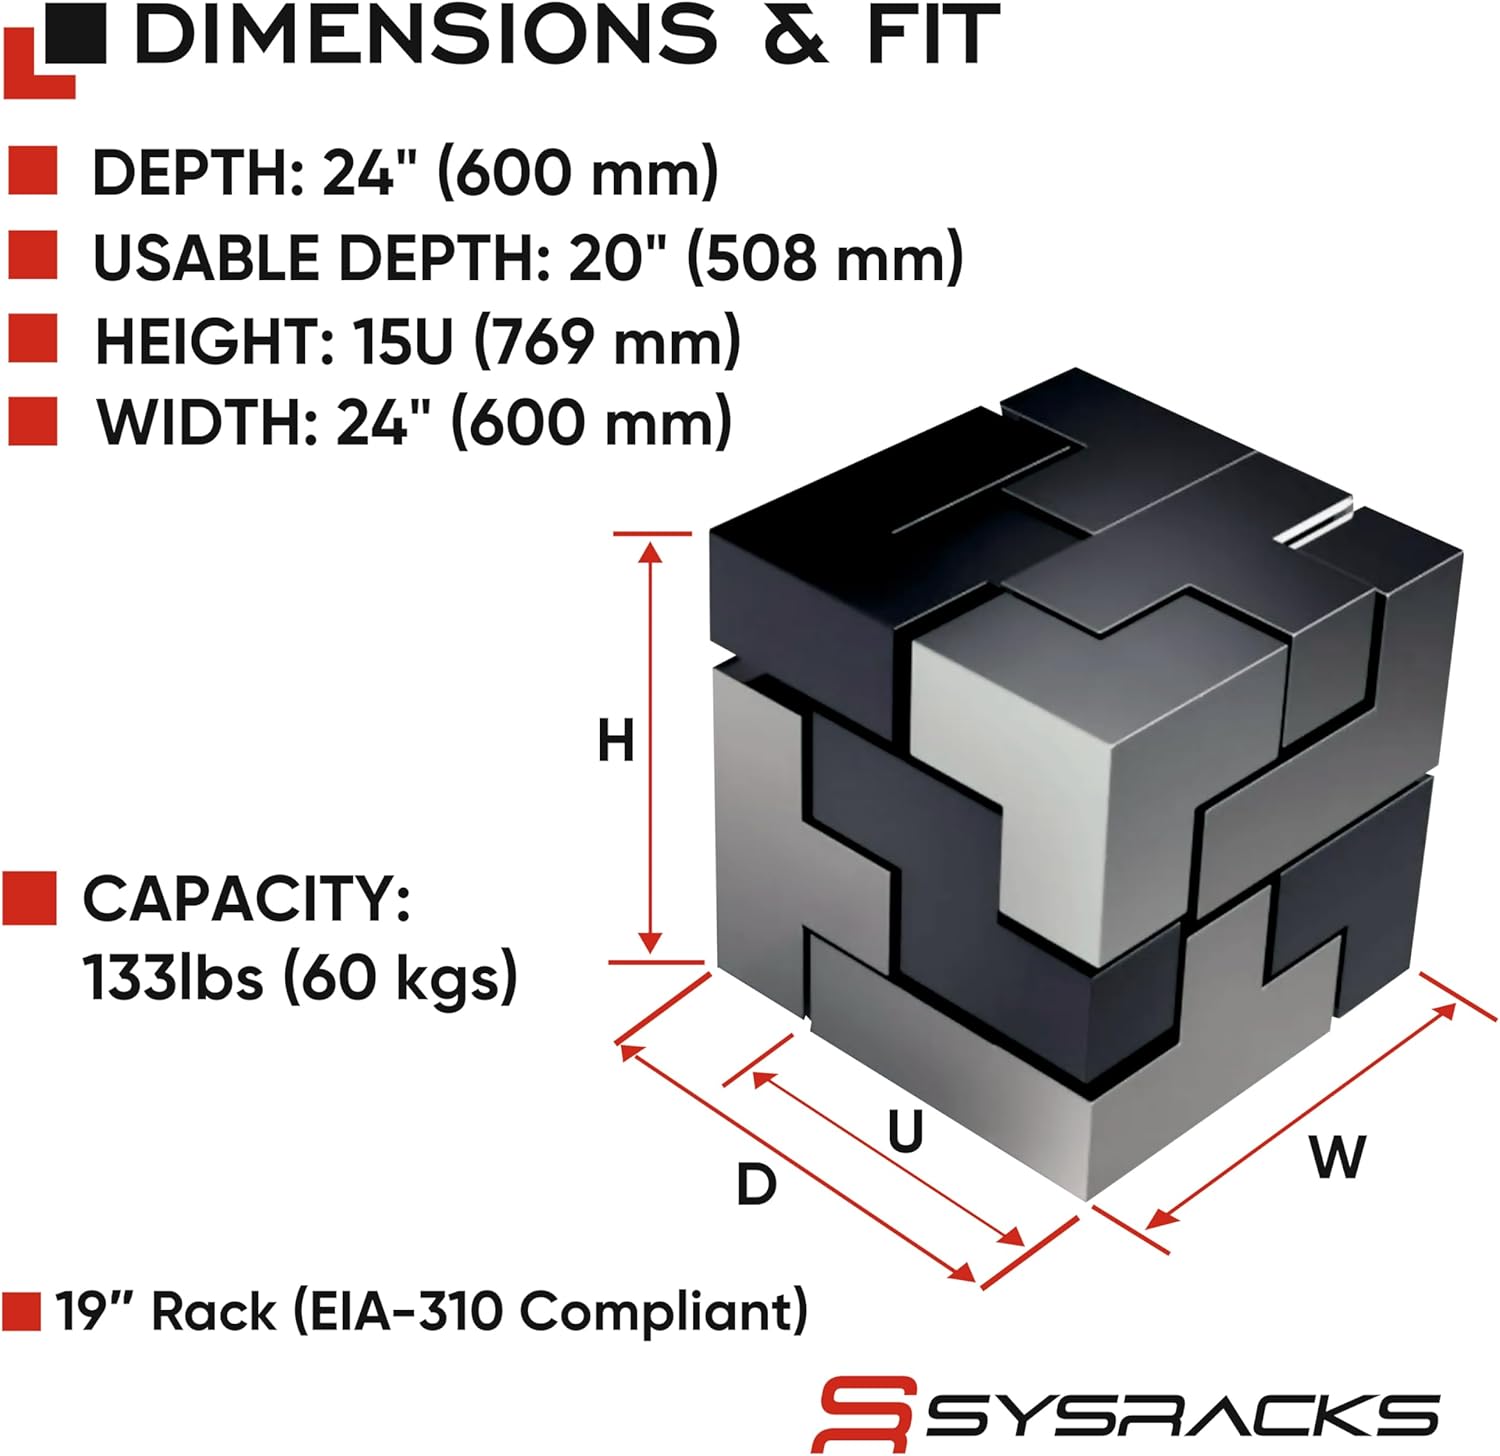
Figure 6: Dimensions and Fit
9. Warranty & Support
9.1. Warranty
This Sysracks product comes with a 2-year warranty from the date of purchase. The warranty covers defects in materials and workmanship under normal use. Please retain your proof of purchase for warranty claims.
9.2. Customer Support
For technical assistance, missing parts, or warranty inquiries, please contact Sysracks customer support. Refer to the official Sysracks website or your purchase documentation for contact details.