
1. Introduction
This manual provides essential information for the safe and effective operation, setup, and maintenance of your HITBOX MIG250 Multi-Process Welder. The MIG250 is a versatile 5-in-1 welding machine designed for various applications, offering MIG (Gas/Gasless), ARC (MMA), and Lift TIG welding capabilities. It features a 250A output, 240V input, and an intuitive LCD digital display for precise control.
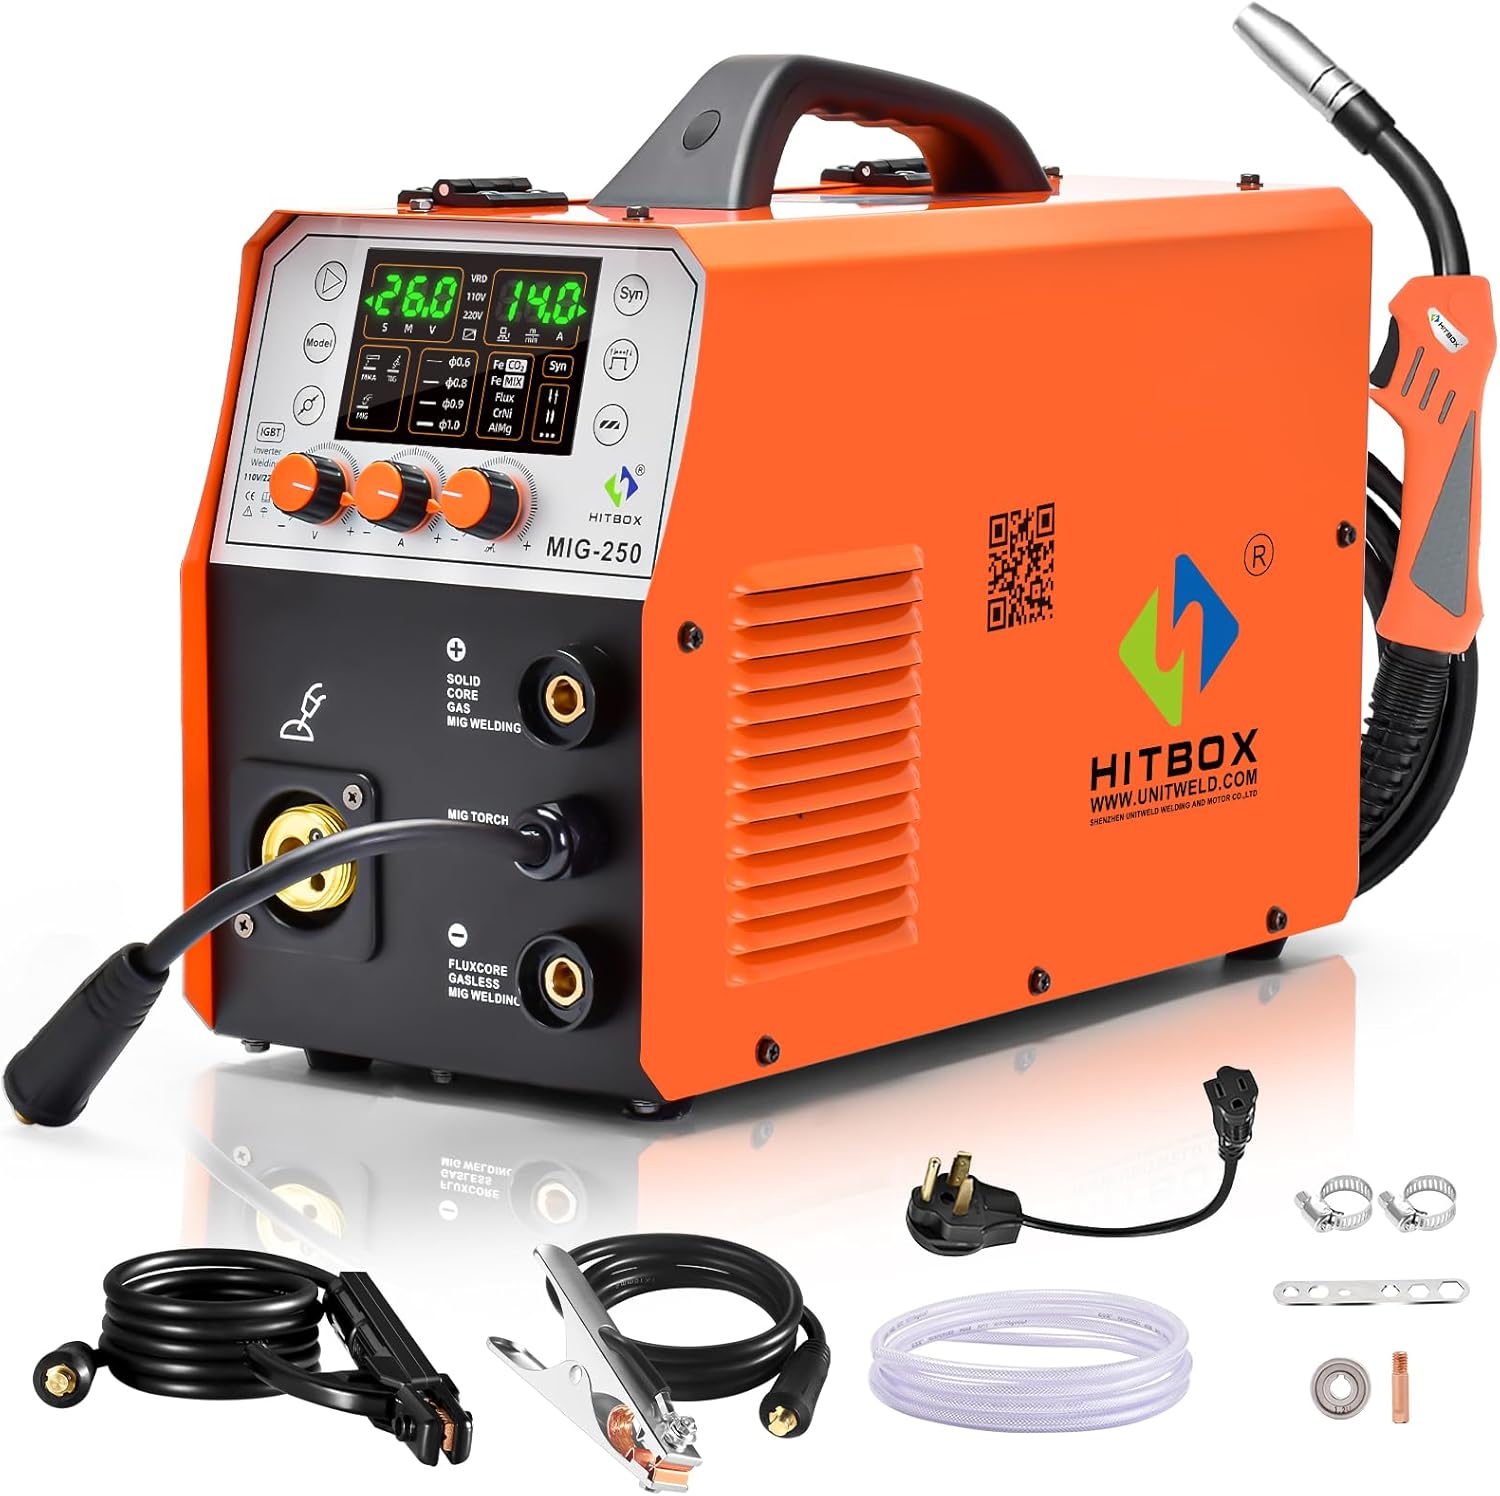
Image 1.1: The HITBOX MIG250 Multi-Process Welder with included accessories, showcasing its compact design and various connection points.
2. Safety Instructions
Always prioritize safety when operating welding equipment. Failure to follow these instructions can result in serious injury or death.
- Eye and Face Protection: Always wear a welding helmet with appropriate shade lenses to protect your eyes and face from arc rays and sparks.
- Protective Clothing: Wear flame-resistant clothing, gloves, and sturdy footwear to protect against burns and electrical shock.
- Ventilation: Ensure adequate ventilation to remove welding fumes and gases from the work area. Welding fumes can be hazardous to your health.
- Electrical Safety: Ensure the welder is properly grounded. Do not operate in wet conditions. Inspect cables and connections for damage before each use.
- Fire Prevention: Keep a fire extinguisher nearby. Remove flammable materials from the welding area. Hot sparks and slag can cause fires.
- Gas Cylinder Safety: Secure gas cylinders to prevent them from falling. Handle cylinders with care and ensure proper connections.
- Work Area: Keep the work area clean and free of clutter. Ensure stable footing.
- Children and Bystanders: Keep children and unauthorized personnel away from the welding area.
3. Product Overview
3.1. Included Components
The HITBOX MIG250 package typically includes the following items:
- 1x MIG Welder Unit
- 1x MIG Welding Torch
- 1x Ground Clamp
- 1x Manual Welder Clamp (Electrode Holder)
- 1x Gas Hose
- 1x Conductive Nozzle
- 1x Wire Feed Roller
3.2. Control Panel and Display
The welder features a large, interactive LCD display for clear visualization of welding parameters. This display allows for precise adjustment of settings such as welding function, wire diameter, metal type, wire feed speed, and voltage factor.

Image 3.1: Close-up of the HITBOX MIG250's large LCD control panel, showing various settings and indicators.

Image 3.2: The large operating window on the HITBOX MIG250, illustrating the display of various metals, welding wires, and 2T/4T switching options.
3.3. Welder Features
The HITBOX MIG250 incorporates advanced features for enhanced performance and safety:
- 6-in-1 Multi-Process Capability: Supports MIG MIX, MIG CO2, Flux Cored, Lift TIG, MMA, and Aluminum Welding.
- IGBT Inverter Technology: Provides more efficient and stable welding compared to traditional MOS transistors.
- Dual Voltage: Operates on 110V/220V power supplies.
- Synergic Control: Simplifies parameter setup for various welding tasks.
- Integrated VRD Function: Voltage Reduction Device for increased safety, especially in ARC and Lift TIG modes.
- High-Speed Cooling Fan: Ensures efficient heat dissipation, operating only when necessary to reduce noise.
- Protection Features: Includes overload, overcurrent, and overheating protection.

Image 3.3: Illustration of the HITBOX MIG250's 6-in-1 multi-function capabilities, including MIG with gas, gasless MIG, MIG MIX, aluminum welding, ARC/MMA, and Lift TIG.

Image 3.4: The HITBOX MIG250's cooling system, highlighting the high-speed fan and various protection features like VRD, quiet operation, overload, overcurrent, and overheating protection.
3.4. Dimensions and Weight
The compact design of the MIG250 makes it portable and easy to handle.
- Package Dimensions: 49.4 x 45.7 x 26.2 cm
- Item Weight: 12.2 kg (approximately 27.5 lbs)
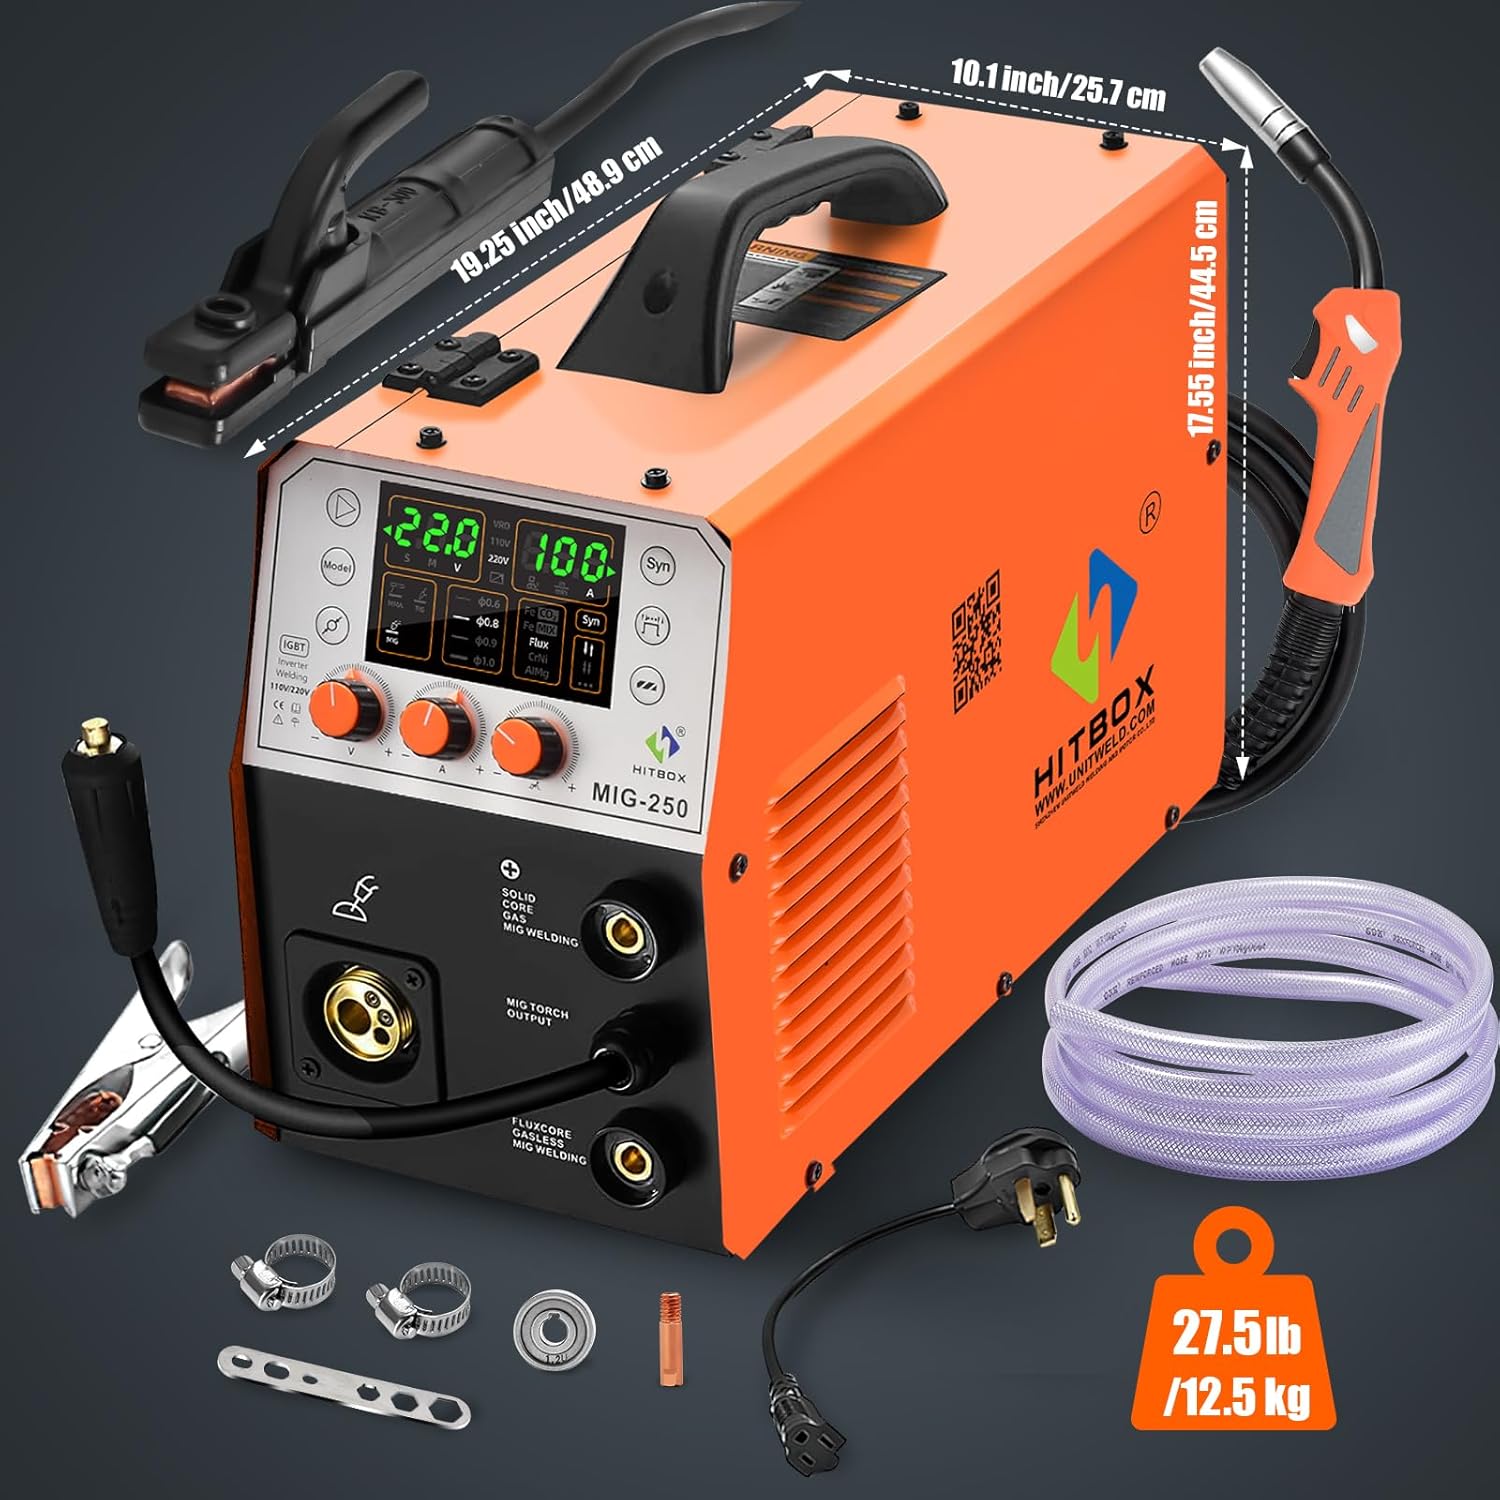
Image 3.5: Detailed view of the HITBOX MIG250's dimensions and included components, such as the ground clamp, electrode holder, gas hose, and wire feed roller.
4. Setup
4.1. Power Connection
Connect the welder to a suitable 240V (or 110V/220V compatible) power outlet. Ensure the power supply matches the welder's requirements to prevent damage.
4.2. Wire Installation
The MIG250 supports various welding wire types and diameters, including 0.6mm, 0.8mm, 0.9mm, and 1.0mm solid wire, as well as 0.8mm and 1.0mm aluminum wire. It can accommodate 1kg or 5kg spools of filler wire.
- Open the wire spool compartment.
- Place the wire spool onto the spindle, ensuring it rotates freely.
- Thread the welding wire through the wire feed mechanism, ensuring it passes through the correct groove on the feed roller for the chosen wire diameter.
- Close the compartment and adjust the wire tension as needed.
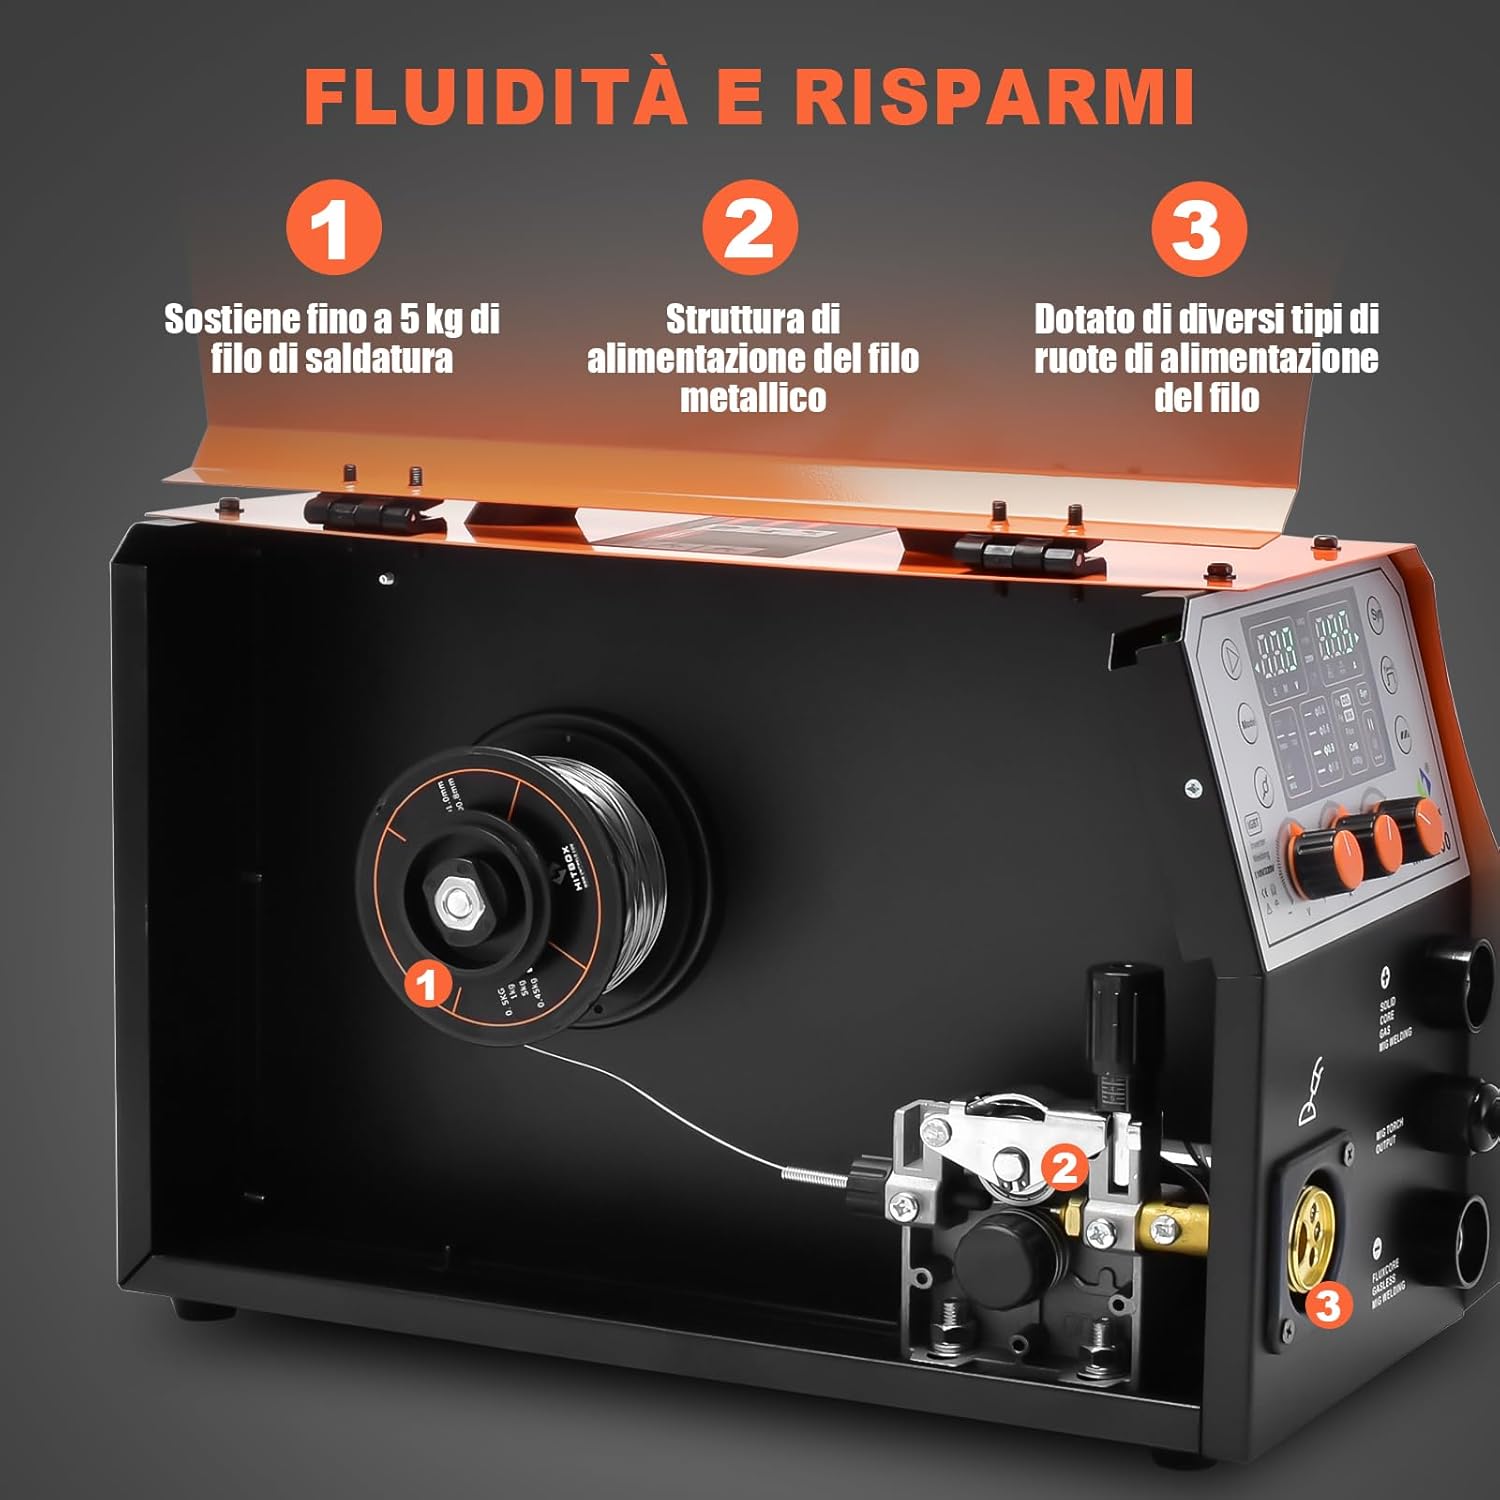
Image 4.1: Internal view of the HITBOX MIG250, illustrating the wire feed mechanism, support for up to 5kg wire spools, and different types of wire feed rollers.
4.3. Gas Connection (for MIG with Gas)
For MIG welding with gas (MIG CO2 or MIG MIX), connect the gas hose from your gas cylinder to the gas inlet on the welder. Ensure all connections are secure and leak-free. Use appropriate shielding gas for your welding application (e.g., CO2 for steel, Argon/CO2 mix for stainless steel).
4.4. Torch and Ground Clamp Connection
Connect the MIG torch to the designated MIG torch output. Connect the ground clamp cable to the ground terminal and securely attach the clamp to the workpiece, ensuring good electrical contact.
5. Operating Modes
The HITBOX MIG250 offers multiple welding processes. Select the desired mode on the control panel.
5.1. MIG Welding (Gas/Gasless)
MIG welding is suitable for various metals including iron, stainless steel, alloy steel, carbon steel, cadmium metal, cadmium-copper metal, and aluminum-magnesium metal. The current range for MIG welding is 30-180A, with a voltage adjustment range of 11-26V.
- MIG CO2: Uses CO2 shielding gas for welding steel.
- MIG MIX: Uses a mixed shielding gas (e.g., Argon/CO2) for various metals.
- Flux Cored (Gasless MIG): Uses flux-cored wire, eliminating the need for external shielding gas.
- 2T/4T Modes: Select 2T for short, intermittent welds or 4T for longer, continuous welds.
- Inductance Control: Adjust the inductance effect to fine-tune the arc width and improve weld quality.
5.2. ARC/MMA Welding
The MMA mode supports welding with electrodes from 1.6mm to 4.0mm in diameter, with a current range of 30-180A. Common electrode types like 6013 and 7018 are supported.
- VRD Function: The built-in VRD (Voltage Reduction Device) enhances safety by reducing the open-circuit voltage when not welding.
- Anti-Stick Process: Prevents the electrode from sticking to the workpiece, ensuring smoother arc initiation.
5.3. Lift TIG Welding
The Lift TIG mode offers a current range of 20-180A. This machine uses a scratch-start (Lift TIG) ignition method.
- VRD Function: The VRD light illuminates in Lift TIG mode to prevent the tungsten needle from sticking to the workpiece.
- TIG Torch: A TIG torch is not included and must be purchased separately. Gas for TIG welding must be connected directly to the TIG torch, as there are no dedicated gas connections for TIG on the machine.
6. Maintenance
Regular maintenance ensures the longevity and optimal performance of your welder.
- Cleaning: Periodically clean the welder's exterior and internal components (if accessible and safe to do so) to remove dust and debris. Use compressed air for internal cleaning.
- Cable Inspection: Regularly inspect all welding cables, torches, and ground clamps for cuts, fraying, or damage. Replace damaged components immediately.
- Wire Feed System: Check the wire feed rollers and liner for wear. Clean any debris from the wire feed path to ensure smooth wire delivery.
- Nozzles and Contact Tips: Replace MIG nozzles and contact tips as they wear out to maintain consistent arc performance.
- Storage: Store the welder in a clean, dry environment when not in use.
7. Troubleshooting
Refer to the following table for common issues and their potential solutions:
| Problem | Possible Cause | Solution |
|---|---|---|
| Welder does not power on | No power supply; damaged power cable; internal fault | Check power connection and circuit breaker; inspect power cable; contact support if fault persists. |
| No arc in MIG mode | No wire feed; poor ground connection; incorrect settings; clogged contact tip | Check wire spool and feed mechanism; ensure ground clamp is secure; verify welding parameters; clean/replace contact tip. |
| No arc in ARC/MMA mode | Poor ground connection; incorrect current setting; damp electrode | Ensure ground clamp is secure; adjust current; use dry electrodes. |
| Poor weld quality | Incorrect parameters; improper technique; contaminated workpiece; insufficient gas flow (MIG) | Adjust current/voltage/wire speed; practice technique; clean workpiece; check gas cylinder and flow rate. |
| Wire feeding issues | Incorrect roller size; tension too loose/tight; clogged liner; bent wire | Ensure correct roller for wire diameter; adjust tension; clean/replace liner; check wire spool for tangles. |
If you encounter issues not listed here or if solutions do not resolve the problem, please contact HITBOX customer support.
8. Technical Specifications
| Specification | Value |
|---|---|
| Manufacturer | HITBOX |
| Item Model Number | MIG250 |
| Rated Input Power | 5.9 kW |
| Rated Input Current | 26.2 A |
| Welding Current Range (MMA) | 30 – 180 A |
| Welding Current Range (TIG) | 20 – 180 A |
| Welding Current Range (MIG) | 30 – 180 A |
| Voltage Adjustment Range (MIG) | 11 – 26 V |
| Total Efficiency | 75% |
| Protection Type | IP21S |
| Insulation Class | H |
| Suitable Welding Wire Diameter | 0.6 / 0.8 / 0.9 / 1.0 mm |
| Suitable Electrode Diameter | 1.6 – 4.0 mm |
| Item Weight | 12.2 Kilograms |
| Power Type | AC DC |
9. Warranty and Support
The HITBOX MIG250 Welder comes with a 2-year warranty, ensuring peace of mind regarding product quality and performance.
For any questions, technical assistance, or troubleshooting beyond this manual, please contact HITBOX customer service. Our 24-hour online customer service team is available to assist you with any issues you may encounter.
For more information, visit the official HITBOX website: www.unitweld.com


