1. Product Overview
The ENEGON C9015 is a versatile universal battery charger designed for various rechargeable battery types. It features independent charging slots, a discharge function, and an LCD display for monitoring charging status.
Key Features:
- Individual Slot Charging: Supports 1-4 AA/AAA/C/D and 1-2 9V Ni-MH/Ni-CD rechargeable batteries simultaneously. Each slot operates independently.
- One-Button Discharge: Press the blue button to initiate discharge for Ni-MH/Ni-CD batteries. The charger automatically switches to charge mode after discharge.
- Fast Charging: Charges 1-4 AA/AAA/C/D batteries with a total current of 2A, completing in under 3 hours. 9V batteries charge in under 10 hours.
- LCD Display: Provides real-time charging status (Charging, Discharging, Full, Error) for AA/AAA/C/D batteries. LED indicators are used for 9V batteries.
- Safety Protections: Includes safeguards against short-circuit, overheating, overcharge, overcurrent, overvoltage, over-discharge, and non-rechargeable battery detection.

Image: The ENEGON C9015 universal battery charger with different battery types (AA, AAA, C, D, 9V) inserted, showcasing its multi-slot design and LCD screen.
2. Safety Instructions
Please read and understand these safety instructions before using the charger to prevent injury or damage.
- Use only with specified Ni-MH/Ni-CD rechargeable batteries (AA, AAA, C, D, 9V). Do not attempt to charge non-rechargeable batteries or other battery types (e.g., Lithium-ion), as this may cause explosion, rupture, or leakage.
- Do not disassemble, modify, or short-circuit the charger.
- Avoid exposing the charger to rain, moisture, or extreme temperatures.
- Keep out of reach of children and pets.
- Unplug the charger from the power source when not in use or before cleaning.
- Ensure proper polarity (+/-) when inserting batteries.
- Do not use the charger if it is damaged.
3. Setup
Follow these steps to set up your ENEGON C9015 battery charger:
- Unpack the Charger: Remove the charger and any included accessories from the packaging.
- Connect to Power: Connect the charger to a power source using a compatible USB cable (Micro-USB or USB-C) and a 5V/2A power adapter (not included). The charger can be powered via a laptop, power bank, car charger, or wall adapter.
- Initial Check: The LCD screen should illuminate, indicating the charger is ready for use.
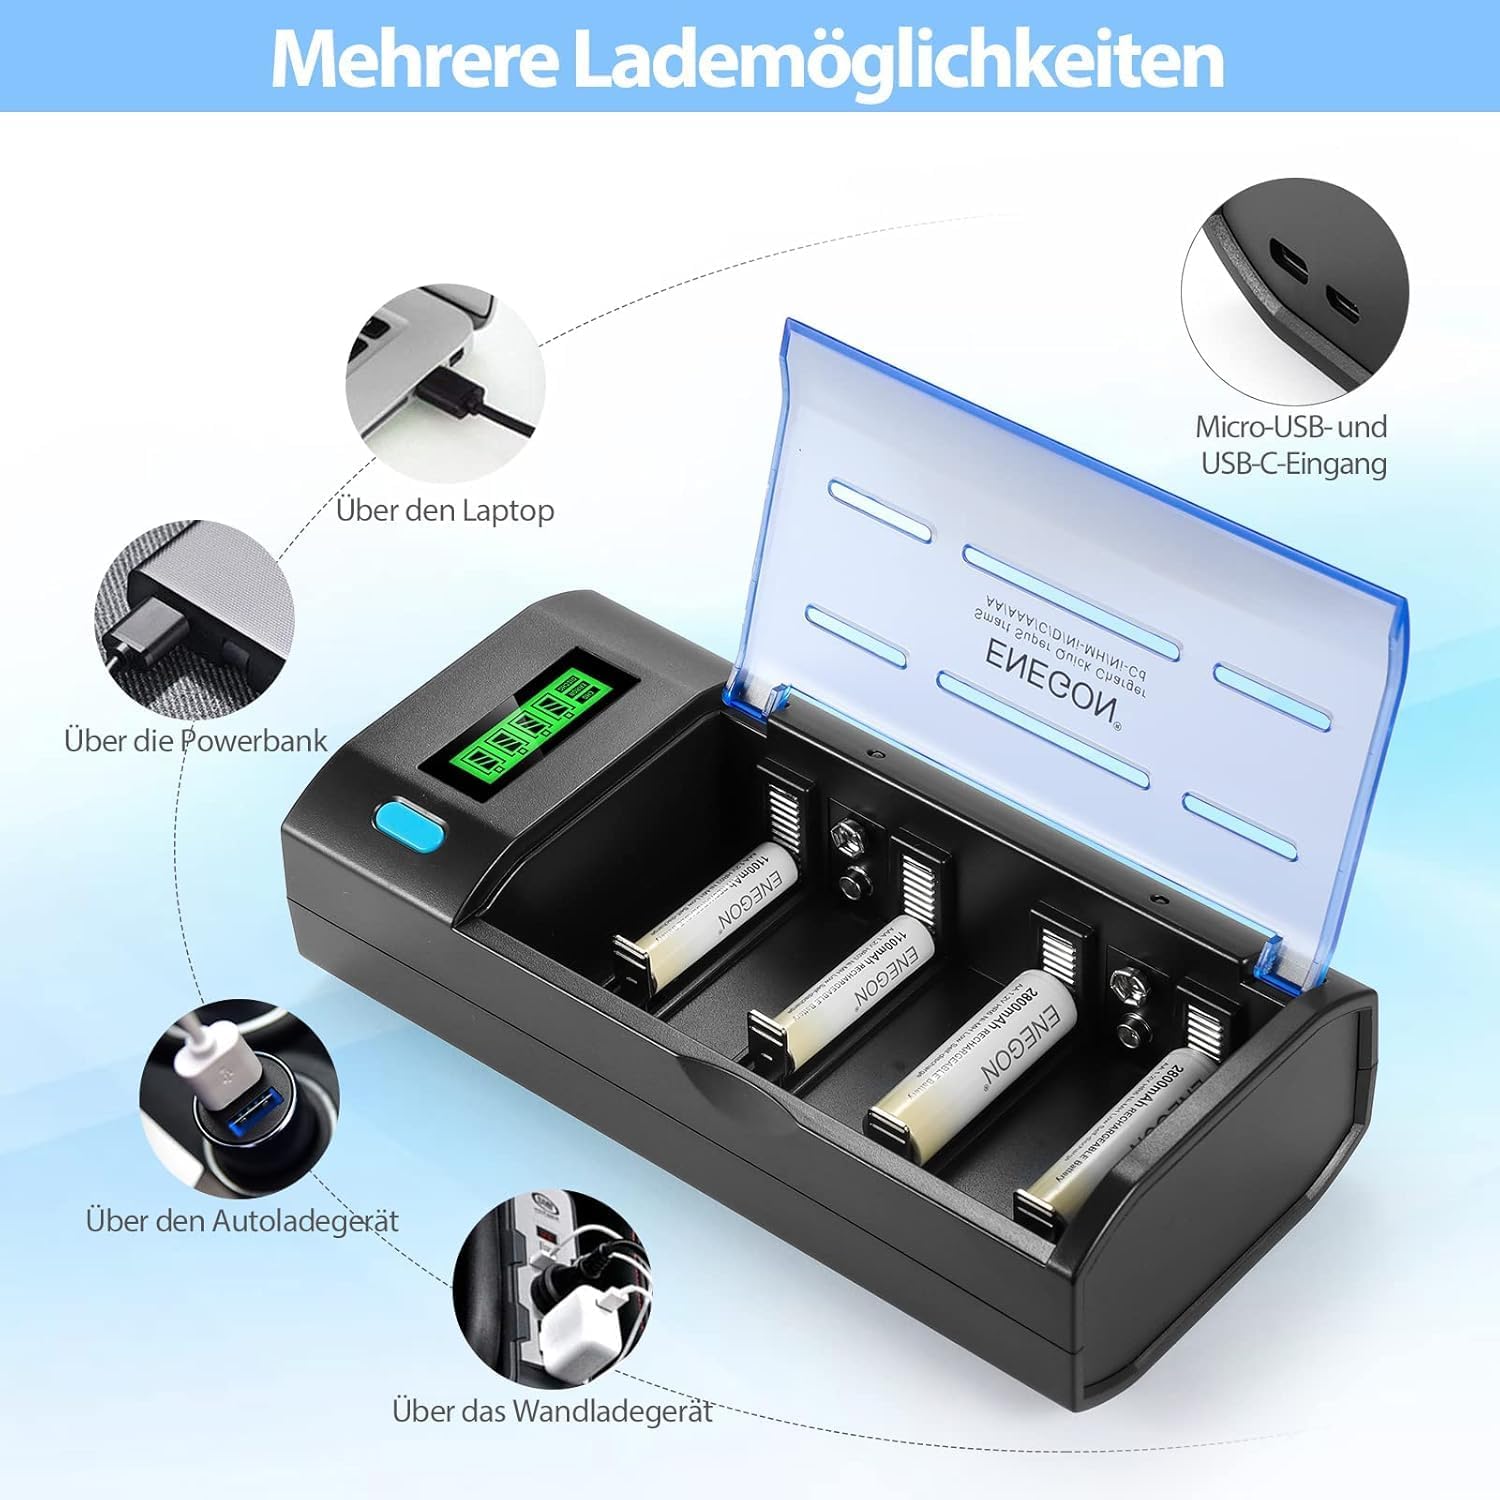
Image: The ENEGON C9015 charger illustrating multiple power input options, including laptop, power bank, car charger, and wall adapter, via Micro-USB and USB-C ports.
4. Operating Instructions
4.1 Charging AA/AAA/C/D Batteries
- Insert Batteries: Place 1 to 4 AA, AAA, C, or D Ni-MH/Ni-CD rechargeable batteries into the corresponding slots, ensuring correct polarity (+ and -).
- Monitor LCD: The LCD display will show the charging progress for each battery. The status will cycle through "Charging", "Discharging" (if initiated), and "Full".
- Charging Completion: Charging stops automatically when batteries are fully charged. The LCD will indicate "Full".

Image: A close-up view of the ENEGON C9015 charger with various battery types (AAA, 9V, AA, C, D) correctly inserted into their respective slots, demonstrating the independent charging capability.
4.2 Charging 9V Batteries
- Insert Batteries: Place 1 or 2 9V Ni-MH/Ni-CD rechargeable batteries into the dedicated 9V slots, observing correct polarity.
- Monitor LED: For 9V batteries, an LED indicator will show charging status. Note that the LED remains continuously lit; charging time should be estimated based on battery capacity.
- Charging Completion: Disconnect 9V batteries after the estimated charging time (up to 10 hours for full charge).
4.3 Discharge Function (for Ni-MH/Ni-CD AA/AAA/C/D Batteries)
- Insert Batteries: Insert 1 to 4 AA, AAA, C, or D Ni-MH/Ni-CD batteries into their slots.
- Initiate Discharge: Press the blue button on the charger. The LCD will display "Discharging".
- Automatic Charging: Once the discharge cycle is complete, the charger will automatically switch to charging mode.

Image: The ENEGON C9015 charger highlighting its LCD display for AA/AAA/C/D batteries and the blue one-button discharge feature. It also shows the LED indicator for 9V batteries.
5. Maintenance
- Cleaning: Disconnect the charger from power before cleaning. Use a soft, dry cloth to wipe the surface. Do not use abrasive cleaners or solvents.
- Storage: Store the charger in a cool, dry place away from direct sunlight and extreme temperatures.
- Inspection: Periodically inspect the charger and cables for any signs of damage.
6. Troubleshooting
| Problem | Possible Cause | Solution |
|---|---|---|
| Charger not powering on. | No power connection or faulty cable/adapter. | Ensure the USB cable is securely connected to both the charger and a working power source. Try a different USB cable or power adapter. |
| Batteries not charging. | Incorrect battery type, incorrect polarity, or faulty battery. | Verify batteries are Ni-MH/Ni-CD rechargeable. Check battery polarity. Remove and reinsert batteries. If problem persists, the battery may be faulty. |
| LCD shows "Error". | Non-rechargeable battery detected, short-circuit, or severely damaged battery. | Remove the problematic battery. Ensure only compatible rechargeable batteries are used. If the error persists with known good batteries, contact support. |
| Slow charging. | Low power input (adapter less than 5V/2A). | Use a 5V/2A power adapter for optimal charging speed. |
7. Specifications
| Feature | Detail |
|---|---|
| Model | C9015 |
| Compatible Battery Types | AA, AAA, C, D, 9V Ni-MH/Ni-CD rechargeable batteries |
| Input Connector | Micro-USB, USB-C |
| Input Voltage/Current | 5V/2A (recommended) |
| Output Current (AA/AAA/C/D) | 2A total (distributed across slots) |
| Approx. Charging Time (AA/AAA/C/D) | Under 3 hours |
| Approx. Charging Time (9V) | Under 10 hours |
| Display | LCD for AA/AAA/C/D, LED for 9V |
| Safety Features | Short-circuit, overheating, overcharge, overcurrent, overvoltage, over-discharge protection, non-rechargeable battery detection. |
| Dimensions | 12P x 16l x 5H centimeters |
8. Warranty and Support
ENEGON products are designed for reliability and performance. For warranty information or technical support, please refer to the contact details provided with your purchase or visit the official ENEGON website. Keep your purchase receipt as proof of purchase for warranty claims.
For further assistance, please contact ENEGON customer service.