Introduction
This instruction manual provides essential information for the safe and effective use of your JKHFDDIG BG-6117 Mini Electric Drill Press Stand. Please read this manual thoroughly before assembly and operation to ensure proper function and to prevent injury or damage. Keep this manual for future reference.

Image: The JKHFDDIG BG-6117 Mini Electric Drill Press Stand, showcasing its green base, chrome main rod, and yellow drill bracket assembly.
Safety Instructions
Always observe basic safety precautions when using this drill press stand to reduce the risk of fire, electric shock, and personal injury.
- Read all instructions: Familiarize yourself with the controls and proper use of the stand.
- Secure the workpiece: Always clamp your workpiece firmly to the base to prevent movement during drilling.
- Wear safety gear: Use safety glasses or a face shield. Wear appropriate hearing protection.
- Ensure stability: Place the drill press stand on a stable, level surface.
- Proper drill installation: Ensure your electric drill is securely clamped into the bracket before operation.
- Keep area clear: Maintain a clean and well-lit work area. Cluttered areas invite accidents.
- Avoid loose clothing: Do not wear loose clothing, gloves, ties, or jewelry that can get caught in moving parts.
- Disconnect power: Always disconnect the electric drill from the power source before making adjustments, changing bits, or performing maintenance.
- Do not force: Allow the drill to do the work. Forcing it can cause damage to the tool or injury.
Package Contents
Verify that all items are present upon unpacking:
- 1 x JKHFDDIG BG-6117 Mini Electric Drill Press Stand
- Adapter Sleeve (for 38-43mm drill clamp)
- Assembly Hardware (bolts, nuts, washers)
Note: Electric drill and flat nose pliers are for demonstration purposes only and are not included in the package.
Product Overview and Components
Familiarize yourself with the main parts of your drill press stand:
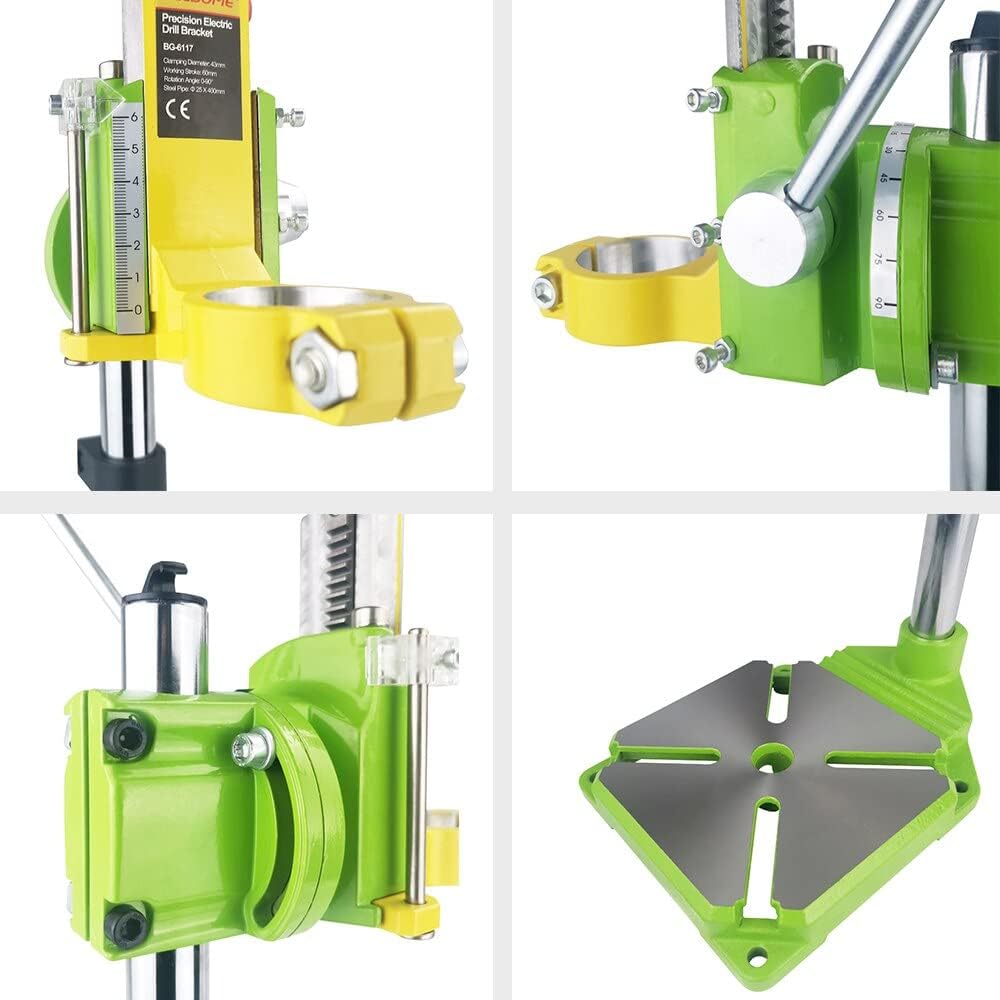
Image: Close-up views of the drill press stand's components, including the drill clamping mechanism, depth gauge, and cast iron base with mounting slots.
- Base: Sturdy cast iron base for stability and workpiece clamping.
- Main Rod: Vertical chrome-plated rod supporting the drill bracket.
- Drill Bracket Assembly: Holds the electric drill and allows vertical movement.
- Clamp Jaws: Securely holds the electric drill (38-43mm diameter).
- Depth Gauge: For precise control of drilling depth.
- Feed Handle: Lever for lowering and raising the drill.
- Angle Adjustment: Mechanism for drilling slant holes up to 90 degrees.
Setup
1. Assembly
The drill press stand typically comes partially assembled. Follow these steps to complete the setup:
- Attach the main rod to the cast iron base using the provided hardware. Ensure it is tightened securely.
- Slide the drill bracket assembly onto the main rod.
- Secure any remaining components as per the visual guides.
2. Mounting Your Electric Drill
This stand is designed for electric drills with a collar diameter between 38mm and 43mm. An adapter sleeve is included for optimal fit within this range.
- Loosen the clamp jaws on the drill bracket assembly.
- Insert your electric drill's collar into the clamp jaws. If your drill's diameter is on the smaller side of the 38-43mm range, use the adapter sleeve for a snug fit.
- Tighten the clamp jaws firmly around the drill collar. Ensure the drill is held securely and does not wobble.
- Verify that the drill's chuck is aligned vertically with the base.
Important: If your drill's diameter is larger than 43mm, this stand is not suitable. If it's slightly smaller than 38mm, you may use a piece of cardboard or rubber mat as a shim, but ensure the drill remains stable and secure.

Image: Side view of the drill press stand, illustrating how an electric drill would be mounted into the yellow bracket.
Operating Instructions
1. Preparing for Drilling
- Secure Workpiece: Place your workpiece on the base. Use clamps (not included) to firmly secure it to the base's slots to prevent movement during drilling.
- Select Drill Bit: Install the appropriate drill bit into your electric drill's chuck.
- Adjust Height: Loosen the locking mechanism on the main rod and adjust the drill bracket assembly to the desired height above your workpiece. Retighten the lock.
2. Setting Drilling Depth
The stand features a precise graduation and transparent pointer for setting drilling depth.
- Lower the drill bit until it just touches the workpiece.
- Adjust the depth stop mechanism to the desired drilling depth. This will prevent the drill from going deeper than intended.
3. Drilling Slant Holes (90-Degree Rotatable)
The drill bracket can be rotated up to 90 degrees to drill angled holes.
- Loosen the angle adjustment mechanism on the drill bracket.
- Rotate the drill bracket to the desired angle, using the angle markings as a guide.
- Tighten the angle adjustment mechanism securely before drilling.
4. Operation
- Ensure your electric drill is plugged in and ready.
- Turn on your electric drill.
- Slowly lower the drill using the feed handle, applying steady, even pressure. Do not force the drill.
- Once the desired depth is reached (or the depth stop engages), retract the drill by raising the feed handle.
- Turn off your electric drill.
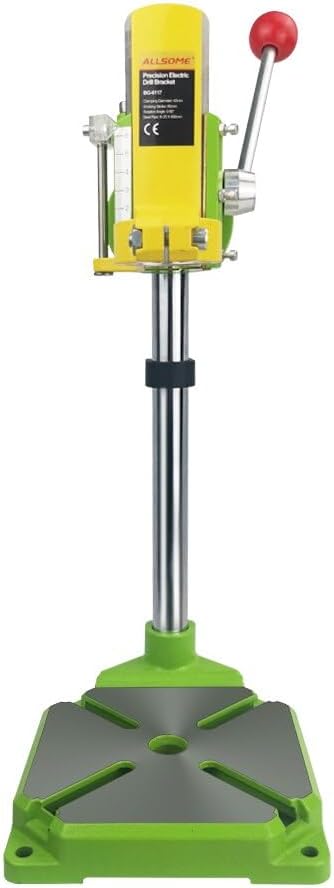
Image: Front view of the drill press stand, showing the feed handle and depth gauge, ready for operation.
Maintenance
Regular maintenance ensures the longevity and optimal performance of your drill press stand.
- Cleaning: After each use, wipe down the stand to remove dust, chips, and debris. Use a dry cloth or a soft brush. Avoid using harsh chemicals that could damage finishes.
- Lubrication: Periodically apply a light coat of machine oil to the main rod and any moving parts to ensure smooth operation.
- Inspection: Regularly check all bolts, nuts, and fasteners for tightness. Tighten any loose components. Inspect the drill clamp jaws for wear or damage.
- Storage: Store the drill press stand in a clean, dry environment, away from moisture and extreme temperatures.
Troubleshooting
| Problem | Possible Cause | Solution |
|---|---|---|
| Drill wobbles in clamp | Drill not securely tightened; incorrect drill size; missing adapter sleeve. | Ensure clamp jaws are fully tightened. Use the adapter sleeve if your drill is 38-43mm. If drill is slightly smaller, use a shim (e.g., cardboard) for a snug fit. |
| Drill bracket movement is stiff | Lack of lubrication; debris on main rod. | Clean the main rod and apply a light coat of machine oil. |
| Inaccurate drilling depth | Depth stop not set correctly or loose. | Re-adjust and securely tighten the depth stop mechanism. |
| Drill bit not perpendicular to base | Drill not properly aligned in clamp; angle adjustment not locked. | Ensure drill is seated squarely in the clamp. Verify the angle adjustment is locked at 0 degrees for vertical drilling. |
Specifications

Image: Diagram showing the dimensions of the drill press stand: height 490cm (likely 490mm), base width 220cm (likely 220mm), and base depth 160cm (likely 160mm).
| Feature | Detail |
|---|---|
| Model | BG-6117 |
| Brand | JKHFDDIG |
| Type | Iron Bottom Bracket Drill Press Stand |
| Min-Max Clamp Diameter | 38-43mm (with adapter sleeve) |
| Main Rod Dimensions | 25mm diameter x 400mm length |
| Overall Size (Approx.) | 400mm (Height) x 155mm (Width) x 155mm (Depth) - *Note: Product description states 400*155*155mm, image shows 490cm height, 220cm width, 160cm depth. Assuming mm for practical tool dimensions.* |
| Drill Trip/Stroke | 60mm (50mm recommended for long-term work) |
| Base Material | Cast Iron |
| Rotatable Angle | Up to 90 degrees for slant holes |
| Features | Copper plug readjustment for precision, precise graduation, transparent pointer, spacing function. |
| Item Weight | Approximately 1 Grams (Note: This seems to be an error in the source data, likely much heavier) |
Note on dimensions: The product description lists "Size : 400*155*155mm" while an image shows "490cm", "220cm", "160cm". Given the nature of the product, it is highly probable that the image labels are in millimeters (mm) and not centimeters (cm), and the description's 400mm height is a general approximation. Users should refer to the physical product for exact measurements.