SMONET A1-BBFHS
SMONET Keyless Entry Smart Lock with Handle (Model A1-BBFHS) User Manual
Model: A1-BBFHS | Brand: SMONET
1. Introduction
This manual provides detailed instructions for the installation, operation, and maintenance of your SMONET Keyless Entry Smart Lock with Handle, Model A1-BBFHS. Please read this manual thoroughly before installation and use to ensure proper function and safety. Keep this manual for future reference.
2. Safety Information
- Do not attempt to disassemble or repair the lock yourself. This may void the warranty and cause damage.
- Use only the specified battery type (4x AA batteries). Do not mix old and new batteries or different battery types.
- Ensure all components are securely fastened during installation to prevent malfunction.
- Protect your passcodes and fingerprints. Do not share them with unauthorized individuals.
- Regularly check the lock for any signs of wear or damage.
3. Package Contents
Verify that all components are present in your package:
- Front Door Handles Set
- Smart Deadbolt (Exterior and Interior Units)
- Physical Keys
- IC Fobs
- Screw Package
- User Manual (this document)
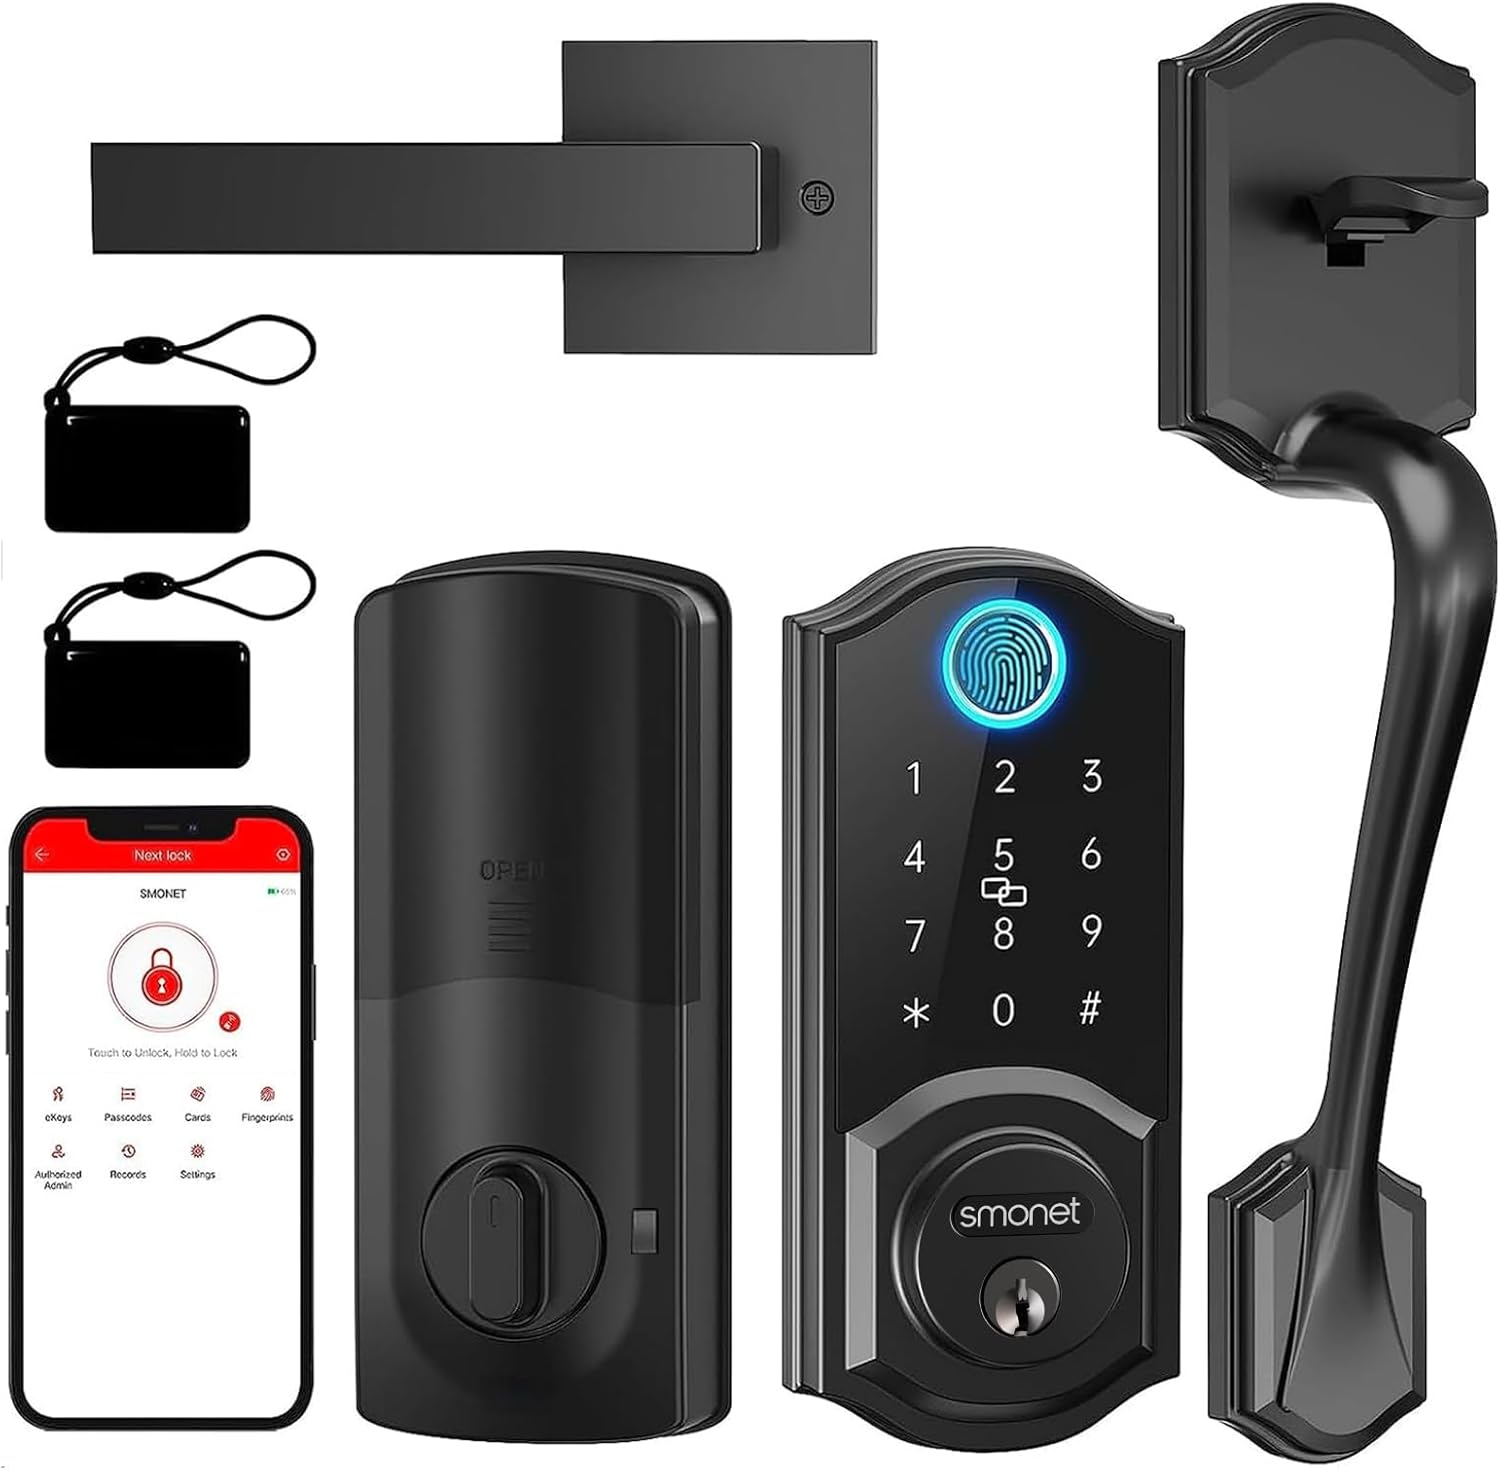
Image: All components included in the SMONET Smart Lock package.
4. Specifications
| Feature | Description |
|---|---|
| Brand | SMONET |
| Model Name | A1-BBFHS |
| Lock Type | Biometric, Bluetooth, APP Lock, Keypad, Keyfobs & Key Lock, Physical Key |
| Special Features | Auto Lock, IC Fobs Unlock, Bluetooth APP, Voice Control, Custom Timed Codes, Keyless Entry, Alexa, Fingerprint, Touchscreen Keypad, Physical Key |
| Material | Metal |
| Color | Black |
| Item Dimensions (L x W x H) | 16.91 x 7.87 x 3.94 inches |
| Item Weight | 5.52 pounds |
| Recommended Use | Residential use, smart home integration |
| Connectivity Protocol | Bluetooth |
| Controller Type | Amazon Alexa, Google Assistant (with optional gateway) |
| Batteries Required | Yes (4x AA, not included) |
5. Setup and Installation
5.1 Door Compatibility
The SMONET Smart Lock is designed for US Standard Left and Right Hand Doors with a thickness of 1.49-1.97 inches (38-48 mm). The backset should be 2-3/8″ (60 mm) or 2-3/4″ (70 mm). Ensure your door meets these specifications before installation.

Image: Door size and compatibility check before installing the smart lock.
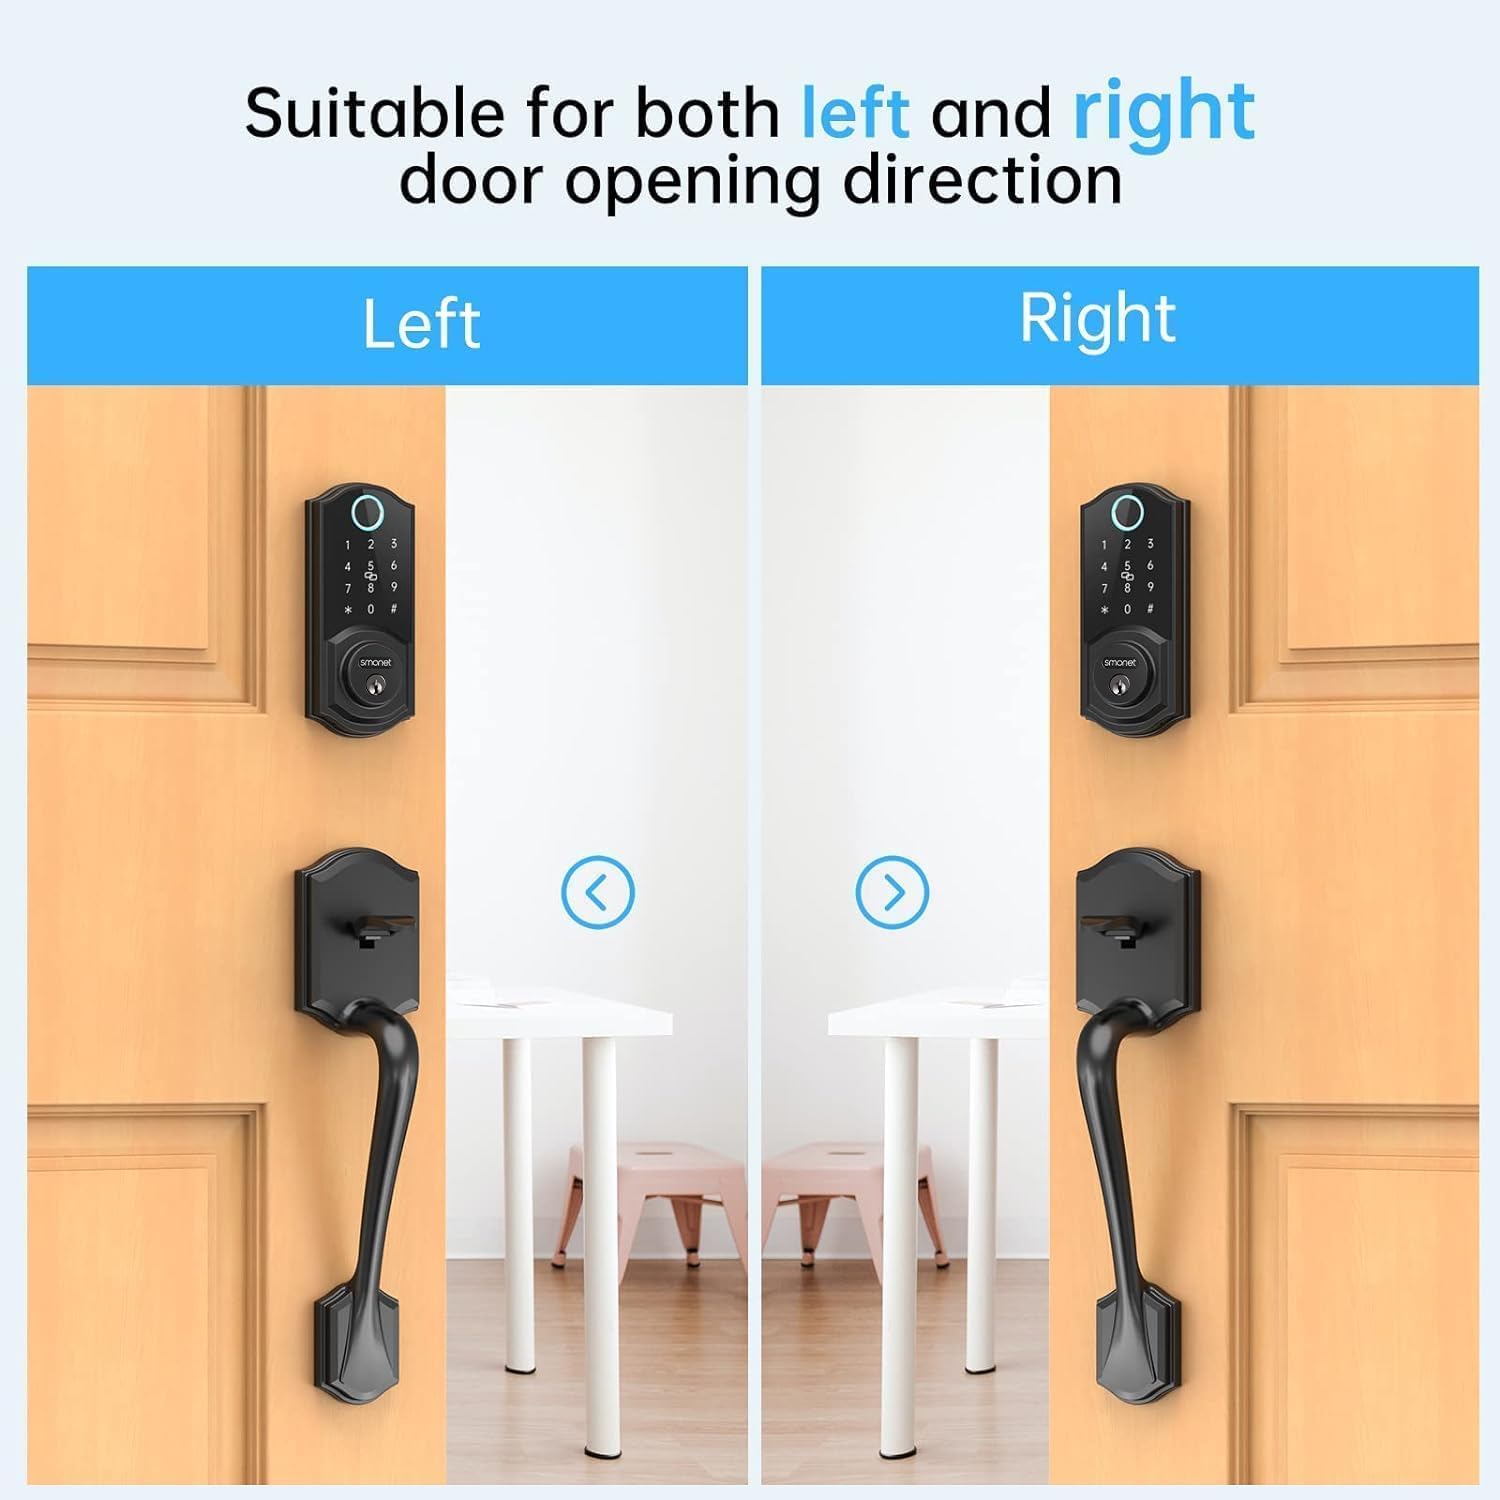
Image: The smart lock is suitable for both left and right door opening directions.
5.2 Installation Steps
Installation can be completed in minutes with a Phillips screwdriver. Follow the detailed instructions provided in the included installation manual (PDF) for specific steps. A general overview is provided below:
- Prepare the door: Ensure the door is properly drilled according to the template.
- Install the latch and strike plate.
- Install the exterior keypad assembly.
- Install the interior unit, connecting the cable from the exterior assembly.
- Secure all components with the provided screws.
- Install 4 AA batteries into the interior unit.
- Test the lock's functionality with a physical key and the keypad.
Note: Keep the latch in the unlocked position before installation.

Image: Illustration of the easy installation process using a screwdriver.
6. Operating Instructions
6.1 Multiple Ways to Lock/Unlock
Your SMONET Smart Lock offers several convenient methods for access:
- Physical Key: Traditional key access.
- Fingerprint ID: Touch and go 360° fingerprint recognition. Supports over 250 fingerprints.
- Keypad Passcode: Enter your personalized code on the touchscreen keypad.
- IC Fobs: Tap the provided IC fobs on the lock for quick entry. Supports up to 1000 fobs.
- Smartphone App (Bluetooth): Control the lock via the dedicated smartphone application.
- Auto Lock: Configurable automatic locking after a set period.
- One-Touch Lock: Press and hold the '#' key on the keypad to lock the door.

Image: Overview of the multiple ways to lock and unlock your smart door.

Image: Fast fingerprint unlock feature.

Image: IC Fob unlocking method.
6.2 Smartphone App Control
The SMONET app provides comprehensive control and management features:
- Remote Unlock/Lock: Control your lock from your smartphone via Bluetooth. For remote control outside Bluetooth range, an optional gateway (sold separately) is required.
- Smart User Management: Share eKeys or passcodes with family, guests, or service personnel. Set permanent, timed, one-time, or customized access.
- View Real-time Records: Monitor unlocking activity and incorrect passcode attempts in real-time.
- Passage Mode: Configure the lock to remain unlocked for specific time periods.

Image: Smartphone app interface for managing the smart lock.

Image: Using the smartphone app to lock/unlock the smart deadbolt.

Image: Remote eKey access management through the app.

Image: Smart user management for authorizing and managing users.

Image: Viewing real-time lock activity records.

Image: Customizing Passage Mode for specific timeframes.
6.3 Auto Lock Function
The auto-lock feature allows you to customize the time period (5-900 seconds) after which the lock automatically engages. This provides added security and peace of mind.

Image: Auto-lock and one-touch lock features for convenient security.

Image: Customizing the automatic lock time.
6.4 Anti-Peeping Passcode
To enhance security, you can enter random digits before or after your actual passcode. This prevents others from guessing your code by observing your finger movements.

Image: Anti-peeping password feature for enhanced keypad security.
6.5 Smart Home Integration (Alexa/Google Assistant)
The SMONET Smart Lock supports integration with Amazon Alexa and Google Home Assistant for voice control. This functionality requires an optional gateway, which is sold separately.

Image: The smart lock is compatible with Alexa (gateway required, sold separately).
7. Maintenance
- Cleaning: Wipe the lock's exterior with a soft, dry cloth. Avoid abrasive cleaners or solvents.
- Battery Replacement: Replace all four AA batteries when the low battery indicator appears or when the lock's response time slows.
- Fingerprint Sensor: Ensure your finger is clean and dry when using the fingerprint sensor for optimal recognition.
- Firmware Updates: Check the SMONET app periodically for available firmware updates to ensure optimal performance and security.
8. Troubleshooting
- Lock not responding: Check battery levels and replace if necessary. Ensure the lock is properly installed and all connections are secure.
- Fingerprint not recognized: Ensure your finger is clean and dry. Try enrolling the same fingerprint multiple times from different angles and positions.
- Keypad not working: Verify battery levels. Ensure no debris is obstructing the keypad.
- App connectivity issues: Ensure Bluetooth is enabled on your smartphone and you are within range of the lock. Restart the app or your phone if necessary.
- Auto-lock not engaging: Check the auto-lock settings in the smartphone app to ensure it is enabled and configured correctly.
- Physical key not working smoothly: Ensure the lock mechanism is clean and free of obstructions. Do not force the key.
For further assistance, refer to the contact information in the Support section.
9. Warranty and Support
9.1 Warranty Information
SMONET provides a 1-year warranty for the smart lock from the date of purchase. This warranty covers manufacturing defects and malfunctions under normal use.
9.2 Customer Support
For any questions regarding installation, app issues, or additional information about the gateway, please contact SMONET customer support:
- Email: service@smonet.com
- Toll Free: 1-(888)-572-0797
- Life-time free technical support is available from the date of purchase.
Ask a question about this manual
Ask about setup, troubleshooting, compatibility, parts, safety, or missing instructions. Manuals+ will review the question and use this page’s manual context to help answer it.