Besuso 500321326
Besuso M9 Motorcycle Tire Pressure Monitoring System User Manual
Model: 500321326
Introduction
This manual provides comprehensive instructions for the installation, operation, and maintenance of your Besuso M9 Motorcycle Tire Pressure Monitoring System (TPMS). This system is designed to enhance riding safety by providing real-time tire pressure and temperature data, alerting you to potential issues before they become critical. Please read this manual thoroughly before using the device to ensure proper function and longevity.
Safety Information
- Ensure all components are securely installed before riding.
- Do not attempt to adjust or repair the system while the motorcycle is in motion.
- Regularly check tire pressure with a calibrated gauge, as the TPMS provides an indication and should not replace manual checks.
- Keep the display unit away from direct sunlight for prolonged periods when not in use to prevent overheating.
- Consult a professional mechanic if you are unsure about any installation steps.
Package Contents
Verify that all items listed below are present in your package:
- 1x Motorcycle Tire Pressure Monitoring Display Unit
- 1x Bracket for Display Unit
- 2x External Tire Pressure Sensors
- 1x English User Manual
- 1x Mounting Accessory Kit (includes nuts, wrench, etc.)
Product Overview
The Besuso M9 TPMS features a colorful LCD screen for clear data display and is powered by both solar energy and USB. It provides real-time monitoring and multiple alarm modes for enhanced safety.

Figure 1: The Besuso M9 TPMS display unit, showing its colorful LCD screen with tire pressure and temperature readings.
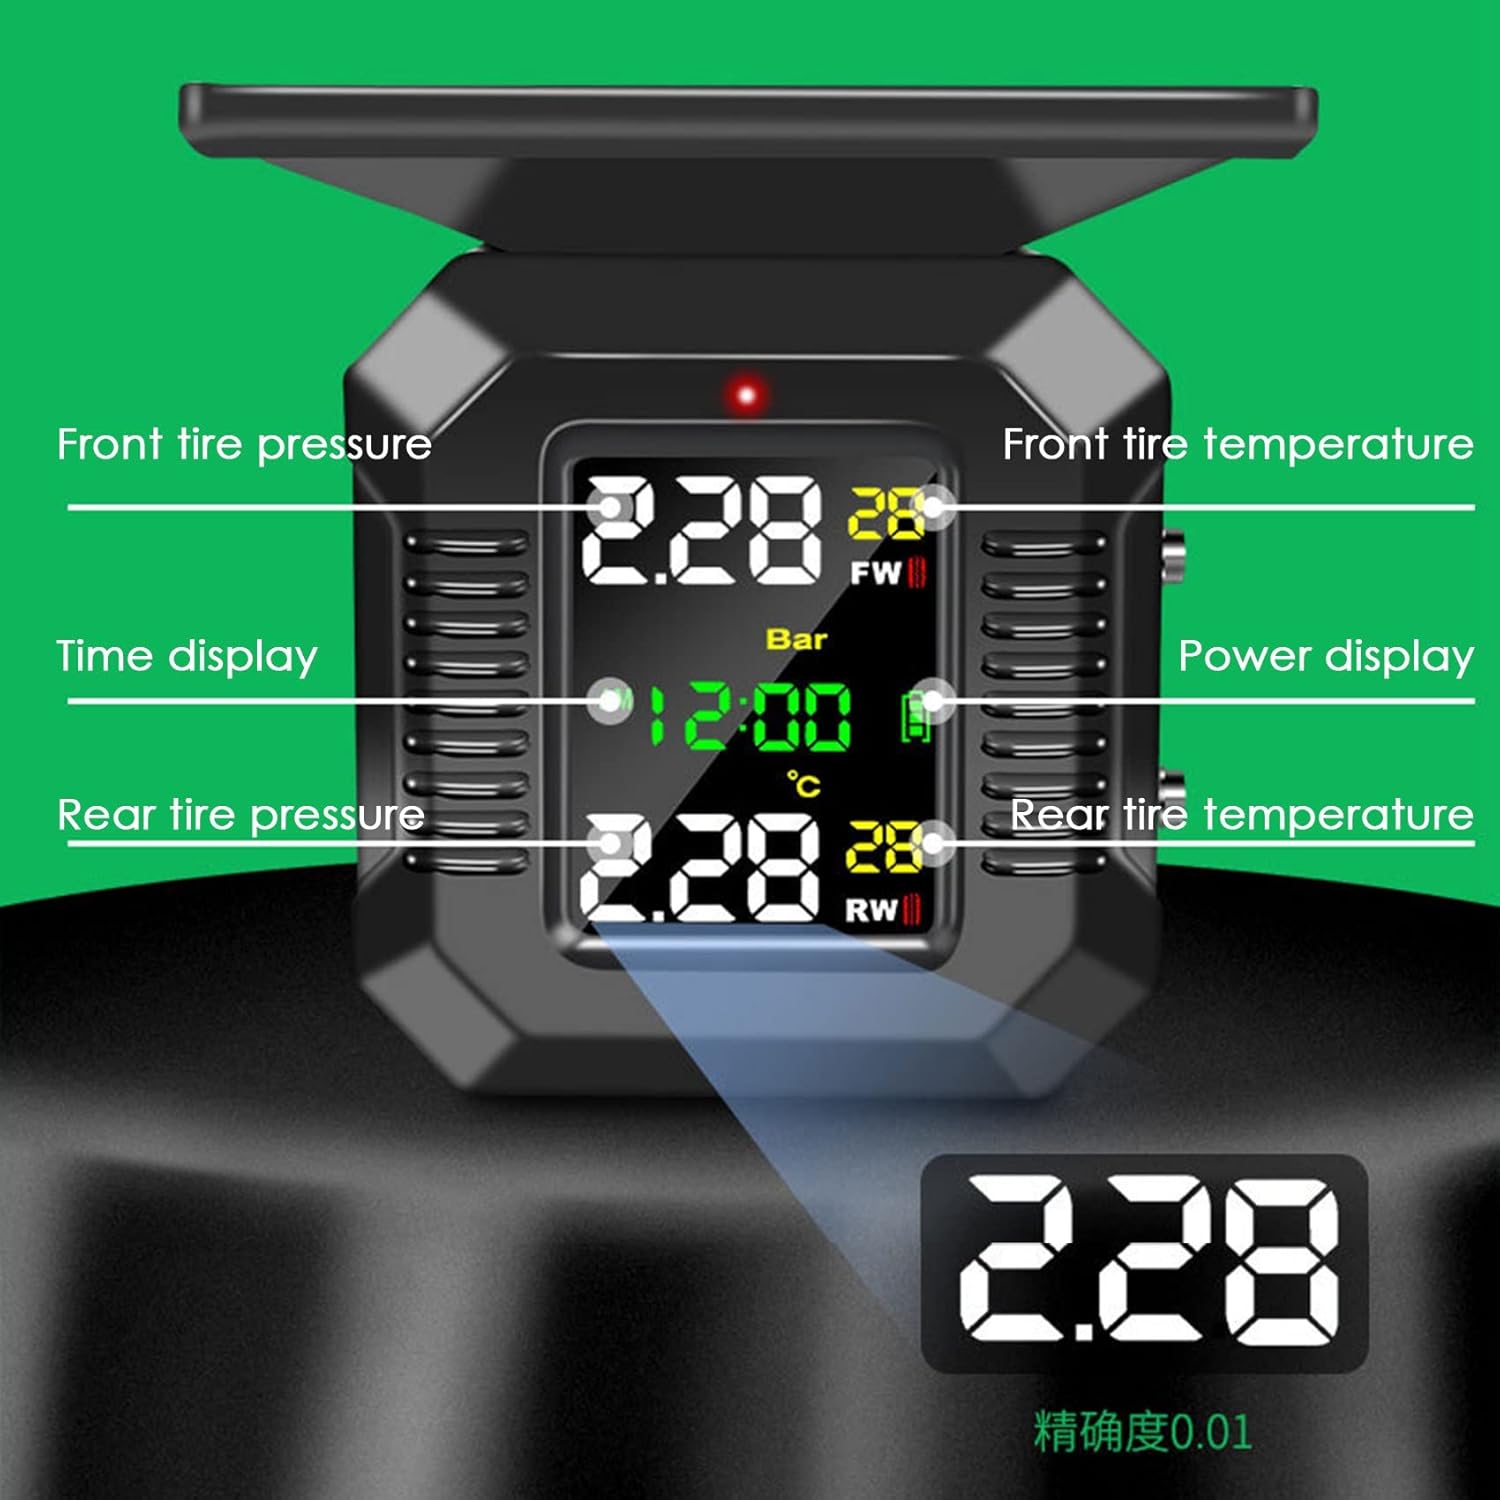
Figure 2: Detailed view of the Besuso M9 TPMS display, indicating locations for front tire pressure, front tire temperature, time display, power display, rear tire pressure, and rear tire temperature.
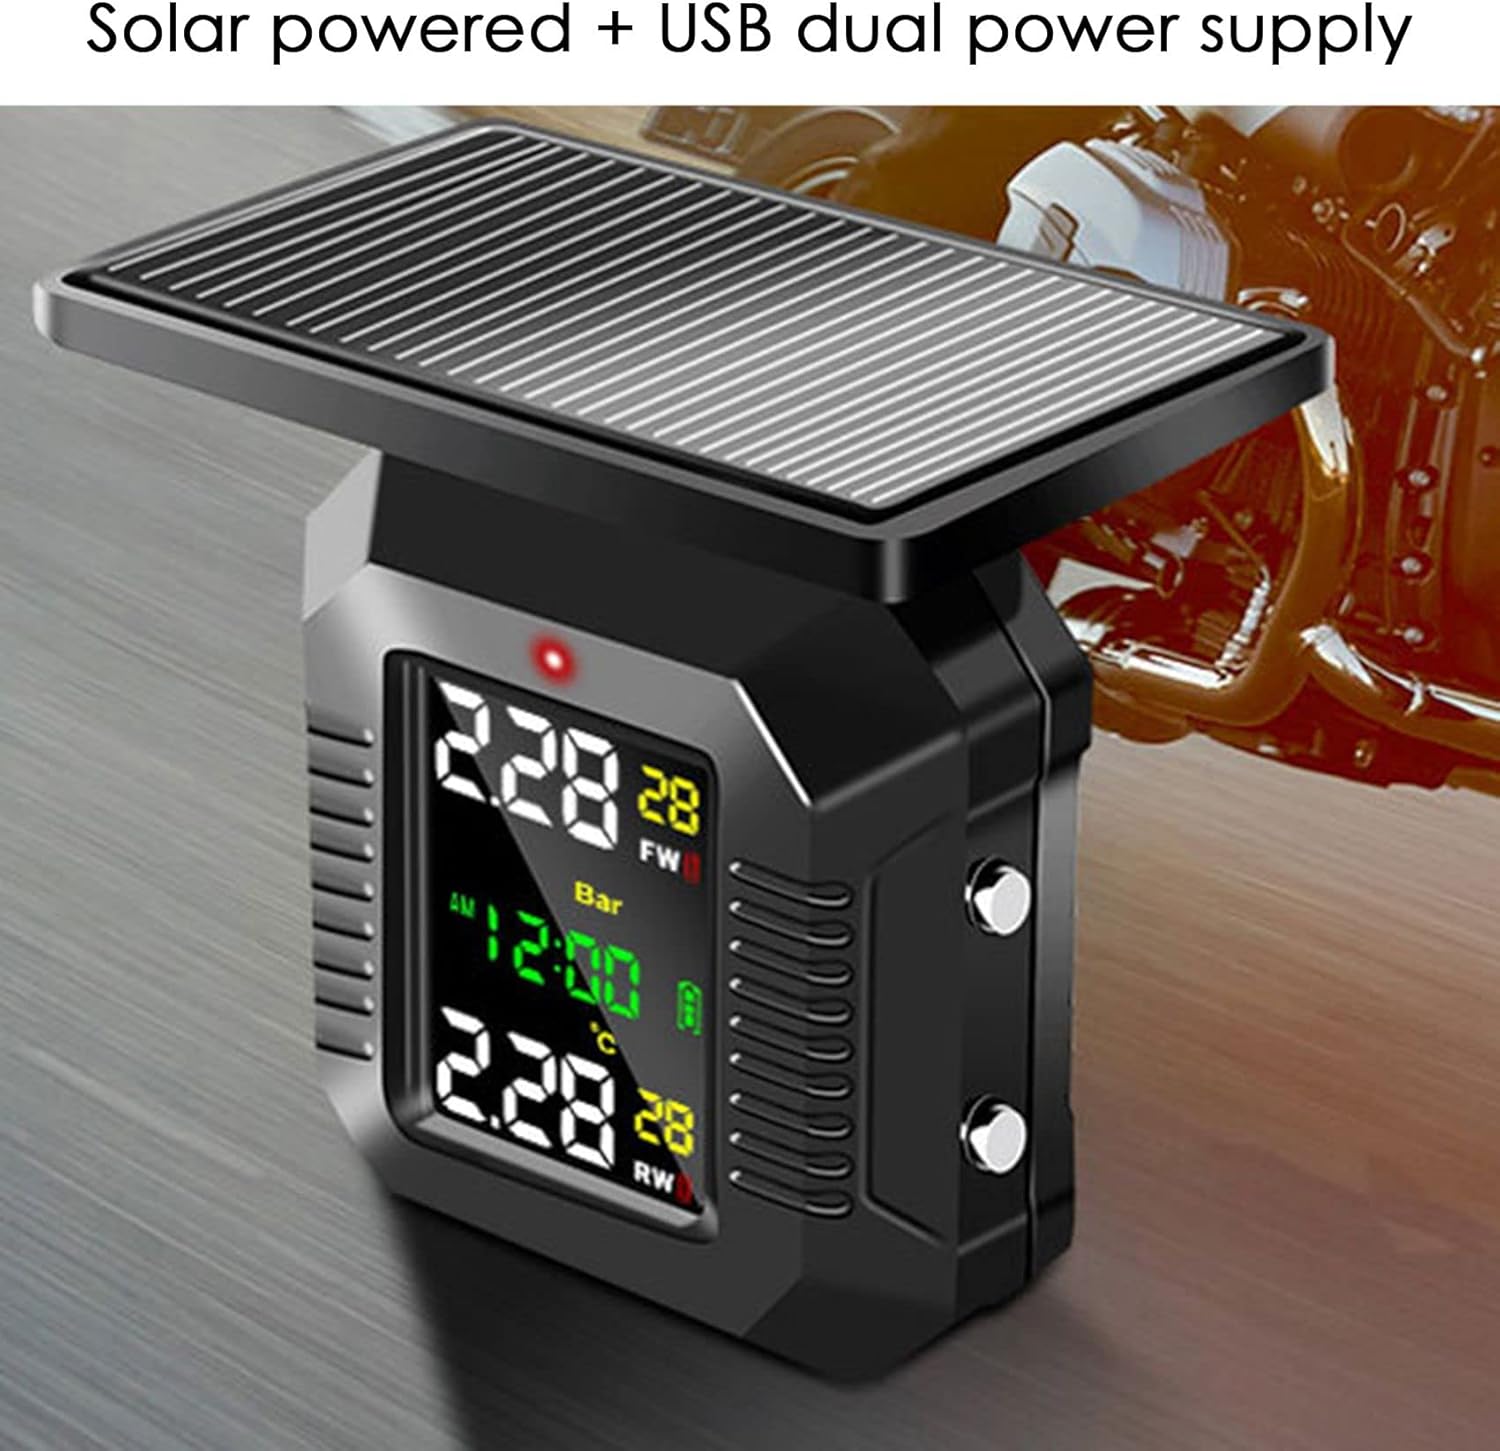
Figure 3: The Besuso M9 TPMS unit highlighting its dual power supply capability: solar charging via the top panel and USB charging port.

Figure 4: The Besuso M9 TPMS display showcasing its high definition and high brightness FSTNP screen, ensuring clear visibility.

Figure 5: The Besuso M9 TPMS mounted on a motorcycle handlebar, demonstrating its deeply waterproof and effective anti-dust capabilities, suitable for various weather conditions.
Setup and Installation
1. Charging the Display Unit
Before first use, fully charge the display unit using the provided USB cable. The unit also features a solar panel for continuous charging during daylight hours.
2. Installing the Bracket
Attach the bracket to a suitable location on your motorcycle's handlebar. Ensure it is securely fastened and provides a clear view of the display unit without obstructing your riding view.

Figure 6: The Besuso M9 TPMS display unit mounted on a motorcycle, illustrating its compact size and placement near the handlebars.
3. Installing the Sensors
The two external sensors are labeled for front (FW) and rear (RW) tires. Screw each sensor onto the corresponding tire valve stem. Use the provided wrench to tighten the sensors securely to prevent air leakage and ensure proper data transmission. Ensure the valve caps are replaced after installation.
4. Pairing (if necessary)
The sensors are typically pre-paired with the display unit. If pairing is required, refer to the specific instructions in the included English manual for the pairing procedure. Generally, this involves entering a pairing mode on the display and rotating the tires to activate the sensors.
Operating Instructions
1. Power On/Off
The unit automatically powers on when vibration is detected (e.g., when the motorcycle starts moving) and enters a dormant state when stationary for a period. Manual power buttons may also be present for direct control.
2. Display Information
The colorful LCD screen displays real-time data for both front and rear tires, including:
- Tire Pressure: Shown in Bar (or other selected unit).
- Tire Temperature: Shown in Celsius (or other selected unit).
- Time: Current time.
- Battery Level: For the display unit and individual sensors.
3. Alarm Modes
The system is equipped with 7 alarm modes to alert you to potential tire issues:
- High Pressure Alarm: Alerts when tire pressure exceeds a preset high limit.
- Low Pressure Alarm: Alerts when tire pressure drops below a preset low limit.
- High Temperature Alarm: Alerts when tire temperature exceeds a preset high limit.
- Fast Leakage Alarm: Alerts rapidly if a sudden drop in pressure is detected.
- Sensor Data Loss Alarm: Indicates a sensor is not transmitting data.
- Sensor Low Battery Alarm: Alerts when a sensor's battery is low.
- Receiver Low Battery Alarm: Alerts when the display unit's battery is low.

Figure 7: The Besuso M9 TPMS indicating its voice alarm feature, with examples of alerts such as low front wheel air pressure, front wheel air leakage, high front temperature, and low front sensor power.
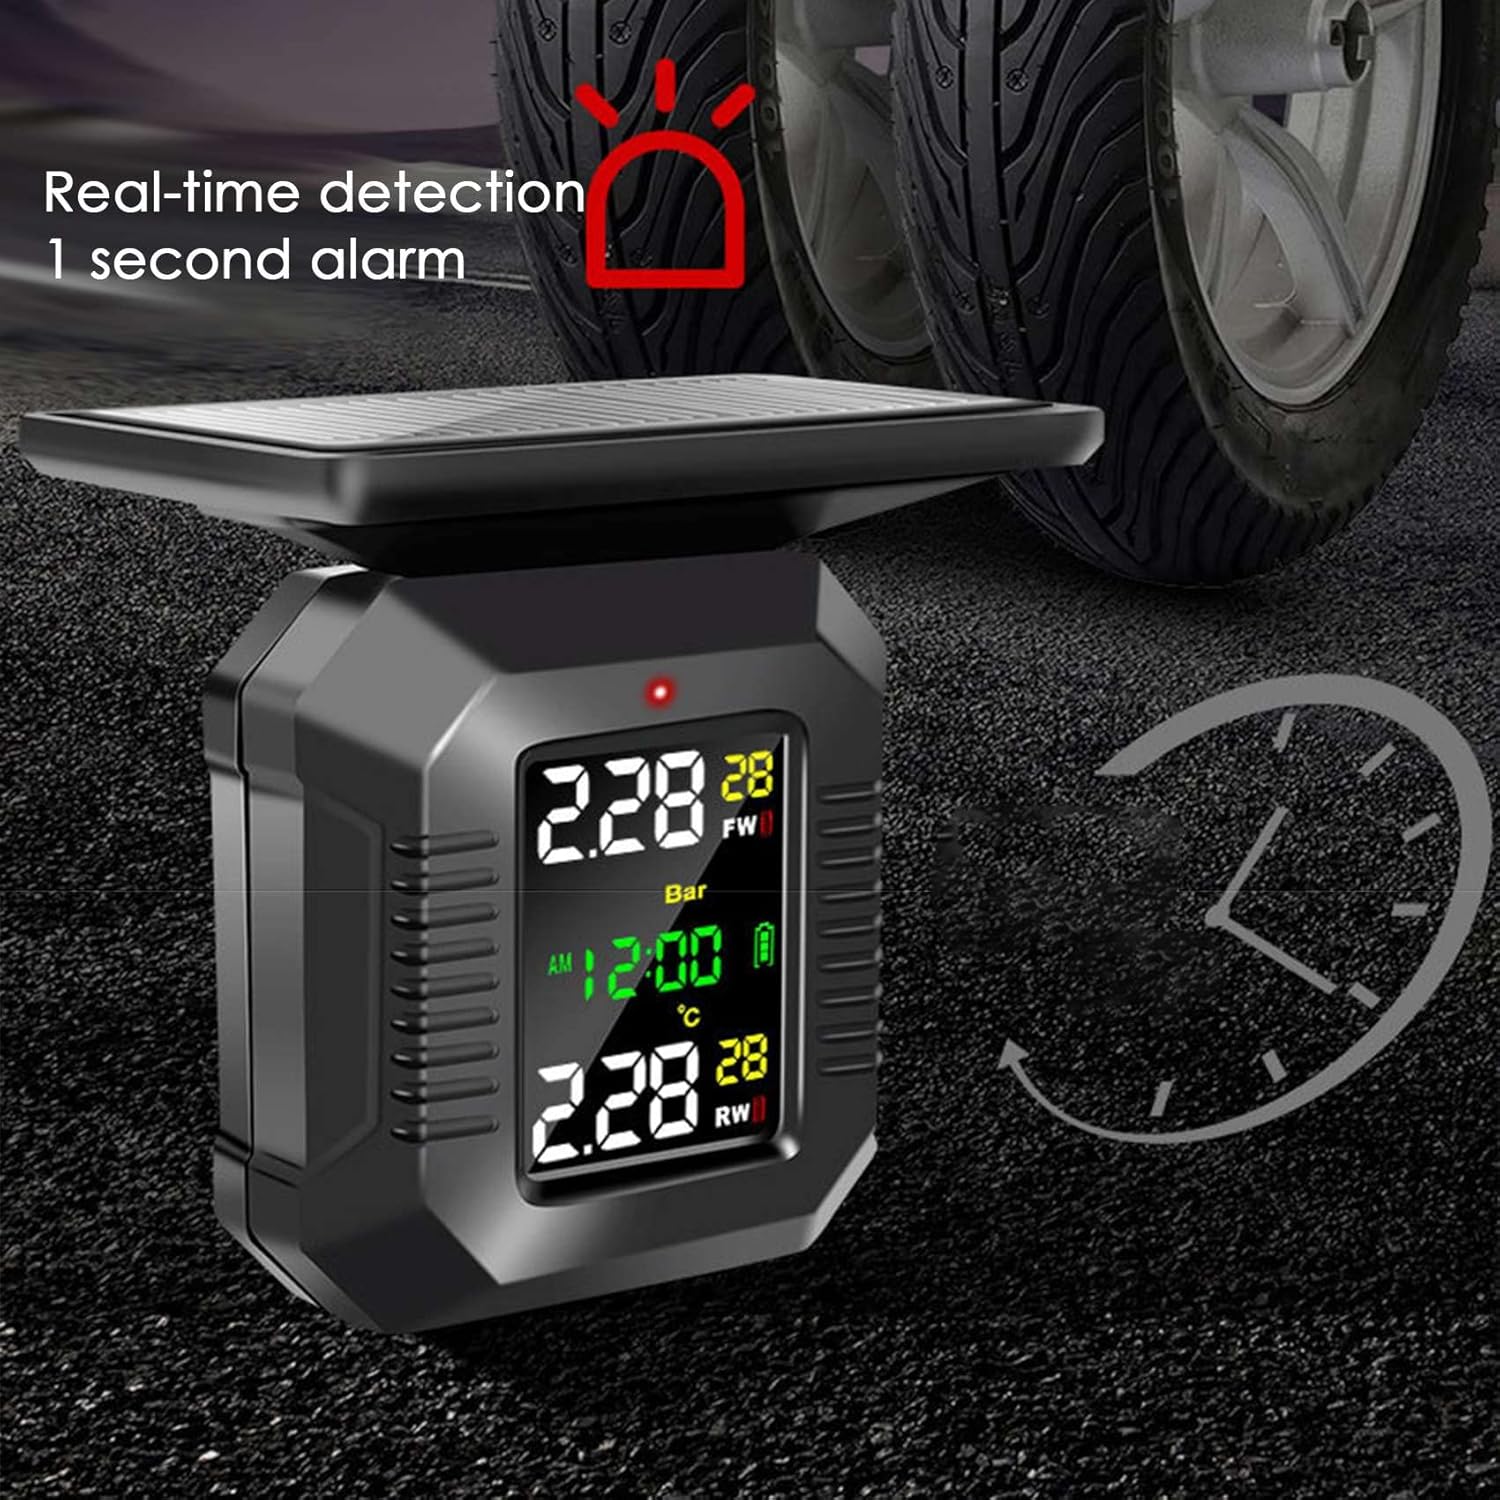
Figure 8: The Besuso M9 TPMS demonstrating its real-time detection capability with a 1-second alarm response for critical tire conditions.
4. Setting Parameters (Pressure/Temperature Units, Alarm Thresholds)
Refer to the detailed instructions in the included English manual for how to access the settings menu to change pressure units (e.g., Bar, PSI), temperature units (Celsius, Fahrenheit), and to set custom high/low pressure and temperature alarm thresholds.
Maintenance
- Cleaning: Wipe the display unit and sensors with a soft, damp cloth. Do not use abrasive cleaners or solvents.
- Battery Life: The display unit's solar panel helps maintain charge. For sensors, replace batteries when the low battery alarm is triggered. Refer to the manual for sensor battery replacement instructions.
- Storage: When not in use for extended periods, store the unit in a cool, dry place. Ensure the display unit is fully charged before storage.
Troubleshooting
| Problem | Possible Cause | Solution |
|---|---|---|
| Display not turning on. | Low battery; unit in dormant mode. | Charge the unit via USB. Move the motorcycle to activate. |
| No tire data displayed. | Sensors not installed correctly; sensors not paired; sensor battery low. | Ensure sensors are tightly screwed on. Re-pair sensors if necessary. Replace sensor batteries. |
| Inaccurate readings. | Sensor not fully seated; external interference. | Re-tighten sensors. Check for strong electromagnetic interference sources. |
| Alarm sounds frequently. | Tire pressure/temperature outside set limits; limits set too narrowly. | Check actual tire pressure/temperature. Adjust alarm thresholds if appropriate for your tires. |
Specifications
| Feature | Detail |
|---|---|
| Product Name | Motorcycle Tire Pressure Monitor |
| Model | M9 (500321326) |
| Display Type | LCD Color Screen |
| Working Voltage | 3.7-5 V |
| Working Temperature | -20 ℃ to 75 ℃ (-4 ℉ to 167 ℉) |
| Storage Temperature | -30 ℃ to 80 ℃ (-22 ℉ to 176 ℉) |
| Working Current | Less than 7 mA |
| Transmission Frequency | 433.92 MHz ± 50 kHz |
| Signal Receiving Sensitivity | -90 dBm |
| Dimensions | 20 x 12 x 6 cm (approx.) |
| Power Supply | Solar / USB Dual Power Supply |
Warranty and Support
For warranty information and technical support, please refer to the contact details provided with your purchase or visit the official Besuso website. Keep your purchase receipt as proof of purchase for any warranty claims.
For further assistance, you may contact Besuso customer service through their official channels. Please have your product model number (M9 or 500321326) ready when contacting support.
Ask a question about this manual
Ask about setup, troubleshooting, compatibility, parts, safety, or missing instructions. Manuals+ will review the question and use this page’s manual context to help answer it.