1. Introduction
This manual provides detailed instructions for the assembly, operation, maintenance, and troubleshooting of your Gruwans Queen Size Bed Frame with Upholstered Wingback Headboard, model YH1001-Q. Please read these instructions carefully before beginning assembly and retain this manual for future reference.

Image 1.1: Fully assembled Gruwans Queen Size Bed Frame in Cream Velvet.
2. Safety Information
- Assembly: Assemble the bed frame strictly according to the instructions provided to ensure the stated weight capacity of up to 900 lbs.
- Component Check: Upon receipt, carefully check all components and accessories to ensure completeness and inspect for any damage. Do not proceed with assembly if parts are missing or damaged.
- Color Variation: Be aware that slight color differences may occur between the product and images due to lighting conditions and individual monitor settings.
- Size Variation: Minor size variations may exist but will not affect the normal use or structural integrity of the bed frame.
- Stability: The bed frame features a metal support rod and legs designed to prevent sagging and squeaking, ensuring a stable sleeping surface.
- Contact: For any concerns or issues, contact the manufacturer directly.
3. Package Contents
Before assembly, ensure all parts listed below are present. It is recommended to lay out all components on a soft, clean surface to prevent scratches.
- Upholstered Wingback Headboard
- Side Rails (Left and Right)
- Footboard
- Wooden Slats with Velcro
- Center Support Beam
- Support Legs (for frame and center beam)
- Hardware Pack (bolts, washers, nuts, Allen wrench)

Image 3.1: Key structural components including Velcro slats, sturdy legs, and metal support.
4. Assembly Instructions
The Gruwans Queen Size Bed Frame is designed for easy assembly, typically completed within 30 minutes. All necessary tools are included. It is recommended to have two people for assembly.
- Unpack Components: Carefully remove all parts from the carton and place them on a soft, flat surface to prevent damage.
- Attach Side Rails to Headboard: Align the side rails with the pre-drilled holes on the headboard. Secure them using the provided bolts and Allen wrench. Do not fully tighten bolts until all major components are connected.
- Attach Side Rails to Footboard: Connect the other end of the side rails to the footboard, aligning holes and securing with bolts.
- Install Center Support Beam: Place the center support beam along the length of the bed frame, connecting it to the headboard and footboard brackets. Attach any central support legs to this beam.
- Attach Frame Support Legs: Screw the remaining support legs into the designated points on the side rails and footboard.
- Install Wooden Slats: Unroll the wooden slats across the bed frame. The slats are designed with Velcro for easy and secure attachment to the side rails. Ensure slats are evenly spaced and firmly attached.
- Final Tightening: Once all components are in place and aligned, fully tighten all bolts using the Allen wrench.

Image 4.1: Detail of wooden slats with Velcro for secure mattress support.

Image 4.2: Detail of a sturdy bed leg attachment.
5. Usage
This platform bed frame is designed to support your mattress directly, eliminating the need for a box spring. The wooden slat base provides breathable support for your mattress, distributing weight evenly.

Image 5.1: The bed frame supports a mattress directly, no box spring required.
Under-Bed Clearance
The bed frame offers 6.3 inches of clearance from the ground to the item, providing space for under-bed storage.

Image 5.2: Illustration of 6.3 inches of under-bed clearance.
6. Maintenance
Upholstered Headboard Care
The headboard is upholstered with skin-friendly velvet fabric. To maintain its appearance:
- Regular Cleaning: Gently vacuum the fabric periodically using an upholstery attachment to remove dust and debris.
- Spot Cleaning: For spills, blot immediately with a clean, dry cloth. For stubborn stains, use a mild fabric cleaner specifically designed for velvet, testing on an inconspicuous area first.
- Avoid Direct Sunlight: Prolonged exposure to direct sunlight can cause fading.

Image 6.1: Detail of the velvet upholstered headboard.
Frame and Slats Care
- Dusting: Wipe down the frame and legs with a soft, damp cloth.
- Check Connections: Periodically check all bolts and connections to ensure they remain tight. Retighten if necessary to maintain stability and prevent squeaking.
- Avoid Harsh Chemicals: Do not use abrasive cleaners or harsh chemicals on any part of the bed frame.
7. Troubleshooting
- Squeaking Noises: If the bed frame squeaks, check all bolts and connections. Tighten any loose hardware. Ensure the center support beam and its legs are properly installed and making firm contact with the floor.
- Unstable Frame: Verify that all components are correctly assembled according to the instructions and that all bolts are fully tightened. Ensure the bed is on a level surface.
- Mattress Sagging: Confirm that the wooden slats are evenly spaced and securely attached to the frame via the Velcro. Ensure the center support beam is correctly positioned and its legs are providing adequate support.
- Missing or Damaged Parts: If you discover any missing or damaged parts during assembly, do not attempt to force assembly. Contact Gruwans customer service immediately for replacement parts.
8. Specifications
| Model Number | YH1001-Q |
| Brand | Gruwans |
| Size | Queen |
| Color | Cream Velvet |
| Product Dimensions (L x W x H) | 82.07" x 60.63" x 41.34" |
| Weight Limit | 900 Pounds |
| Upholstery Fabric Type | Velvet |
| Special Feature | Squeak Resistant |
| Assembly Required | Yes |
| Ground To Item Distance | 6.3 Inches |
| Item Weight | 59.9 pounds |
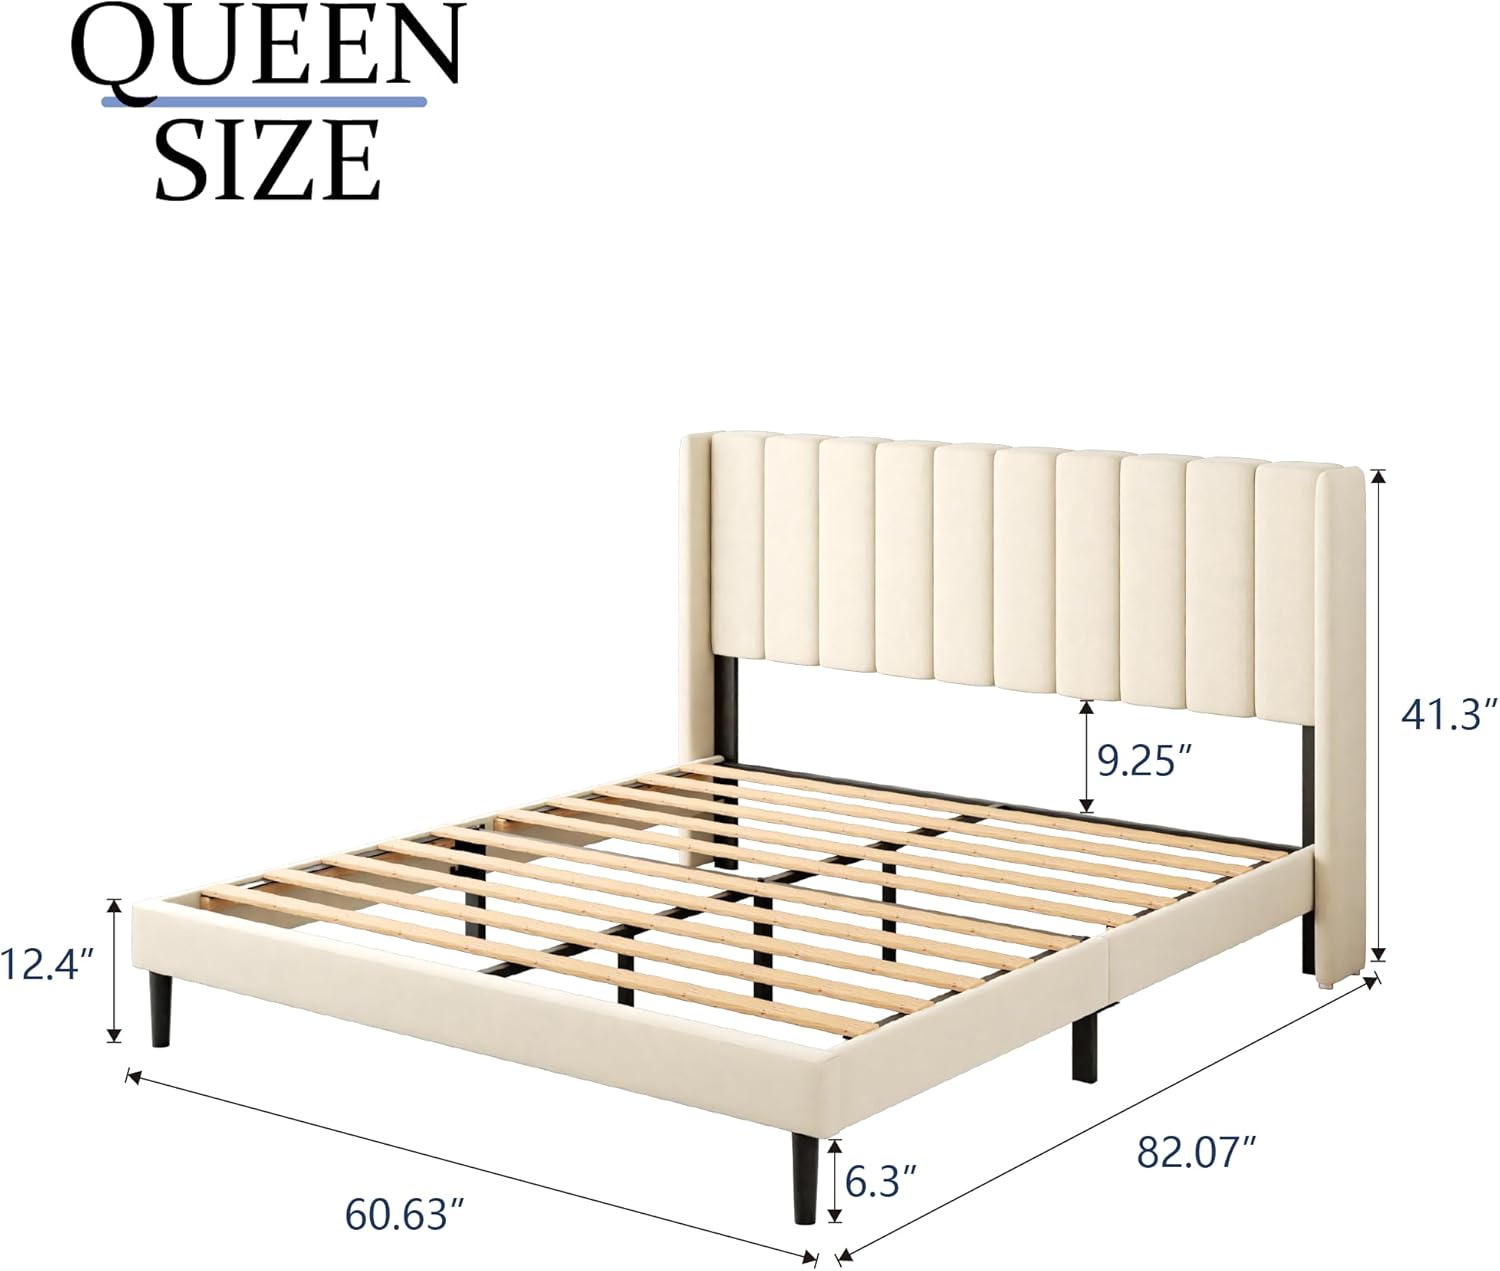
Image 8.1: Detailed dimensions for the Queen size bed frame.
9. Warranty and Support
Gruwans offers a 12-month warranty for this product. This warranty covers manufacturing defects and ensures free replacement parts for eligible issues. Our goal is to ensure your satisfaction with our products and services.
Customer Service
If you have any questions, require assistance with assembly, or need to claim warranty service, please contact Gruwans customer support. We are committed to resolving your problems as quickly as possible.
Please refer to your purchase documentation or the Gruwans official website for specific contact information.