Introduction
The TRIOCOTTAGE M12 Lab Incubator is designed for hatching various types of eggs, including chicken, quail, duck, and bird eggs. This professional and user-friendly incubator provides an optimal environment for egg development, making it suitable for laboratory research, educational projects, and scientific experiments. Its features include a 360° transparent lid for observation, an LED display, automatic egg turning, automatic water replenishment, precise temperature control, and a built-in fan.

Figure 1: Overview of the TRIOCOTTAGE M12 Lab Incubator, showing its compact design, transparent dome, and external water replenishment system.
Product Features
- Temperature Display and Adjustment: Equipped with a precise temperature control system. The turbo duct and 24 air outlets ensure even temperature distribution inside the incubator, preventing direct airflow onto fertilized eggs. An external insulator enhances low-temperature hatching rates.
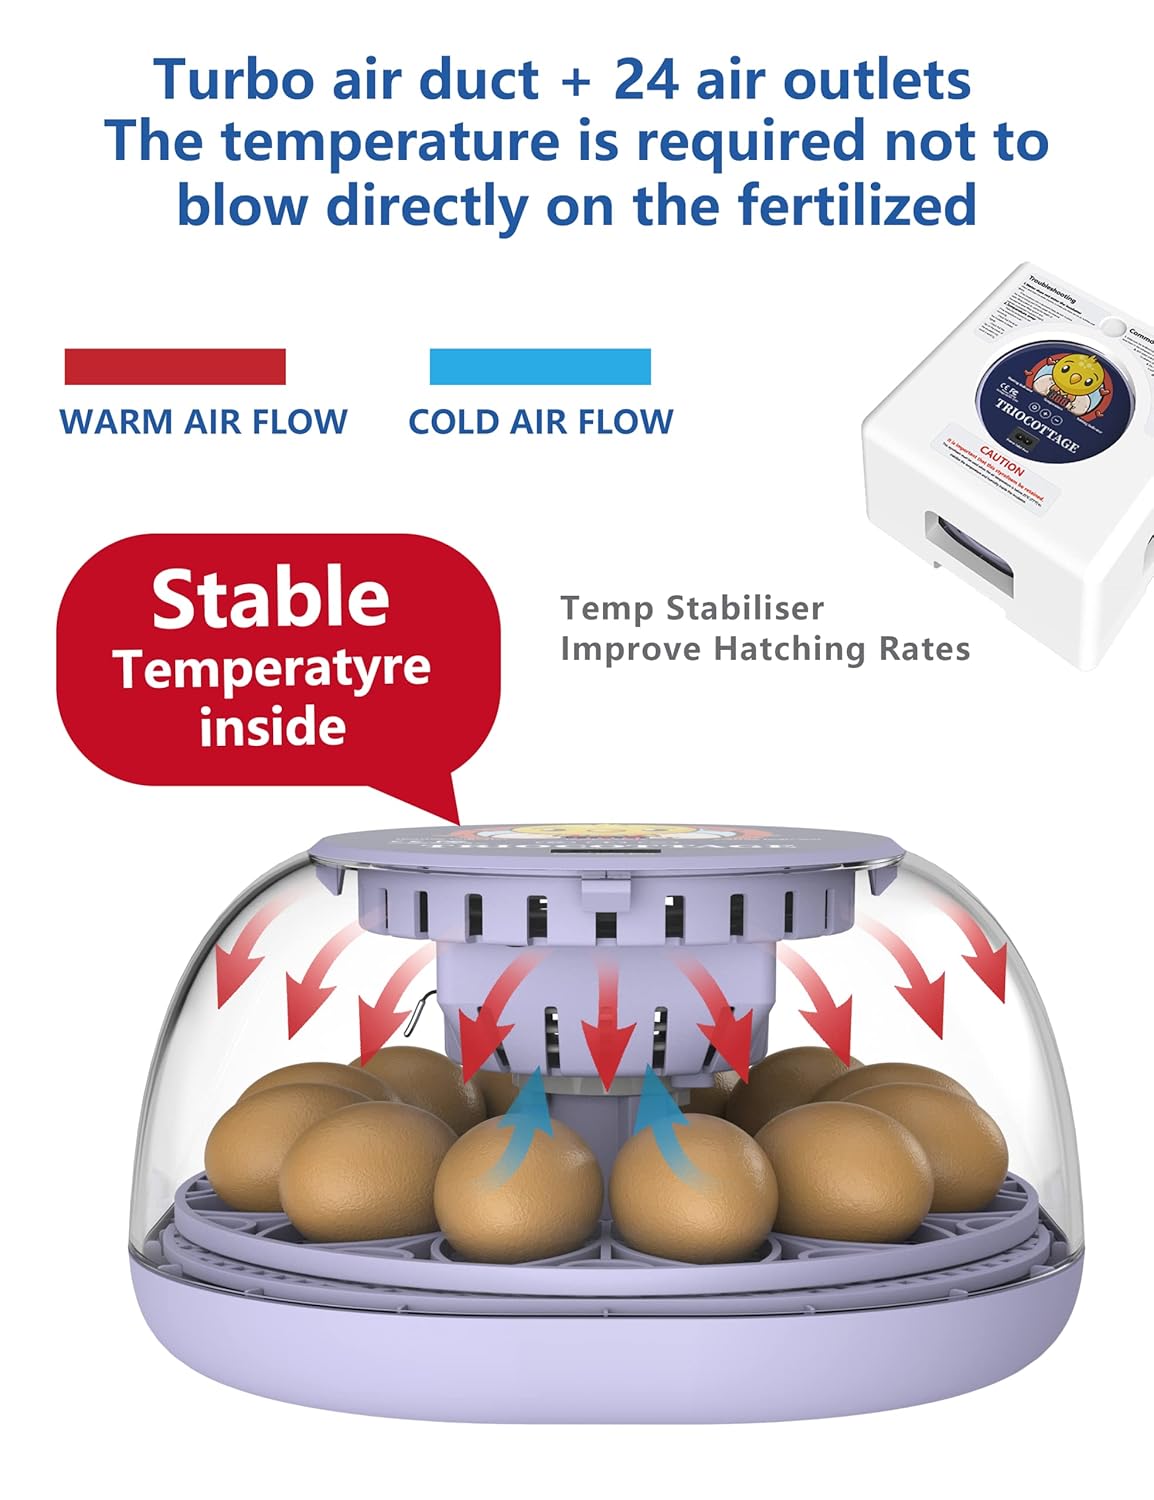
Figure 2: Illustration of the internal air circulation system, demonstrating how the turbo air duct and multiple outlets maintain a stable and uniform temperature around the eggs.
- Automatic Water Replenishment: An automatic gravity waterer facilitates continuous water supply, reducing the need for manual refills and minimizing temperature fluctuations caused by opening the lid.
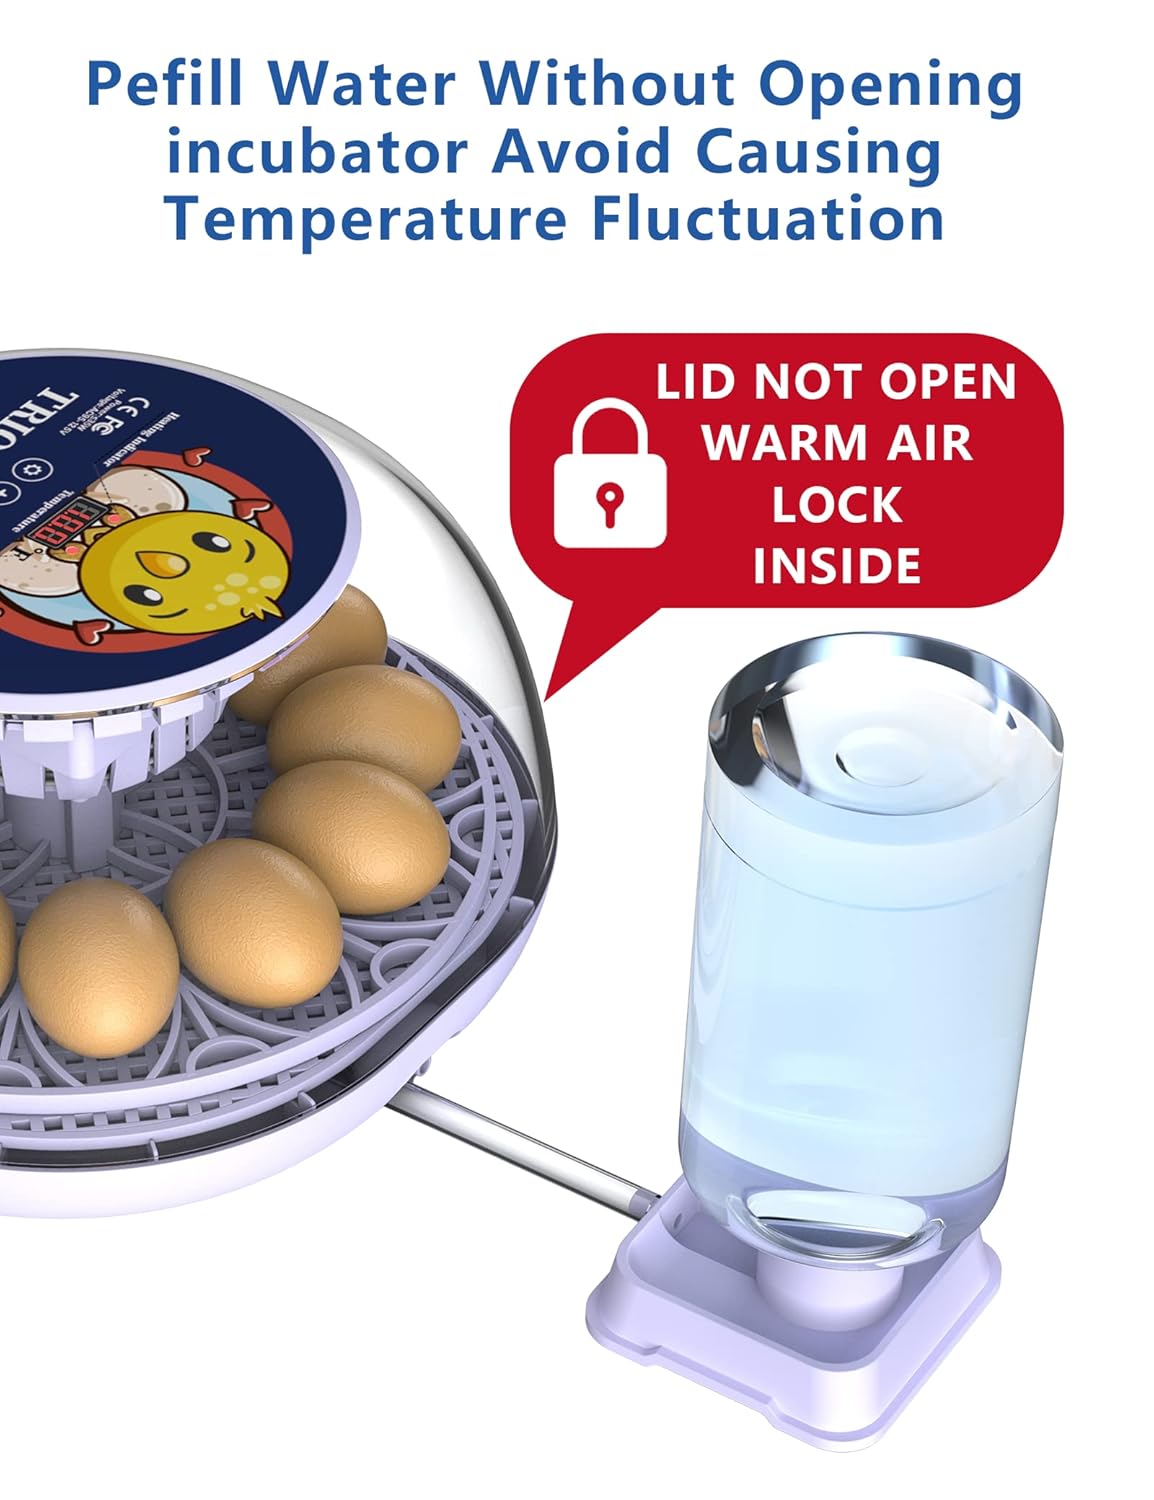
Figure 3: The automatic water replenishment system, highlighting its design to allow water addition without disturbing the internal environment of the incubator.
- 360° View: Features a fully transparent panel, offering a larger and clearer observation field. The curved design of the panel provides ample space for chicks to move after hatching.

Figure 4: The transparent lid allows for continuous, real-time observation of the egg hatching process, providing an unobstructed view of the developing chicks.
- Automatic Egg Rotation: The incubator includes an automatic egg turning function that mimics natural hatching processes, eliminating the need for frequent manual egg rotation. This feature operates at regular intervals with an auto-stop mechanism.

Figure 5: Depiction of the automatic egg turning mechanism, illustrating how eggs are gently rotated to ensure even development and prevent embryo adhesion.
- Hatchable Eggs: Suitable for various egg types, including chicken eggs, quail eggs, duck eggs, and bird eggs.
- Use Case: Ideal for laboratory research, experimental studies, educational projects, and scientific experiments.
Setup Instructions
- Unpacking: Carefully remove all components from the packaging. Verify that all parts are present: incubator base, egg turning tray, transparent lid, automatic water feeder bottle, and tubing.
- Placement: Place the incubator on a stable, level surface away from direct sunlight, drafts, and extreme temperature fluctuations. Ensure adequate ventilation around the unit.
- Assemble Water Feeder: Fill the automatic water feeder bottle with distilled or de-chlorinated water. Connect the tubing from the water bottle to the designated inlet on the incubator base. Ensure the connection is secure to prevent leaks.
- Power Connection: Connect the power adapter to the incubator's power inlet port. Plug the adapter into a suitable electrical outlet. The LED display will illuminate, indicating power.
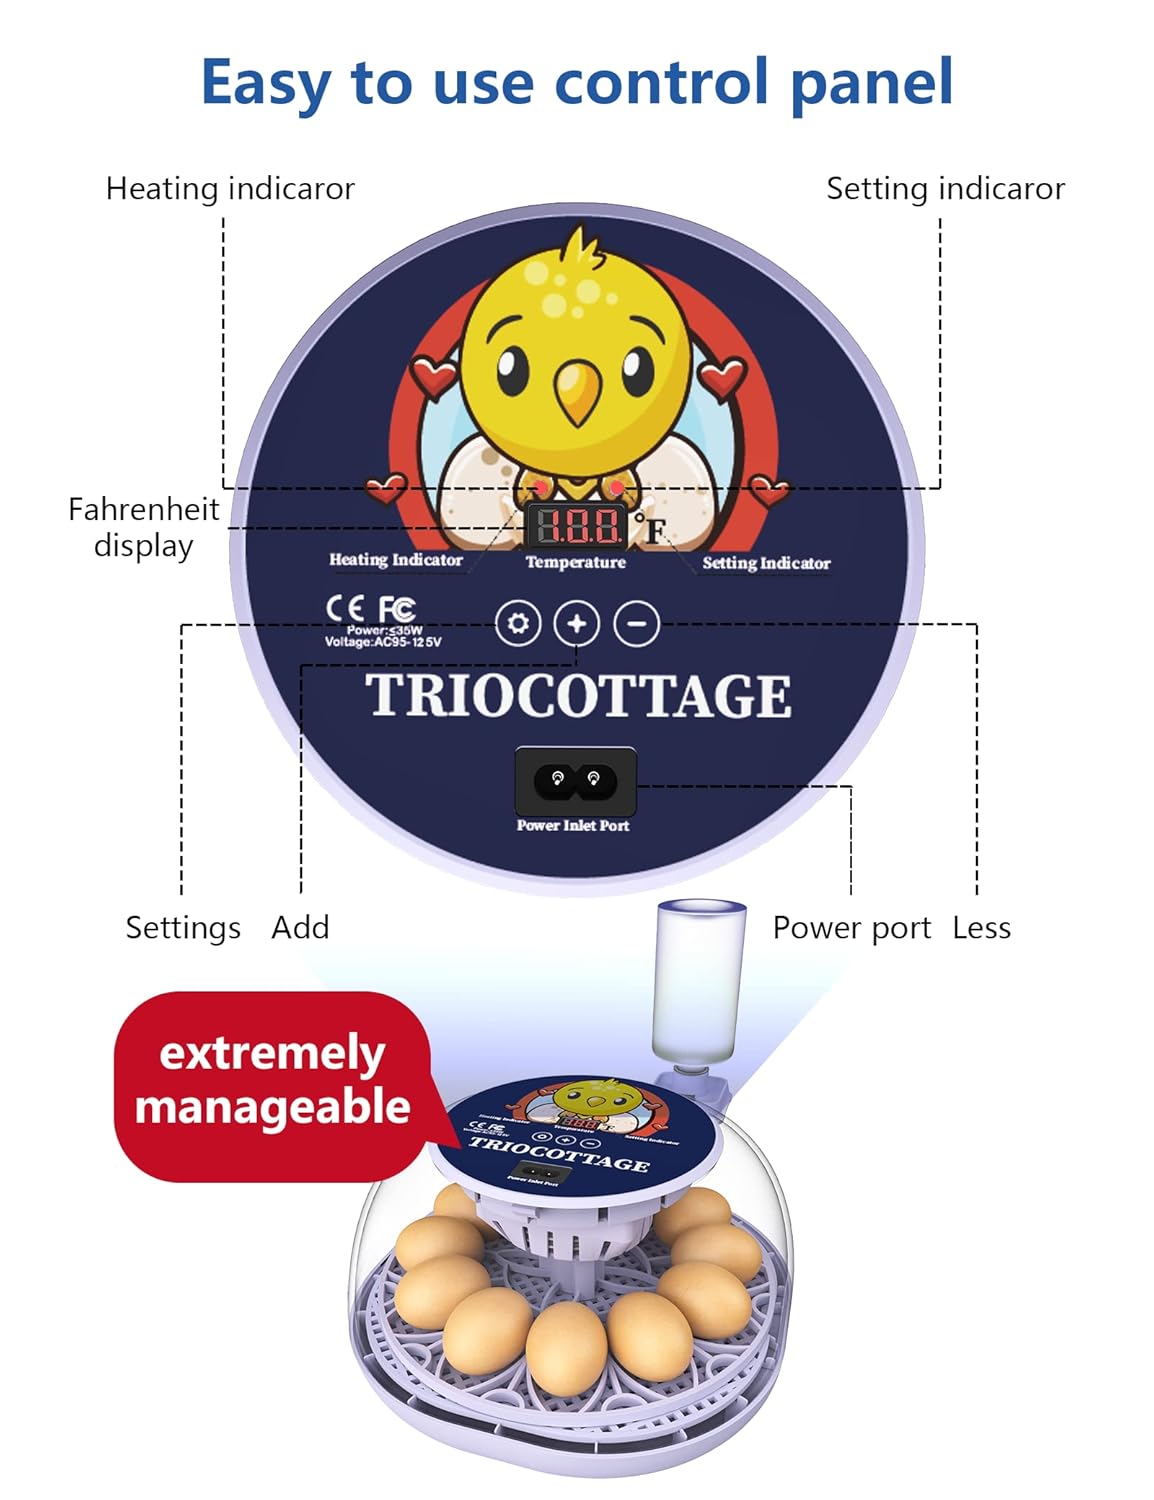
Figure 6: The easy-to-use control panel, detailing the temperature display, indicators, and power connection points for straightforward operation.
- Pre-heating and Stabilization: Allow the incubator to run for at least 2-3 hours (or preferably 24 hours) before placing eggs inside. This allows the internal temperature and humidity to stabilize at the desired settings. Use an external hygrometer/thermometer for verification if precise readings are critical.
Operating Instructions
- Setting Temperature: The incubator comes with default temperature settings suitable for most common eggs. Refer to the control panel (Figure 6) for temperature display. Adjust temperature using the '+' and '-' buttons if necessary, according to the specific requirements of the eggs being incubated.
- Egg Placement: Carefully place fertilized eggs onto the egg turning tray. Ensure eggs are positioned correctly within the slots to allow for proper automatic turning. The incubator can hold up to 12 chicken eggs or 24 quail eggs.
- Humidity Management: The automatic water replenishment system will maintain humidity. Monitor the water level in the external bottle and refill as needed. Avoid opening the lid frequently to prevent humidity and temperature fluctuations.
- Automatic Turning: The incubator's automatic turning function will rotate the eggs at regular intervals. This process is crucial for embryo development and prevents the embryo from sticking to the shell.
- Lockdown Period: Approximately 3 days before the expected hatch date, remove the egg turning tray. Place the eggs directly on the bottom grid of the incubator. Increase humidity slightly if recommended for the specific egg type. Do not open the lid during the lockdown period unless absolutely necessary.
- Hatching: Once chicks begin to hatch, allow them to dry and fluff up inside the incubator for several hours before transferring them to a brooder. Avoid assisting chicks unless absolutely necessary, as this can cause more harm than good.
Typical Incubation Periods:
- Chicken Eggs: Approximately 21 days
- Quail Eggs: Approximately 17-18 days
- Duck Eggs: Approximately 28 days (Muscovy ducks 35 days)
- Bird Eggs (general): Varies widely, consult specific species guidelines
Maintenance
- Cleaning: After each hatch, unplug the incubator and allow it to cool. Disassemble the lid, egg turning tray, and base. Clean all components with a mild disinfectant solution and warm water. Rinse thoroughly and allow to air dry completely before reassembly or storage. Do not immerse the electrical components in water.
- Water System: Periodically clean the water feeder bottle and tubing to prevent algae or mineral buildup.
- Storage: Store the incubator in a clean, dry place, away from direct sunlight and extreme temperatures.
Troubleshooting
| Problem | Possible Cause | Solution |
|---|---|---|
| Incubator not heating or powering on. | Power cord not properly connected; power outlet issue; unit malfunction. | Check power connections. Try a different outlet. If problem persists, contact support. |
| Temperature fluctuations or incorrect readings. | Incubator placed in drafty area; lid not sealed properly; external temperature variations; sensor issue. | Relocate incubator to a stable environment. Ensure lid is securely closed. Verify with an external thermometer. |
| Humidity too high or too low. | Water reservoir issues; environmental humidity; lid seal. | Ensure water bottle is correctly installed and filled. Check for leaks. Adjust room humidity if possible. Ensure lid is sealed. |
| Automatic egg turner not working. | Egg tray not properly seated; motor obstruction; unit malfunction. | Ensure the egg turning tray is correctly aligned and seated. Check for any obstructions. If the issue persists, contact support. |
| Low hatch rate. | Inconsistent temperature/humidity; infertile eggs; improper egg handling; premature opening of lid. | Verify and maintain stable temperature and humidity. Ensure eggs are fertile and handled correctly. Avoid opening the lid during critical periods. |
Specifications
| Attribute | Detail |
|---|---|
| Model Number | TRIOCOTTAGE 12-0001 |
| Brand | TRIOCOTTAGE |
| Capacity | 12 Chicken Eggs / 24 Quail Eggs |
| Dimensions (approx.) | 32.59 x 30.61 x 18.21 cm |
| Weight (approx.) | 200 g |
| Manufacturer | Triocottage |
| Country of Origin | China |
| First Available Date | Dec 14 2022 |
Warranty and Support
For product support, technical assistance, or warranty inquiries, please contact TRIOCOTTAGE customer service. While specific warranty terms may vary, the product is generally subject to standard manufacturer's warranty against defects in materials and workmanship.
Contact Information:
- Manufacturer: Triocottage
- Email: triocottage@outlook.com
- Amazon Store: TRIOCOTTAGE Store on Amazon.ca
Please retain your proof of purchase for any warranty claims.


