1. Introduction
This manual provides essential instructions for the safe and efficient operation of your TIBURN HQ Board 75" R2 MAX Smart Board. Please read this manual thoroughly before using the product and retain it for future reference. The TIBURN HQ Board is an all-in-one interactive display designed for office and classroom environments, featuring a 4K UHD touch screen, dual operating systems (Windows 11 Pro and Android 13), and integrated computing capabilities.

Image 1.1: The TIBURN HQ Board 75" R2 MAX Smart Board, showcasing its dual operating system capabilities with Windows 11 and Android 13 interfaces simultaneously.
2. Safety Information
Observe the following safety precautions to prevent damage to the product or injury to yourself and others:
- Power Supply: Use only the provided power adapter. Ensure the power outlet meets the specified voltage requirements.
- Ventilation: Do not block ventilation openings. Ensure adequate space around the device for proper airflow.
- Placement: Install the board on a stable surface or use the recommended wall mount/movable stand. Avoid placing it in direct sunlight, near heat sources, or in humid environments.
- Cleaning: Disconnect power before cleaning. Use a soft, dry cloth. Do not use liquid or aerosol cleaners directly on the screen.
- Servicing: Do not attempt to service this product yourself. Refer all servicing to qualified service personnel.
3. Package Contents
Verify that all items are present in the package:
- TIBURN HQ Board 75" Smart Board
- Windows 11 Pro Mini PC (pre-installed)
- Movable Stand (optional, may be packaged separately)
- Wall Mounting Bracket (optional, may be packaged separately)
- Whiteboard Remote Control
- Whiteboard Pens
- Power Cables and other necessary connection cables
- Markers

Image 3.1: Visual representation of the main components included with the TIBURN HQ Board 75" R2 MAX, such as the smart board, mini PC, wall mount, and movable stand.
4. Setup
4.1 Physical Installation
The TIBURN HQ Board can be installed using either a movable stand or a wall mount. Follow the instructions provided with the respective accessory for proper assembly and secure installation.
- Movable Stand Assembly: Attach the smart board to the movable stand according to the stand's specific instructions. Ensure all screws are tightened securely and the wheels are locked when stationary.
- Wall Mounting: Secure the wall mount bracket to a sturdy wall capable of supporting the board's weight. Attach the smart board to the bracket, ensuring it is level and firmly locked into place.
4.2 Connecting the Mini PC
The Mini PC is typically pre-installed. If not, locate the OPS slot on the back of the smart board and carefully insert the Mini PC until it is securely seated. Ensure all necessary internal connections are made.

Image 4.1: Detail of the OPS slot on the rear of the TIBURN HQ Board, illustrating how the Mini PC integrates into the system.
4.3 Initial Power On
- Connect the power cable to the smart board and then to a power outlet.
- Press the power button, usually located on the side or bottom of the board.
- The board will boot up, typically starting with the Android system.
5. Operating Instructions
5.1 Dual System Operation (Android & Windows)
The TIBURN HQ Board features both Android 13 and Windows 11 Pro operating systems. You can switch between them seamlessly.
- Switching Systems: A dedicated button or on-screen icon allows you to toggle between Android and Windows. When in Android, you can access the Windows system, and vice-versa.
- Android 13: Provides a robust app ecosystem for quick access to tools and media.
- Windows 11 Pro: Offers full PC functionality, allowing you to run professional software like AutoCAD, Microsoft Teams, and other Windows-compatible applications.

Image 5.1: The TIBURN HQ Board displaying both its Android and Windows operating system environments.
5.2 Touch Screen and Display Features
- 4K UHD Display: Enjoy high-resolution visuals for clear and detailed content.
- Automatic Light Sensation: The screen automatically adjusts its brightness based on ambient light conditions for optimal viewing comfort and energy efficiency.
- Multi-touch: The screen supports multiple touch points for interactive use.
5.3 Presenting and Annotation
The TIBURN HQ Board facilitates dynamic presentations and collaborative annotation.
- Wireless Screen Casting: Cast content wirelessly from up to four devices simultaneously using various standards (Miracast, Airplay, DLNA).
- HDMI Connectivity: Connect devices via HDMI for direct display.
- Built-in Annotation Software: Utilize the Android Annotation software to write notes or draw directly on any displayed content, whether from Android or Windows.

Image 5.2: The TIBURN HQ Board demonstrating its ability to display and annotate content from multiple wirelessly connected devices.
5.4 Connectivity
- Wi-Fi: Supports 2.4GHz and 5GHz Wi-Fi for high-speed internet access and data transfer.
- Ports: Includes various ports for external devices (e.g., USB, HDMI, Ethernet).
6. Maintenance
6.1 Cleaning
- Always power off and unplug the board before cleaning.
- Use a soft, lint-free cloth to gently wipe the screen and frame.
- For stubborn marks, lightly dampen the cloth with water or a screen-safe cleaning solution. Do not spray liquids directly onto the screen.
6.2 Software Updates
Regularly check for and install software updates for both Android and Windows to ensure optimal performance, security, and access to new features. Updates can typically be found in the system settings of each operating system.
7. Troubleshooting
If you encounter issues, refer to the following common problems and solutions:
| Problem | Possible Cause | Solution |
|---|---|---|
| No power | Power cable disconnected; Power outlet fault | Check power cable connections; Try a different outlet |
| Touch screen unresponsive | Software glitch; Calibration issue | Restart the board; Recalibrate touch screen (if option available in settings) |
| Cannot switch OS | System error | Restart the board; Ensure Mini PC is properly seated |
| No Wi-Fi connection | Wi-Fi module off; Router issue | Check Wi-Fi settings in both OS; Restart router |
| Screen casting fails | Network issue; Device incompatibility | Ensure devices are on the same network; Check casting app/feature on source device |
If the problem persists after attempting these solutions, please contact TIBURN customer support.
8. Specifications
Detailed technical specifications for the TIBURN HQ Board 75" R2 MAX:
| Feature | Detail |
|---|---|
| Brand | TIBURN |
| Model Number | TE-QS1M-75 (Manufacturer Part Number: TE-QS-75) |
| Screen Size | 75 inches |
| Display Resolution | 4K UHD |
| Operating Systems | Windows 11 Pro, Android 13 |
| Processor (Mini PC) | Intel 12th Gen I5-1250PE (4 Cores, up to 3.6GHz) |
| RAM | 16GB DDR4 |
| Storage | 256GB SSD |
| Wi-Fi | 2.4GHz + 5GHz (up to 1000Mbps) |
| Material Type | Metal |
| Color | Black |
| Item Weight | 334 pounds |
| Product Dimensions | 75 x 75 x 75 inches (Note: This dimension seems generic and might refer to packaging or overall setup, not just the screen) |
| Mounting Type | Wall Mount (Movable Stand also available) |
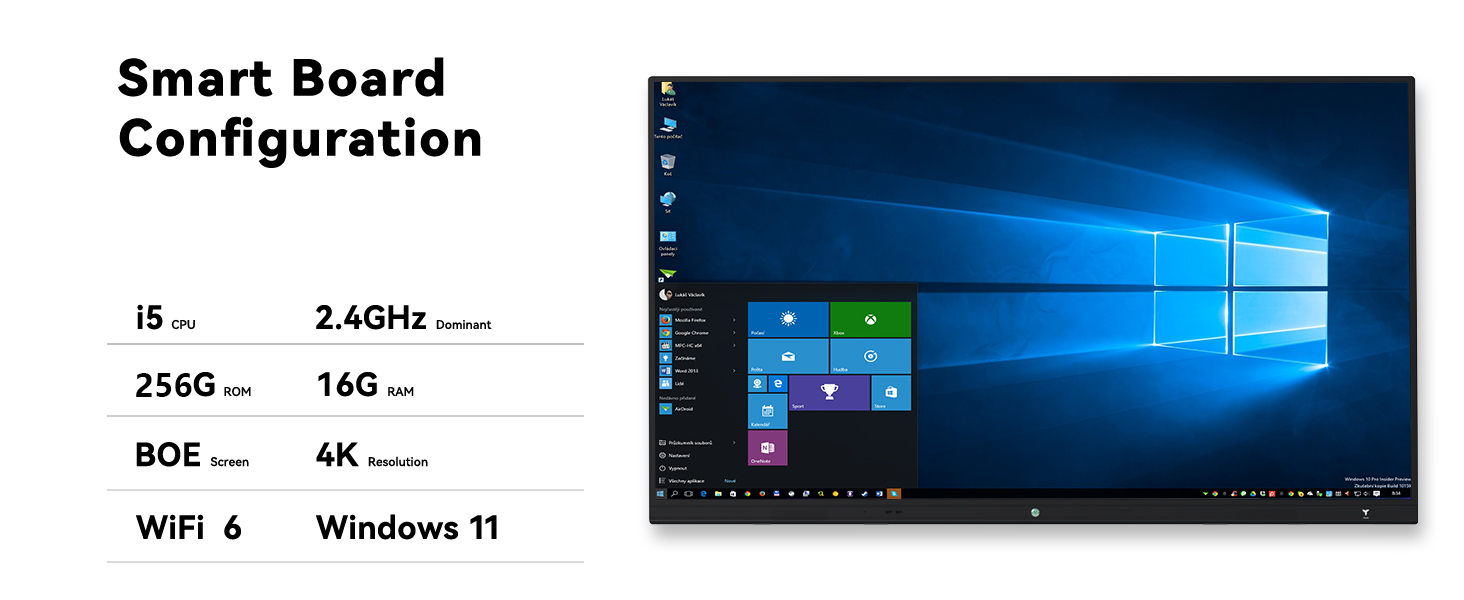
Image 8.1: Overview of the TIBURN HQ Board's core smart board configuration and specifications.

Image 8.2: Detailed hardware configuration of the integrated Mini PC, highlighting its components and capabilities.
9. Warranty and Support
TIBURN products are backed by a manufacturer's warranty. For specific warranty terms and conditions, please refer to the documentation included with your purchase or visit the official TIBURN website. Customer support is available for assistance with product setup, operation, and troubleshooting.
- Returns: The product is eligible for 30-day easy returns.
- Customer Service: Contact TIBURN customer support for any inquiries or technical assistance.