1. Introduction
This manual provides instructions for the installation, use, and maintenance of the Wocloer 1/2 inch 100Ft Liquid-Tight Conduit Kit. This kit includes a 100-foot length of 1/2 inch flexible non-metallic electrical conduit, along with 6 straight and 5 90-degree conduit connectors. The conduit is designed for protecting electrical wiring in various environments.

Image 1: Wocloer 1/2 inch 100Ft Liquid-Tight Conduit Kit. This image displays the coiled 100-foot length of gray liquid-tight conduit and the included assortment of straight and 90-degree gray plastic fittings.
2. Product Components
The Wocloer 1/2 inch 100Ft Liquid-Tight Conduit Kit includes the following items:
- 100 feet of 1/2 inch flexible non-metallic liquid-tight conduit.
- 6 straight liquid-tight conduit connectors.
- 5 90-degree liquid-tight conduit connectors.
3. Specifications
| Feature | Specification |
|---|---|
| Brand | Wocloer |
| Model Number | 1/2 |
| Conduit Material | Antioxidant PVC |
| Conduit Length | 100 feet (1200 inches) |
| Inside Diameter | 0.5 inches (16 mm) |
| Outside Diameter | 0.83 inches (21 mm) |
| Nominal Wall Thickness | 1.3 mm |
| Item Weight | 14.52 pounds (6.6 Kilograms) |
| Resistance | Corrosion, wear, oil, water, acid, metal chips, UV |
| Flammability Classification | 94V-2 |
| Temperature Index | 125°C |
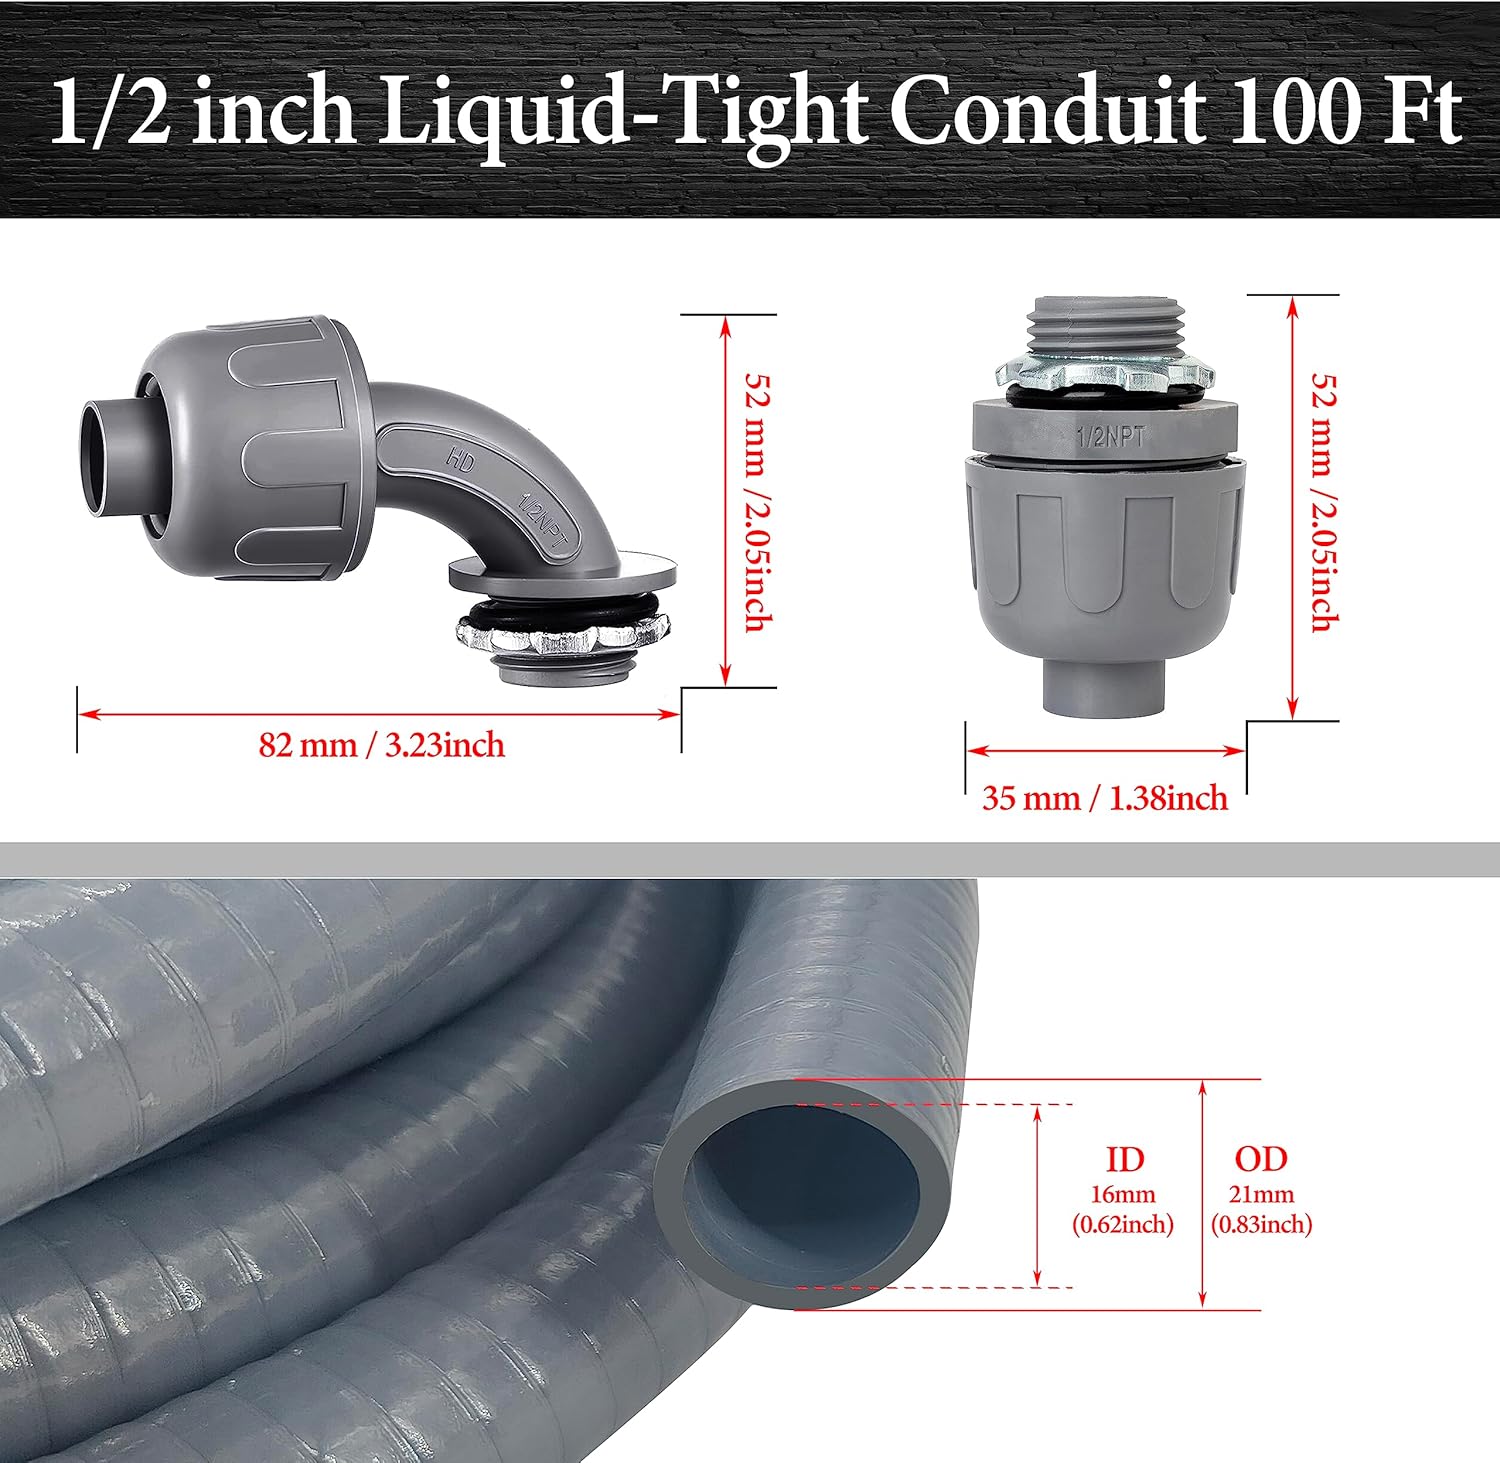
Image 2: Detailed dimensions of the 1/2 inch liquid-tight conduit and its corresponding straight and 90-degree fittings. The image shows measurements in both millimeters and inches for the conduit's inner and outer diameter, and the fittings' length and height.
4. Installation
The Wocloer liquid-tight conduit system is designed for straightforward installation without requiring disassembly of the connectors. Follow these steps for secure connections:
- Prepare the Conduit: Cut the conduit to the desired length using a utility knife or PVC cutter. Ensure the cut is clean and free of burrs.
- Connect the Conduit: Push the conduit end firmly onto the ferrule of the connector. The design allows for a secure fit without needing to take the connector apart.
- Tighten the Sealing Nut: Once the conduit is fully seated on the ferrule, tighten the dome sealing nut by hand until snug, then use a wrench for a final quarter to half turn to ensure a liquid-tight seal.
- Secure Fittings: For straight or 90-degree fittings, ensure the fixed steel ring and EPDM washer are correctly positioned before tightening the dome nut onto the electrical box or enclosure.

Image 3: A visual guide demonstrating the four steps for installing liquid-tight conduit connectors. It shows the components of a connector (dome nut, EPDM washer, fixed steel ring, main body) and how the conduit is inserted and secured.

Image 4: A close-up view illustrating the process of connecting the conduit to a fitting. It highlights the conduit being pushed into the connector for a secure fit.
5. Safety and Durability Features
The Wocloer liquid-tight electrical conduit is engineered for safety and long-term reliability in demanding environments. Key features include:
- Material Composition: Made from high-quality virgin PVC, ensuring a smooth interior for easier wire pulling and preventing damage to conductors.
- Environmental Resistance: Resists corrosion, wear, oil, water, acid, and metal chips.
- Mechanical Strength: Offers excellent tensile and compressive strength.
- Outdoor Suitability: Suitable for outdoor, UV-resistant, and direct burial applications.
- Lightweight Design: Approximately 50% lighter than metallic conduits, which can reduce installation costs and effort.

Image 5: An illustration highlighting the conduit's resistance to oil and acid, emphasizing its safety and sturdiness.

Image 6: A visual representation of the conduit's high-quality waterproof properties, with water splashing over a coiled section.
6. Applications
This liquid-tight electrical conduit is suitable for a wide range of applications where protection against moisture, oil, and other environmental factors is critical. Common applications include:
- AC equipment installations.
- Machine tools.
- Marine equipment wiring.
- Motors and control systems.
- Printing equipment.
- Pumps and refrigeration systems.
- Transformer connections.
- Outdoor lighting installations.
- Direct burial applications.

Image 7: A collage of images depicting the liquid-tight conduit installed in various settings, including an electrical box, an outdoor unit, and a compressor, showcasing its versatility.
7. Maintenance
The Wocloer liquid-tight conduit is designed for minimal maintenance. However, periodic inspection can help ensure its continued performance and safety:
- Visual Inspection: Regularly check the conduit and fittings for any signs of physical damage, cracks, or degradation, especially in areas exposed to harsh conditions or direct sunlight.
- Connection Integrity: Verify that all connections remain tight and secure. Loose connections can compromise the liquid-tight seal.
- Cleanliness: Keep the conduit free from excessive dirt, debris, or chemical spills that could potentially degrade the PVC material over time.
8. Troubleshooting
While the Wocloer conduit is designed for ease of use, some common issues may arise during installation:
- Difficulty Pulling Wires: The interior of the conduit is smooth to facilitate wire pulling. If wires are difficult to pull, especially over longer lengths or through bends, consider using an electrical cable lubricant. This reduces friction and prevents damage to wire insulation.
- Conduit Kinking: Although flexible, excessive bending in tight radii can cause kinking. Plan your runs to avoid sharp bends. If a kink occurs, gently straighten the affected section.
- Leaking Connections: Ensure the conduit is fully seated onto the connector's ferrule and the dome sealing nut is tightened adequately. The EPDM washer must be correctly positioned to create a waterproof seal.
9. Warranty and Support
For warranty information or technical support regarding your Wocloer Liquid-Tight Conduit Kit, please refer to the product packaging or contact Wocloer customer service directly. Contact details are typically available on the manufacturer's official website or through your point of purchase.