1. Safety Instructions
Always read and understand all safety warnings, instructions, illustrations, and specifications provided with this power tool. Failure to follow all instructions listed below may result in electric shock, fire, and/or serious injury.
General Power Tool Safety
- Work Area Safety: Keep the work area clean and well-lit. Cluttered or dark areas invite accidents. Do not operate power tools in explosive atmospheres, such as in the presence of flammable liquids, gases, or dust.
- Electrical Safety: Power tool plugs must match the outlet. Never modify the plug in any way. Do not expose power tools to rain or wet conditions. Water entering a power tool will increase the risk of electric shock.
- Personal Safety: Always wear eye protection. Use appropriate safety equipment such as dust masks, non-skid safety shoes, hard hats, or hearing protection when necessary. Stay alert, watch what you are doing, and use common sense when operating a power tool.
- Tool Use and Care: Do not force the power tool. Use the correct power tool for your application. Disconnect the plug from the power source and/or remove the battery pack before making any adjustments, changing accessories, or storing power tools.
Battery Tool Use and Care
- Recharge only with the charger specified by the manufacturer. A charger that is suitable for one type of battery pack may create a risk of fire when used with another battery pack.
- Use power tools only with specifically designated battery packs. Use of any other battery packs may create a risk of injury and fire.
- When the battery pack is not in use, keep it away from other metal objects, like paper clips, coins, keys, nails, screws, or other small metal objects, that can make a connection from one terminal to another. Shorting the battery terminals together may cause burns or a fire.
- Under abusive conditions, liquid may be ejected from the battery; avoid contact. If contact accidentally occurs, flush with water. If liquid contacts eyes, additionally seek medical help. Liquid ejected from the battery may cause irritation or burns.
2. Product Overview
The Steiner 58V 5Ah Cordless Impact Drill is a versatile power tool designed for drilling and driving applications. It features a robust metal gearbox, copper-wound motor, and comes with two 58V 5Ah Lithium batteries for extended operation. The 24-piece set includes various bits and accessories to handle a wide range of tasks.
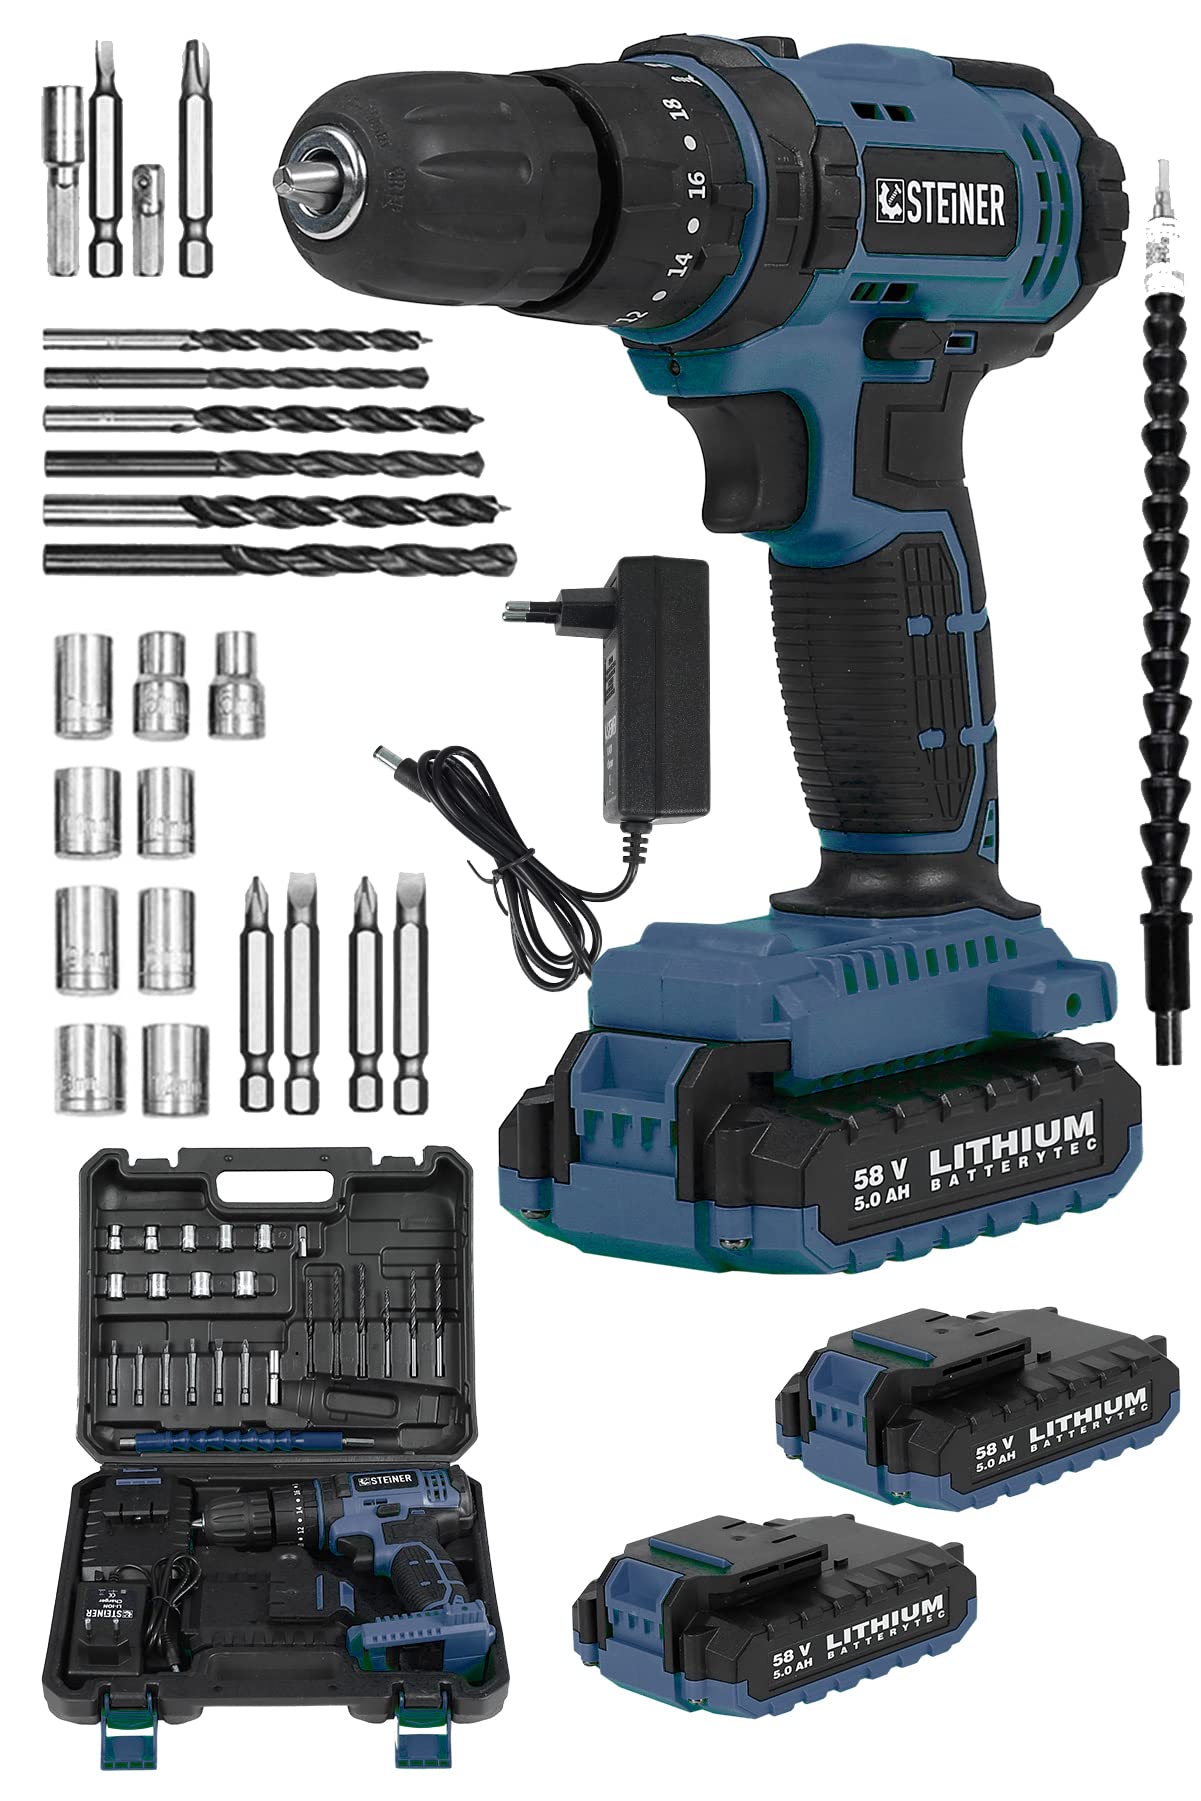
Figure 1: Steiner 58V 5Ah Cordless Impact Drill 24-Piece Set. This image displays the main drill unit, two 58V 5Ah Lithium batteries, a battery charger, a variety of drill bits, screwdriver bits, sockets, and a flexible shaft, all neatly organized within a durable carrying case.
Components
- Cordless Impact Drill: The main unit with chuck, torque adjustment ring, mode selector, speed trigger, and forward/reverse switch.
- 58V 5Ah Lithium Batteries (x2): Rechargeable power sources for the drill.
- Battery Charger: For recharging the lithium batteries.
- Carrying Case: Provides organized storage and transport for the drill and accessories.
- Assorted Drill Bits: Various sizes for drilling into different materials.
- Screwdriver Bits: Phillips, flathead, and other types for driving screws.
- Sockets: For fastening nuts and bolts.
- Flexible Shaft: Allows access to tight or awkward spaces for driving screws.
3. Setup
3.1 Charging the Battery
- Ensure the battery charger is connected to a standard power outlet (220-240V AC).
- Slide the 58V 5Ah Lithium battery into the charger until it clicks into place.
- Observe the indicator lights on the charger. A red light typically indicates charging, and a green light indicates a full charge.
- Once fully charged, remove the battery from the charger. Do not overcharge the battery.
3.2 Installing/Removing the Battery
- Installation: Align the battery with the base of the drill handle. Slide the battery upwards until it clicks securely into place. Ensure it is firmly seated before operation.
- Removal: Press the battery release buttons (usually on the sides of the battery pack) and slide the battery downwards and out of the drill handle.
3.3 Installing Drill Bits or Accessories
- Ensure the drill is switched off and the forward/reverse switch is in the center (locked) position to prevent accidental starting.
- Rotate the chuck counter-clockwise to open the jaws wide enough to insert the desired drill bit or accessory.
- Insert the shank of the bit fully into the chuck.
- Rotate the chuck clockwise to tighten the jaws firmly around the bit. Hand-tighten securely. For best results, use the chuck key if provided, or ensure the chuck is tightened sufficiently to prevent slippage during operation.
- To remove, rotate the chuck counter-clockwise to loosen the jaws and pull out the bit.
4. Operating Instructions
4.1 Power On/Off and Speed Control
- The drill is turned on by pressing the variable speed trigger switch. The speed increases as you press the trigger further.
- Release the trigger to turn the drill off.
4.2 Forward/Reverse Rotation
- The forward/reverse switch is located above the trigger.
- Push the switch to the left for forward rotation (for drilling and driving screws).
- Push the switch to the right for reverse rotation (for removing screws or backing out drill bits).
- When the switch is in the center position, the trigger is locked, preventing accidental operation.
4.3 Torque Adjustment and Mode Selection
The drill features a torque adjustment ring and a mode selector ring.
- Torque Adjustment Ring: This ring allows you to set the desired torque for driving screws. Settings typically range from 1 to 18 (as indicated in the image OCR). Lower numbers are for smaller screws or softer materials, while higher numbers are for larger screws or harder materials. This prevents over-tightening and stripping screw heads.
- Mode Selector Ring: This ring allows you to switch between different operating modes:
- Drill Mode (Drill Bit Symbol): For general drilling tasks without impact. The clutch is disengaged, providing maximum torque.
- Impact Drill Mode (Hammer Symbol): For drilling into masonry or very hard materials. This mode engages an impact mechanism in addition to rotation.
4.4 Using the Flexible Shaft
The flexible shaft allows you to reach screws or drilling points in confined or awkward spaces. Simply insert one end into the drill chuck and the other end into the desired screwdriver bit or small drill bit.
5. Maintenance
Regular maintenance ensures the longevity and optimal performance of your Steiner Cordless Impact Drill.
- Cleaning: Keep the ventilation openings of the power tool clean to prevent overheating. Use a soft, damp cloth to clean the tool's exterior. Do not use harsh chemicals or abrasive cleaners.
- Chuck Maintenance: Periodically clean the chuck jaws to ensure proper gripping of bits. Remove any dust or debris.
- Battery Care: Store batteries in a cool, dry place away from direct sunlight and extreme temperatures. Do not store fully discharged batteries for extended periods. Charge them periodically if not in use.
- Accessory Inspection: Regularly inspect drill bits, screwdriver bits, and other accessories for wear or damage. Replace worn or damaged accessories to ensure safe and effective operation.
- Storage: When not in use, store the drill and all accessories in the provided carrying case in a dry, secure location out of reach of children.
6. Troubleshooting
If you encounter issues with your drill, refer to the following common problems and solutions:
- Drill does not start:
- Check if the battery is fully charged and properly installed.
- Ensure the forward/reverse switch is not in the center (locked) position.
- The battery may be too hot or too cold. Allow it to reach room temperature.
- Battery not charging:
- Verify the charger is properly plugged into a working power outlet.
- Ensure the battery is correctly inserted into the charger.
- Check for any visible damage to the charger or battery.
- Poor drilling/driving performance:
- Ensure the correct mode (drill or impact) and torque setting are selected for the task.
- Check if the drill bit or screwdriver bit is sharp and appropriate for the material. Replace if dull or damaged.
- Ensure the bit is securely tightened in the chuck.
- The battery may be low; recharge it.
- Excessive vibration or noise:
- Check if the bit is properly installed and not bent.
- Ensure all parts are securely fastened.
- If the issue persists, discontinue use and contact customer support.
7. Specifications
- Model: ST0518R215400209
- Brand: STEINER
- Voltage: 58V
- Battery Capacity: 5.0 Ah Lithium-Ion
- Gearbox: Metal
- Motor Winding: Copper
- Type: Cordless Impact Drill
- Set Contents: Drill, 2x Batteries, Charger, 24-piece accessory set (bits, sockets, flexible shaft), Carrying Case.
8. Warranty and Support
For warranty information and customer support, please refer to the documentation provided at the time of purchase or contact your retailer. Keep your purchase receipt as proof of purchase for any warranty claims.
If you have any questions or require assistance with your Steiner 58V 5Ah Cordless Impact Drill, please contact Steiner customer service through their official website or the contact information provided with your product.