1. Introduction and Safety Information
Thank you for purchasing the COSTWAY Commercial Ice Maker. This manual provides important information regarding the safe operation, installation, maintenance, and troubleshooting of your ice maker. Please read this manual thoroughly before using the appliance and retain it for future reference.
Important Safety Instructions:
- Ensure the appliance is properly grounded.
- Do not operate the ice maker with a damaged power cord or plug.
- Keep ventilation openings clear of obstruction.
- Do not store explosive substances such as aerosol cans with a flammable propellant in this appliance.
- Only use potable water for ice production.
- Unplug the appliance before cleaning or performing any maintenance.
2. Product Overview
The COSTWAY Commercial Ice Maker is designed for efficient ice production, suitable for both commercial and household use. It features a robust design and intelligent controls.
Key Features:
- Efficient Ice Making: Produces 80 lbs of ice per 24 hours, with 40 square ice cubes per 7-11 minute cycle.
- Large Storage Capacity: Internal ice bin holds up to 25 lbs of ice.
- Adjustable Ice Thickness: Customize ice cube thickness based on ice making time.
- Intelligent LCD Control Panel: Features a 24H timer, auto deicing, water shortage reminder, and ice full reminder.
- Built-In Drain Pump: Effectively drains water with a maximum pumping height of 35.5 inches.
- Self-Cleaning Function: Automated 360° cleaning for convenience.
- Durable Construction: 3-layer structure with zinc-plate sheet, thickened foaming layer, and food-grade ABS liner for insulation and longevity.
- Reversible Door: Allows flexible installation and door opening direction.
- Thoughtful Details: Includes a built-in ice scoop slot, stainless steel handle, interior LED light, and adjustable anti-slip feet.
Components and Accessories:

Figure 2.1: Main Ice Maker Unit. This image shows the full stainless steel ice maker unit with its sleek design, ready for installation.

Figure 2.2: Complete Accessories. The image displays the included accessories: a 6.5 ft water outlet pipe, a 10 ft water inlet pipe with quick connector, a removable ice bin, and an ice scoop.

Figure 2.3: Thoughtful Details. This image highlights specific design elements such as the built-in ice scoop slot, the durable stainless steel handle, the interior LED light for visibility, and the adjustable anti-slip feet for stability.
The package includes:
- Water Inlet Pipe
- Water Outlet Pipe
- Water Connector
- Ice Bin
- Ice Scoop
- User Manual
3. Setup and Installation
Proper installation is crucial for the optimal performance and longevity of your ice maker.
3.1 Unpacking:
Carefully remove all packaging materials. Inspect the ice maker for any shipping damage. Report any damage to your retailer immediately.
3.2 Placement:
The ice maker can be used as a freestanding unit or installed under a counter.

Figure 3.1: Installation Options. The image illustrates the flexibility of placing the ice maker either as a standalone unit or integrated neatly under a kitchen counter.
- Place the ice maker on a flat, stable surface.
- Ensure adequate ventilation around the unit. Maintain at least 4 inches of clearance from walls and other objects.
- Avoid direct sunlight or heat sources.
- The unit should be placed near a water supply and a drain.
3.3 Water Connection:
Connect the water inlet pipe to a potable water supply. Use the provided water quick connector. Connect the water outlet pipe to a suitable drain. The built-in drain pump can handle a maximum pumping height of 35.5 inches.

Figure 3.2: Water Connections and Drain Pump. This diagram details the water inlet connection, the water outlet with its integrated drain pump, and visually represents the 360° self-cleaning function.
3.4 Electrical Connection:
Plug the ice maker into a grounded 115V electrical outlet. Ensure the outlet meets the appliance's power requirements.
3.5 Reversible Door Installation:
The door can be reversed to open from either the left or right side, offering flexibility for different installation sites. Refer to the detailed instructions in the separate door reversal guide (if provided) or contact customer support for assistance.

Figure 3.3: Reversible Door. This image shows the ice maker with its door configured to open from both the left and right sides, illustrating the reversible door feature.
4. Operating Instructions
Familiarize yourself with the control panel and operating modes.
4.1 Control Panel Overview:

Figure 4.1: Intelligent LCD Control Panel. This image displays the ice maker's LCD control panel, highlighting buttons for Timer/Self-Cleaning, Power Switch/Self-Deicing, and controls to increase or decrease ice thickness/time.
- TIMER/CLEAN Button: Press to set a timer for operation or long press for 5 seconds to activate the self-cleaning function.
- ON/OFF Button: Powers the unit on or off. Also functions as a self-deicing control.
- +/- Buttons: Adjust ice thickness/time settings.
- LCD Display: Shows current temperature, timer settings, and indicators for water shortage or ice full.
4.2 Initial Startup:
- Ensure the water supply is connected and turned on.
- Plug in the ice maker.
- Press the "ON/OFF" button to start the ice production cycle.
4.3 Adjusting Ice Thickness:
The ice cube thickness can be adjusted by changing the ice making time using the "+" and "-" buttons. Longer times result in thicker ice.

Figure 4.2: Efficient Ice Making and Thickness Adjustment. This image illustrates the ice maker's efficiency, showing ice production cycles and examples of thin (7 mins), medium (9 mins), and thick (11 mins) ice cubes.
4.4 Timer Function:
Use the "TIMER/CLEAN" button to set a delayed start or stop time for the ice maker. Follow the on-screen prompts to adjust the timer duration.
4.5 Indicators:
- Water Shortage: An indicator will light up when the water supply is low. Refill the water tank or ensure the water inlet is properly connected.
- Ice Full: The ice maker will automatically stop production when the ice bin is full. Empty the ice bin to resume operation.
5. Maintenance
Regular maintenance ensures the longevity and hygienic operation of your ice maker.
5.1 Self-Cleaning Function:
The ice maker features an automatic 360° self-cleaning function. To activate, long press the "TIMER/CLEAN" button for 5 seconds. The unit will perform a cleaning cycle. It is recommended to perform this regularly, especially after prolonged periods of inactivity.
5.2 Manual Cleaning:
- Unplug the ice maker before any manual cleaning.
- Clean the interior of the ice bin and water reservoir with a mild detergent and warm water. Rinse thoroughly.
- Wipe down the exterior with a soft, damp cloth.
- For descaling, use a food-grade descaling solution as per the product's instructions.
5.3 Drain Pump Maintenance:
Periodically check the drain pump and outlet pipe for any blockages or debris. Clear any obstructions to ensure proper water drainage.
5.4 Air Filter Cleaning:
The air filter (located at the front bottom) should be cleaned regularly to ensure efficient cooling. Remove the filter and wash it with water, then dry completely before reinserting.
6. Troubleshooting
Before contacting customer support, please refer to the following common issues and their solutions.
| Problem | Possible Cause | Solution |
|---|---|---|
| Ice maker not producing ice. | No water supply; Water shortage indicator on; Ambient temperature too high; Refrigerant leak. | Ensure water supply is connected and turned on; Check water level and refill if necessary; Ensure proper ventilation and lower room temperature; Contact qualified service personnel. |
| Ice cubes are too thin or too thick. | Ice making time setting is incorrect. | Adjust ice thickness using the "+" and "-" buttons on the control panel. |
| Ice maker is noisy. | Unit not level; Fan obstruction; Normal operation sounds. | Adjust adjustable feet to level the unit; Check for obstructions around the fan; Some operational sounds (e.g., water flowing, compressor running) are normal. |
| Water leakage. | Loose water connections; Clogged drain pipe; Damaged water hose. | Check and tighten all water connections; Clear any blockages in the drain pipe; Inspect hoses for damage and replace if necessary. |
| Ice full indicator remains on after emptying bin. | Sensor obstruction or malfunction. | Ensure nothing is blocking the ice full sensor; Clean the sensor area. If issue persists, contact support. |
If the problem persists after attempting these solutions, please contact COSTWAY customer support.
7. Specifications
| Attribute | Value |
|---|---|
| Brand | COSTWAY |
| Model Number | 10242US-SL-CYPF |
| Product Dimensions (D x W x H) | 20.3" x 15" x 33.5" |
| Daily Ice Production Capacity | 80 lbs / 24 hours |
| Ice Storage Capacity | 25 lbs |
| Ice Cube Size | 0.9" x 0.9" x 0.9" (square) |
| Ice Production Cycle Time | 7-11 minutes (for 40 pcs) |
| Voltage | 115V |
| Wattage | 290 watts |
| Country of Origin | USA |
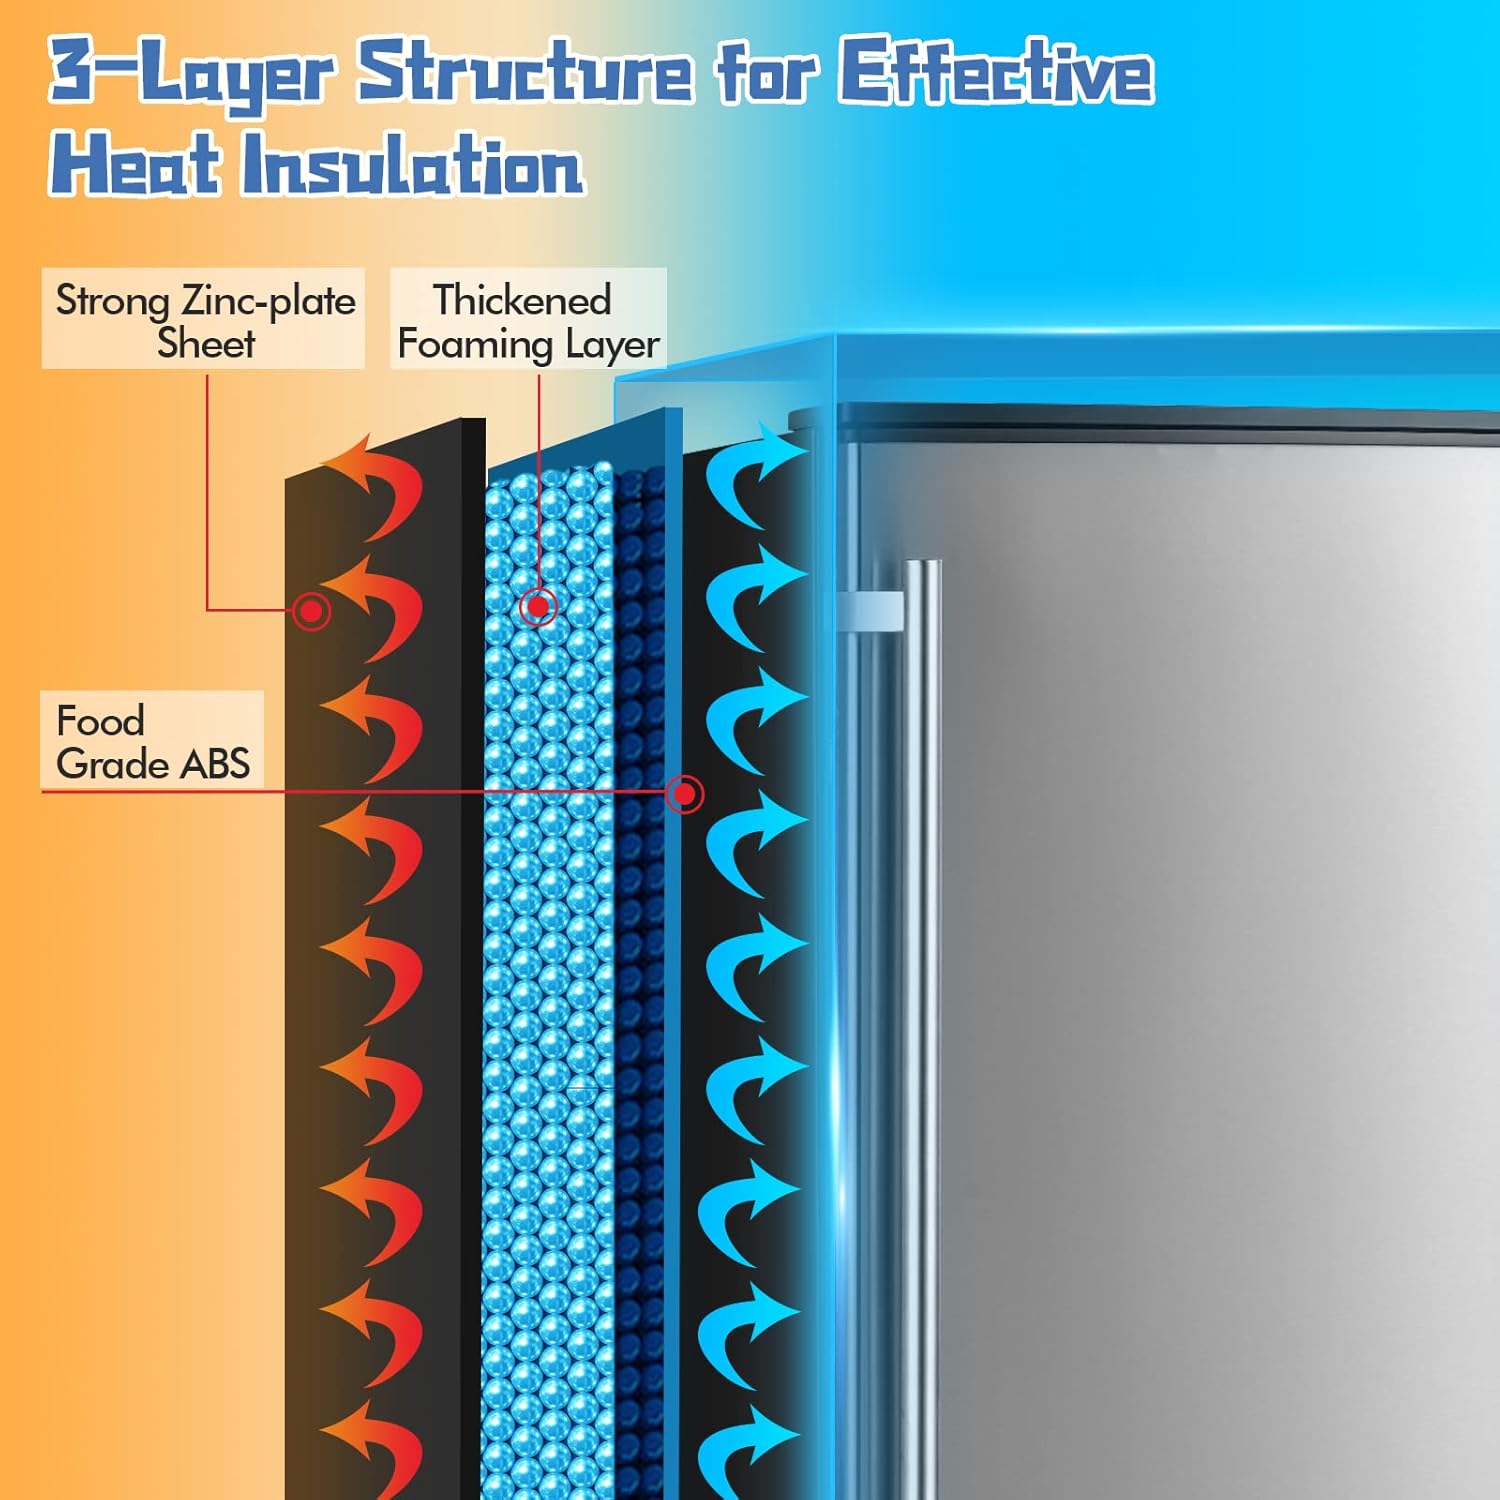
Figure 7.1: 3-Layer Structure for Effective Heat Insulation. This diagram illustrates the construction of the ice maker's walls, composed of a strong zinc-plate sheet, a thickened foaming layer, and a food-grade ABS liner, designed for superior cold insulation.
Figure 7.2: Ice Production Capabilities. This image visually summarizes the ice maker's performance metrics, including its 25 lbs ice storage capacity, 80 lbs/24H daily capacity, 7-11 minute ice produce cycle, 0.9"x0.9"x0.9" ice cube size, and 3.2L water tank.
8. Warranty and Support
COSTWAY provides a warranty for this product. Please refer to your purchase documentation or the official COSTWAY website for specific warranty terms and conditions. For technical support, parts, or service inquiries, please contact COSTWAY customer service.
Contact Information:
- COSTWAY Official Website Contact Page
- Refer to your product packaging or purchase invoice for direct customer service phone numbers or email addresses.


