1. Introduction
This manual provides comprehensive instructions for assembling and operating your ISolderStore Classic Game Kit. This kit is designed as a DIY soldering project, offering an engaging way to learn about electronics and practice soldering skills. Upon successful assembly, you will have a functional game console featuring retro classic games.

Figure 1: Assembled ISolderStore Classic Game Kit, showcasing the LED matrix display, digital score display, control buttons, and clear acrylic casing.
2. What's in the Box
The ISolderStore Classic Game Kit includes all necessary components for assembly. Please verify that all items listed below are present before beginning the assembly process. If any components are missing, please contact ISolderStore customer support for assistance.
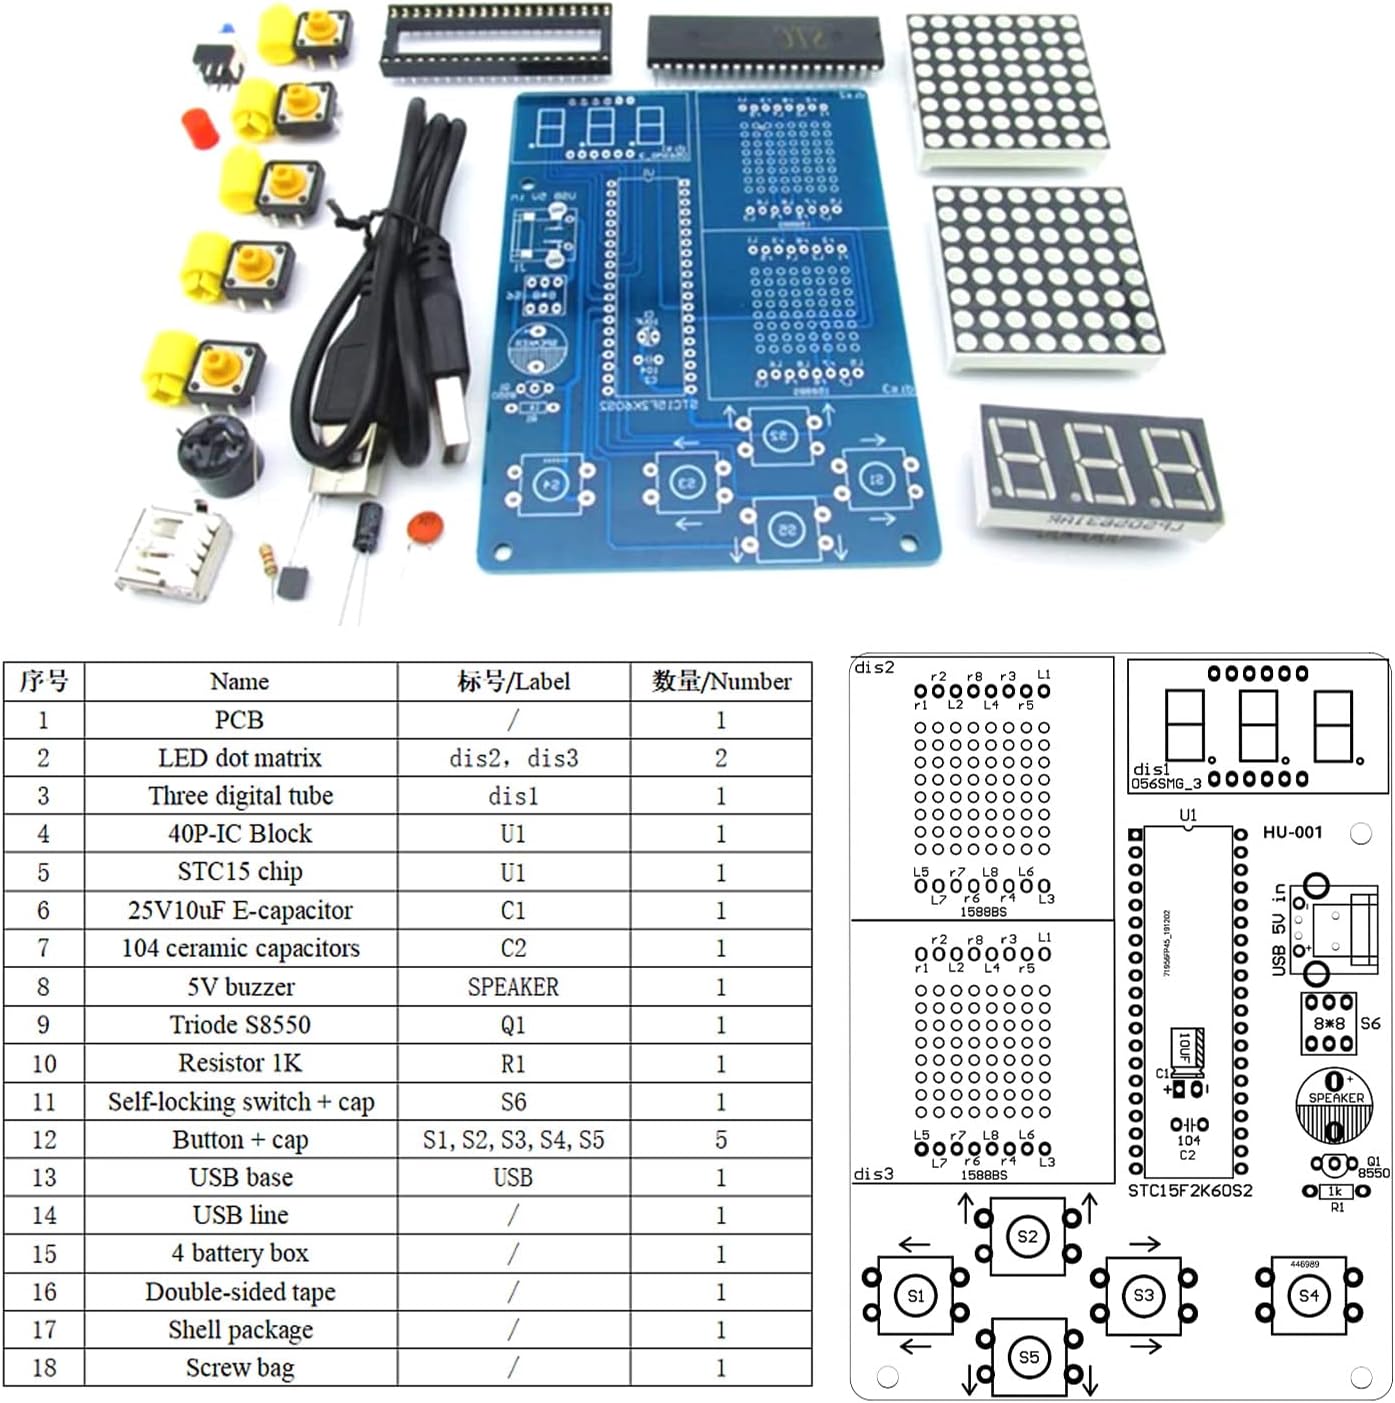
Figure 2: Overview of all components included in the kit, laid out on a surface, including the PCB, LED matrices, digital tubes, ICs, resistors, capacitors, buttons, USB base, battery holder, and acrylic shell parts.
| No. | Name | Label | Quantity |
|---|---|---|---|
| 1 | PCB | / | 1 |
| 2 | LED dot matrix | dis2, dis3 | 2 |
| 3 | Three digital tube | dis1 | 1 |
| 4 | 40P-IC Block | U1 | 1 |
| 5 | STC15 chip | U1 | 1 |
| 6 | 25V10uF E-capacitor | C2 | 1 |
| 7 | 104 ceramic capacitors | C1 | 1 |
| 8 | 5V buzzer | SPEAKER | 1 |
| 9 | Triode S8550 | Q1 | 1 |
| 10 | Resistor 1K | R1 | 1 |
| 11 | Self-locking switch + cap | S6 | 1 |
| 12 | Button + cap | S1, S2, S3, S4, S5 | 5 |
| 13 | USB base | USB | 1 |
| 14 | USB line | / | 1 |
| 15 | 4 battery box | / | 1 |
| 16 | Double-sided tape | / | 1 |
| 17 | Shell package | / | 1 |
| 18 | Screw bag | / | 1 |
3. Setup and Assembly Instructions
This kit requires soldering. Detailed instructions with pictures are available by scanning the QR code provided with the product packaging. The PCB board is clearly mapped and labeled to facilitate easy assembly. Ensure correct component orientation, especially for polarized components like electrolytic capacitors (long leads are positive, short leads are negative) and the STC15 single chip microcomputer (U-shaped notch corresponds to the marker on the PCB).
Assembly Steps:
- Solder the 1K resistor at R1.
- Solder the 10uF electrolytic capacitors (long leads are positive, short leads are negative), and 104 ceramic capacitors (non-polar).
- Solder the 40P-IC holder at U1 (note that the U-shaped notch corresponds to the marker on the PCB board).
- Solder the USB socket (the middle two pins do not need to be soldered).
- Solder the S8550 triode (note the position corresponds to the mark of PCB board).
- Solder the buzzer (note that the positive pin corresponds to marker on the PCB board).
- Solder the buttons.
- Soldering dot matrix and nixie tube (the label direction is consistent with the direction of the marker).
- Solder the wires of the battery box (red + black, corresponding to the marker on the PCB board).
- Install the STC15 single chip microcomputer (the U-shaped notch corresponds to the marker on the PCB board).
- Install the acrylic shell components as shown in the PDF instructions.
Power Supply: The device can be powered by DC5V via USB or by 4 AA-batteries.

Figure 3: Visual guide for soldering and assembly steps, including component placement and final casing assembly.
Video 1: Official product video demonstrating the assembly process and functionality of the Classic Game Kit.
4. Operating Instructions
Once assembled and powered, the Classic Game Kit offers a selection of retro games and adjustable settings.

Figure 4: Diagram illustrating the game selection and control buttons, along with specific game operation details.
General Operation:
- Power On: Ensure the device is powered via USB or 4 AA batteries.
- Select Game: Use the left and right buttons to navigate through game options.
- Game Selection & Settings:
- Items 1 to 4: Game selection (Tetris, Snakes, Racing car, Space invaders).
- Item 5: Screen brightness adjustment.
- Item 6: Sound on/off switch.
- Enter Game: Press the "OK" key to start the selected game.
Game-Specific Controls:
- Tetris: Left and right keys for horizontal movement, lower key for accelerated falling, OK key to rotate the module.
- Snake: Use up, down, left, and right buttons to move the snake.
- Racing Car: Left and right keys control the car's movement, OK key accelerates falling obstacles.
- Space Invaders: Left and right keys move the airplane, OK key fires bullets.
The digital tube on the top displays the score and saves the highest score achieved.
5. Maintenance
- Cleaning: Use a soft, dry cloth to clean the acrylic casing. Avoid abrasive cleaners or solvents.
- Battery Replacement: If using batteries, replace all 4 AA batteries simultaneously when power is low to ensure optimal performance.
- Storage: Store the game kit in a dry, cool place away from direct sunlight and extreme temperatures.
- Component Integrity: Periodically inspect soldered joints for any signs of damage or corrosion. Re-solder if necessary.
6. Troubleshooting
- Device does not power on:
- Check if the power source (USB or batteries) is correctly connected and functional.
- Ensure the power switch is in the "ON" position.
- Verify all power-related solder joints on the PCB are secure.
- Games do not start or controls are unresponsive:
- Inspect all button solder joints for proper connection.
- Ensure the STC15 chip is correctly seated in its socket and oriented correctly (U-shaped notch).
- Check for any short circuits or cold solder joints on the PCB.
- Display issues (e.g., missing pixels, incorrect display):
- Verify the LED dot matrix and digital tube modules are correctly inserted and soldered.
- Check the solder joints for these display components.
- No sound or distorted sound:
- Ensure the buzzer is correctly soldered with the positive pin aligned.
- Check the sound on/off setting in the operating menu.
- If issues persist after troubleshooting, please refer to the detailed instructions via the QR code or contact ISolderStore customer support.
7. Specifications
- Product Dimensions: 7.4 x 4.33 x 0.78 inches
- Item Weight: 8.4 ounces
- Power Supply: DC5V (via USB) or 4 AA-batteries
- Games Included: Tetris, Snakes, Racing car, Space invaders
- Features: Digital score display, high score saving, adjustable brightness, sound on/off function.
- Manufacturer: ISolderStore
- Recommended Age: 19 years and up
8. Warranty and Support
For any missing components or technical assistance, please contact ISolderStore customer support directly. Refer to the product packaging or the QR code for specific warranty information and contact details.