1. Product Overview
The YHTAUTO Pocket Bolt-Riveted Style Fender Flares are designed to provide enhanced protection and a rugged aesthetic upgrade for your truck. These flares extend beyond the wheel well, offering defense against road debris, mud, and other elements, while also giving your vehicle a distinctive, aggressive appearance. Constructed from high-quality polypropylene, they are built for durability and resistance to environmental factors.

Image 1.1: Complete set of YHTAUTO Pocket Bolt-Riveted Style Fender Flares and included hardware.
2. Product Compatibility
These fender flares are specifically designed for the following vehicle models:
- Ford F-150: 2018, 2019, 2020 models.
Important Note: These fender flares are not compatible with Ford F-150 models equipped with the Technology Package. Please verify your vehicle's specifications before installation.

Image 2.1: Compatibility details for Ford F-150 models.
3. What's Included
Your YHTAUTO Fender Flare kit includes all necessary components and hardware for installation. Please verify all parts are present before beginning the installation process.

Image 3.1: Detailed view of all included components and hardware.
Component List:
- Front Left Flare
- Front Right Flare
- Rear Left Flare
- Rear Right Flare
- Front Left Inner Piece
- Front Right Inner Piece
Hardware List:
- SW1-0003 1/4" x 1.5" Phillips Truss Screw
- Black Nylon Retainer
- FY1-0006 6.2mm Black Nylon Retainer
- SW1-0002 5/16" x 1.5" Hex Screw
- WA1-0010 0.300 x 0.700 x 0.03" Washer
- NU1-0010 5/16-18 Jam Nut
- CL1-0002 "U" Clip
- CL1-0008 Long "U" Clip
- CL1-0009 Spring Clip
- MT1-0014 9.5" x 1.5" x 0.01" Black Mylar Tab
- GP1-0007 Mod. Wiper Style Edge Trim
- SW1-0005 T-45 Torx Bit
- ET1-0002 Edge Trim Tool
- Additional bolts, washers, and nuts as shown in Image 3.1
4. Installation Instructions
Proper installation is crucial for the performance and longevity of your fender flares. Please read all instructions carefully before beginning. If you are not confident in your ability to install these flares, it is highly recommended to seek assistance from a qualified mechanic.

Image 4.1: Important safety and professional assistance recommendation.
4.1. Tools Required (Not Included):
- Socket Wrench Set
- Drill (with appropriate drill bits if required for pilot holes)
- Measuring Tape
- Marker or Pencil
- Clean Cloth
- Safety Glasses
- Gloves
4.2. Pre-Installation Steps:
- Clean the Installation Area: Thoroughly clean the vehicle's fender wells and surrounding body panels where the flares will be installed. Ensure all dirt, debris, and wax are removed for proper adhesion and fit.
- Test Fit: Before making any permanent modifications, carefully test fit each fender flare to its corresponding wheel well. This will help you understand the alignment and identify any potential issues.
- Apply Edge Trim: If included, apply the provided edge trim along the top edge of each fender flare. This trim protects the vehicle's paint and provides a finished look.
4.3. Step-by-Step Installation:
- Remove Existing Components: Depending on your vehicle model, you may need to remove existing mud flaps, inner fender liners, or other components that obstruct the installation area.
- Prepare Mounting Points: Locate the factory mounting points within the wheel well. Some installations may require drilling pilot holes for the provided hardware. Refer to the detailed manual included in your kit for precise drilling locations if necessary.
- Attach Inner Pieces (if applicable): For flares with inner pieces, attach them to the main flare body as per the included diagram.
- Secure Fender Flares: Align the fender flare with the wheel well. Use the provided screws, retainers, clips, and nuts to secure the flare to the vehicle's body. Ensure all fasteners are tightened securely but do not overtighten to avoid damaging the flare or vehicle.
- Install Decorative Bolts: The pocket/bolt-riveted style features decorative bolts. These are typically for aesthetic purposes and do not directly attach to the truck's body. Insert them into the designated holes on the flare.
- Repeat for All Flares: Follow the same steps for all four fender flares (front left, front right, rear left, rear right).
- Final Inspection: Once all flares are installed, double-check all fasteners for tightness and ensure the flares are securely mounted and properly aligned.

Image 4.2: Fender flares installed on a truck, showcasing the front and rear appearance.

Image 4.3: Visual demonstration of how fender flares can hide existing fender damage and rust.
5. Usage and Benefits
Once installed, your YHTAUTO Fender Flares offer multiple benefits:
- Enhanced Protection: The flares provide an additional barrier against rocks, mud, dirt, and other road debris that can be kicked up by your tires, protecting your vehicle's paint and bodywork from chips and scratches.
- Aesthetic Enhancement: They give your truck a more aggressive, rugged, and customized appearance, enhancing its overall visual appeal.
- Compliance with Tire Coverage Laws: For vehicles with oversized tires, fender flares can help ensure compliance with local laws regarding tire coverage, preventing tires from extending beyond the vehicle's body.
- Durability in Various Conditions: Made from high-quality polypropylene, these flares are designed to withstand harsh weather conditions, including extreme heat and cold, without chalking or degrading.

Image 5.1: Fender flares help prevent road debris from scratching your vehicle.

Image 5.2: The durable material is designed to withstand hot temperatures.

Image 5.3: The material also withstands cold conditions, ensuring year-round performance.

Image 5.4: Fender flares help fulfill big tire coverage laws.
6. Maintenance
To ensure your YHTAUTO Fender Flares maintain their appearance and functionality, follow these simple maintenance tips:
- Regular Cleaning: Wash the fender flares regularly with mild automotive soap and water. Use a soft brush or cloth to remove accumulated dirt and grime.
- Rinse Thoroughly: After washing, rinse the flares thoroughly to remove all soap residue.
- Avoid Harsh Chemicals: Do not use abrasive cleaners, solvents, or harsh chemicals, as these can damage the finish of the polypropylene material.
- Inspect Fasteners: Periodically check all mounting hardware to ensure they remain tight. Retighten if necessary.
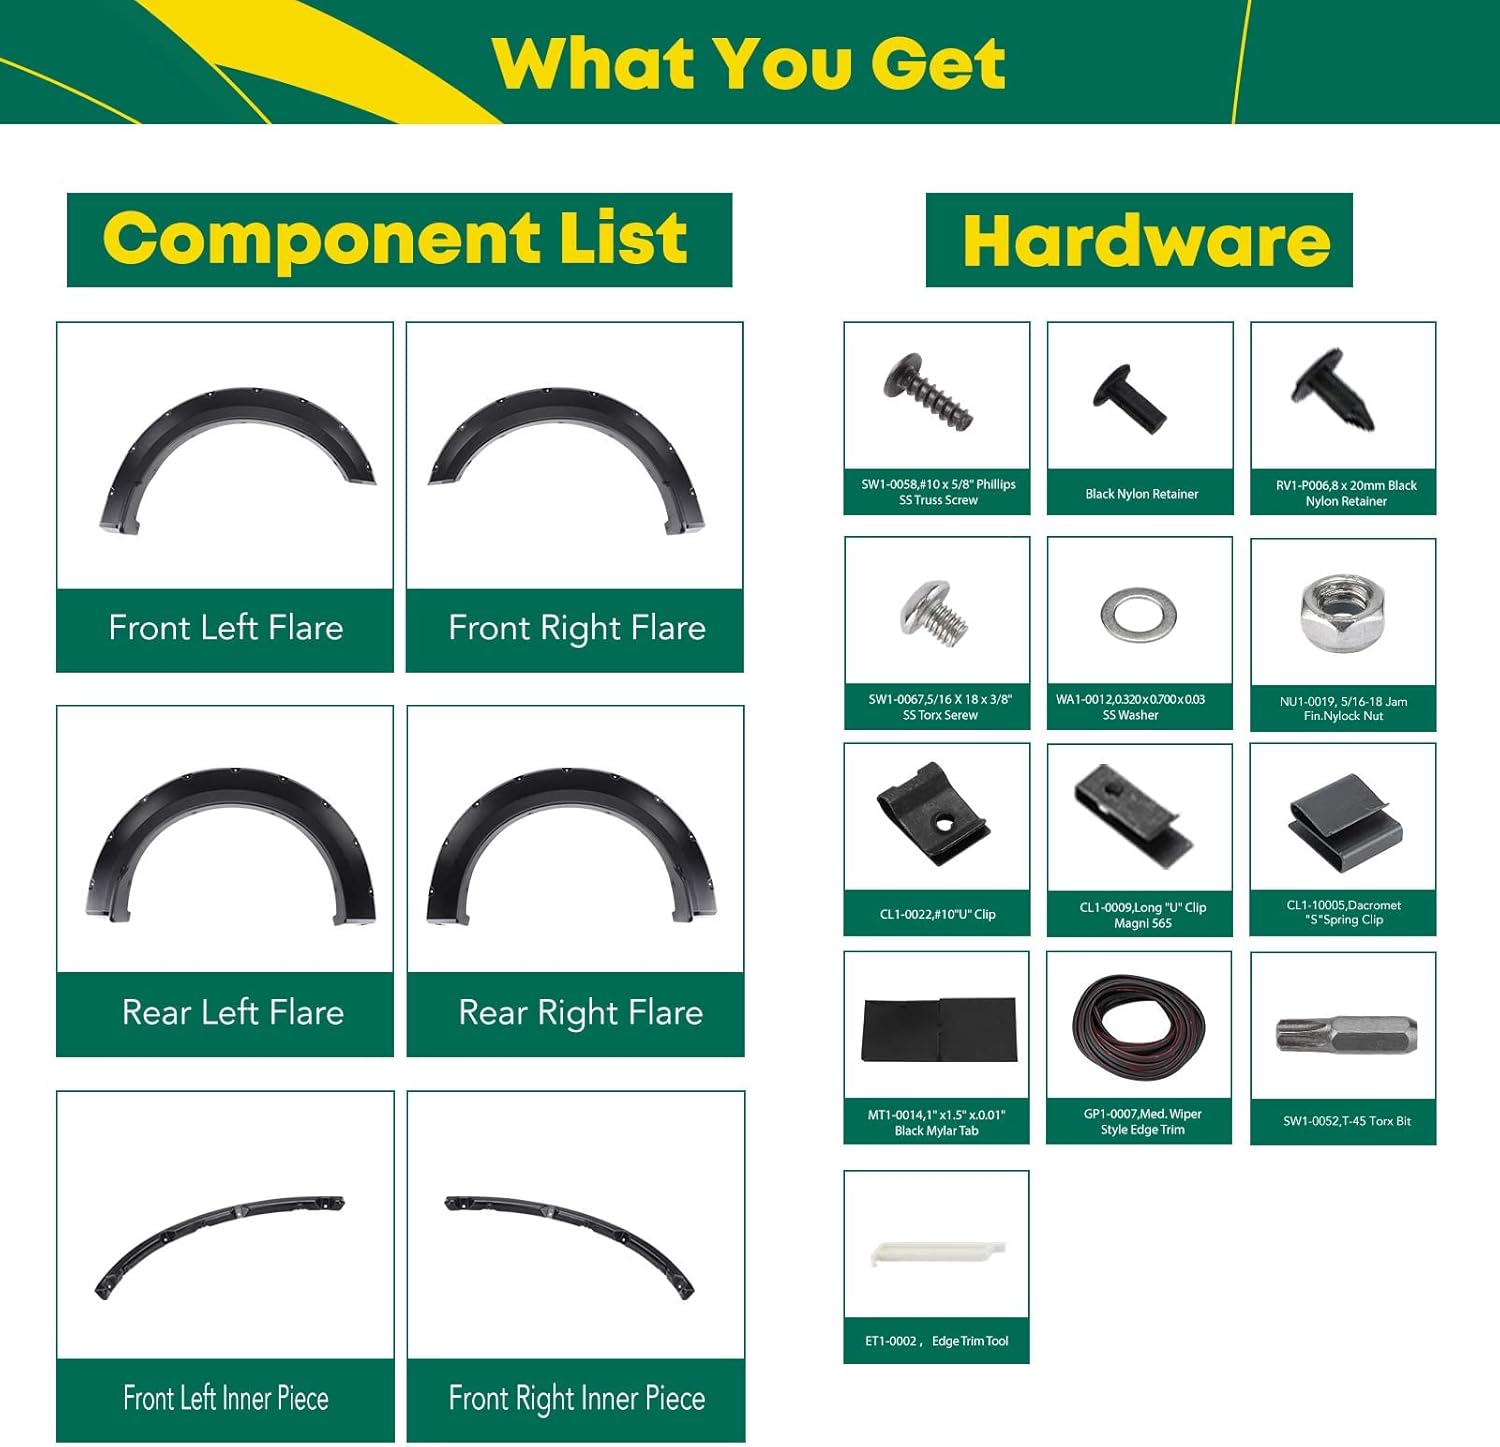
Image 6.1: Fender flares are easy to clean with just water.
7. Troubleshooting
If you encounter any issues during or after installation, refer to the following common problems and solutions:
- Flares Do Not Fit Properly:
- Double-check the product compatibility section (Section 2) to ensure the flares are designed for your specific vehicle year and model, especially regarding the Technology Package.
- Ensure you are installing the correct flare on the correct wheel well (e.g., front left flare on front left wheel).
- Verify that all existing factory components that might obstruct the fit have been removed.
- Flares Seem Loose After Installation:
- Ensure all provided hardware (screws, clips, nuts) are securely tightened. Do not overtighten, but ensure a snug fit.
- Check if any mounting points were missed during installation.
- Gaps Between Flare and Vehicle Body:
- Ensure the edge trim (if applicable) is properly seated along the entire edge of the flare.
- Verify that the flare is correctly aligned with the vehicle's body lines.
- Difficulty with Bolt Installation:
- Ensure you are using the correct tools and applying appropriate force.
- For decorative bolts, ensure they are inserted correctly into their designated slots.
If troubleshooting steps do not resolve the issue, please contact YHTAUTO customer support for further assistance.
8. Specifications
| Attribute | Detail |
|---|---|
| Brand | YHTAUTO |
| Model Name | Pocket Bolt-Riveted Style Fender Flares |
| Item Model Number | YHTFF00027 |
| Material | Polypropylene |
| Color | Black (Shiny Black Exterior Finish) |
| Vehicle Service Type | Truck |
| Fit Type | Vehicle Specific Fit |
| Position | Front & Rear (Set of 4) |
| Item Weight | 10.5 kg |
| Parcel Dimensions | 128.78 x 71.63 x 23.37 cm |
| Manufacturer | YTAUTOPARTS |
| Date First Available | Feb. 7 2023 |
9. Warranty and Support
YHTAUTO is committed to providing high-quality products and customer satisfaction. For specific warranty information regarding your fender flares, please refer to the documentation included with your purchase or visit the official YHTAUTO website.
If you require technical assistance, have questions about installation, or need to report a missing/damaged part, please contact YHTAUTO customer support through their official channels. When contacting support, please have your product model number (YHTFF00027) and purchase details readily available.
For the most up-to-date contact information, please visit the YHTAUTO brand page on Amazon or their official website.