Introduction
This manual provides detailed instructions for the installation, programming, and operation of your Garage2Go Keyless Entry Keypad. This keypad is designed as a replacement for specific Liftmaster, Sears, and Chamberlain garage door openers that utilize a purple learn button and were manufactured after 2005. Please read these instructions carefully before use to ensure proper functionality and safety.
Product Overview & Compatibility
The Garage2Go Keyless Entry Keypad offers convenient access to your garage without a remote. It features a backlit keypad for visibility in low light conditions.

Image: Front view of the Garage2Go Keyless Entry Keypad with its protective cover open, revealing the numeric buttons and a small instruction label.
Compatibility
- Compatible with Liftmaster, Sears, and Chamberlain garage door openers.
- Requires a garage door opener with a purple learn button on the back.
- For openers manufactured after 2005.
- Replaces part numbers: 376LM, 377LM, 950D, 956D, 139.53754.

Image: Visual representation of the keypad's compatibility with Liftmaster, Sears, and Chamberlain garage door openers that have a purple learn button, along with a list of compatible part numbers.
Package Contents
Verify that all items are present in your package:
- Garage2Go Keyless Entry Keypad
- Program Guide (Instruction Manual)
- Mounting Screws and Anchors
- 9V Battery (pre-installed)

Image: An illustration showing the included items: the wall keypad, a program guide, mounting screws, and a 9V battery.
Installation & Programming
Mounting the Keypad
- Choose a convenient location outside your garage door, at least 5 feet above the ground, out of reach of small children.
- Open the keypad cover.
- Mark the position for the top mounting screw through the designated hole on the back of the keypad.
- Drill a pilot hole if necessary and insert the provided screw, leaving it slightly loose.
- Hang the keypad on the screw.
- While the keypad is hanging, mark the position for the second screw (if applicable for your installation preference). Drill a pilot hole and secure the second screw.
- Ensure the keypad is securely mounted and does not wobble.
Programming the Keypad
Follow these steps to program your keypad to your garage door opener. It is recommended to perform these steps near your garage door opener's motor unit.

Image: A diagram illustrating the step-by-step programming process for the keypad, covering model selection and PIN setup.
Step 1: Select the Model
- Ensure the keypad backlight is OFF.
- Press and hold the 2 and 8 keys simultaneously.
- Continue holding for approximately 10 seconds until the backlight flashes twice.
- Enter the model number 1 to select the purple learn button function. (For this specific keypad, '1' corresponds to GDR21 - purple).
- If an incorrect value is entered, the LED will flash three times.
Step 2: Set a PIN
- Locate the learn button on the back of your garage door opener's motor unit.
- Press and immediately release the learn button. The program light on the motor unit will illuminate for 30 seconds.
- Within these 30 seconds, enter a unique 4-digit PIN on the keypad.
- After entering your PIN, press and hold the ENTER button on the keypad.
- Release the ENTER button when the lights on the opener flash or you hear two "clicks".
- Your PIN is now set.
Operation
Once programmed, the keypad can be used to open and close your garage door.
- To Open: Enter your 4-digit PIN, then press the ENTER button.
- To Close: Press the ENTER button twice. (It is not necessary to enter your PIN to close the door).
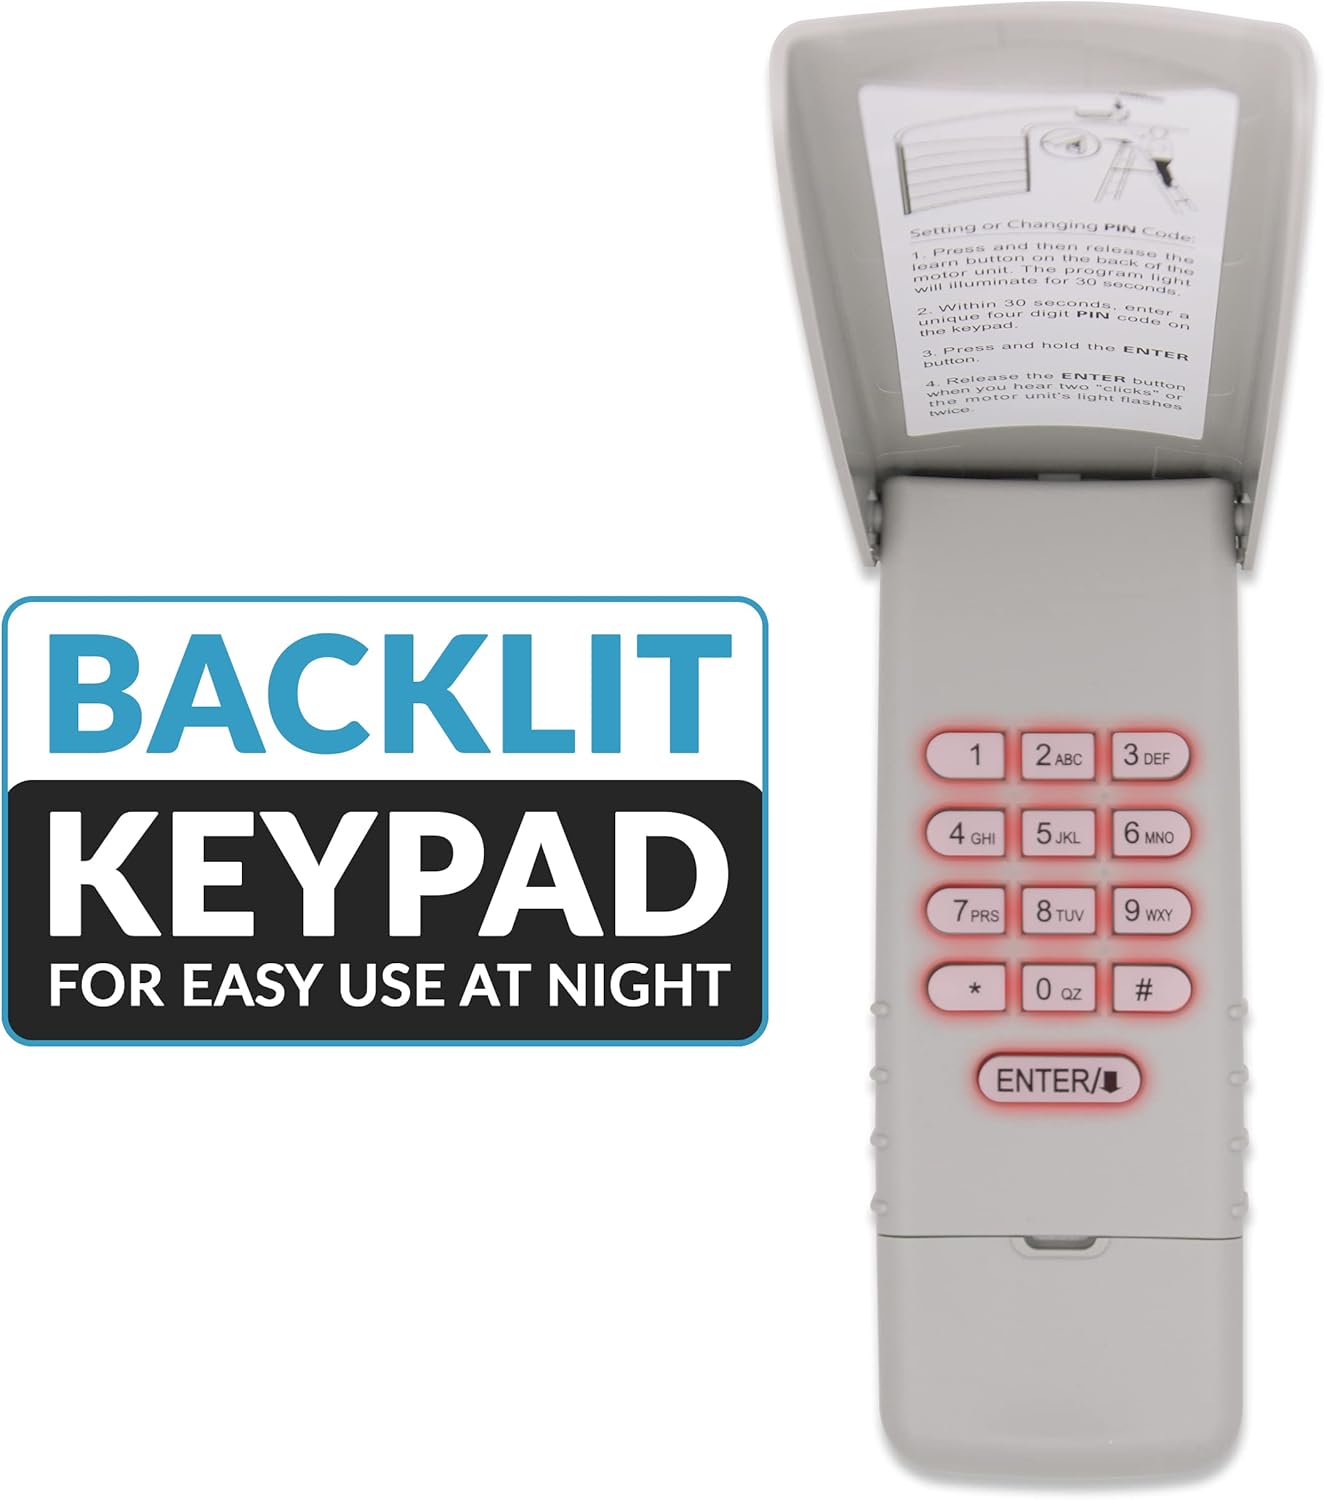
Image: The Garage2Go keypad highlighting its backlit keys, designed for improved visibility and ease of use during nighttime or in low-light conditions.
Maintenance
Battery Replacement
The keypad uses a 9V Lithium Metal battery. When the keypad's backlight becomes dim or the keypad becomes unresponsive, it is time to replace the battery.
- Open the keypad cover.
- Locate the battery compartment, typically on the back or inside the keypad.
- Remove the old 9V battery.
- Insert a new 9V Lithium Metal battery, ensuring correct polarity.
- Close the battery compartment and test the keypad's functionality.
Troubleshooting
- Keypad not responding after programming:
Ensure the learn button on the garage opener was pressed and released correctly, and the PIN was entered within 30 seconds. Repeat the programming steps carefully. Check the battery level. - Keypad works immediately after programming but not later:
This could indicate a battery issue or a communication problem with the opener. Replace the battery. If the issue persists, re-program the keypad. - Keypad feels wobbly after installation:
Ensure both mounting points are securely fastened. If only one screw is used, the keypad may not be stable. Consider drilling a second hole for added stability if the design allows. - Backlight is dim or not working:
Replace the 9V battery. - Garage door does not open/close:
Verify that the correct 4-digit PIN is being entered. Ensure the keypad is within range of the garage door opener. Check if the garage door opener itself is functioning correctly with other remotes or the wall switch.
Specifications
| Brand | Garage2Go |
| Model Number | GD R21 315 PAD |
| Item Weight | 9.6 ounces |
| Package Dimensions | 6.73 x 3.15 x 1.18 inches |
| Batteries | 2 Lithium Metal batteries required (included) |
| Color | Purple |
| Special Features | Backlit Keypad |
| Compatible Devices | Liftmaster, Sears, Chamberlain garage doors with a purple learn button, manufactured after 2005 |
| Max Number of Supported Devices | 1 |

Image: A visual representation of the keypad's approximate dimensions, showing a length of 6 inches and a width of 2.5 inches.
Support and Warranty
For any questions or technical assistance regarding your Garage2Go Keyless Entry Keypad, please contact our customer support. Free technical support is included with your purchase.
This product comes with a 30-day satisfaction guarantee. If the product does not meet your expectations for any reason within 30 days of purchase, please contact us for a refund or replacement.
For further assistance, please visit the Garage2Go Store on Amazon.