TAC TRUCK ACCESSORIES COMPANY TAC-NDS9-024
TAC Sniper Running Boards User Manual
For 2005-2025 Nissan Frontier Crew Cab
1. Introduction
Thank you for choosing TAC Sniper Running Boards. This manual provides essential information for the proper installation, operation, and maintenance of your new running boards. Please read these instructions thoroughly before beginning installation to ensure a safe and correct setup. Proper installation and care will ensure the longevity and optimal performance of your product.
2. Vehicle Compatibility
These TAC Sniper Running Boards are specifically designed for:
- Vehicle: Nissan Frontier
- Model Years: 2005-2025
- Cab Type: Crew Cab (4 Full-Size Doors)
Important: This product is not compatible with King Cab models (2 Full-Size Front Doors & 2 Suicided Rear Doors). Please verify your vehicle's cab type before proceeding with installation.

Image 2.1: Vehicle Compatibility Diagram. This image illustrates the difference between a Crew Cab (compatible) and a King Cab (incompatible) for Nissan Frontier models, highlighting the four full-size doors of the Crew Cab.
3. Product Features and Design
The TAC Sniper Running Boards are engineered for durability, functionality, and ease of use. Key features include:
- Material: Constructed from heavy-duty carbon steel for the main tube and high-strength steel for the step pads, ensuring robust support.
- Finish: Features a TAC e-coating and fine textured powder coating for enhanced rust resistance and a refined appearance.
- Load Capacity: Each running board is designed to support over 500 lbs.
- Step Design: Equipped with 5" x 16.6" non-slip wide step pads and a 4" drop, facilitating easier and more comfortable entry and exit from your vehicle.
- Integrated-Molding Step Pads: Provides additional underside protection for your vehicle, suitable for various terrains.
- Manufacturing Process: Utilizes robot welding for precision and strength in construction.
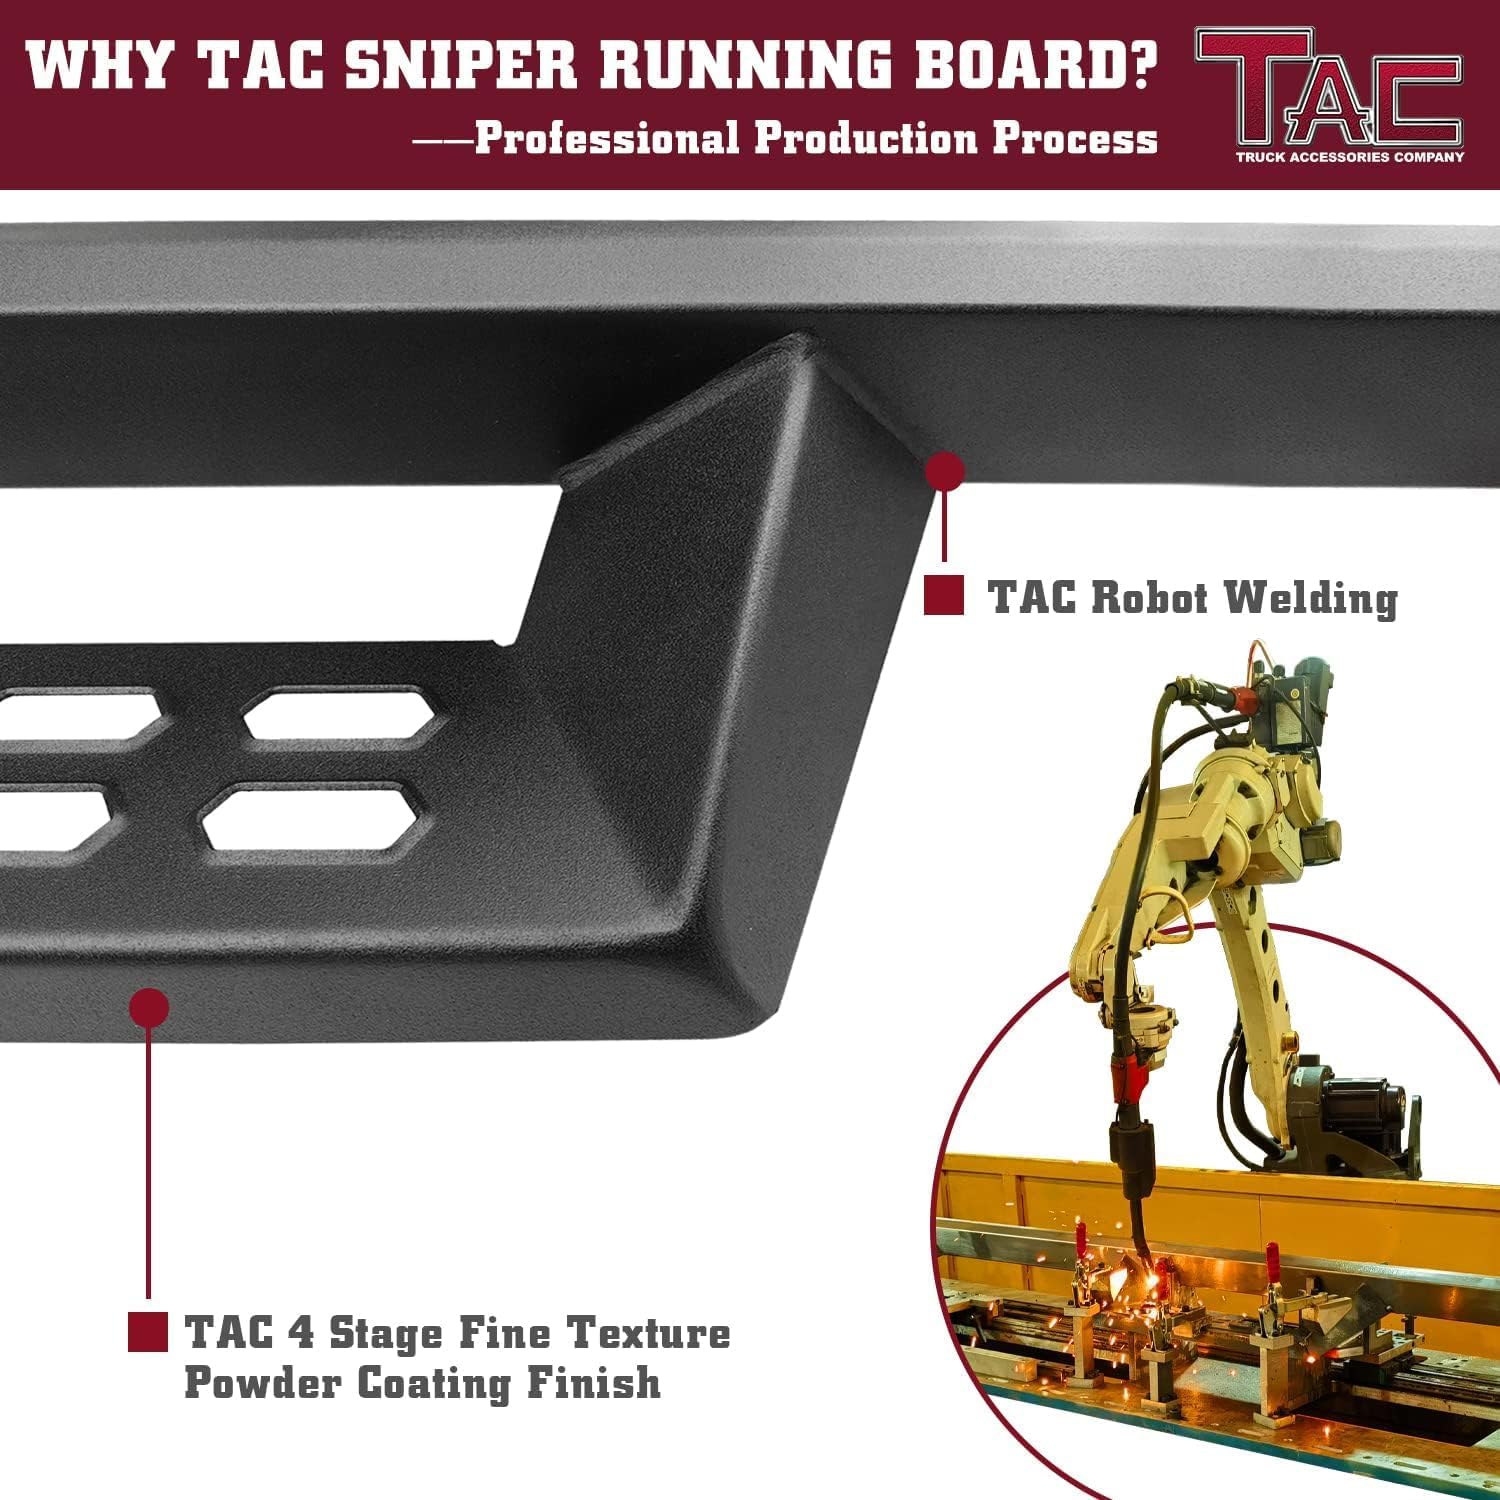
Image 3.1: Production Process. This image highlights the robot welding technique used for precise construction and the four-stage fine texture powder coating finish applied to the running boards.

Image 3.2: Functional Design. This image details the unique anti-slip pattern on the step pads and the integrated-molding design, which contributes to greater carrying capacity and stability.
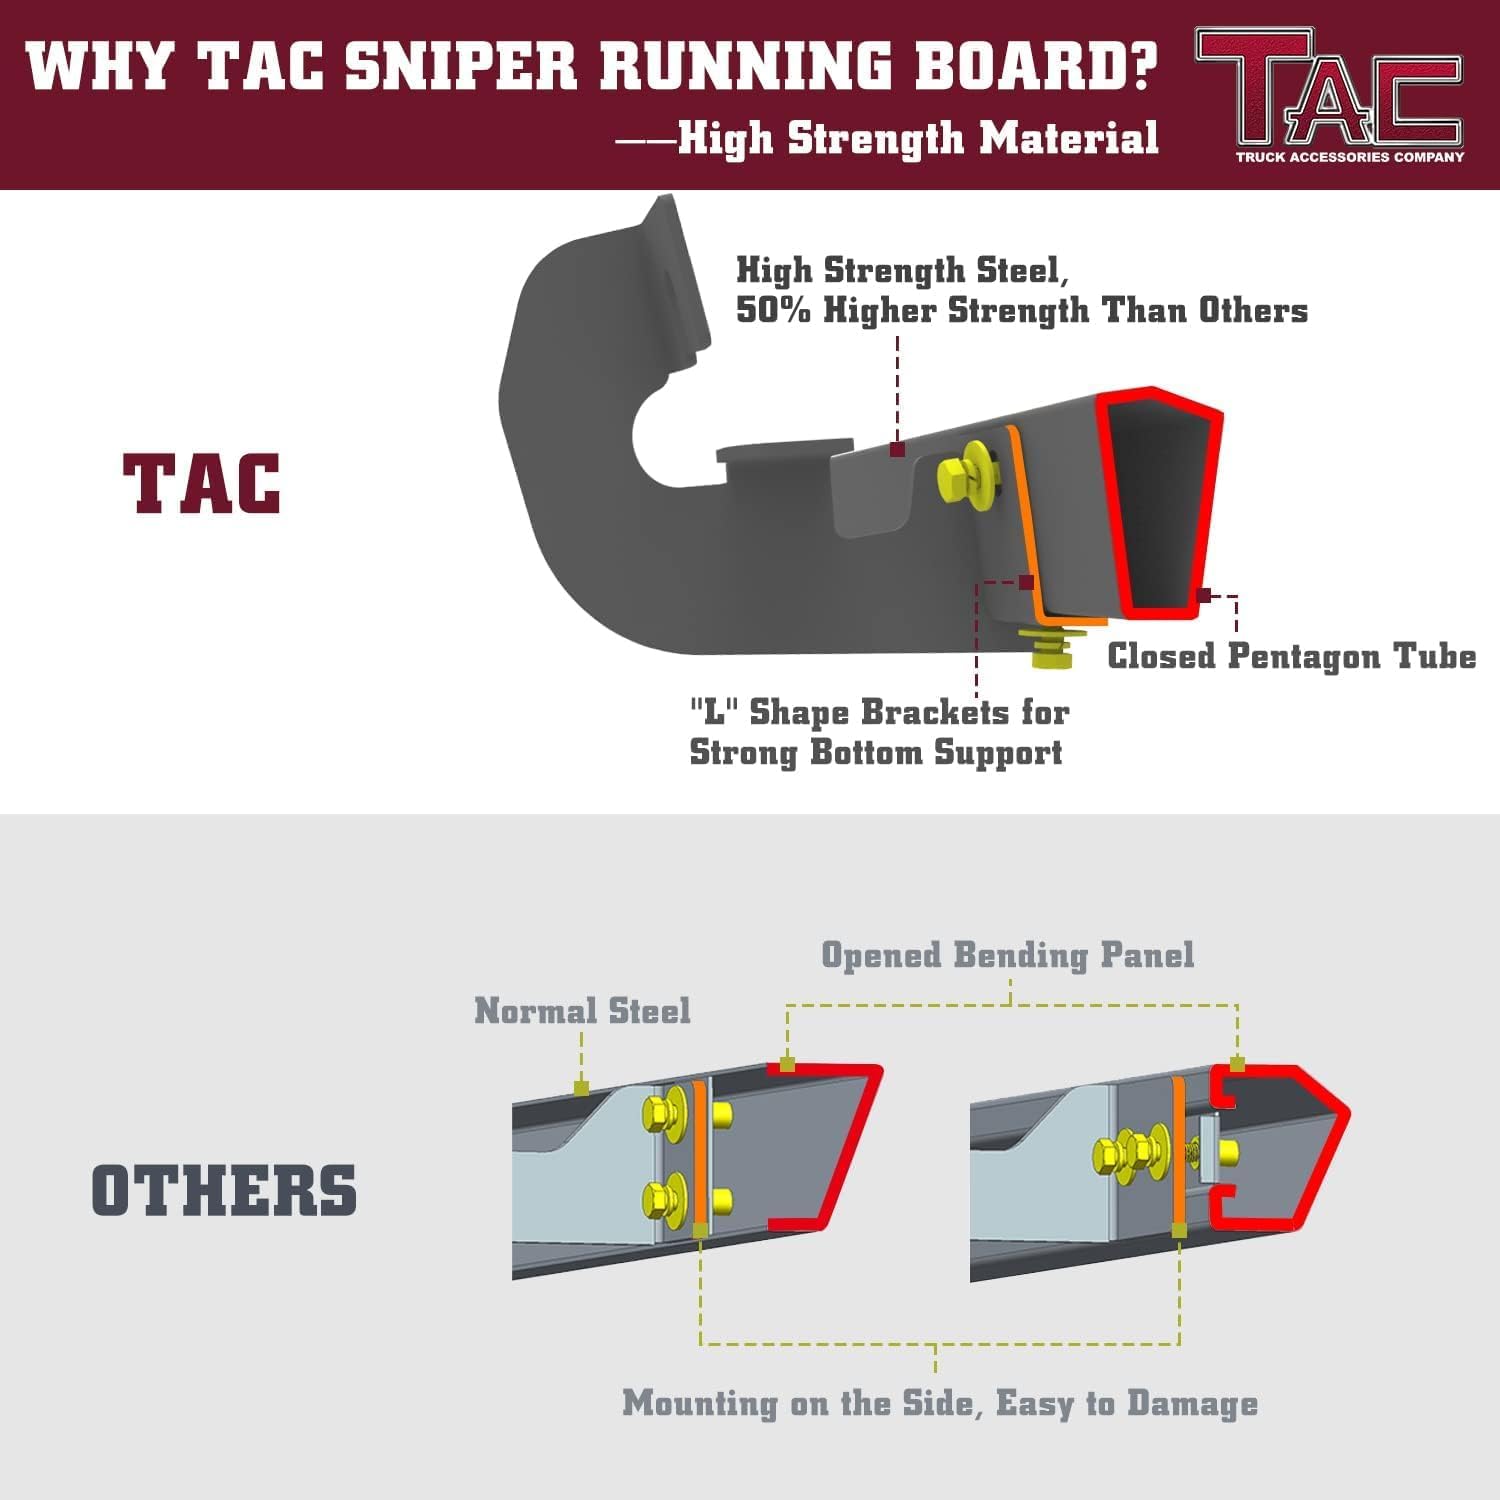
Image 3.3: High Strength Material Comparison. This diagram illustrates the superior construction of TAC running boards, featuring high-strength steel and a closed pentagon tube with 'L' shaped brackets for strong bottom support, compared to a standard open bending panel design.
4. Package Contents
Upon opening your package, please verify that all the following components are present:
- Step Bar x 2 (one for each side of the vehicle)
- Bracket & Hardware Package x 1 (contains all necessary mounting hardware)
- Installation Instruction x 1 (this manual)

Image 4.1: Package Contents. This image displays the typical contents of the TAC running board package, including the two step bars, the hardware kit, and the instruction manual.
5. Installation Guide
Installation is a direct bolt-on process. No drilling or special modifications are typically required for compatible vehicles. It is recommended to have a second person assist during installation.
5.1. Before You Begin
- Read all instructions carefully before starting.
- Ensure your vehicle is parked on a level surface and the parking brake is engaged.
- Gather all necessary tools (e.g., wrenches, sockets).
- Verify all package contents are present and undamaged.
5.2. Identifying Left and Right Bars
Each running board is marked to indicate its correct side. Look for a letter on the front end of the step bar:
- "L" indicates the bar for the Left Side (driver's side).
- "R" indicates the bar for the Right Side (passenger's side).

Image 5.1: Left and Right Bar Identification. This image demonstrates how to identify the correct side for each running board by checking the 'L' (Left) or 'R' (Right) marking on the front end of the step bar.
5.3. Step-by-Step Installation
- Locate Mounting Points: Identify the factory-installed studs or pre-drilled holes on your vehicle's frame or rocker panel. These are typically found along the underside of the vehicle, beneath the doors.
- Attach Brackets: Secure the appropriate mounting brackets from the hardware package to the vehicle's frame using the provided bolts, washers, and nuts. Do not fully tighten the hardware at this stage; allow for some adjustment.
- Position Running Board: Carefully lift the identified 'L' (Left) running board into position and align it with the attached brackets.
- Secure Running Board: Attach the running board to the brackets using the remaining hardware. Again, do not fully tighten yet.
- Adjust and Align: Adjust the running board for optimal alignment and desired position. Ensure it is level and evenly spaced from the vehicle body.
- Final Tightening: Once satisfied with the alignment, progressively tighten all bolts and nuts securely. Double-check all connections to ensure they are firm.
- Repeat for Other Side: Follow the same steps for the 'R' (Right) running board on the passenger side of the vehicle.
After installation, gently test the stability of the running boards before regular use.

Image 5.2: Installed Running Boards. This image shows the TAC Sniper Running Boards properly installed on a Nissan Frontier Crew Cab, demonstrating their appearance and fit.
6. Operation
The TAC Sniper Running Boards provide a stable and convenient step for entering and exiting your Nissan Frontier Crew Cab. Simply step onto the non-slip surface to gain easier access to your vehicle's cabin. The 4-inch drop and wide step pads are designed for comfortable use.

Image 6.1: Easy Access. This image demonstrates a person using the running board to easily step into a truck, highlighting the product's functional benefit for vehicle access.
7. Maintenance
To ensure the longevity and appearance of your TAC Sniper Running Boards, follow these simple maintenance guidelines:
- Regular Cleaning: Wash the running boards regularly with mild soap and water to remove dirt, mud, and road grime. Avoid harsh chemicals or abrasive cleaners, which can damage the finish.
- Inspect Hardware: Periodically check all mounting hardware (bolts, nuts, brackets) to ensure they remain tight. Vibrations from driving can sometimes loosen fasteners over time. Re-tighten as necessary.
- Check for Damage: Inspect the running boards for any signs of damage, such as dents, scratches, or rust, especially after off-road use. Address any issues promptly to prevent further deterioration.
- Protect Finish: While the powder coating offers good protection, applying a non-abrasive automotive wax or sealant can provide an extra layer of defense against environmental elements.
8. Troubleshooting
If you encounter any issues with your TAC Sniper Running Boards, consider the following:
- Loose Boards: If the running boards feel loose or unstable, re-check all mounting hardware. Ensure all bolts are securely tightened according to the installation instructions.
- Unusual Noises: Rattling or squeaking noises may indicate loose hardware or improper installation. Inspect all connection points and re-tighten as needed.
- Difficulty Installing: Double-check your vehicle's compatibility (Crew Cab vs. King Cab) and ensure you are using the correct 'L' and 'R' bars for each side. Refer to the installation guide for detailed steps.
- Corrosion/Rust: While the product is designed for rust resistance, prolonged exposure to harsh conditions or damage to the coating can lead to corrosion. Clean regularly and consider touch-up paint for minor scratches if necessary.
For persistent issues or concerns not addressed here, please contact TAC customer support.
9. Specifications
| Attribute | Detail |
|---|---|
| Brand | TAC TRUCK ACCESSORIES COMPANY |
| Model | DS9 Running boards (TAC-NDS9-024) |
| Material | Carbon Steel |
| Exterior Finish | Fine Texture Black |
| Color | Black |
| Vehicle Service Type | Truck (Nissan Frontier Crew Cab 2005-2025) |
| Weight Limit | 500 Pounds per side |
| Item Weight | 54.9 pounds (total package) |
| Package Dimensions | 77 x 10 x 9.5 inches |
| UPC | 300387567623 |

Image 9.1: Product Dimensions. This diagram provides key measurements of the TAC Sniper Running Board, including its overall length, step pad dimensions, and the vertical drop from the vehicle.
10. Warranty Information
TAC provides a no-hassle 3-year warranty for this product. This warranty covers manufacturing defects and damages incurred during delivery. Please retain your proof of purchase for warranty claims.
11. Customer Support
If you have any questions regarding the installation, operation, or warranty of your TAC Sniper Running Boards, please contact TAC TRUCK ACCESSORIES COMPANY customer support. For the most up-to-date contact information, please visit the official TAC website or refer to your purchase documentation.
Ask a question about this manual
Ask about setup, troubleshooting, compatibility, parts, safety, or missing instructions. Manuals+ will review the question and use this page’s manual context to help answer it.