1. Introduction
Thank you for choosing the Gochanmi TK100 Professional 2-Channel UHF Wireless Microphone System. This system is designed to provide clear and stable audio for various applications, including home karaoke, outdoor performances, concerts, exhibitions, conferences, meetings, and church events. Please read this manual thoroughly before use to ensure proper setup and operation.
The TK100 system features two durable metal handheld microphones with dynamic cardioid capsules, offering high sensitivity and low noise. The receiver provides a strong reception range of up to 80 meters (260 feet) and versatile connectivity options, including XLR and 6.35mm outputs.
2. Package Contents
Please check the package carefully to ensure all items are present:
- 2 x Handheld Microphones
- 1 x Receiver Unit
- 1 x Power Adapter
- 1 x RCA Cable
- 1 x User Manual (this document)
3. Product Overview
3.1. Receiver Unit
The receiver unit is the central component of your wireless microphone system. It processes the audio signals from the microphones and outputs them to your sound system.
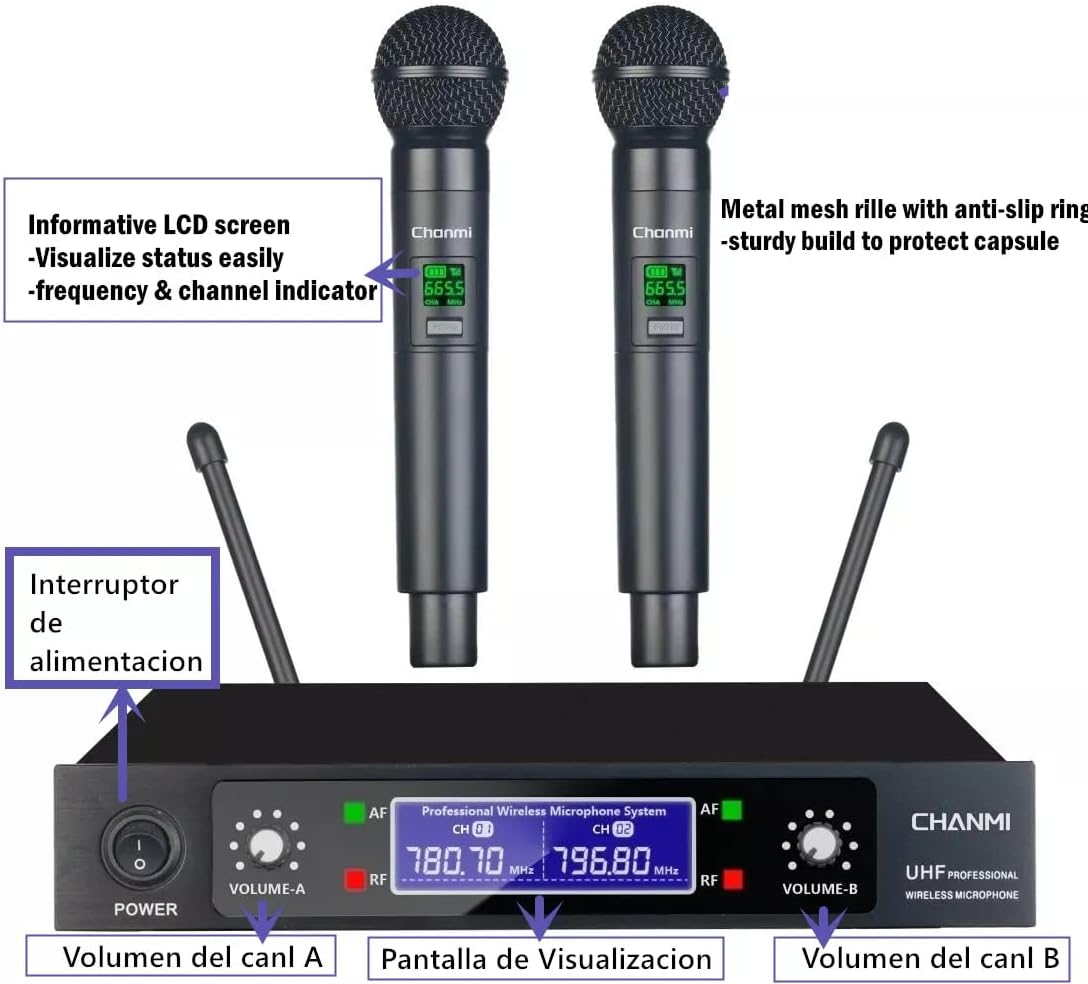
Image 3.1: Gochanmi TK100 Receiver and Microphones. The receiver features a power switch, volume controls for each channel (Volume A and Volume B), and a display screen showing frequency and status. The microphones have informative LCD screens and metal mesh grilles.
- Power Switch: Turns the receiver on or off.
- Volume Controls (A & B): Adjusts the output volume for each wireless microphone channel independently.
- Display Screen: Shows current frequency and connection status for both channels.
- Antennas: Two antennas for stable signal reception.
- 6.35mm Microphone Input: Allows connection of a third wired microphone (not included).
3.2. Handheld Microphones
The two handheld microphones are constructed from durable metal and designed for clear vocal pickup.

Image 3.2: Gochanmi TK100 Microphone internal view, highlighting the high-fidelity moving coil core. This design ensures precise sound capture over a wide area.
- Metal Construction: Provides durability and a professional feel.
- LCD Screen: Displays current operating frequency and remaining battery level.
- Cardioid Dynamic Capsule: Designed to pick up sound primarily from the front, reducing background noise and feedback.
- Battery Compartment: Houses two AA batteries (not included).
4. Setup Instructions
4.1. Installing Batteries in Microphones
- Unscrew the bottom part of each handheld microphone to reveal the battery compartment.
- Insert two AA batteries into each microphone, ensuring correct polarity (+/-).
- Screw the bottom part back on securely.
4.2. Connecting the Receiver
The receiver offers multiple output options for connecting to various audio devices.

Image 4.2: Rear panel of the Gochanmi TK100 Receiver, showing XLR balanced audio outputs (XLR Output A, XLR Output B), a mixed 6.35mm audio output, and the DC power input.
- Power Connection: Connect the provided power adapter to the DC IN port on the receiver and plug it into a power outlet.
- Audio Output Options:
- Mixed Output (6.35mm Jack): Use the provided RCA cable (or a 6.35mm to 6.35mm cable, not included) to connect the MIXED OUTPUT port to your amplifier, mixer, or active speaker's input. This combines both microphone signals into a single output.
- XLR Balanced Outputs (XLR Output A, XLR Output B): For professional setups, use XLR cables (not included) to connect XLR Output A and XLR Output B to a mixer or professional amplifier. This provides separate, balanced outputs for each microphone channel.
- Third Wired Microphone (Optional): If using a third wired microphone, connect its 6.35mm cable to the 6.35mm MIC input on the front of the receiver.
4.3. Connection Diagrams
Refer to the following diagrams for common connection scenarios:

Image 4.3: General connection diagram showing how to connect the TK100 receiver to a PC, mixer, power amplifier, and speakers. Note: For optimal performance, use speakers with a power rating above 70 Watts. Low-power speakers may result in low microphone volume or malfunction.
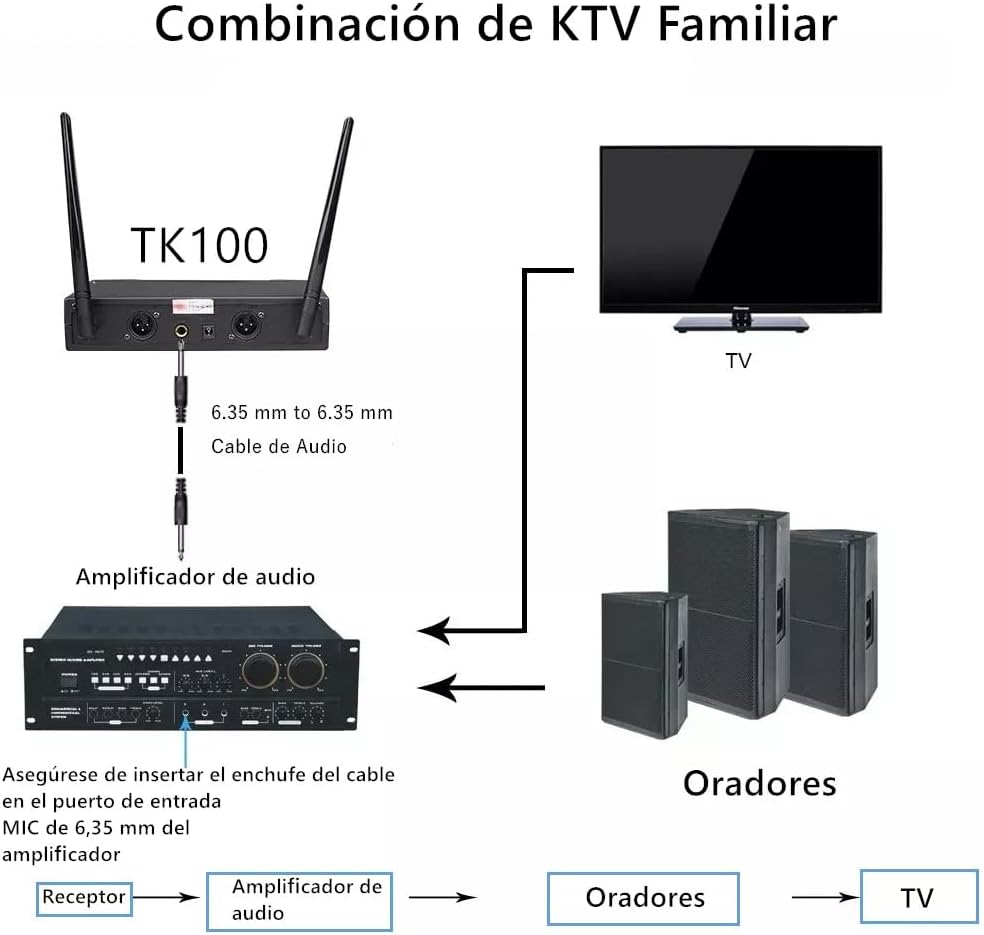
Image 4.4: KTV Family Combination diagram. Connect the TK100 receiver to an audio amplifier using a 6.35mm audio cable. The amplifier then connects to speakers and a TV for a home karaoke setup. Ensure the cable is inserted into the MIC 6.35mm input port of the amplifier.
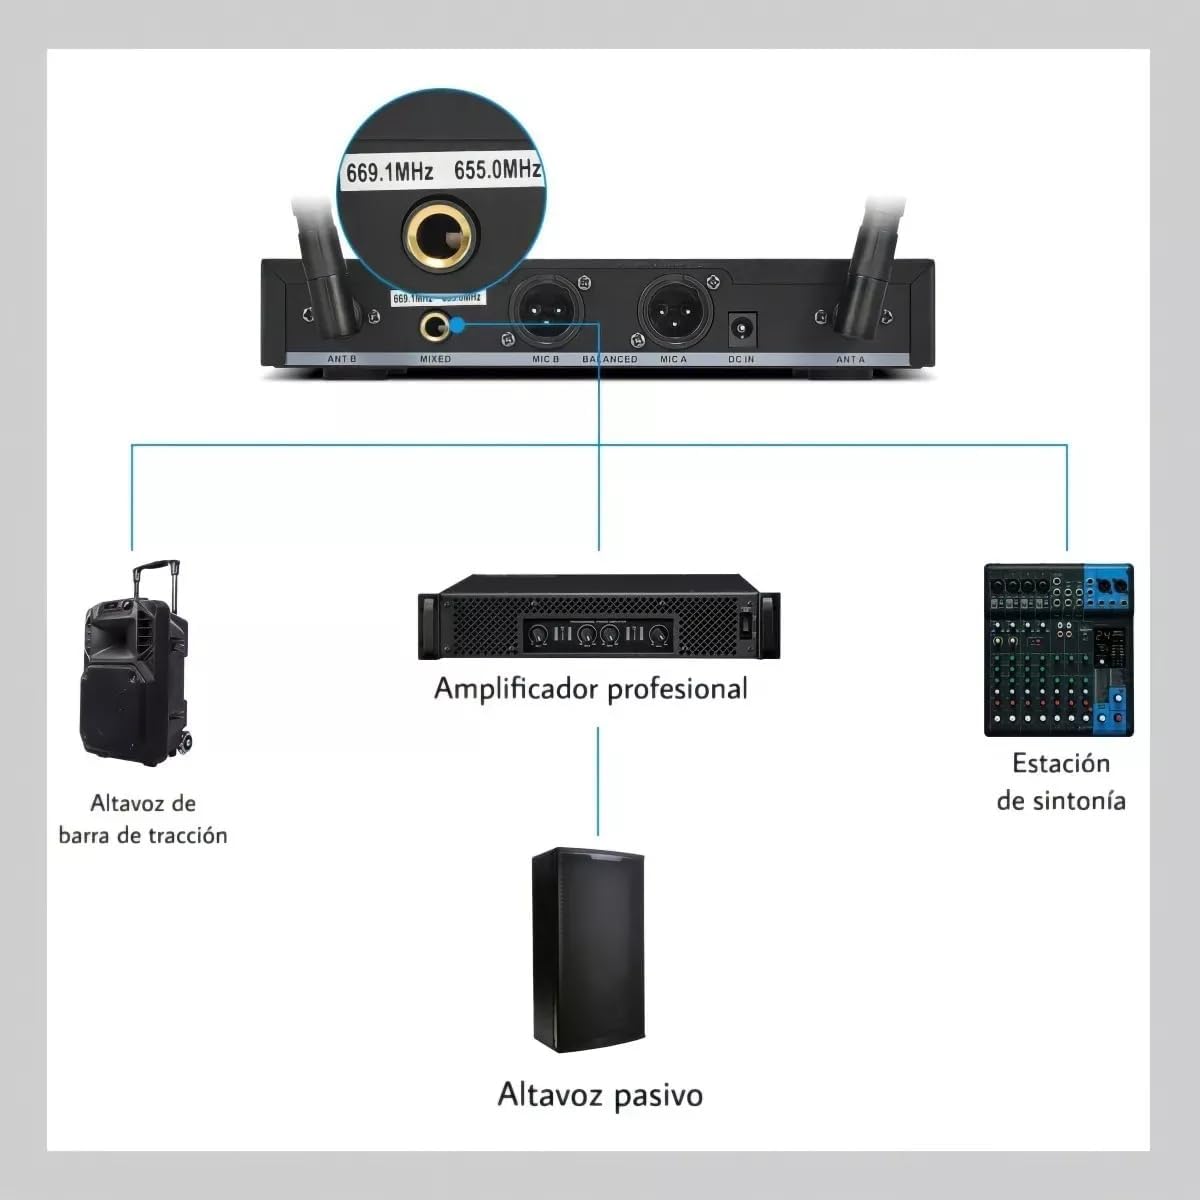
Image 4.5: Professional setup diagram. The receiver can connect to a professional amplifier, a passive speaker, and a tuning station (mixer) for more advanced audio control. The image also indicates frequency settings (e.g., 669.1MHz, 655.0MHz).
5. Operating Instructions
5.1. Powering On/Off
- Receiver: Press the power button on the front panel of the receiver to turn it on. The display screen will illuminate.
- Microphones: Press and hold the power button on each handheld microphone until its LCD screen illuminates. The microphone will automatically pair with the receiver.
- To power off, reverse the steps.
5.2. Volume Adjustment
- Use the "VOLUME-A" and "VOLUME-B" knobs on the receiver's front panel to adjust the output volume of Microphone A and Microphone B independently.
- Adjust the master volume on your connected amplifier or mixer to achieve the desired overall sound level.
5.3. Monitoring Status
- Receiver Display: The receiver's display shows the operating frequency and signal strength (RF/AF indicators) for both channels.
- Microphone LCD: Each microphone's LCD screen displays its current operating frequency and remaining battery level. Monitor the battery level to avoid interruptions during use.
5.4. Operating Range
The system offers a reception range of up to 80 meters (260 feet) in open areas. Optimal performance is achieved when there are no significant obstructions between the microphones and the receiver. Avoid placing the receiver near metal objects or other wireless devices that may cause interference.
6. Maintenance
- Cleaning: Use a soft, dry cloth to clean the receiver and microphones. Do not use liquid cleaners or abrasive materials.
- Battery Replacement: Replace microphone batteries when the low battery indicator appears on the microphone's LCD screen. Always use fresh AA batteries.
- Storage: When not in use for extended periods, remove batteries from the microphones and store the system in a cool, dry place away from direct sunlight and extreme temperatures.
- Antennas: Ensure the receiver antennas are securely attached and positioned for optimal reception.
7. Troubleshooting
7.1. No Sound Output
- Ensure the receiver is powered on and connected correctly to your audio system (amplifier, mixer, active speakers).
- Check that the microphones are powered on and have fresh batteries.
- Verify that the volume knobs on the receiver and your audio system are turned up.
- Confirm that the microphone's frequency is displayed on both the microphone and receiver, indicating a successful connection.
- Check all audio cables for secure connections and damage.
7.2. Interference or Poor Sound Quality
- Ensure the receiver antennas are fully extended and positioned vertically.
- Move the receiver away from other electronic devices (Wi-Fi routers, cordless phones, computers, large metal objects) that may cause interference.
- Ensure the operating distance between the microphones and receiver is within the specified range (up to 80 meters).
- Avoid using multiple wireless systems on the same frequency band in close proximity.
7.3. Microphone Not Pairing
- Ensure the microphone has fresh batteries and is powered on.
- Power cycle both the microphone and the receiver.
- If the issue persists, consult the manufacturer's support for frequency synchronization instructions (if applicable, though this model seems to auto-pair).
8. Specifications
| Brand | Gochanmi |
| Model Name | TK100 |
| Connectivity Technology | UHF |
| Number of Channels | 2 |
| Operating Range | Up to 80 meters (260 feet) |
| Microphone Type | Dynamic Handheld |
| Polar Pattern | Cardioid Directional |
| Material | Metal |
| Audio Sensitivity | 80 dB |
| Signal-to-Noise Ratio | 120 dB |
| Microphone Power Source | 2 x AA Batteries (per microphone, not included) |
| Receiver Output Connectors | 1 x 6.35mm Mixed Output, 2 x XLR Balanced Outputs |
| Receiver Input Connectors | 1 x 6.35mm Wired Microphone Input |
| Compatible Devices | Amplifier, Audio Mixer, Television, Karaoke Machine |
| Product Dimensions (L x W x H) | 27.8 x 36.8 x 7.8 cm |
| Product Weight | 2 kg |
| Color | Black |
9. Warranty and Support
Gochanmi products are designed for reliability and performance. For any questions, technical assistance, or warranty inquiries, please contact your retailer or Gochanmi customer support. Please retain your proof of purchase for warranty claims.