1. Introduction
The Gochanmi ET12 is a professional 12-channel audio mixer designed for high-quality sound mixing in live performances, recording studios, and various audio applications. It features ultra-low noise preamplifiers, 48V phantom power, a 3-band equalizer on each mono channel, a 5-band stereo equalizer, 16 built-in analog effects, and versatile connectivity options including USB and Bluetooth.
2. Product Overview
The ET12 mixer provides comprehensive control over your audio signals. Familiarize yourself with the layout and functions of the various controls and inputs/outputs.

Figure 2.1: Front view of the Gochanmi ET12 mixer, showing all channels, faders, knobs, and the central display.
2.1 Input and Output Interfaces

Figure 2.2: Detail of microphone (XLR) and line (1/4 inch) inputs, along with the +48V phantom power switch.
- Microphone Inputs: 12 XLR inputs for connecting microphones.
- Line Inputs: 12 1/4 inch (6.35mm) line inputs for instruments or other audio devices.
- 48V Phantom Power: Switchable for condenser microphones.
- Auxiliary Output: 1 set of auxiliary outputs.
- Headphone Monitor Output: 1/4 inch (6.35mm) output for monitoring.
- USB Port: For computer connection and U disk recording/playback.
- Bluetooth: Wireless audio input.
2.2 Channel Controls
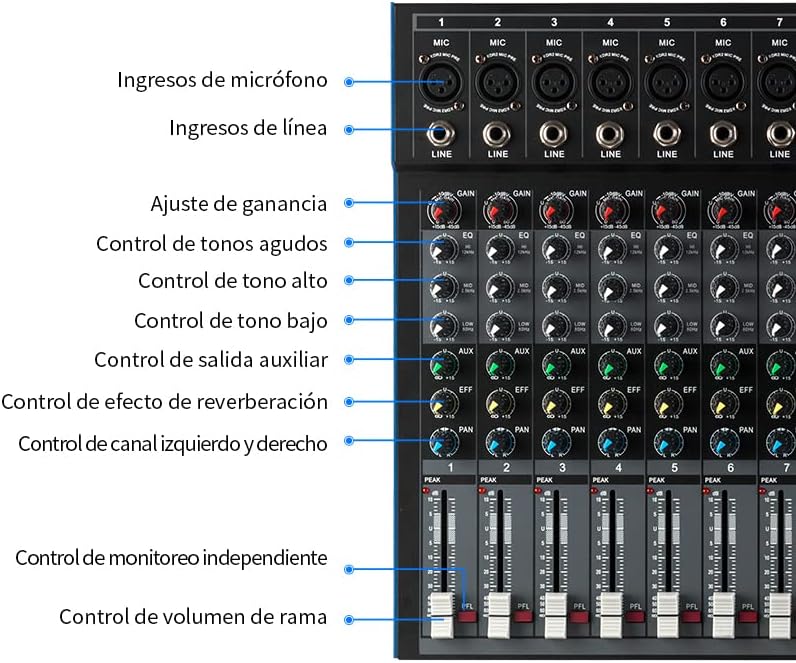
Figure 2.3: Labeled controls for individual channels, including Gain, High Tone, Mid Tone, Low Tone, Auxiliary Send, Reverb Effect Send, Left/Right Channel Control (Pan), Independent Monitoring (PFL), and Channel Volume Fader.
- GAIN Control: Adjusts input sensitivity for each channel.
- 3-Band EQ: High, Mid, and Low frequency controls for tone shaping.
- AUX Send: Controls the level sent to the auxiliary output.
- EFF Send: Controls the level sent to the internal effects processor.
- PAN Control: Adjusts the stereo position of the channel.
- PEAK LED: Indicates when the input signal is clipping.
- PFL (Pre-Fader Listen): Activates independent monitoring for the channel.
- Channel Fader: Adjusts the output volume of each channel.
2.3 Master Section Controls

Figure 2.4: Labeled controls for the master section, including MP3 player controls, display, effect level adjustments, and main volume faders.
- MP3/USB Player: Controls for playback from USB drive or Bluetooth.
- Display Screen: Shows status for MP3/USB/Bluetooth and effects.
- Effect Selector/Level: Selects and adjusts the level of the 16 built-in effects.
- Main Mix Faders: Controls the overall output volume.
- Headphone Monitor Level: Adjusts the volume for headphone output.
3. Setup
Follow these steps to set up your Gochanmi ET12 audio mixer.
3.1 Power Connection
- Ensure the mixer's power switch is in the OFF position.
- Connect the provided power adapter to the mixer's power input.
- Plug the power adapter into a suitable electrical outlet.
3.2 Connecting Audio Devices

Figure 3.1: Example connection diagram for the ET12 mixer with various input and output devices.
- Microphones: Connect XLR cables from your microphones to the MIC inputs (1-12). If using condenser microphones, activate the +48V phantom power switch for the respective channels.
- Line-Level Devices: Connect instruments (e.g., keyboards, guitars with DI boxes) or other audio sources (e.g., CD players) to the LINE inputs using 1/4 inch (6.35mm) cables.
- Output Devices: Connect the main outputs (e.g., XLR or 1/4 inch) to your power amplifier, powered speakers, or recording interface.
- Headphones: Plug your headphones into the PHONES output for monitoring.
- Computer Connection: Connect a USB cable from the mixer's USB port to your computer for recording or playback.
4. Operating Instructions
This section details the basic operation of your Gochanmi ET12 mixer.
4.1 Powering On and Initial Checks
- Ensure all channel faders and the main mix faders are set to their lowest position.
- Turn on the mixer using the power switch.
- Gradually raise the main mix faders to a comfortable listening level.
4.2 Adjusting Input Levels (Gain)
- Select a channel with an active input source.
- Slowly increase the GAIN knob for that channel until the PEAK LED flashes only occasionally during the loudest parts of the signal. Avoid constant illumination of the PEAK LED to prevent distortion.
- Adjust the channel fader to balance the level with other channels.
4.3 Using the Equalizer (EQ)

Figure 4.1: Visual representation of a 3-band equalizer's effect on high, mid, and low frequencies.
Each mono input channel features a 3-band EQ (High, Mid, Low) for precise tone shaping. The master section includes a 5-band stereo equalizer.
- HIGH: Adjusts the treble frequencies.
- MID: Adjusts the mid-range frequencies.
- LOW: Adjusts the bass frequencies.
Turn the knobs clockwise to boost frequencies and counter-clockwise to cut them. Start with all EQ knobs at the center (flat) position and make subtle adjustments.
4.4 Applying Effects
The ET12 features 16 built-in analog effects.
- Use the EFFECT selector knob in the master section to choose an effect.
- Adjust the EFF SEND knob on individual channels to send a portion of that channel's signal to the effects processor.
- Use the master EFFECT RETURN knob to control the overall level of the applied effect in the main mix.
4.5 Bluetooth Connectivity

Figure 4.2: The mixer's integrated Bluetooth module allows wireless connection to compatible devices for audio playback.
- Press the MODE button in the MP3/USB section until 'Bluetooth' is displayed.
- On your Bluetooth-enabled device (e.g., smartphone, tablet), search for available devices and select 'ET12 Mixer'.
- Once paired, you can play audio from your device through the mixer. Adjust the MP3/USB channel fader for volume control.
4.6 USB Playback and Recording
The mixer supports direct USB connection for computer recording and U disk (USB drive) recording/playback.
- USB Drive Playback: Insert a USB drive containing MP3 files into the USB port. Use the MP3/USB controls (Play/Pause, Next/Previous) to navigate and play tracks.
- USB Recording (to U Disk): Press the REC button in the MP3/USB section to start recording the main mix directly to a connected USB drive. Press REC again to stop.
- USB Audio Interface (to Computer): Connect the mixer to a computer via USB. The mixer will function as an audio interface, allowing you to record the main mix into your digital audio workstation (DAW) software or play audio from your computer through the mixer.
5. Maintenance
Proper maintenance ensures the longevity and optimal performance of your mixer.
- Cleaning: Use a soft, dry cloth to clean the exterior of the mixer. Avoid using abrasive cleaners, solvents, or waxes. Do not spray liquids directly onto the mixer.
- Storage: Store the mixer in a cool, dry place away from direct sunlight, extreme temperatures, and high humidity. If transporting, use appropriate protective casing.
- Ventilation: Ensure proper ventilation around the mixer to prevent overheating. Do not block ventilation openings.
- Power Cord: Regularly inspect the power cord for any damage. Do not use a damaged power cord.
6. Troubleshooting
This section addresses common issues you might encounter with your ET12 mixer.
| Problem | Possible Cause | Solution |
|---|---|---|
| No sound output |
|
|
| Distorted sound |
|
|
| Microphone not working (condenser mic) |
|
|
| Bluetooth not connecting |
|
|
| USB recording not working |
|
|
7. Specifications
Key technical specifications for the Gochanmi ET12 Audio Mixer:
- Model: ET12
- Channels: 12 (Microphone/Line inputs)
- Phantom Power: +48V (switchable per channel)
- Equalization: 3-band EQ per mono channel, 5-band stereo EQ
- Effects: 16 built-in analog effects
- Connectivity: USB, Bluetooth
- Dimensions: 53 x 44 x 10 cm (approximately 20.9 x 17.3 x 3.9 inches)
- Weight: 5.5 kg (approximately 12.1 lbs)
- UPC: 791360189985
8. Warranty and Support
For warranty information or technical support, please refer to the documentation included with your purchase or contact Gochanmi customer service through their official channels. Keep your purchase receipt as proof of purchase.