1. Introduction
Thank you for choosing the Gevi 10-Cup Coffee Maker with Built-in Grinder. This versatile appliance allows you to enjoy freshly ground and brewed coffee with ease. Featuring a programmable timer, adjustable grind settings, and strength control, it's designed to deliver a perfect cup every time. This manual provides detailed instructions for setup, operation, maintenance, and troubleshooting to ensure optimal performance and longevity of your coffee maker.

Figure 1: Gevi 10-Cup Coffee Maker
2. Safety Instructions
Please read all safety instructions carefully before using the appliance to prevent personal injury or damage to the coffee maker.
- Always unplug the coffee maker from the power outlet before cleaning or when not in use.
- Do not immerse the cord, plug, or the appliance itself in water or other liquids.
- Close supervision is necessary when the appliance is used by or near children.
- Do not operate any appliance with a damaged cord or plug, or after the appliance malfunctions or has been damaged in any manner.
- Use the appliance only for its intended household use.
- Do not touch hot surfaces. Use handles or knobs. The warming plate remains hot after brewing.
- Ensure the carafe is properly placed on the warming plate before brewing.
3. Parts Identification
Familiarize yourself with the components of your Gevi coffee maker:
- Bean Hopper: Stores whole coffee beans for grinding.
- Grind Adjustment Knob: Controls the fineness of the coffee grind.
- Water Reservoir: Holds water for brewing (1.5L capacity, up to 10 cups).
- Control Panel: Features LCD display, Program, Grind Off, Strength Control, On/Off, Powder (2-10 cups), Hour, and Min buttons.
- Filter Basket: Holds the reusable filter and coffee grounds. Swings out for easy access.
- Glass Carafe: Collects brewed coffee (10-cup capacity).
- Warming Plate: Keeps brewed coffee warm.
- Powder Outlet: Where ground coffee is dispensed into the filter basket.

Figure 2: Coffee Maker Components and Dimensions
4. Setup
Before first use, it is recommended to clean the coffee maker.
- Initial Cleaning: Fill the water reservoir with 10 cups of clean water. Place the empty carafe on the warming plate. Press the ON/OFF button to run a full brewing cycle without coffee. Discard the water. Repeat this process 2-3 times to ensure the system is clean.
- Place Carafe: Ensure the glass carafe is correctly positioned on the warming plate.
- Add Water: Open the water reservoir lid and fill with fresh, cold water up to the desired cup marking (MAX 10 cups).
- Add Coffee:
- For Whole Beans: Open the bean hopper lid and add whole coffee beans. Close the lid securely.
- For Pre-Ground Coffee: Press the Filter Basket Release Button to open the Swing-out Filter Basket. Place your desired amount of pre-ground coffee into the reusable filter. Close the filter basket gently. Press the GRIND OFF button on the control panel to disable the grinder.
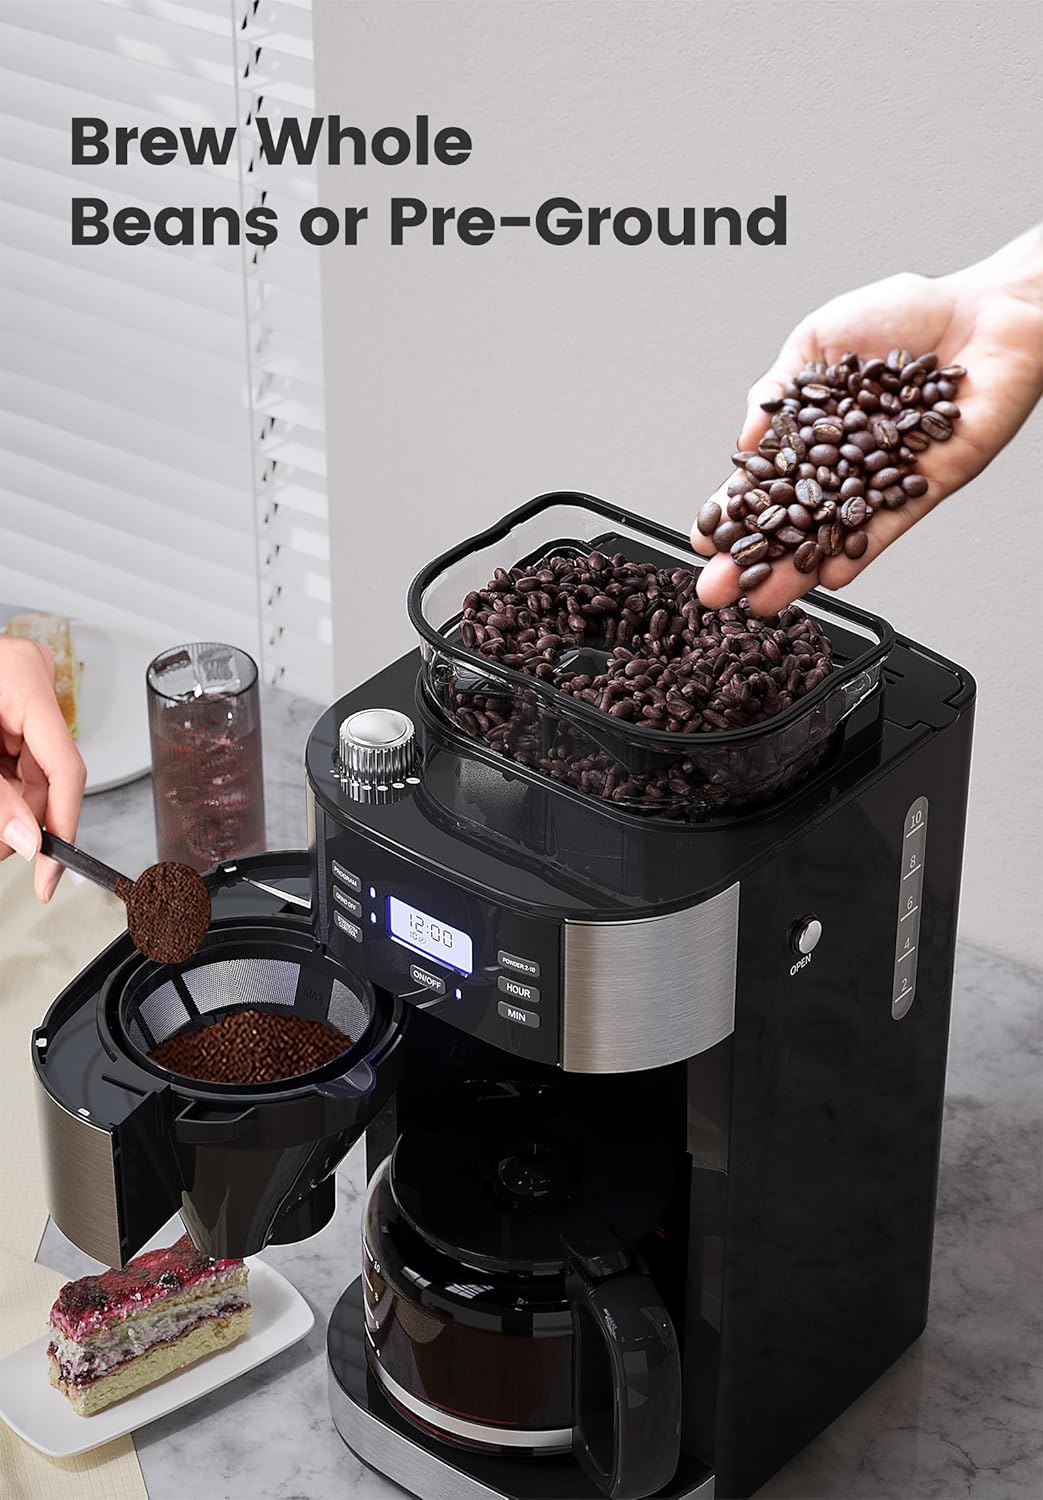
Figure 3: Adding Whole Beans or Pre-Ground Coffee
5. Operating Instructions
Follow these steps to brew your coffee:
- Adjust Grind Level (for whole beans): Rotate the Grind Adjustment Knob on top of the bean hopper to select your desired grind fineness (from coarse to fine).
- Select Cup Quantity: Press the 'Powder 2-10' button repeatedly to select the number of cups you wish to brew (2 to 10 cups). The display will show the selected quantity.
- Adjust Coffee Strength: Press the 'Strength Control' button to choose your preferred coffee strength (light, medium, dark).
- Start Brewing: Press the 'ON/OFF' button. The machine will begin grinding (if whole beans are used) and then start the brewing process.
- Programmable Brewing:
- Set Current Time: Press the 'Hour' and 'Min' buttons to set the current time on the display.
- Set Program Time: Press the 'Program' button. The display will flash. Use the 'Hour' and 'Min' buttons to set the desired time for brewing to start. Press 'Program' again to confirm. The 'Program' indicator light will illuminate.

Figure 4: Setting the 24-Hour Programmable Brew
- Grab-A-Cup Auto Pause: The machine features an auto-pause function that allows you to temporarily remove the carafe (for up to 30 seconds) to pour a cup before the brewing cycle is complete. Brewing will resume once the carafe is returned.
- Warm-Keeping Function: After brewing, the warming plate will automatically keep the coffee warm for up to 120 minutes. You can adjust this time using the control panel.
How to Use Gevi 10-Cup Coffee Maker with Grinder
Video 1: Demonstrates the basic operation of the Gevi 10-Cup Coffee Maker, including adding water and coffee, selecting settings, and starting the brew cycle.
6. Maintenance and Cleaning
Regular cleaning ensures the best coffee taste and extends the life of your appliance.
Daily Cleaning (After Each Brew)
- Remove Carafe: Carefully remove the glass carafe from the warming plate.
- Discard Grounds: Press the Filter Basket Release Button to open the Swing-out Filter Basket. Remove the filter insert, discard used coffee grounds, and rinse the filter under running water.
- Wipe Powder Outlet: Use a clean, dry cloth to wipe any coffee residue from the powder outlet and the inside area around the filter basket. Do not touch the hot warming plate.
- Clean Carafe: Wash the glass carafe and its lid with warm, soapy water. Rinse thoroughly and dry.
- Reassemble: Place the clean filter back into the filter basket and close the swing-out filter basket gently. Return the clean carafe to the warming plate.
How To Clean After Each Brew
Video 2: Provides a step-by-step guide on how to clean the Gevi coffee maker after each use, focusing on the filter basket and carafe.
Deep Cleaning (Descaling)
Descaling should be performed regularly (e.g., every 2-3 months, or more often with hard water) to remove mineral deposits.
- Prepare Descaling Solution: Mix 33 grams of descaler (or white vinegar) with 10 cups of water in a glass jug. Stir evenly.
- Fill Water Tank: Pour the descaling solution into the water tank.
- Run Descaling Cycle: Place the empty carafe on the warming plate. Press the ON/OFF button to start a brewing cycle. Let the machine brew about 2 cups of the solution, then press ON/OFF to stop.
- Soak: Wait for 60 minutes to allow the solution to work inside the machine.
- Complete Cycle: Press the ON/OFF button again to brew the remaining solution. Wait until the machine beeps 3 times and the brew cycle is complete.
- Rinse Cycles: Empty the carafe and fill it with 10 cups of clean water. Pour this clean water into the water tank. Run a full brewing cycle with clean water. Repeat this rinsing process 2-3 times to ensure all descaling solution is flushed out.
How To Deeply Clean The Coffee Machine
Video 3: Illustrates the deep cleaning (descaling) process for the Gevi coffee maker, including preparing the solution and running the cleaning cycles.
7. Troubleshooting
Refer to the table below for common issues and their solutions:
| Problem | Possible Cause | Solution |
|---|---|---|
| Coffee not brewing | No water in reservoir; machine not plugged in; program not set correctly. | Fill water reservoir; check power connection; verify program settings. |
| Weak coffee | Insufficient coffee grounds; grind too coarse; strength setting too low. | Add more coffee; adjust grind to finer setting; increase strength setting. |
| Grinder not working | Bean hopper empty; GRIND OFF button activated; beans jammed. | Add beans; deactivate GRIND OFF; clear any jammed beans. |
| Machine leaking | Carafe not properly placed; filter basket overflowing. | Ensure carafe is centered; do not overfill filter basket. |
| Coffee tastes bad | Machine needs descaling; old coffee grounds; poor water quality. | Perform descaling; clean thoroughly; use filtered water. |
8. Specifications
| Feature | Detail |
|---|---|
| Brand | Gevi |
| Model Number | 1025 |
| Product Dimensions | 12"D x 10"W x 17"H |
| Item Weight | 9.92 pounds |
| Coffee Maker Type | Drip Coffee Machine |
| Coffee Input Type | Beans and Ground Coffee |
| Filter Type | Reusable |
| Voltage | 120 Volts |
| Special Features | Integrated Coffee Grinder, Programmable, Keep Warm Plate |
9. Warranty and Support
Your Gevi coffee maker comes with a manufacturer's warranty. Please refer to the warranty card included in your product packaging for specific terms and conditions.
For technical support, troubleshooting assistance, or warranty claims, please contact Gevi customer service through their official website or the contact information provided in your product documentation.
You can also visit the Gevi Store on Amazon for additional resources and product information.