kavey KXS-56
Kavey 2.6 Cubic Feet Safe Box User Manual
Model: KXS-56 | Brand: Kavey
Introduction
This user manual provides comprehensive instructions for the Kavey 2.6 Cubic Feet Safe Box. It covers setup, operation, maintenance, and troubleshooting to ensure optimal performance and security for your valuables. Please read this manual thoroughly before using the safe.
Product Overview & Components
The Kavey 2.6 Cub Safe Box is designed to protect your money, documents, and other valuables with advanced security features including an LCD touch screen, dual alarm system, and a hidden compartment.

Figure 1: Kavey 2.6 Cubic Feet Safe Box with interior view.
Included Components:
- 1 x Kavey Safe Box
- 2 x Emergency Keys
- 2 x Hidden Compartment Keys
- 6 x Expansion Screws
- 1 x Emergency Battery Box
- 4 x Non-Slip Foot Mats
- 1 x User Manual (this document)

Figure 2: Product Instruction Diagram with labeled parts.
Setup
1. Initial Opening & Battery Installation
Upon receiving your safe, you will need to open it using the emergency key and install the batteries.
- Locate the emergency keyhole, usually hidden behind the Kavey logo plate or a small cover on the keypad.
- Insert one of the provided emergency keys into the keyhole and turn it.
- Simultaneously turn the main knob to open the safe door.
- Inside the door, locate the battery compartment. It typically requires 4 AA batteries (not included).
- Insert the batteries, ensuring correct polarity.
- Close the battery compartment cover.
Video 1: Demonstrates the three unlocking methods, including emergency key use and battery installation.

Figure 3: Visual guide to the three unlocking methods and mute function.
2. Setting Passcodes
Your safe supports setting a primary and a secondary passcode.
- With the safe door open, press the green "Setting Button" located on the inside of the door (refer to Figure 2). You will hear a beep.
- On the LCD touch screen, enter your desired new code (8 digits recommended), then press the '#' key to confirm.
- Repeat the new code and press '#' again to confirm. A successful confirmation will be indicated by a beep.
- To set a second code, repeat steps 1-3.
Video 2: Demonstrates setting the primary and secondary passcodes.
3. Mounting the Safe
For enhanced security, it is highly recommended to mount your safe to a wall or floor.
- The safe features pre-drilled holes on the back and bottom for easy installation.
- Use the provided expansion screws to secure the safe to a solid surface.
- If placing on the floor without mounting, attach the non-slip foot mats to the bottom to prevent scratching and provide stability.

Figure 4: Pre-drilled holes on the back of the safe for mounting.
Operating Instructions
1. Opening the Safe
- Using Passcode: Enter your 8-digit passcode on the LCD touch screen, then turn the knob clockwise to open the door.
- Using Emergency Key: Insert the emergency key into the keyhole, turn it, and simultaneously turn the main knob to open.
- Using Emergency Battery Box (if main batteries are dead): Connect the emergency battery box to the external power port (usually near the keypad). Enter your passcode, then turn the knob to open.
2. Mute Function
To enable or disable the keypad sound:
- Press '*' then '1' on the keypad to turn on the mute function.
- Press '*' then '1' again to turn off the mute function.
Video 3: Demonstrates how to activate and deactivate the mute function.
3. Dual Alarm System
The safe is equipped with a dual alarm system for enhanced security:
- Incorrect Code Alarm: If an incorrect code is entered three consecutive times, the alarm will activate.
- Vibration Alarm: If the safe is shaken or hit hard, the vibration alarm will activate. The alarm sound can reach up to 70 decibels.
- To stop the alarm, enter the correct passcode.
Video 4: Demonstrates the anti-tampering alarm system.

Figure 5: Visual representation of the dual alarm system.
4. Hidden Compartment
The safe includes a unique invisible hidden compartment for double security.
- To access, lift the bottom felt lining of the safe.
- Use the dedicated hidden compartment key to unlock and open the small inner compartment.
Video 5: Demonstrates the removable shelf and hidden compartment features.
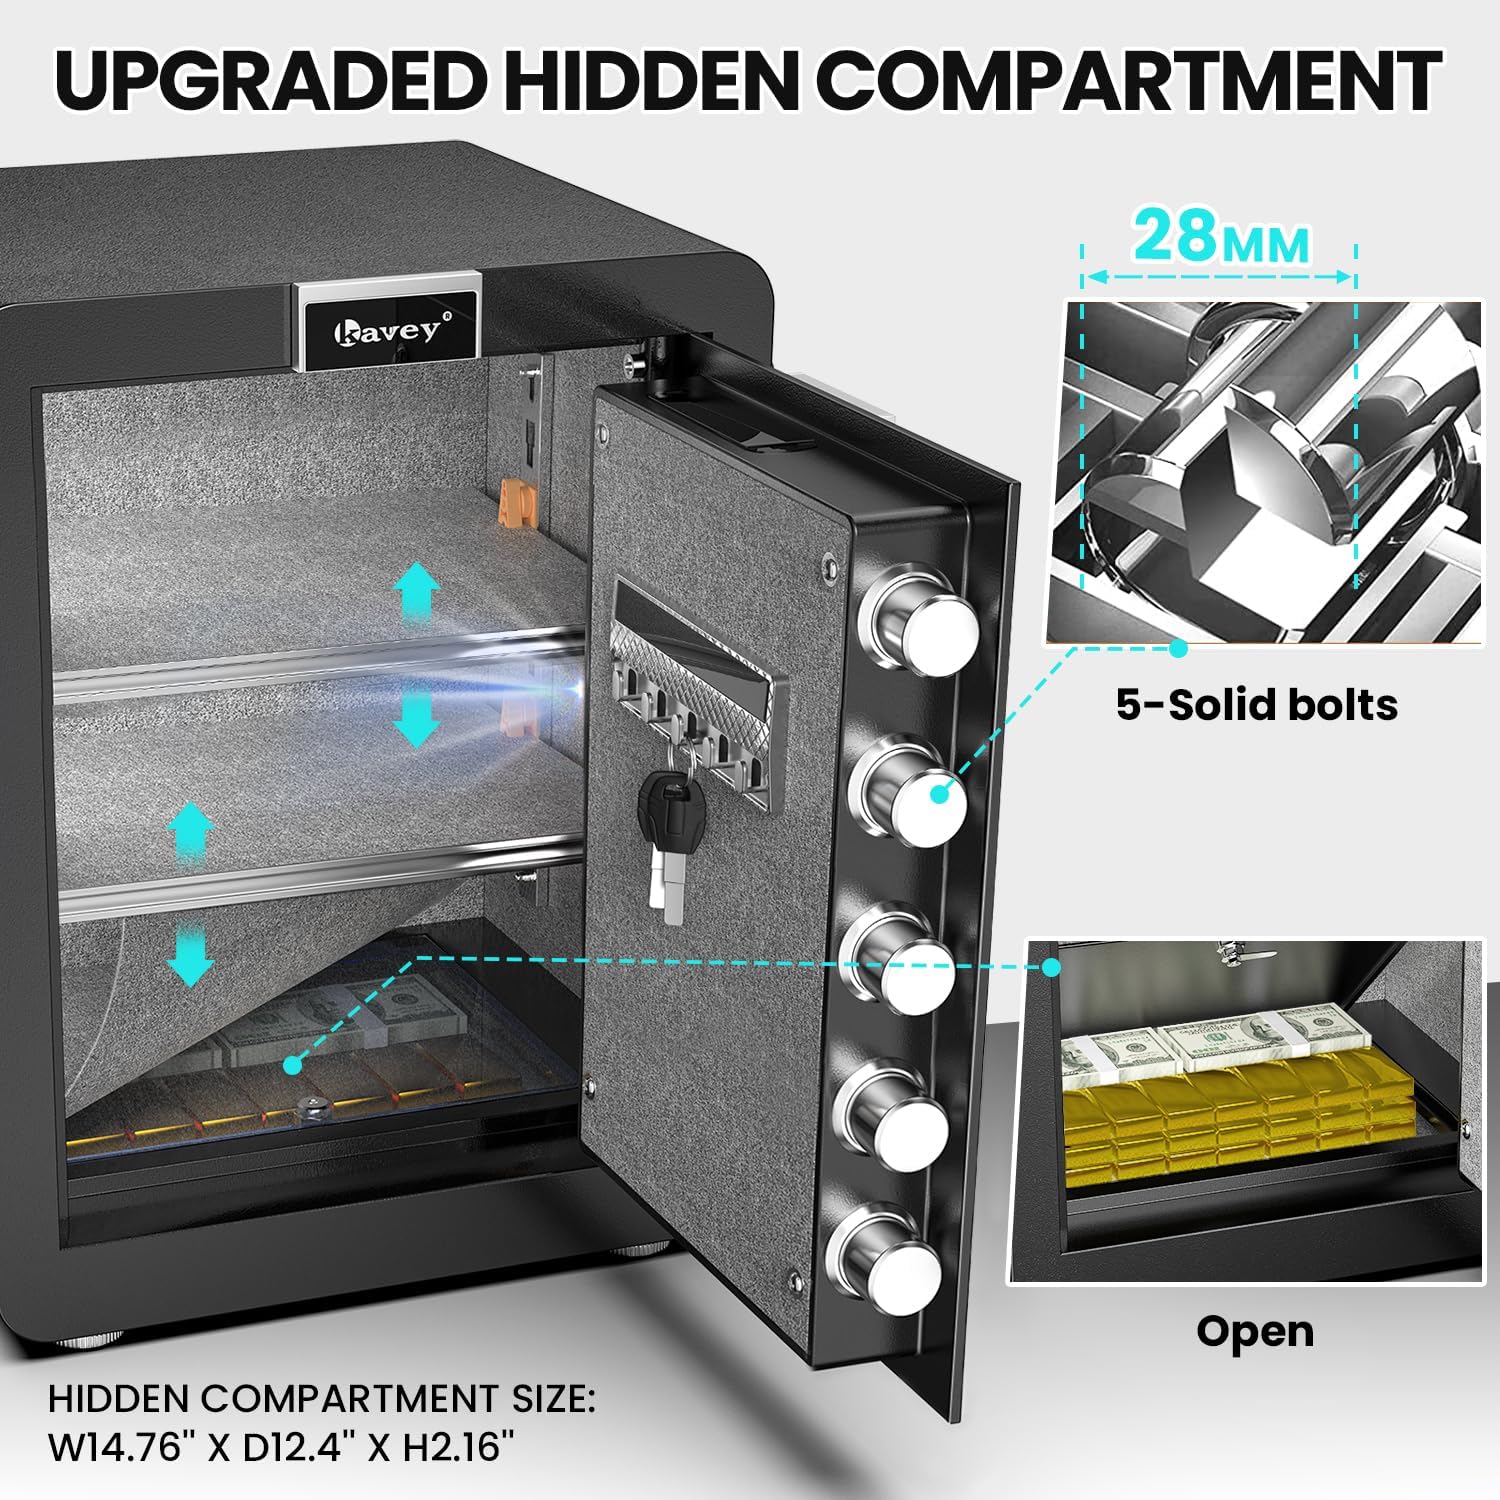
Figure 6: The upgraded hidden compartment for additional security.
5. Removable and Adjustable Shelves
The safe features removable and adjustable shelves to customize your storage space.
- Simply lift and slide the shelves out of their current position.
- Re-insert them into the desired slots along the side rails to adjust height.
Video 6: Demonstrates the removable and adjustable shelf feature.
Maintenance
- Regularly check battery levels and replace them when low to avoid being locked out.
- Clean the exterior with a soft, damp cloth. Avoid abrasive cleaners.
- Ensure the door closes securely and the locking bolts engage properly.
- Keep emergency keys and hidden compartment keys in a secure location outside the safe.
Troubleshooting
| Problem | Possible Cause | Solution |
|---|---|---|
| Safe won't open with passcode. | Incorrect code entered, low batteries. | Ensure correct passcode. Replace batteries or use emergency battery box. Use emergency key. |
| Alarm sounds unexpectedly. | Incorrect code attempts, physical impact. | Enter correct passcode to disarm. Avoid shaking or hitting the safe. |
| Keypad is unresponsive. | Dead batteries, internal malfunction. | Replace batteries. If issue persists, contact customer service. |
| Door does not close properly. | Obstruction, misaligned bolts. | Check for obstructions. Ensure bolts retract fully before closing. |
Specifications
| Feature | Detail |
|---|---|
| Brand | Kavey |
| Model Number | KXS-56 |
| Capacity | 2.6 Cubic Feet |
| Product Dimensions | 13"D x 15.7"W x 22.05"H |
| Lock Type | Electronic Combination Lock |
| Material | Alloy Steel |
| Special Features | Alarm System, Hidden Compartment, LED Light, Removable/Adjustable Shelves |
| Mounting Type | Wall Mount, Floor Mount |
| Item Weight | 46.5 pounds (21.14 Kilograms) |
| Water Resistance Level | Not Water Resistant |
Warranty & Support
Kavey offers a one-year product service for your safe box. For any issues or inquiries, please contact our customer service team directly. We provide 24-hour online customer service and 90-day unconditional returns.
Key Matching Service: In case of lost keys, a key matching service is available.
How to Find the Seller on Amazon:
- Log in to your Amazon buyer's account.
- Find your order for the Kavey Safe Box.
- Click "Get help" to contact the seller directly.

Figure 7: Kavey's Professional After-Sales Service information.
Ask a question about this manual
Ask about setup, troubleshooting, compatibility, parts, safety, or missing instructions. Manuals+ will review the question and use this page’s manual context to help answer it.