1. Introduction
This manual provides essential information for the safe installation, operation, and maintenance of your Philips LED Slim Flood Light, model PTF150-NW-G1-Y-FL-8-BZ. Please read this manual thoroughly before installation and retain it for future reference.
The Philips LED Slim Flood Light is designed for outdoor applications such as sign lighting, building facades, security lighting, and general area illumination. Its robust construction and efficient LED technology ensure reliable performance.
2. Safety Information
WARNING: Risk of electric shock. Installation should be performed by a qualified electrician or trained personnel in accordance with all applicable electrical codes.
- Disconnect power at the circuit breaker or fuse box before installation or servicing.
- Ensure the supply voltage is compatible with the fixture's requirements (120V AC).
- Do not operate the fixture with damaged wiring or components.
- Avoid direct eye exposure to the light source when illuminated.
- The fixture's housing acts as a heat sink and may become hot during operation. Allow adequate cooling time before handling.
- Ensure all connections are secure and properly sealed, especially the IP66 liquid-tight connector for the power cord, to maintain water resistance.
- Do not modify the fixture. Any modifications may void the warranty and create safety hazards.
3. Package Contents
Verify that all components are present before beginning installation:
- Philips LED Slim Flood Light (1 unit)
- Integrated Yoke Mount (pre-attached)
- Power Cord (3-foot, STW 16 gauge)
- IP66 Liquid Tight Connector (pre-attached to cord exit)

Image 1: Philips LED Slim Flood Light. This image shows the front view of the flood light with its integrated yoke mount and power cord connection point.
4. Specifications
| Specification | Detail |
|---|---|
| Model Number | PTF150-NW-G1-Y-FL-8-BZ |
| Brand | Signify (Philips) |
| Wattage | 150 Watts |
| Lumen Output | 18600 Lumens |
| Color Temperature | 4000K Cool White |
| Efficiency | 124 lumens per watt |
| Voltage | 120 Volts (AC) |
| Mounting Type | Yoke Mount (Surface Mount) |
| Finish | Bronze |
| Material | Die-cast aluminum housing, tempered glass lens |
| Ingress Protection (IP) Rating | IP65 (fixture), IP66 (connector) |
| Item Weight | 4 Pounds |
| Dimensions (Approx.) | 16.93" H x 11.41" W x 2.36" D (430mm H x 289.8mm W x 59.9mm D) |
5. Setup and Installation
The Philips LED Slim Flood Light is designed for surface mounting using its integrated yoke. Follow these steps for proper installation:
- Preparation: Ensure power is disconnected at the main circuit breaker. Gather necessary tools (drill, screwdriver, wire strippers, electrical tape, mounting hardware suitable for your surface).
- Mounting Location: Select a sturdy surface (wall, pole, ground) capable of supporting the fixture's weight and providing adequate clearance for light distribution.
- Marking and Drilling: Use the yoke mount as a template to mark the drilling points on the mounting surface. Drill appropriate pilot holes for your chosen mounting hardware. Refer to the dimension diagram for precise measurements.
- Secure the Fixture: Attach the yoke mount securely to the prepared surface using appropriate screws or bolts (not included). Ensure the fixture is stable and cannot vibrate loose. The yoke includes a bolt to lock in the aiming angle after adjustment.
- Electrical Connection:
- The fixture comes with a 3-foot watertight STW 16 gauge cord exiting the housing via an IP66 liquid-tight connector.
- Connect the fixture's power cord to your main power supply wiring. This connection must be made by a qualified electrician and comply with all local and national electrical codes.
- Ensure all wire connections are properly insulated and protected from moisture.
- Aiming Adjustment: Loosen the bolt on the yoke mount, adjust the flood light to the desired aiming angle, and then securely tighten the bolt to lock the position.
- Restore Power: Once installation is complete and all connections are secure, restore power at the circuit breaker.
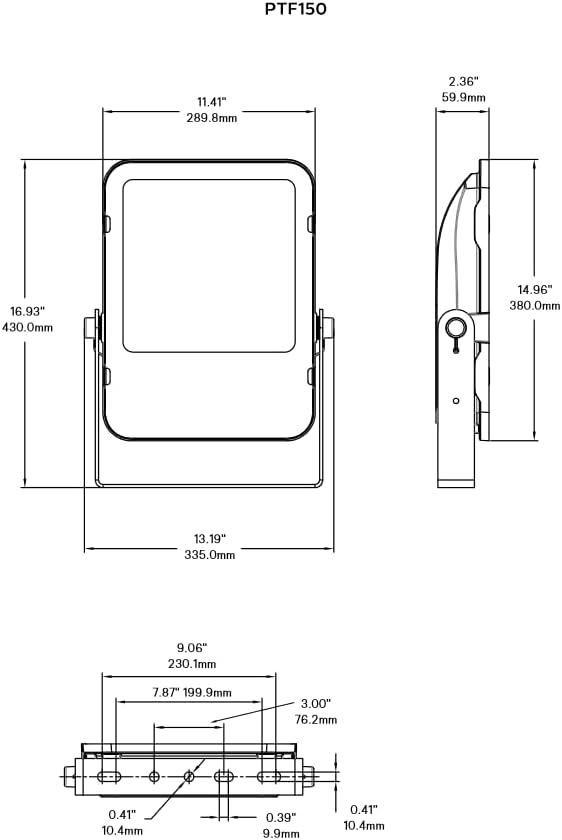
Image 2: Philips LED Slim Flood Light Dimension Diagram. This diagram provides detailed measurements for the flood light, including height, width, depth, and mounting hole spacing, crucial for accurate installation.
6. Operating Instructions
The Philips LED Slim Flood Light operates upon receiving power. There are no user-adjustable controls on the fixture itself.
- Power On/Off: Control the light by switching the connected power circuit on or off. This can be done via a wall switch, timer, or photocell (not included).
- Automatic Operation: For automated operation, connect the flood light to an external timer, motion sensor, or photocell switch (purchased separately) according to their respective installation instructions.
7. Maintenance
The Philips LED Slim Flood Light is designed for minimal maintenance. Regular inspection and cleaning will ensure optimal performance and longevity.
- Cleaning: Periodically clean the lens and housing with a soft, damp cloth to remove dirt, dust, and debris. Do not use abrasive cleaners or solvents, as these can damage the finish or lens. Ensure power is off before cleaning.
- Inspection: Annually inspect the fixture for any signs of damage, loose connections, or wear on the power cord. Address any issues promptly.
- Component Replacement: The LED light source is integrated and not user-replaceable. If the fixture malfunctions, contact customer support.
8. Troubleshooting
If your Philips LED Slim Flood Light is not functioning as expected, refer to the following common issues and solutions:
| Problem | Possible Cause | Solution |
|---|---|---|
| Light does not turn on. | No power to the fixture. Loose wiring connection. Faulty circuit breaker/fuse. | Check power supply. Verify all wiring connections are secure (consult a qualified electrician). Reset circuit breaker or replace fuse. |
| Light flickers or is dim. | Inconsistent power supply. Loose wiring. Fixture damage. | Ensure stable power. Check wiring connections. If damage is suspected, discontinue use and contact support. |
| Water inside the fixture. | Improperly sealed connections. Damaged housing/lens. | Immediately disconnect power. Inspect and re-seal all connections, especially the IP66 connector. If housing or lens is damaged, the IP rating may be compromised; contact support. |
If troubleshooting steps do not resolve the issue, contact customer support.
9. Warranty and Support
For warranty information and technical support, please refer to the official Signify (Philips) website or contact their customer service department. Keep your purchase receipt as proof of purchase.
Manufacturer: Signify
Model Number: PTF150-NW-G1-Y-FL-8-BZ
Contact Information: Please visit the official Signify website for the most up-to-date contact details and support resources.


