1. Introduction
This instruction manual provides comprehensive guidance for the installation, operation, and maintenance of your Marhynchus 95-240V WiFi Smart Thermostat. Please read this manual thoroughly before installation and use to ensure proper function and safety. Retain this manual for future reference.
2. Product Overview
The Marhynchus WiFi Smart Thermostat is designed for boiler heating systems, offering precise temperature control and smart connectivity. Its features include:
- Efficient and Convenient Control: Manage your boiler heating system remotely via smartphone or tablet.
- Accurate Temperature Measurement: High-precision sensor provides ±1℃ accuracy for consistent comfort.
- User-Friendly Interface: Features a sleek black design with a large display for easy navigation and temperature customization.
- Energy Saving and Cost Effective: Programmable schedules optimize heating, reducing energy consumption and utility costs.
- Durable Construction: PC and ABS shell materials ensure longevity and reliable performance.
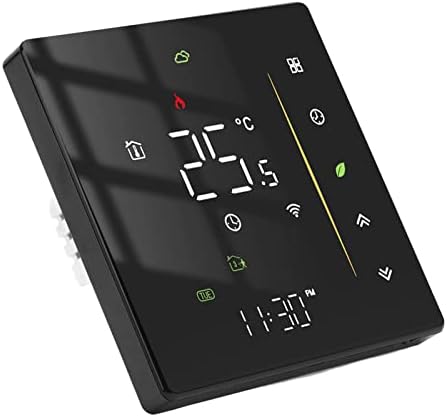
Image 2.1: Front view of the Marhynchus WiFi Smart Thermostat, displaying current temperature and various icons.
3. Setup and Installation
3.1 Package Contents
Before beginning installation, verify that all components are present:
- 1 x Smart Thermostat
- 1 x User Manual (this document)
- 2 x Mounting Screws
3.2 Wiring and Mounting
Important: Installation should be performed by a qualified electrician. Ensure power to the heating system is turned off at the circuit breaker before proceeding.
- Disconnect power to your boiler heating system.
- Remove your existing thermostat (if applicable) and identify the wiring.
- Connect the wires from your boiler heating system to the corresponding terminals on the back of the Marhynchus thermostat. Refer to the wiring diagram below. This thermostat is designed for 95-240V boiler heating systems.
- Mount the thermostat to a standard 86mm square cassette or 60mm European cassette using the provided screws.
- Restore power to the heating system.

Image 3.1: Detailed specification diagram showing thermostat dimensions and wiring terminals on the back panel.

Image 3.2: Illustration of the thermostat being installed into a standard wall cassette, demonstrating compatibility with 86mm square and 60mm European cassettes.
3.3 App Setup and WiFi Connection
To enable remote control and smart features, connect your thermostat to your home WiFi network via the Tuya Smart App.
- Download the Tuya Smart App from your device's app store (available for iOS and Android).
- Register or log in to your Tuya Smart account.
- On the thermostat, activate WiFi pairing mode (refer to the on-screen instructions or the app for specific steps).
- In the Tuya Smart App, follow the prompts to add a new device. Select 'Thermostat' or 'Heating Device'.
- Enter your WiFi network credentials when prompted.
- Once connected, the WiFi icon on the thermostat display will illuminate, and you can control the thermostat via the app.

Image 3.3: The thermostat being controlled both manually via its touch screen and remotely through the Tuya Smart App on a smartphone.
4. Operating Instructions
4.1 Basic Operation
The thermostat features a touch-sensitive display for direct control.
- Power On/Off: Press the power icon to turn the thermostat on or off.
- Temperature Adjustment: Use the up (▲) and down (▼) arrows on the display to manually adjust the target temperature.
- Mode Selection: Cycle through available modes (e.g., Manual, Programmable) by pressing the mode icon.
- Display Information: The large LCD shows the current room temperature, set temperature, time, and various status icons (e.g., heating on, WiFi status).
4.2 Weekly Programming
The thermostat supports weekly programming with 5+1+1 day settings and 6 customizable periods per day to optimize energy usage.
- Access the programming menu by pressing the schedule icon (often represented by a clock or calendar).
- Select the day or group of days (e.g., Monday-Friday, Saturday, Sunday) you wish to program.
- For each period (e.g., Get up, Go out, Go home, Sleep), set the desired time and temperature.
- Save your settings. The thermostat will automatically follow this schedule.
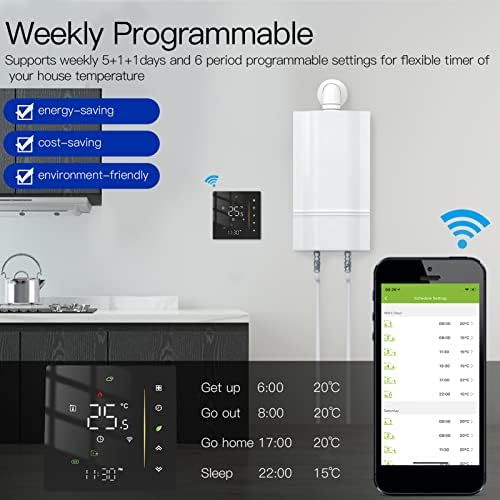
Image 4.1: Example of a weekly programmable schedule, showing different temperature settings for various times of the day across different days.
4.3 Weather and Humidity Monitoring
When connected to WiFi, the thermostat can synchronize weather conditions and humidity levels from the internet. This information is displayed on the screen, typically updating hourly after the initial connection.

Image 4.2: The thermostat display showing current temperature, weather icons, and humidity percentage, indicating synchronized data from the internet.
5. Maintenance
To ensure optimal performance and longevity of your Marhynchus Smart Thermostat, follow these simple maintenance guidelines:
- Cleaning: Gently wipe the screen and casing with a soft, dry cloth. Avoid using abrasive cleaners, solvents, or excessive moisture, as these can damage the device.
- Avoid Obstructions: Ensure that the thermostat's vents (if any) are not blocked by furniture, curtains, or other objects, as this can affect temperature sensing accuracy.
- Software Updates: Periodically check the Tuya Smart App for any available firmware updates for your thermostat to ensure you have the latest features and bug fixes.
6. Troubleshooting
If you encounter issues with your thermostat, refer to the following common problems and solutions:
| Problem | Possible Cause | Solution |
|---|---|---|
| Thermostat does not power on. | No power supply; incorrect wiring. | Check circuit breaker. Verify wiring connections according to the installation instructions. Consult a qualified electrician if unsure. |
| Heating system is not responding. | Incorrect wiring; thermostat in wrong mode; system fault. | Ensure thermostat is in heating mode and set temperature is above room temperature. Recheck wiring. |
| WiFi connection fails or disconnects. | Incorrect WiFi password; weak signal; router issues. | Verify WiFi password. Ensure thermostat is within range of your router. Restart your router. Re-attempt app setup. |
| Temperature reading is inaccurate. | Thermostat placed near heat source/draft; sensor obstruction. | Ensure thermostat is not exposed to direct sunlight, drafts, or other heat sources. Clean any dust from the sensor area. |
| Cannot display Fahrenheit. | Thermostat configured for Celsius only. | Check the thermostat's advanced settings menu or the Tuya Smart App for an option to switch between Celsius and Fahrenheit. If no option is available, the device may only support Celsius. |
7. Specifications
| Feature | Specification |
|---|---|
| Brand | Marhynchus |
| Model Name | Marhynchusg1h2u7ivgd |
| Controller Type | Tmall Genie (App Control) |
| Special Feature | Programmable |
| Color | Black |
| Specific Uses For Product | Boiler Heating |
| Temperature Control Type | Programmable |
| Connectivity Technology | Wi-Fi |
| Power Source | Corded Electric |
| Voltage | 240 Volts (95-240V compatible) |
| Display Type | LCD |
| Control Type | Touch |
| Control Method | App |
| Connectivity Protocol | Wi-Fi |
| Wattage | 1.5 watts |
| Package Dimensions | 4.25 x 3.78 x 2.4 inches |
| Item Weight | 7.3 ounces |
8. Warranty and Support
For warranty information and technical support, please contact Marhynchus customer service through the retailer where the product was purchased or refer to the official Marhynchus website. Please have your model number (Marhynchusg1h2u7ivgd) and purchase details ready when contacting support.