1. Product Overview
The Generic 3.7V Li-on Cordless Rotary Tool PCG01B is a versatile, portable tool designed for various detailed tasks. It features a rechargeable lithium-ion battery and multiple speed settings, making it suitable for polishing, cleaning, engraving, carving, and trimming.
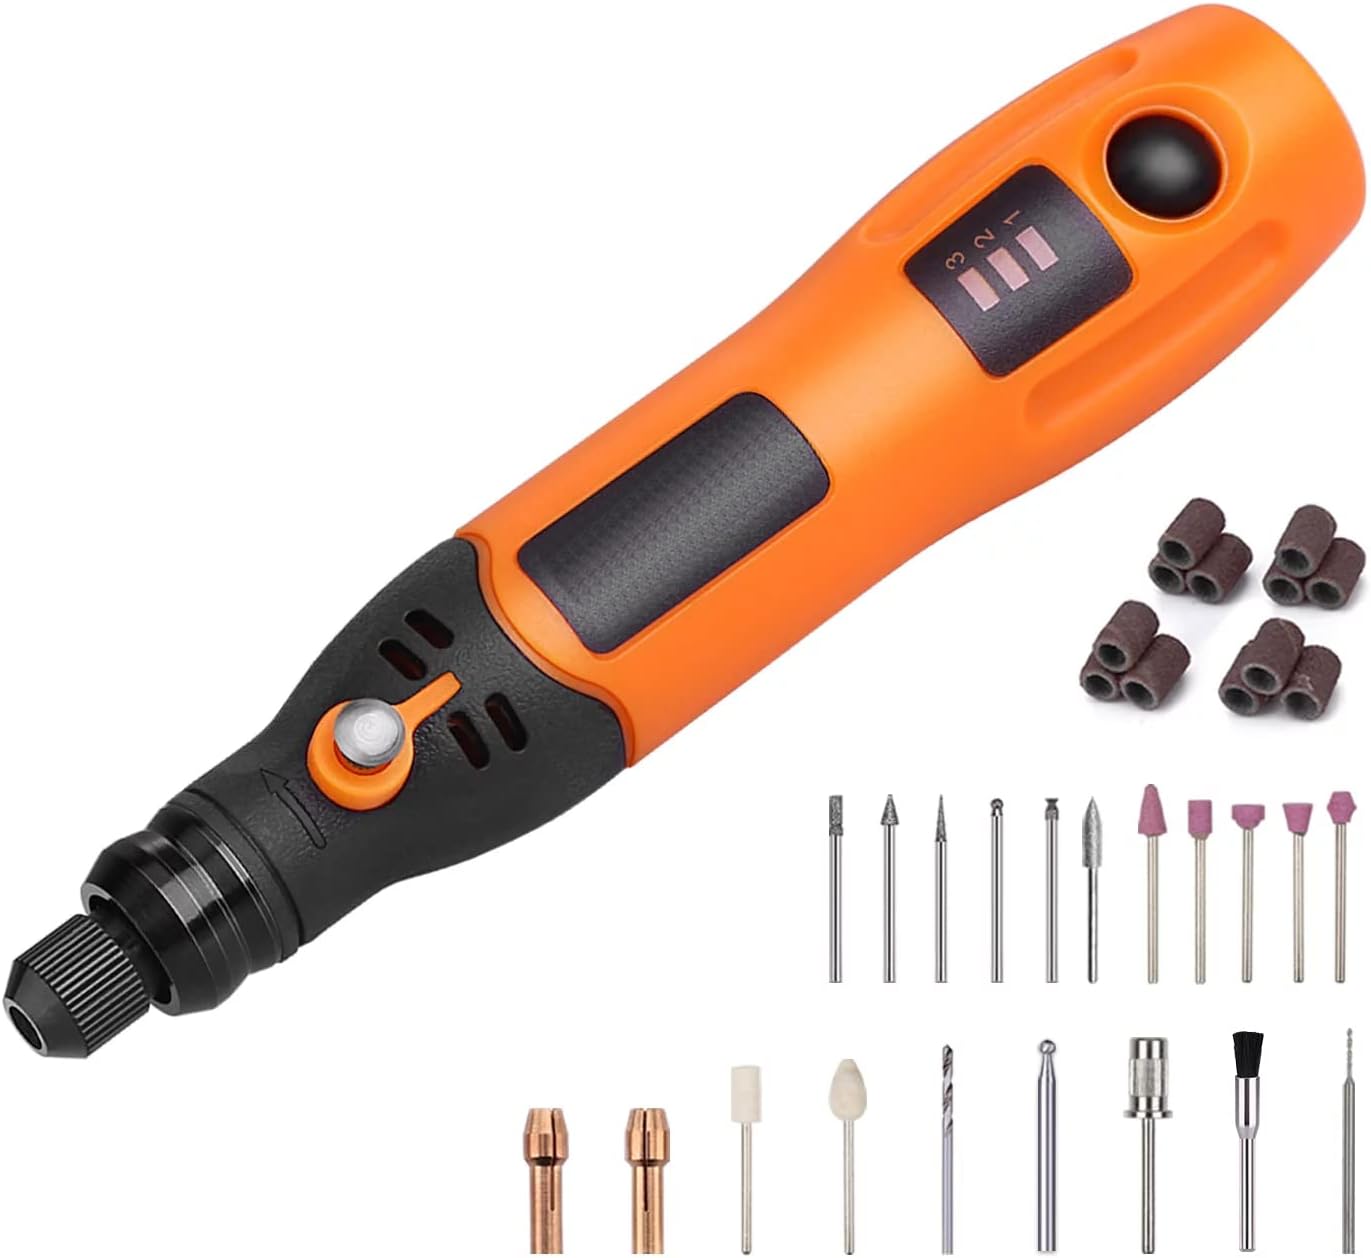
Image 1.1: The Generic 3.7V Li-on Cordless Rotary Tool PCG01B, shown with a selection of its 31 included accessories.
Key Features:
- Three Speed Settings: Offers 5000rpm, 10000rpm, and 15000rpm for adapting to different project requirements.
- Comprehensive Accessory Set: Includes 31 accessories such as sanding bands, drill bits, grinding wheels, and diamond bits.
- Micro USB Charging: Compatible with standard USB chargers for convenient recharging of the 3.7V rechargeable lithium battery.
- Ergonomic Design: Lightweight and pen-sized for comfortable handling and precise control during use.
Package Contents:
- 1 x 3.7V Cordless Rotary Tool
- 1 x USB Charging Cable
- 1 x Accessory Case
- 31 x Assorted Accessories
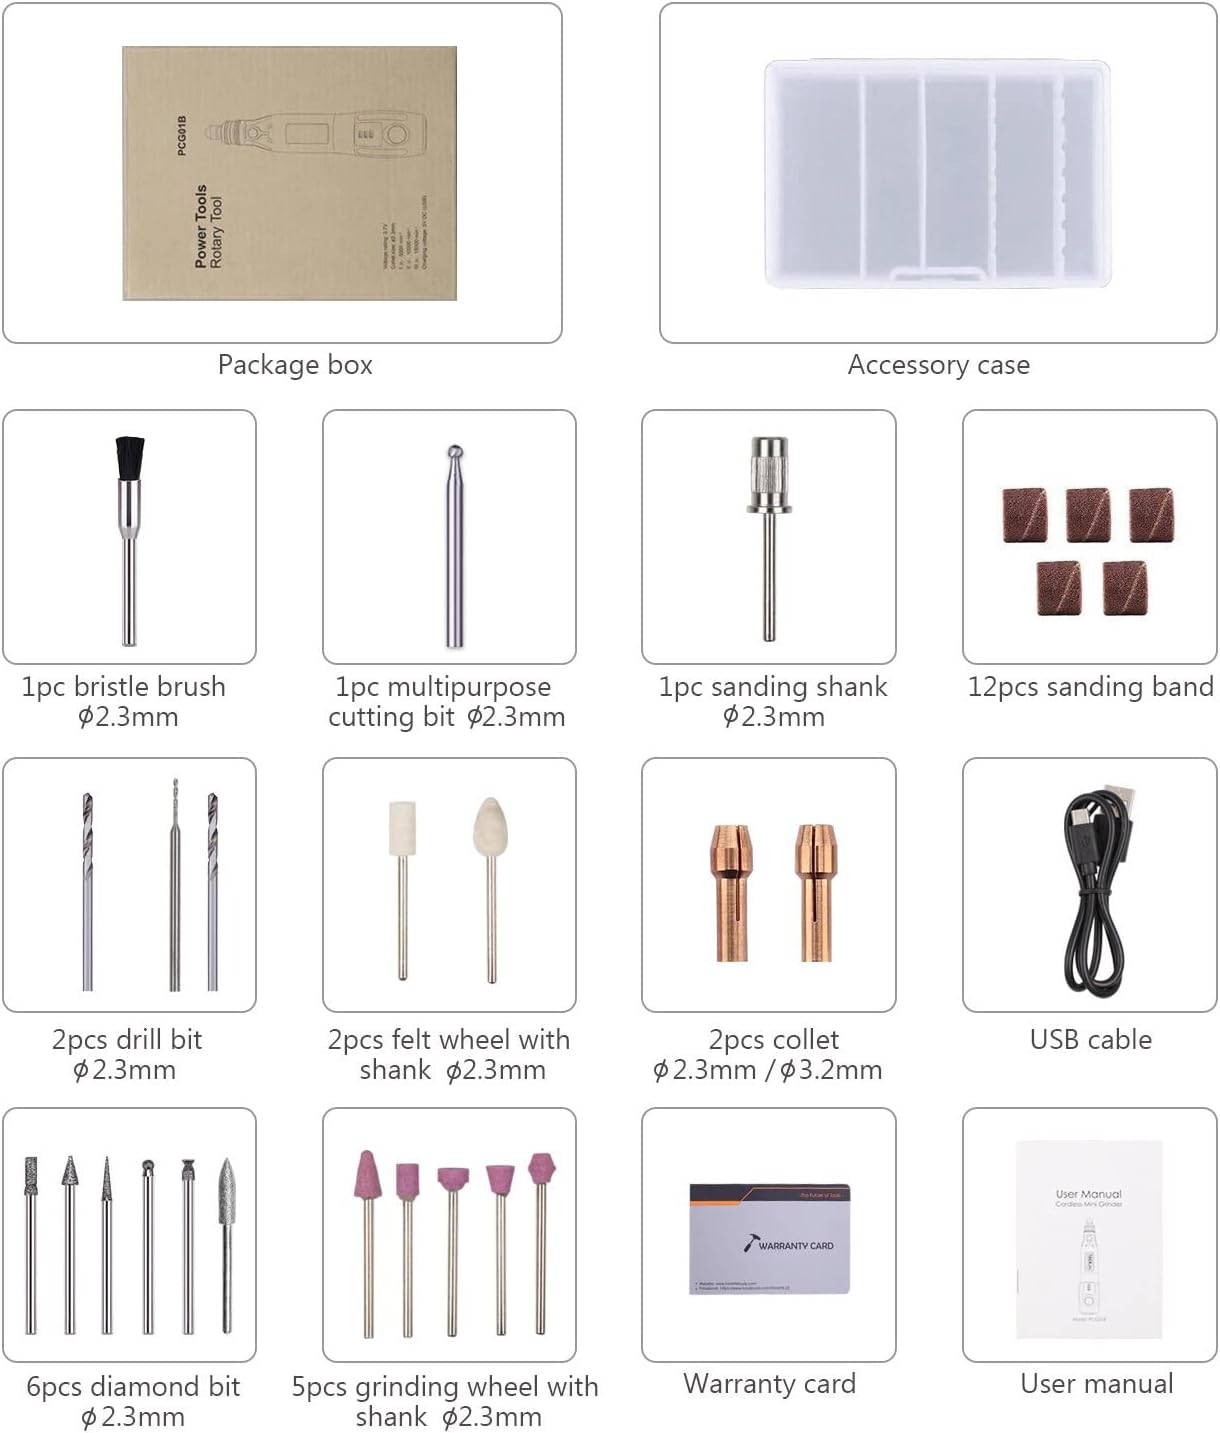
Image 1.2: Detailed view of the included accessories and components, such as various bits, sanding bands, collets, and the USB charging cable.
2. Safety Information
Always observe basic safety precautions when using electrical tools to reduce the risk of fire, electric shock, and personal injury.
- Wear appropriate personal protective equipment (PPE) such as safety glasses and gloves.
- Ensure the workpiece is securely clamped or held to prevent movement during operation.
- Keep the work area clean and well-lit.
- Do not operate the tool in explosive atmospheres, such as in the presence of flammable liquids, gases, or dust.
- Keep children and bystanders away while operating a power tool.
- Avoid accidental starting. Ensure the switch is in the off-position before connecting to a power source, picking up or carrying the tool.
- Do not overreach. Keep proper footing and balance at all times.
- Disconnect the tool from the power source before making any adjustments, changing accessories, or storing the tool.
3. Setup and Charging
3.1 Installing Accessories:
- Ensure the rotary tool is turned off and disconnected from any charging cable.
- Locate the collet nut at the tip of the tool.
- Press and hold the spindle lock button (usually a small grey button near the collet).
- While holding the spindle lock, unscrew the collet nut counter-clockwise.
- Insert the desired accessory shank into the collet. Ensure it is fully seated.
- While still holding the spindle lock, tighten the collet nut clockwise until the accessory is firmly secured. Do not overtighten.
- Release the spindle lock button.

Image 3.1: Illustration of accessory installation, showing how to firmly clamp and replace accessories in the collet.
3.2 Charging the Tool:
The rotary tool is powered by a 3.7V rechargeable lithium battery.
- Connect the provided USB charging cable to the micro USB port on the tool.
- Connect the other end of the USB cable to a compatible USB power source (e.g., computer USB port, USB wall adapter).
- The charging indicator light (if present) will illuminate to show charging status. Refer to the tool's specific indicator behavior for full charge notification.
- Allow sufficient time for a full charge before first use or after the battery is depleted.

Image 3.2: The rotary tool being charged via a USB connection, highlighting its convenient charging method.
4. Operating Instructions
4.1 Powering On and Off:
- To turn on the tool, press the power button.
- To turn off the tool, press the power button again.
4.2 Adjusting Speed:
The tool offers three rotational speed settings: 5000rpm, 10000rpm, and 15000rpm.
- After turning on the tool, press the speed adjustment button (often the same as the power button or a separate button) to cycle through the available speeds.
- Observe the indicator lights on the tool to identify the currently selected speed setting.
- Select a speed appropriate for the material and accessory being used. Lower speeds are generally for polishing and delicate work, while higher speeds are for cutting and grinding.

Image 4.1: The rotary tool's speed adjustment interface, illustrating the three available rotation speeds and their corresponding indicator lights.
4.3 General Usage Tips:
- Apply light pressure. Let the tool and accessory do the work. Excessive pressure can cause the tool to slow down, overheat, or damage the workpiece.
- Maintain a steady hand and control.
- For best results, practice on scrap material before working on your final project.
- Examples of use include sanding small wooden pieces or engraving intricate designs on jewelry.

Image 4.2: The rotary tool in use for sanding a small wooden craft, demonstrating its application for finishing tasks.

Image 4.3: The rotary tool being used for detailed work on a bracelet, showcasing its precision for engraving or fine adjustments.
5. Maintenance
Regular maintenance ensures the longevity and optimal performance of your rotary tool.
- Cleaning: After each use, wipe down the tool with a clean, dry cloth to remove dust and debris. Do not use harsh chemicals or abrasive cleaners.
- Accessory Care: Clean accessories after use. Store them in the provided accessory case to prevent damage and loss. Replace worn or damaged accessories promptly.
- Storage: Store the tool and accessories in a dry, cool place, away from direct sunlight and moisture. Ensure the tool is fully charged before long-term storage to maintain battery health.
- Battery Care: Avoid fully discharging the battery frequently. Recharge the tool when the power indicator shows low battery.
6. Troubleshooting
If you encounter issues with your rotary tool, refer to the following common troubleshooting steps.
| Problem | Possible Cause | Solution |
|---|---|---|
| Tool does not turn on. | Battery is depleted. | Charge the tool using the USB cable. |
| Tool stops during operation. | Battery is low or tool is overloaded. | Recharge the battery. Reduce pressure on the workpiece. |
| Accessory wobbles or is loose. | Accessory not properly installed or collet nut is loose. | Ensure the accessory shank is fully inserted and the collet nut is tightened securely. |
| Reduced performance. | Worn accessory or low battery. | Replace the accessory. Recharge the battery. |
If the problem persists after attempting these solutions, please contact customer support.
7. Specifications
| Feature | Detail |
|---|---|
| Brand | Generic |
| Model Number | PCG01B (RTD35ACL) |
| Voltage | 3.7 Volts |
| Power Source | Battery Powered (3.7V Li-on) |
| Maximum Rotational Speed | 15000 RPM |
| Minimum Rotational Speed | 5000 RPM |
| Speed Settings | 5000rpm, 10000rpm, 15000rpm |
| Recommended Uses | Polishing, Cleaning, Engraving, Carving, Trimming |
| Item Dimensions (L x W x H) | 7 x 5.5 x 1.49 inches |
| Item Weight | 9.5 ounces |
| Included Components | Rotary Tool, USB Charging Wire, Accessory Case, 31 Accessories |
| UPC | 673324212192 |
8. Warranty and Support
For warranty information and customer support, please refer to the warranty card included in your package or contact the manufacturer directly. Keep your purchase receipt as proof of purchase.
Manufacturer: Generic


