1. Introduction and Overview
This manual provides detailed instructions for the installation, operation, and maintenance of your DEWIN 12V/24V PWM Solar Charge Controller. This device is designed to manage the power flow from your solar panels to your battery bank, ensuring efficient charging and protecting your battery from overcharge and over-discharge.

Figure 1: Front view of the DEWIN 40A Solar Charge Controller, showing the LCD display, menu and set buttons, and USB ports.
The controller features a large LED display for clear status indication, dual USB 5V ports for charging external devices, and robust protection mechanisms. Its high-quality flame-retardant PC material housing and aluminum alloy heat sink cover ensure durability and efficient heat dissipation.
2. Key Features
- High-Quality Construction: Made with flame-retardant PC material and an aluminum alloy heat sink for enhanced durability and heat dissipation.
- PWM Charging: Utilizes Pulse Width Modulation technology for efficient and stable battery charging.
- Automatic System Voltage Identification: Automatically detects 12V or 24V system voltage.
- Dual USB Ports: Equipped with two 5V/2A USB outputs for charging mobile phones, tablets, and other devices.
- Comprehensive Protection: Includes protection against overvoltage, short circuit, overload, overcharge, over-discharge, reverse polarity, and overheating.
- Temperature Compensation: Precise temperature compensation automatically corrects charge and discharge voltage.
- User-Friendly Interface: Large LED display and two function buttons for easy monitoring and parameter configuration.
- Versatile Application: Suitable for various solar power systems, including home solar panels, solar street lights, and solar advertising boxes.

Figure 2: Key features and ports of the solar charge controller.

Figure 3: Common applications for the DEWIN solar charge controller.
3. Setup and Installation
Proper installation is crucial for the safe and efficient operation of your solar charge controller. Please follow the connection order carefully.
3.1 Connection Order
- Connect the Battery: Install the solar charge controller as close as possible to the battery to minimize voltage drop. Ensure the battery end is installed securely. The recommended installation distance is not more than 150mm.
- Connect the Load: Connect your DC load to the designated terminals on the controller.
- Connect the Photovoltaic Array: Connect your solar panels to the controller.
- Power On: Power on the controller. It will automatically identify the system voltage (12V or 24V). Observe the status of the LCD display. If it does not work properly, refer to the troubleshooting section.
Important Safety Note: Always connect the battery first, then the load, and finally the solar panels. Disconnect in the reverse order: solar panels, then load, then battery. This sequence prevents damage to the controller and other components.

Figure 4: Recommended connection order for the solar charge controller.

Figure 5: Basic wiring diagram for the solar charge controller system.
4. Operating Instructions
The DEWIN solar charge controller features an intuitive LED display and two function buttons for easy operation and monitoring.
4.1 Display Interface
The large LED screen displays various parameters and working statuses. You can cycle through different screens to view information such as battery voltage, charging current, discharge current, and system status.
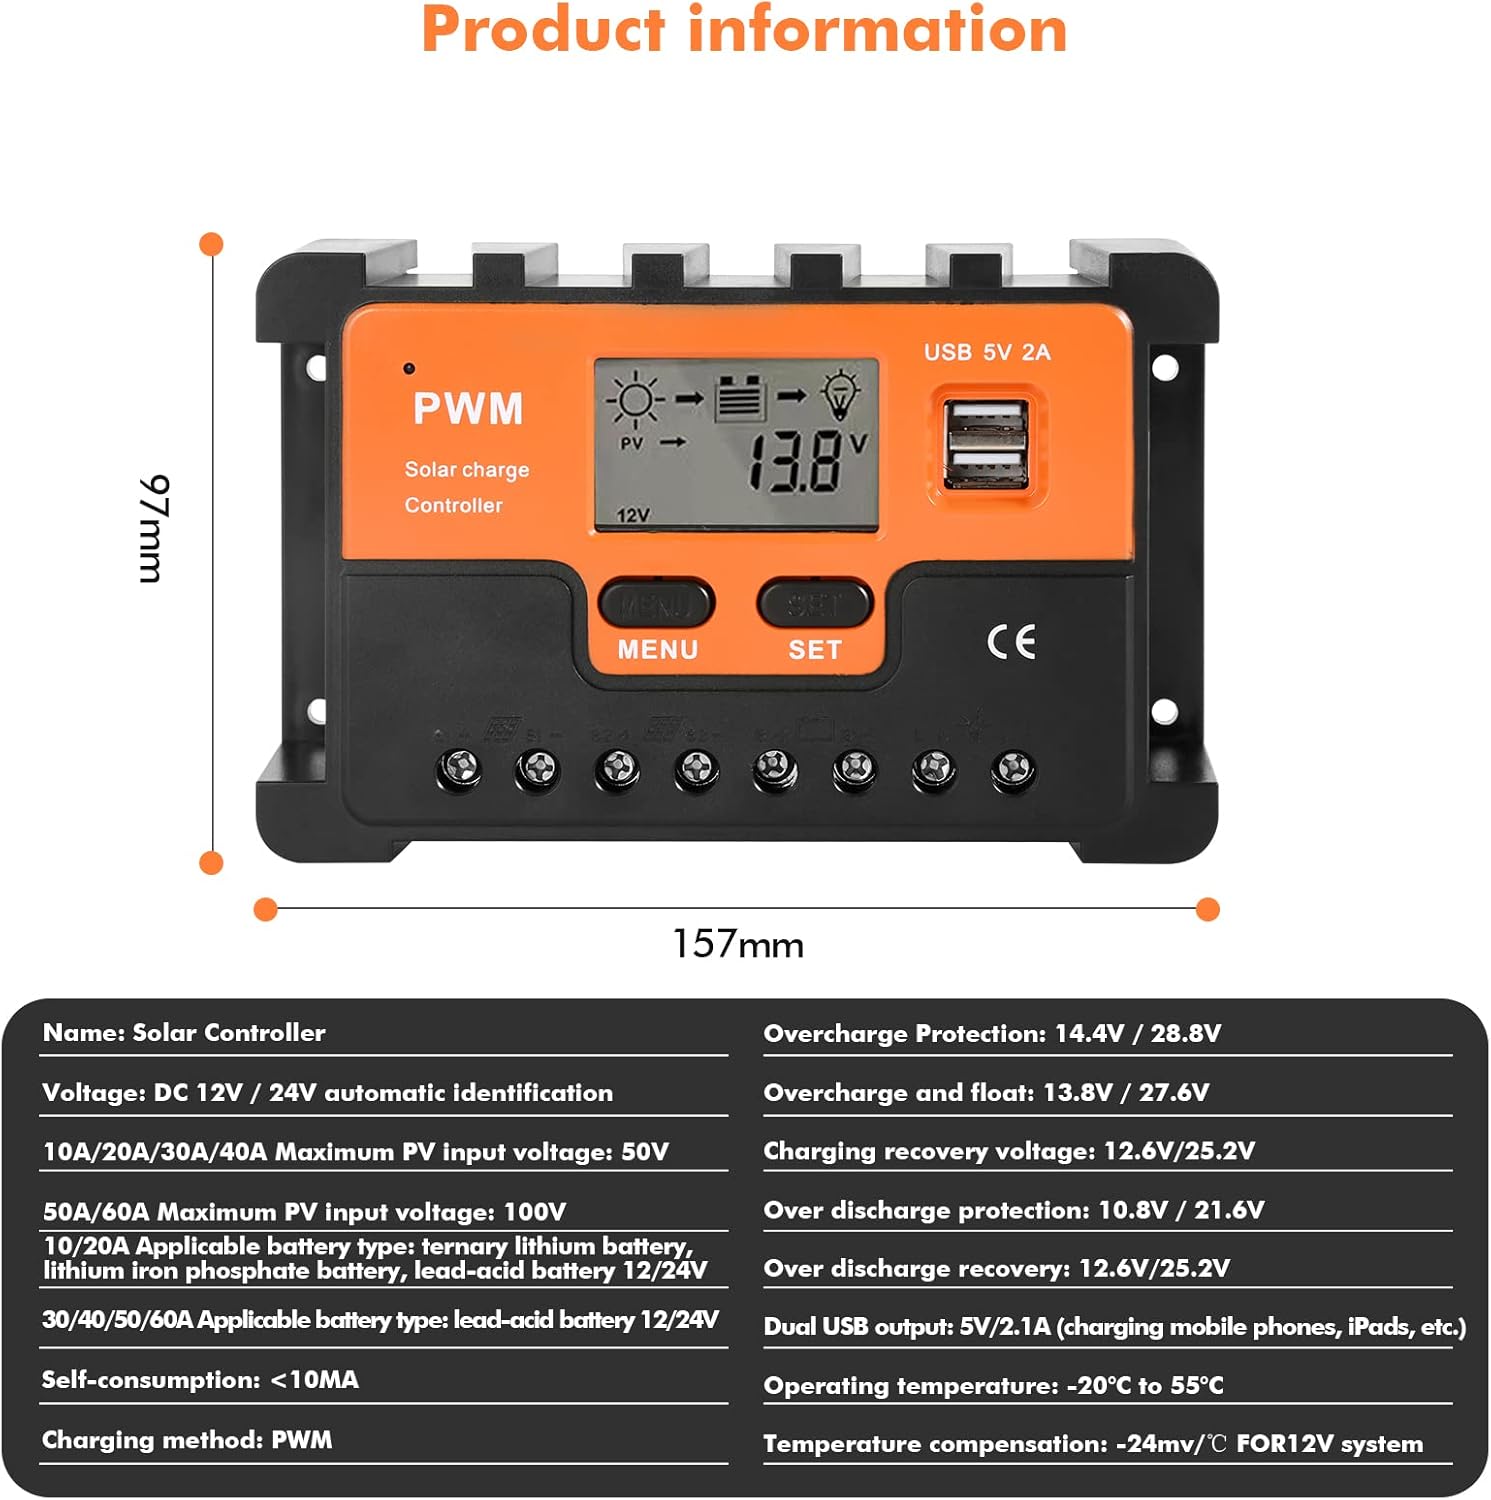
Figure 6: Main interface display screens and their meanings.
4.2 Button Functions
- MENU Button: Press to cycle through different display screens and enter parameter setting mode.
- SET Button: Used to adjust parameters when in setting mode.
To enter parameter setting mode, long press the MENU button (typically >5 seconds) until the numbers start flashing. Use the SET button to adjust values and the MENU button to switch between parameters. Long press MENU again to save settings and exit.
4.3 Battery Type Selection
The controller supports various battery types. Ensure you select the correct battery type for optimal charging and battery life. Different numbers on the display represent different battery types:
- b1: 12V/24V automatic identification (Lead-acid battery)
- b2: 3 strings of ternary lithium battery / 6 strings of ternary lithium batteries automatic identification
- b3: 4 strings of lithium iron phosphate batteries / 8 strings of lithium iron phosphate batteries automatically recognized
Refer to Figure 6 for visual representation of battery type selection on the display.
5. Specifications
Below are the technical specifications for the DEWIN 40A Solar Charge Controller:

Figure 7: Product dimensions and detailed specifications.
| Parameter | Value |
|---|---|
| Brand | DEWIN |
| Model Number | 40A |
| Voltage | DC 12V / 24V automatic identification |
| Maximum PV Input Voltage (40A model) | 50V |
| Applicable Battery Type (10A/20A) | Ternary lithium battery, lithium iron phosphate battery, lead-acid battery 12/24V |
| Applicable Battery Type (30A/40A/50A/60A) | Lead-acid battery 12/24V |
| Self-consumption | <10mA |
| Charging Method | PWM |
| Overcharge Protection | 14.4V / 28.8V |
| Overcharge and Float | 13.8V / 27.6V |
| Charging Recovery Voltage | 12.6V / 25.2V |
| Over Discharge Protection | 10.8V / 21.6V |
| Over Discharge Recovery | 12.6V / 25.2V |
| Dual USB Output | 5V / 2.1A (charging mobile phones, iPads, etc.) |
| Operating Temperature | -20°C to 55°C |
| Temperature Compensation | -24mV/°C FOR12V system |
| Dimensions (approx.) | 157mm x 97mm |
| Material | Polycarbonate (PC) |
| Display Type | LED |
6. Troubleshooting
If your DEWIN solar charge controller is not functioning as expected, please review the following common issues and solutions.
6.1 Common Issues and Solutions
- Controller Not Powering On:
- Check battery connections. Ensure they are secure and correctly polarized.
- Verify battery voltage is within the controller's operating range (12V/24V).
- Ensure the battery is connected first, before solar panels or load.
- Battery Not Charging:
- Check solar panel connections and ensure they are receiving sufficient sunlight.
- Verify solar panel voltage is within the controller's maximum PV input voltage (50V for 40A model).
- Confirm the correct battery type is selected in the controller settings.
- Inspect for any blown fuses in the system.
- Load Not Receiving Power:
- Check load connections and ensure they are secure.
- Verify the load current does not exceed the controller's rated discharge current.
- Check if the battery voltage is too low, triggering the low voltage disconnect protection.
- Ensure the load control mode is set correctly (e.g., always on, or timer mode).
- Overheating:
- Ensure the controller is installed in a well-ventilated area, away from direct sunlight or excessive heat sources.
- Verify that the load and solar panel currents do not exceed the controller's rated capacity.
6.2 Understanding MPPT vs. PWM Controllers
The DEWIN 40A controller is a PWM (Pulse Width Modulation) type. Understanding the difference between PWM and MPPT (Maximum Power Point Tracking) controllers can help in system design and troubleshooting.
- What is a PWM Controller?
A PWM controller is designed to limit the output power of the solar panel to a fixed voltage based on a defined voltage value. When the output power of the panel exceeds the set value, the PWM controller automatically cuts off the current to maintain stable output voltage. This type of controller is generally more cost-effective and suitable for smaller systems where the solar panel voltage closely matches the battery voltage.
- What is an MPPT Controller?
The main function of an MPPT controller is to ensure that the solar panel operates at maximum efficiency. It can maximize the extraction of solar energy into electricity by dynamically adjusting the voltage and current of the load to achieve maximum power output. MPPT controllers are typically more efficient, especially in colder conditions or when the solar panel voltage is significantly higher than the battery voltage, but they are also more expensive.
7. Maintenance
Regular maintenance helps ensure the longevity and optimal performance of your solar charge controller.
- Cleanliness: Keep the controller clean and free from dust and debris. Use a dry, soft cloth for cleaning. Do not use liquid cleaners.
- Connections: Periodically check all wiring connections to ensure they are tight and free from corrosion. Loose connections can cause overheating and poor performance.
- Ventilation: Ensure that the ventilation openings on the controller are not blocked to allow for proper heat dissipation.
- Environment: Avoid installing the controller in direct sunlight, high humidity, or dusty environments.
- Battery Health: Monitor your battery's health regularly. A healthy battery is essential for the controller's efficient operation.
8. Warranty and Support
For warranty information and technical support, please contact DEWIN customer service or refer to the product's purchase documentation. Keep your purchase receipt as proof of purchase.
For further assistance, you may visit the official DEWIN website or contact their authorized service centers.