1. Introduction
This document provides essential information for the safe and effective use of the Generic 40W 12V DC to 220V AC Power Inverter Unit. This unit is designed to convert a 12V DC power source into a 220V AC output, suitable for powering small electronic devices.
Key features include:
- Input: 12V DC.
- Output: 220V AC.
- High-frequency output for stable power delivery.
- Capable of operating 40W energy-saving lamps.
- Designed for integration into circuit boards for various household appliances.
- Offers enhanced performance, stable power, improved efficiency, and durable quality.
- Supports DIY booster circuit creation.
2. Safety Information
Please read and understand all safety instructions before operating this device. Failure to follow these instructions may result in electric shock, fire, or serious injury.
- Electrical Hazard: This unit produces 220V AC. Handle with extreme care.
- Ventilation: Ensure adequate ventilation around the unit to prevent overheating.
- Moisture: Do not expose the unit to water, rain, or excessive humidity.
- Overload: Do not exceed the maximum rated output of 40W. Overloading can damage the unit and connected devices.
- Polarity: Observe correct input polarity (positive and negative) when connecting the 12V DC source. Incorrect polarity will damage the unit.
- Children: Keep out of reach of children.
- Professional Installation: If you are unsure about installation or wiring, seek assistance from a qualified electrician.
3. Product Overview and Components
The inverter unit is a compact circuit board designed for integration. It features input terminals for 12V DC and output terminals for 220V AC.
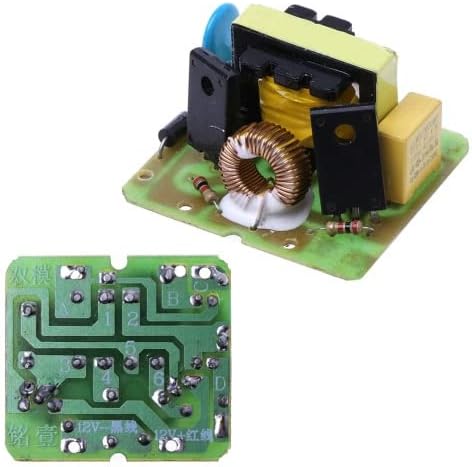
Figure 3.1: Top view of the inverter unit, displaying its main components.
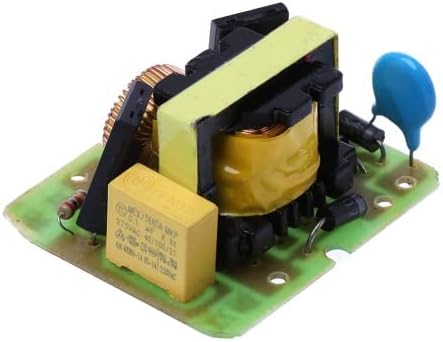
Figure 3.2: Angled view of the inverter unit.
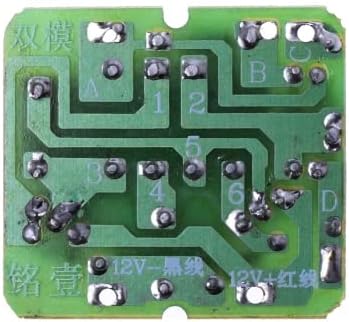
Figure 3.3: Bottom view of the inverter unit circuit board.

Figure 3.4: Labeled bottom view showing input and output connections.
As shown in Figure 3.4, the input for 8-12V DC is located at the bottom of the board, and the 220V AC output is at the top (A + B port).
4. Setup and Installation
This inverter unit is designed for integration into custom circuits or existing appliances. Follow these steps for basic setup:
- Prepare the Power Source: Ensure you have a stable 12V DC power source (e.g., a car battery, 12V power adapter). The input voltage range is 8V to 12V DC.
- Identify Connections: Refer to Figure 3.4 for the input and output terminals. The 12V DC input has clearly marked positive (+) and negative (-) terminals. The 220V AC output is labeled as A + B port.
- Connect DC Input: Carefully solder or connect your 12V DC power source to the designated input terminals, observing correct polarity. Connect the positive lead of your DC source to the '+' terminal and the negative lead to the '-' terminal.
- Connect AC Output: Connect your 220V AC load (e.g., energy-saving lamp, router) to the A and B output ports. Ensure all connections are secure and insulated to prevent short circuits.
- Mounting: Secure the circuit board in a stable, well-ventilated enclosure to protect it from physical damage and ensure proper heat dissipation.
Note: This unit is a bare circuit board. Proper enclosure and insulation are required for safe operation.
5. Operating Instructions
Once the unit is correctly installed and connected, follow these steps for operation:
- Verify Connections: Double-check all DC input and AC output connections to ensure they are secure and correctly polarized.
- Apply DC Power: Turn on your 12V DC power source. The inverter unit will begin converting the DC power to AC.
- Connect AC Device: Plug your 220V AC device (up to 40W) into the output of your circuit.
- Monitor Performance: Observe the connected device to ensure it is functioning correctly. If any issues arise, immediately disconnect the power source and troubleshoot.
- Disconnecting: To turn off the system, first disconnect the AC load, then turn off the 12V DC power source.
Important: Do not exceed the 40W output capacity. Exceeding this limit can cause damage to the inverter and connected devices.
6. Maintenance
This inverter unit requires minimal maintenance. Adhere to the following guidelines to ensure longevity and reliable performance:
- Keep Clean: Regularly inspect the unit for dust and debris. Use a soft, dry cloth to clean the surface. Do not use liquids or abrasive cleaners.
- Ventilation: Ensure that the unit's operating environment allows for proper airflow to prevent heat buildup.
- Connections: Periodically check all electrical connections for tightness and signs of corrosion. Re-tighten or clean as necessary.
- Storage: When not in use for extended periods, store the unit in a cool, dry place away from direct sunlight and moisture.
7. Troubleshooting
If you encounter issues with your inverter unit, refer to the following common problems and solutions:
| Problem | Possible Cause | Solution |
|---|---|---|
| No AC output | No 12V DC input power; Incorrect DC polarity; Faulty connections; Overload. | Check DC power source; Verify DC input polarity; Inspect all wiring; Reduce AC load to below 40W. |
| Low AC output voltage | Low DC input voltage; Overload. | Ensure DC input is stable 12V; Reduce AC load. |
| Unit overheating | Poor ventilation; Overload. | Ensure adequate airflow around the unit; Reduce AC load. |
| Connected device not working | Device requires more than 40W; Device incompatible with modified sine wave output (if applicable); Faulty device. | Check device power requirements; Test device with a standard AC outlet; Consult device manual. |
If the problem persists after attempting these solutions, discontinue use and consult a qualified technician.
8. Specifications
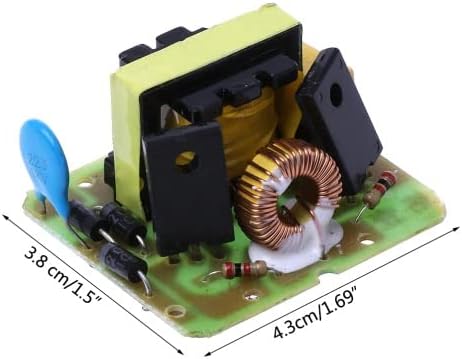
Figure 8.1: Product dimensions.
| Specification | Value |
|---|---|
| Model | 40W 12V DC to 220V AC Inverter Unit |
| Input Voltage | 8-12V DC |
| Output Voltage | 220V AC |
| Output Power | 40W (Maximum) |
| Product Dimensions | 3.9 x 2.5 x 4.35 cm (approximately 1.5 x 1.0 x 1.7 inches) |
| Weight | 10 grams |
| ASIN | B0BLLV1GHS |
9. Warranty and Support
This product is sold as a component. Specific warranty details may vary depending on the retailer or the final assembled product. For support, please refer to the vendor or platform from which this product was purchased.
Always retain your proof of purchase for any warranty claims or support inquiries.