
1. Introduction
This manual provides essential information for the proper installation, operation, and maintenance of the MAKO AIRTEK Controller, model 1089935597. This controller is designed for compatibility with Atlas Copco XAS186 and XAS196 air compressors, ensuring reliable performance and direct replacement functionality. Please read this manual thoroughly before installation and use to ensure safe and efficient operation.
2. Safety Information
Always observe the following safety precautions to prevent personal injury and damage to the equipment:
- Electrical Safety: Ensure all power sources are disconnected before installing, servicing, or performing any maintenance on the controller or associated equipment. Only qualified personnel should perform electrical work.
- Proper Installation: Install the controller in a clean, dry environment, free from excessive vibration, dust, and extreme temperatures.
- Authorized Personnel: Operation and maintenance should only be performed by trained and authorized personnel familiar with the equipment and safety procedures.
- Original Standards: This controller is manufactured to meet original standards. Any modifications or use of non-approved parts may compromise safety and performance.
3. Product Overview
The MAKO AIRTEK Controller (Model 1089935597) is a robust unit designed for precise control of Atlas Copco XAS186 and XAS196 compressors. It features a user-friendly interface with essential controls and indicators, along with clearly labeled connection points for straightforward integration.
3.1 Front Panel

Figure 3.1: Front view of the MAKO AIRTEK Controller. This image displays the primary user interface, including the prominent red START/STOP button and a series of indicator lights that provide operational status and alerts.

Figure 3.2: Top-down view of the MAKO AIRTEK Controller. This perspective highlights the START/STOP button and the array of symbols representing different operational states and warnings, such as oil pressure, temperature, and battery status.
3.2 Rear Panel and Connections

Figure 3.3: Rear view of the MAKO AIRTEK Controller. This image shows the various electrical connectors for power input, signal output, and sensor connections. Also visible are DIP switches, which may be used for specific configuration settings (refer to application-specific documentation for details).
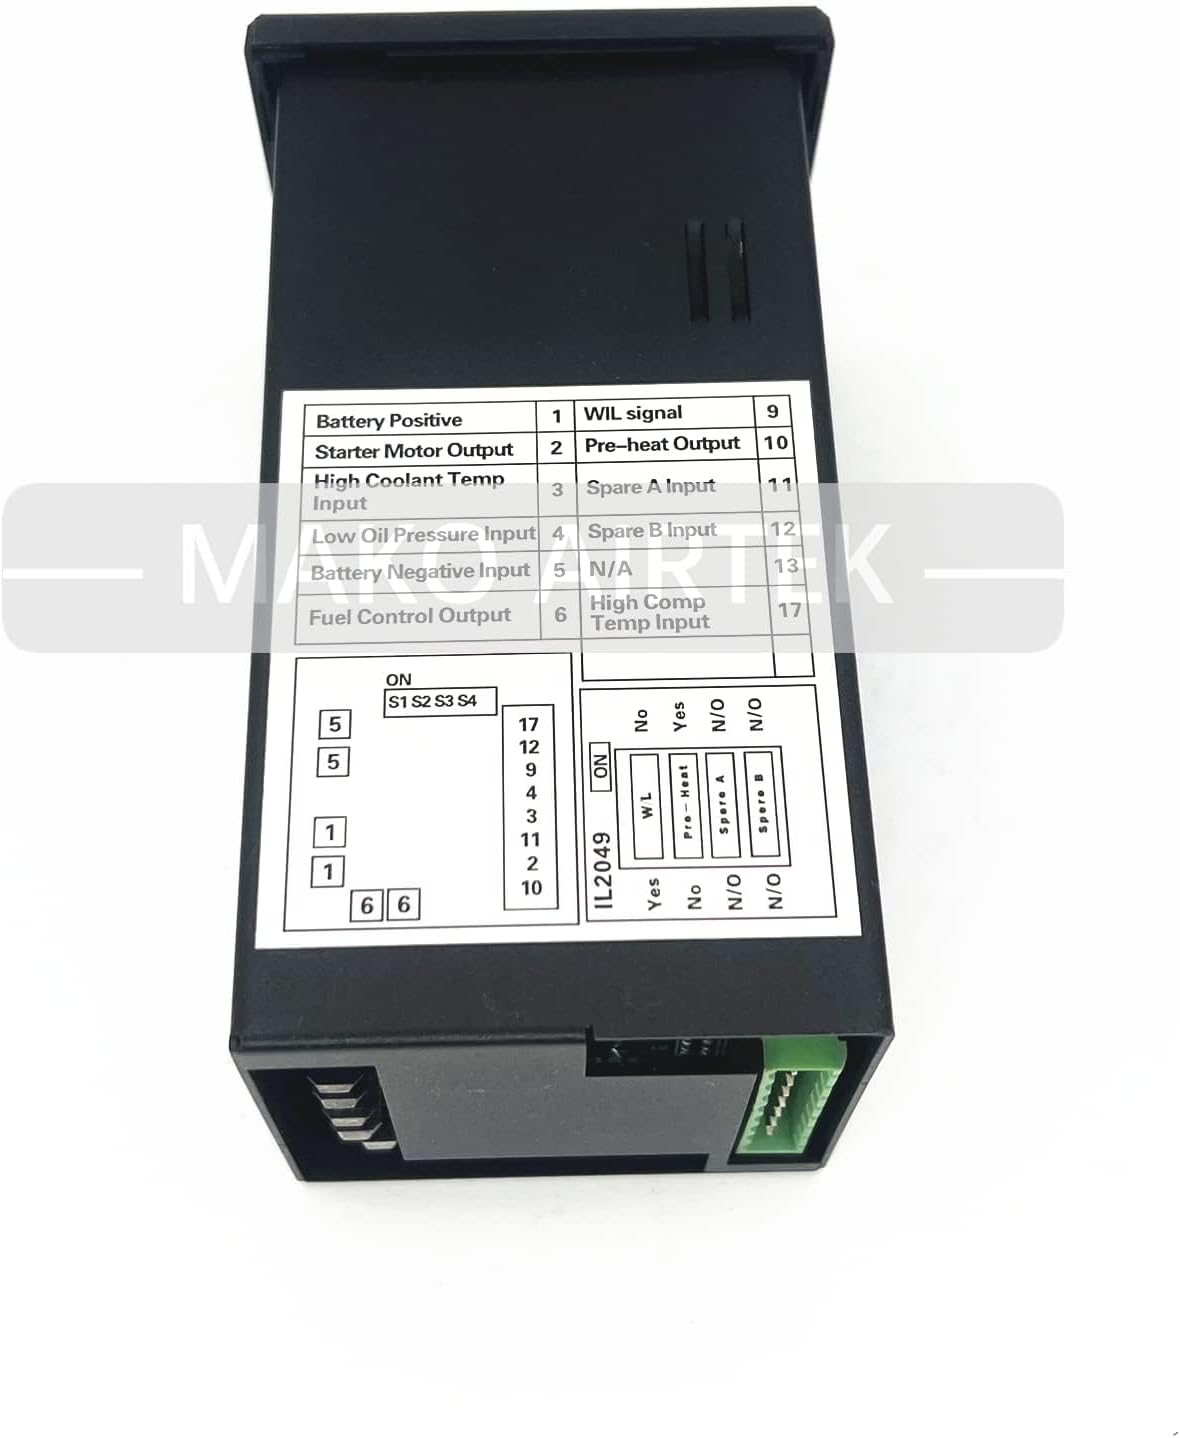
Figure 3.4: Wiring diagram label on the controller's rear panel. This label provides a clear guide for connecting various signals, including Battery Positive, Starter Motor Output, High Coolant Temp Input, Low Oil Pressure Input, Battery Negative Input, Fuel Control Output, Warning Signal, Pre-heat Output, Spare Inputs, and High Compressor Temp Input.
4. Setup and Installation
Proper installation is crucial for the controller's functionality and longevity. Follow these steps carefully:
- Mounting: Securely mount the controller in a suitable panel cutout. Ensure adequate clearance for wiring and ventilation.
- Wiring Connections: Refer to the wiring diagram (Figure 3.4) on the controller's rear panel for all electrical connections. Connect the following:
- Battery Positive and Negative
- Starter Motor Output
- High Coolant Temperature Input
- Low Oil Pressure Input
- Fuel Control Output
- Warning Signal
- Pre-heat Output
- Spare Inputs (A and B)
- High Compressor Temperature Input
- DIP Switch Configuration: If applicable to your specific application, configure the DIP switches located on the rear of the controller (Figure 3.3) according to your compressor's requirements. Consult your compressor's specific documentation or a qualified technician for correct settings.
- Power On: Once all connections are verified, apply power to the controller. The controller should initiate its startup sequence.
5. Operating Instructions
The MAKO AIRTEK Controller provides intuitive control over your compressor unit.
- Starting the Compressor: Press the START button (red button, white center) on the front panel (Figure 3.1). The controller will initiate the compressor's startup sequence, including pre-heat if configured.
- Stopping the Compressor: Press the STOP button (red button, white center) on the front panel. The controller will safely shut down the compressor.
- Indicator Lights: Monitor the indicator lights on the front panel for operational status and alerts. These lights provide visual feedback on various parameters such as oil pressure, coolant temperature, battery status, and general warnings. Refer to your compressor's operational manual for specific interpretations of these indicators.
6. Maintenance
Regular maintenance ensures the longevity and optimal performance of your controller.
- Cleaning: Periodically clean the controller's exterior with a soft, dry cloth. Avoid using abrasive cleaners or solvents.
- Connection Checks: Annually, or as part of your compressor's maintenance schedule, inspect all electrical connections to the controller. Ensure they are secure and free from corrosion.
- Environmental Conditions: Ensure the operating environment remains within specified limits for temperature and humidity to prevent damage to internal components.
7. Troubleshooting
This section provides guidance for common issues. For complex problems, contact MAKO AIRTEK support.
| Problem | Possible Cause | Solution |
|---|---|---|
| Controller not powering on | No power supply; loose connections; blown fuse. | Check power source; verify all wiring connections; inspect and replace fuses if necessary. |
| Compressor not starting | Safety interlock active; faulty starter motor; incorrect wiring. | Check compressor safety systems; verify starter motor functionality; re-check wiring against diagram. |
| Indicator lights not functioning | Faulty wiring to indicators; internal controller issue. | Inspect wiring to indicator lights; if problem persists, contact support. |
8. Specifications
- Manufacturer: MAKO AIRTEK
- Part Number: 1089935597
- Model/Style: 1089935597
- Compatibility: Atlas Copco XAS186, XAS196
- ASIN: B0BLLK9FYP
- First Available Date: November 6, 2022
- Key Features: Direct replacement, high-quality raw materials, cost-effective, reduces maintenance cost, ensures original manufacturing standard.
9. Warranty and Support
MAKO AIRTEK is committed to providing high-quality products and customer satisfaction. For any issues or support needs, please contact us directly.
- After-sale Service: Provided by MAKO AIRTEK.
- Contact Information: If you encounter any problems, please do not hesitate to contact us. We aim to reply within 1 business day (excluding public holidays).
- Work Hours: Monday to Friday.