Goldsea PKN-2
Goldsea 6-inch Cordless Mini Chainsaw PKN-2 User Manual
Model: PKN-2 | Brand: Goldsea
1. Introduction
This manual provides essential instructions for the safe and efficient operation of your Goldsea 6-inch Cordless Mini Chainsaw, model PKN-2. Please read this manual thoroughly before use and retain it for future reference. This mini chainsaw is designed for light-duty pruning, wood cutting, and garden maintenance tasks.

Image 1: Overview of the Goldsea 6-inch Cordless Mini Chainsaw highlighting its key features: lightweight and portable design, cordless operation, pure copper motor for efficiency, inclusion of two batteries, and emphasis on safety and durability.
2. Important Safety Instructions
Always follow basic safety precautions to reduce the risk of fire, electric shock, and serious personal injury.
- Personal Protective Equipment: Always wear safety goggles or glasses, cut-resistant gloves, and appropriate protective clothing when operating the chainsaw.
- Accidental Startup Prevention: The chainsaw is equipped with a safety lock function to prevent accidental starting. Ensure the safety lock is engaged when not in use.
- Overheat Protection: The mini chainsaw features overheat protection. If the tool becomes excessively hot, it may shut down automatically. Allow it to cool before resuming operation.
- Splash Guard: Utilize the integrated splash guard to protect against flying wood chips and debris during operation.
- Secure Grip: Always maintain a firm, two-handed grip on the chainsaw during operation.
- Stable Footing: Ensure stable footing and balance before and during cutting. Avoid overreaching.
- Work Area: Keep the work area clear of bystanders, children, and pets.
- Battery Safety: Use only the specified batteries and charger. Do not expose batteries to extreme temperatures or moisture.

Image 2: Illustration of the chainsaw's safety mechanism. To start, press the main switch and the safety lock button concurrently. The safety lock can then be released once the chainsaw is running.

Image 3: The chainsaw features a splash guard that can rotate up to 90 degrees for user protection, alongside a safety lock mechanism designed to prevent unintentional activation.
3. Product Overview and Parts Diagram
Familiarize yourself with the components of your Goldsea 6-inch Cordless Mini Chainsaw:
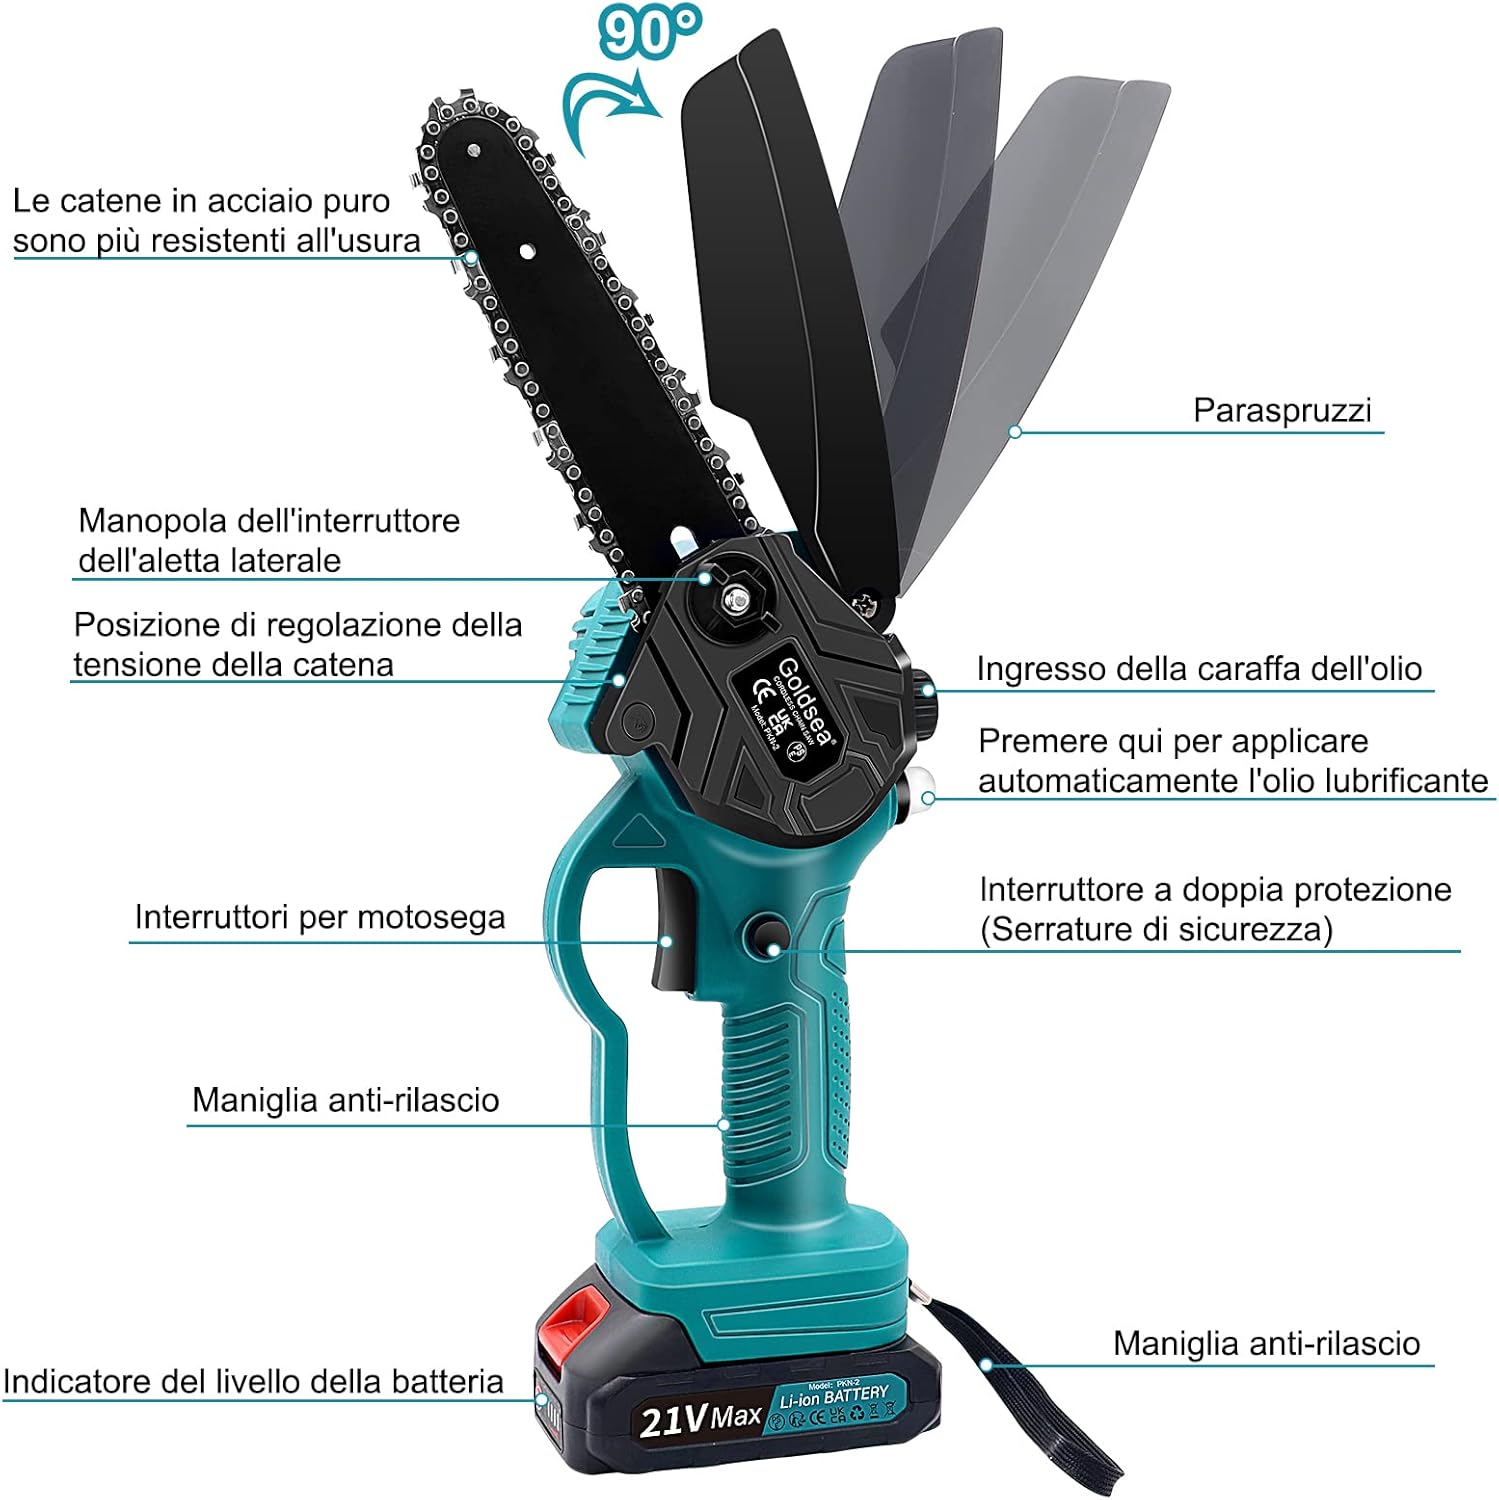
Image 4: A detailed diagram illustrating the key parts of the chainsaw, including the rotatable splash guard, side cover knob, chain tension adjustment point, oil reservoir inlet with automatic oil pump button, main power switch, dual protection safety lock, ergonomic non-slip handle, battery level indicator, and the durable pure steel chain.
- Splash Guard: Protects against debris. Rotates up to 90 degrees.
- Side Cover Knob: Secures the side cover and guide bar.
- Chain Tension Adjustment: Mechanism for adjusting chain tightness.
- Oil Reservoir Inlet: Port for adding lubricating oil.
- Automatic Oil Pump Button: Press to lubricate the chain during operation.
- Chainsaw Switch: Main power trigger.
- Dual Protection Safety Lock: Prevents accidental startup.
- Non-slip Handle: Ergonomically designed for a secure grip.
- Battery Level Indicator: Displays remaining battery charge.
- Pure Steel Chain: Designed for wear resistance and efficient cutting.
4. Package Contents
Please check the package contents upon receipt to ensure all items are present and undamaged:

Image 5: Complete package contents of the Goldsea 6-inch Cordless Mini Chainsaw, including the chainsaw unit, two replacement chains, two 21V batteries, a battery charger, safety glasses, protective gloves, a screwdriver, a cleaning brush, and a durable carrying case.
- Cut-resistant gloves (1 pair)
- Instruction Manual (1)
- Screwdriver (1)
- Brush (1)
- Chainsaw chain (2)
- Batteries (2)
- Tool box (1)
- Battery charger (1)
- Goggles (1)
- Sanding rod (1)
- 6-inch Mini Chainsaw (1)

Image 6: The included toolbox provides convenient storage and portability for the chainsaw and its accessories.
5. Assembly and Setup
Follow these steps to assemble and prepare your chainsaw for use:
- Install Guide Bar and Chain: Carefully install the guide bar and chain. Ensure the chain is correctly oriented, with the sharp cutting edge facing the direction of the chainsaw's rotation.
- Install Side Cover: Place the side cover over the guide bar and chain, aligning it properly.
- Tighten Side Cover Nut: Lightly tighten the nut on the side cover.
- Adjust Chain Tension: Adjust the chain tension. The ideal tension allows for approximately 0.3 cm of slack between the chain and the guide plate.
- Secure Knob: Fully tighten the knob to secure the guide bar and chain in place.
- Install Battery: Insert a fully charged battery into the battery slot until it clicks into place.
- Fill Oiler (if needed): The chainsaw features an automatic oiler. Gently press the oil bottle to fill the oil reservoir, ensuring proper lubrication during operation.

Image 7: Step-by-step visual guide for assembling the chainsaw, covering chain and guide bar installation, securing the side cover, adjusting chain tension, and finally, inserting the battery.

Image 8: Detailed view illustrating the correct orientation for chain installation, highlighting the importance of aligning the cutting teeth with the chainsaw's rotation direction.
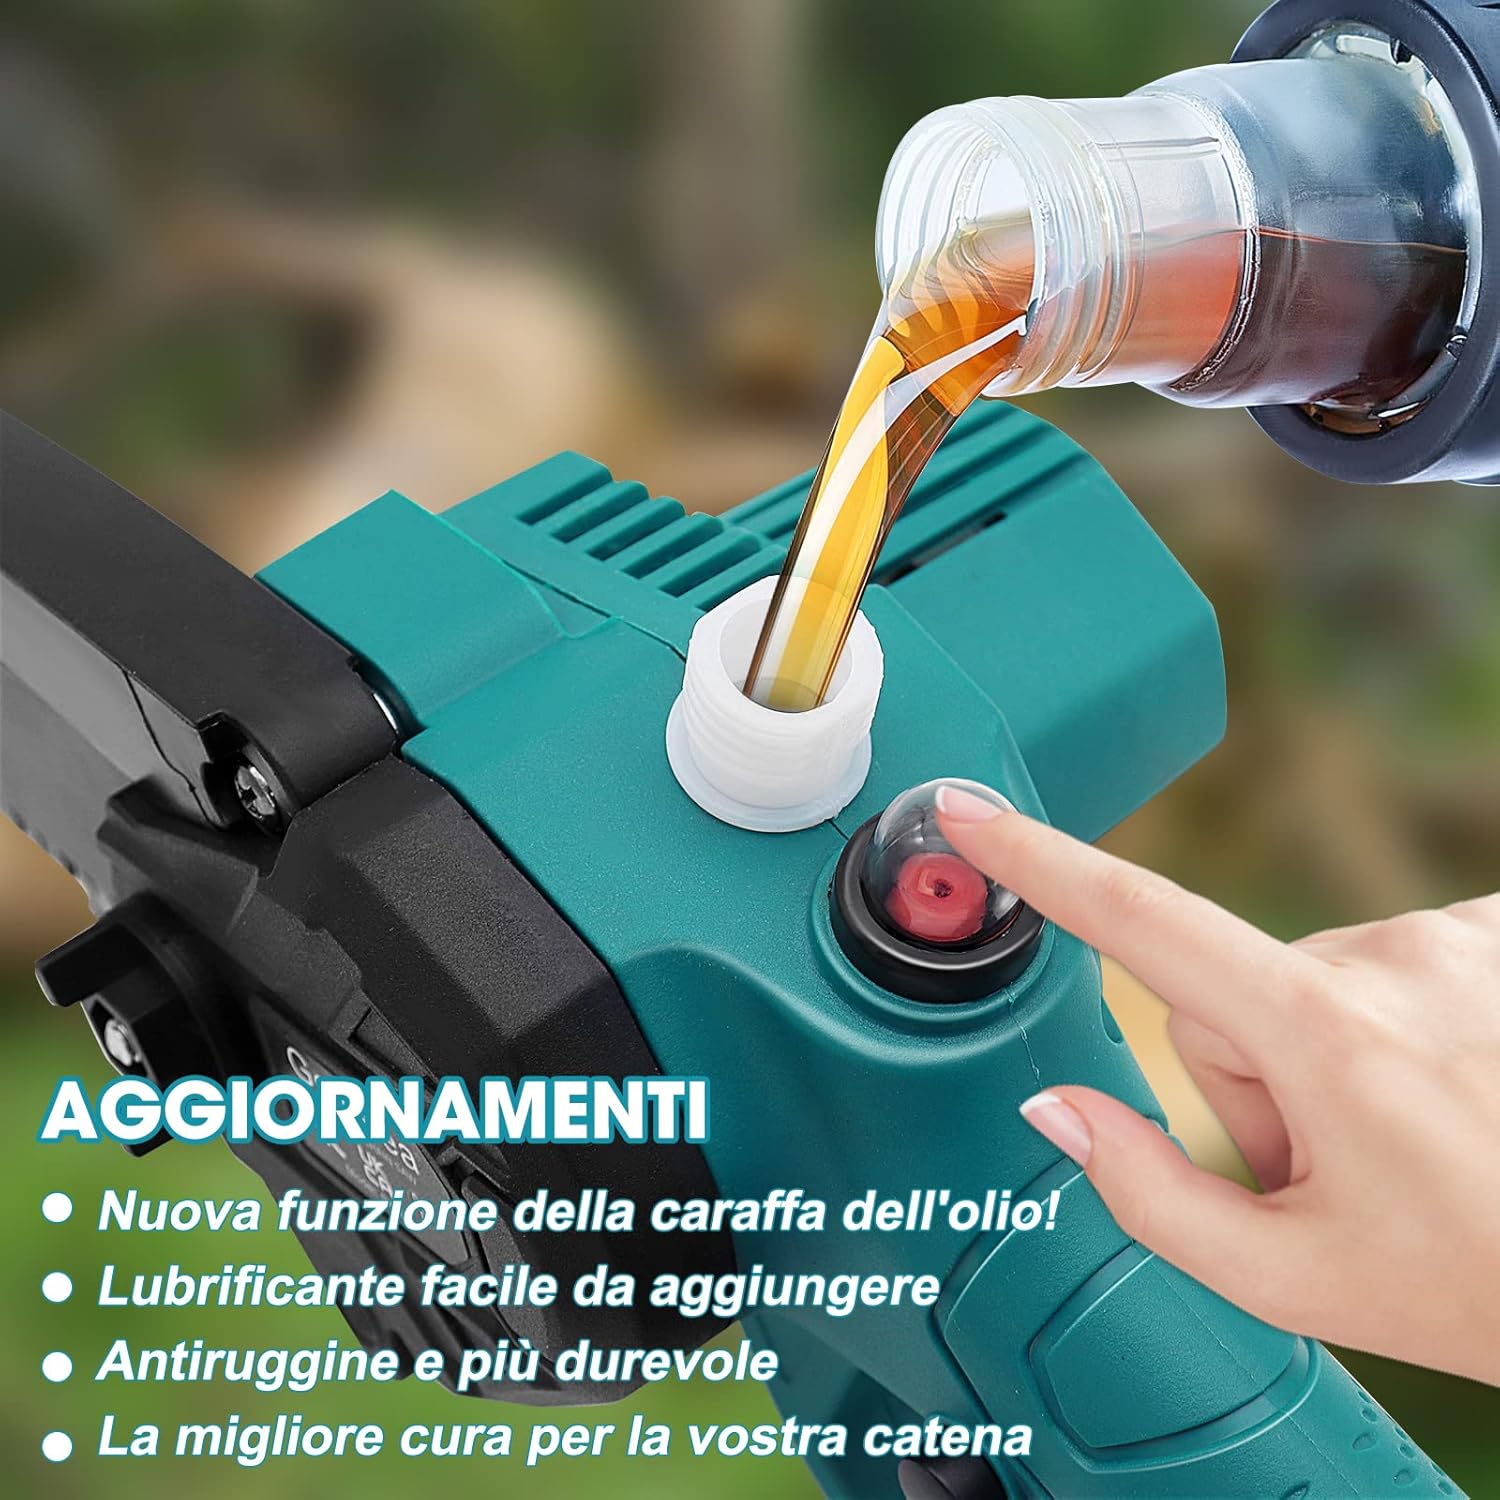
Image 9: The chainsaw's automatic oiler feature, demonstrating how to easily add oil to the reservoir for continuous chain lubrication, which helps reduce friction and extend chain life.

Image 10: A close-up view of the chainsaw's oil filling port and the manual pump button for the automatic oiler system.
6. Operating Instructions
Before operating, ensure you have read and understood all safety instructions.
6.1 Starting the Chainsaw
- Ensure a fully charged battery is installed.
- Hold the chainsaw firmly with both hands.
- Press the main trigger switch and the safety lock button simultaneously to start the chainsaw.
- Once the chainsaw is running, you may release the safety lock button.
6.2 Cutting Techniques
- Pruning Branches: Position the chainsaw firmly against the branch before starting the cut. Support the branch if necessary to prevent pinching the chain.
- Wood Cutting: For cutting logs or larger pieces of wood, ensure the material is stable and cannot roll. Make small, controlled cuts.
- Garden Pruning: The lightweight design (1.16 kg) allows for comfortable one-handed operation for extended periods, making it suitable for various garden pruning tasks.

Image 11: Demonstrations of the chainsaw's versatility in different applications, including pruning tree branches, cutting firewood, general garden pruning, and processing larger logs.
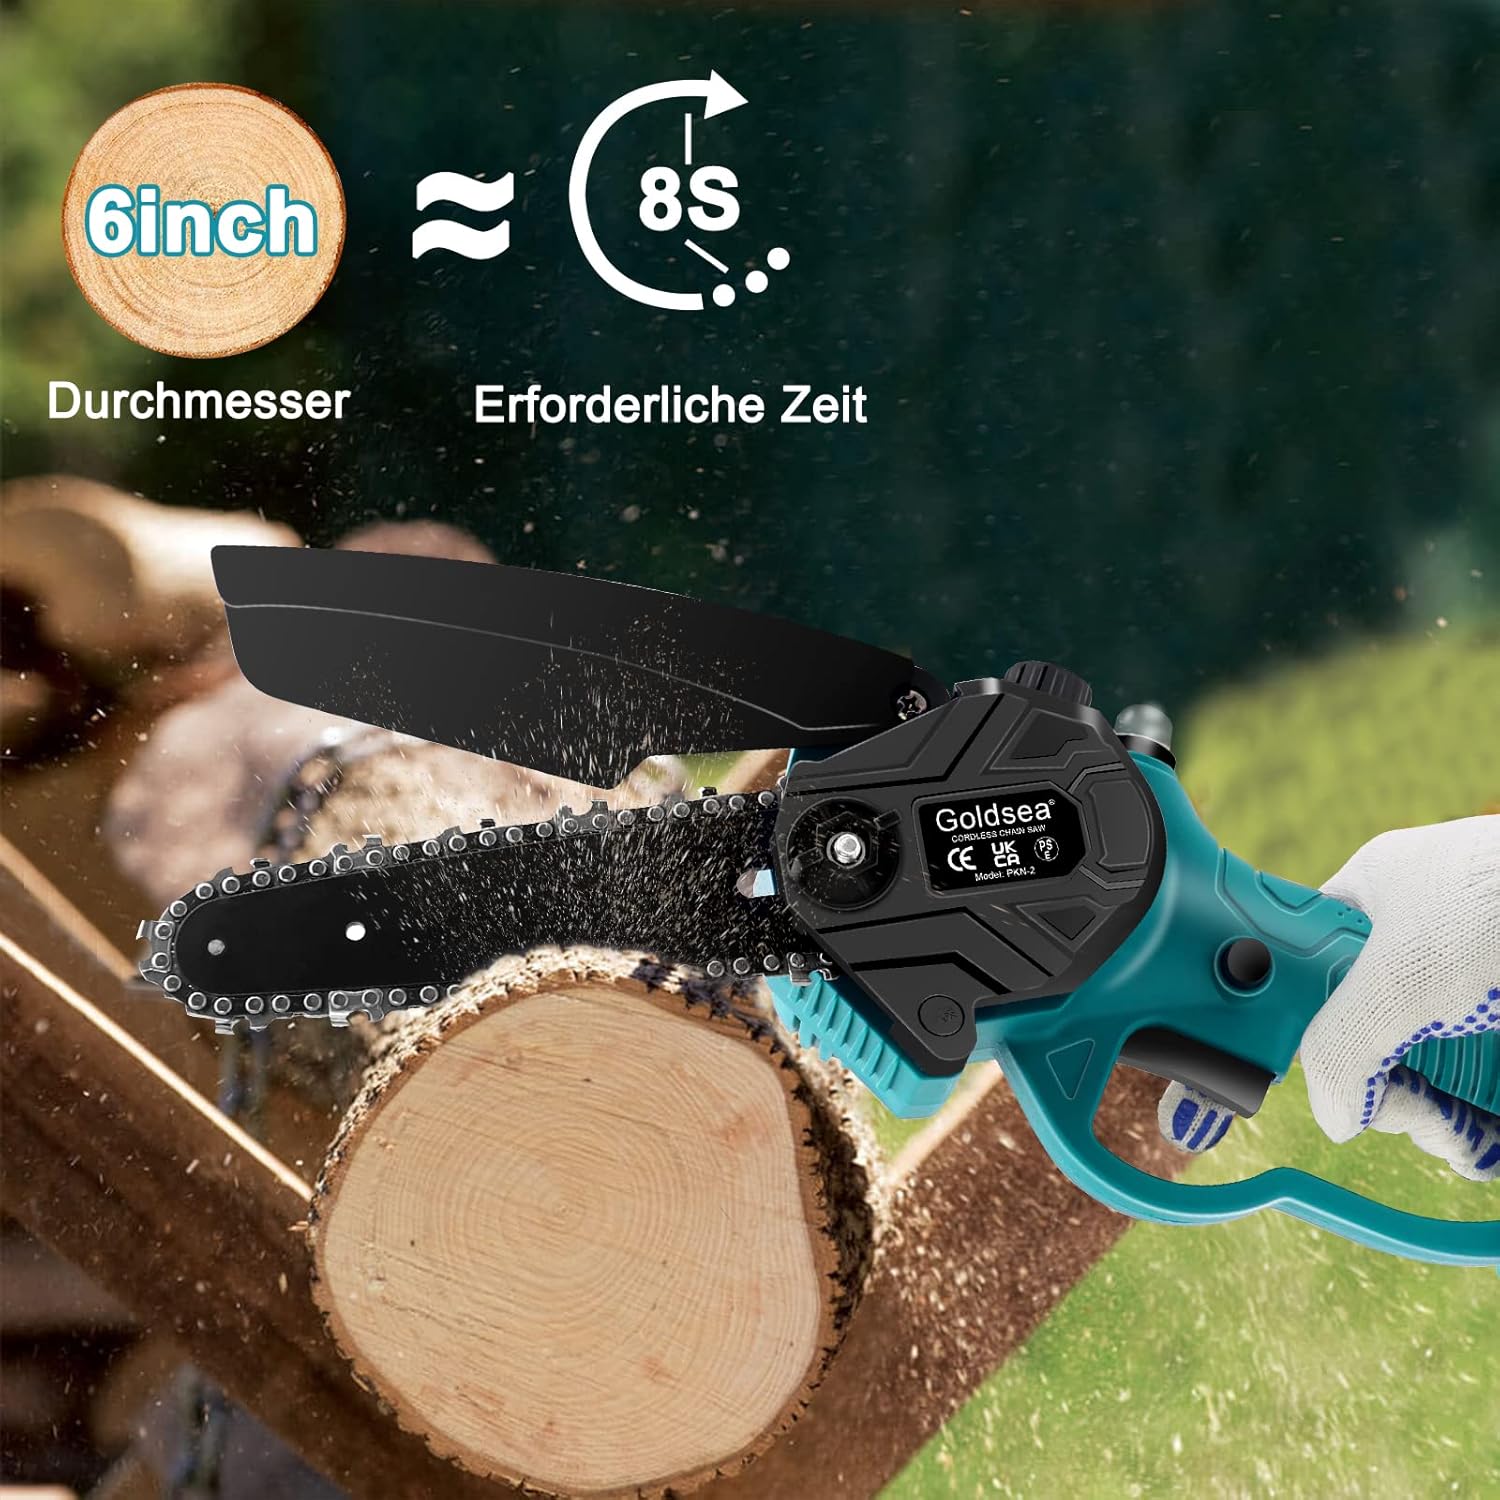
Image 12: Illustration of the chainsaw's cutting efficiency, showing it can cut through a 6-inch diameter log in approximately 8 seconds.
7. Maintenance
Regular maintenance ensures optimal performance and extends the lifespan of your chainsaw.
- Chain Lubrication: Regularly check the oil level and refill the automatic oiler as needed. Proper lubrication reduces friction and wear on the chain and guide bar.
- Chain Tension: Periodically check and adjust the chain tension. A properly tensioned chain should have about 0.3 cm of slack.
- Cleaning: After each use, clean the chainsaw, guide bar, and chain to remove sawdust, resin, and debris. Use the included brush for this purpose.
- Battery Care:
- Charge batteries fully before storage and after each use.
- Store batteries in a cool, dry place away from direct sunlight and extreme temperatures.
- Do not attempt to open or repair damaged batteries.
- Chain Sharpening/Replacement: A dull chain will reduce cutting efficiency and increase strain on the motor. Sharpen the chain as needed or replace it with a new one.

Image 13: The design allows for easy disassembly of the guide bar and chain, facilitating routine cleaning and maintenance.

Image 14: The two included 21V 2000mAh lithium-ion batteries feature a charge level indicator. Each battery requires approximately 2 hours to fully charge and provides about 30 minutes of continuous operation.
8. Troubleshooting
If you encounter issues with your chainsaw, refer to the following common problems and solutions:
| Problem | Possible Cause | Solution |
|---|---|---|
| Chainsaw does not start |
|
|
| Chain not moving |
|
|
| Poor cutting performance |
|
|
| Chainsaw overheats quickly |
|
|
9. Product Specifications
| Brand | Goldsea |
| Model Number | PKN-2 |
| Product Dimensions (L x W x H) | 41 x 18.49 x 15.01 cm |
| Item Weight | 2.9 Kilograms (total package) |
| Chainsaw Unit Weight | 1.16 kg (approx.) |
| Color | Blue |
| Material | ABS + Metal |
| Power Source | Battery Powered |
| Voltage | 21 Volts |
| Power | 800 Watts |
| Sound Level | 70 dB |
| Switch Style | Press |
| Battery Type | Lithium-ion |
| Battery Capacity | 2000 mAh (5 cells) |
| Chain Length | 6 Inches |
| Chain Speed | 19000 rpm |
| Charging Time | Approx. 2 hours |
| Operating Time (uninterrupted) | Approx. 30 minutes |
| UPC | 717981722691 |
10. Warranty and Support
Goldsea is committed to providing high-quality products and excellent customer service.
- After-Sales Service: If you encounter any problems with your Goldsea electric chainsaw, please do not hesitate to contact our customer support team. We aim to respond within 24 hours and provide a satisfactory solution.
- Contact Information: Please refer to the contact details provided on the product packaging or the official Goldsea website for support.
Ask a question about this manual
Ask about setup, troubleshooting, compatibility, parts, safety, or missing instructions. Manuals+ will review the question and use this page’s manual context to help answer it.