1. Introduction
This manual provides detailed instructions for the installation, operation, and maintenance of your DealLED 5M/16ft 12V SM16703/WS2811 Pixel Addressable LED Strip Set. This kit includes a 5-meter (16-foot) LED strip, a power supply, and a mini controller. The LED strip features SM16703 integrated circuits, which are compatible with WS2811 protocols, allowing for individual pixel control when used with an addressable controller (sold separately).

Image 1.1: Overview of the DealLED 5M/16ft 12V SM16703/WS2811 Pixel Addressable LED Strip Set. The image displays a coiled LED strip emitting various colors, highlighting its addressable nature.
2. Package Contents
Please verify that all items listed below are included in your package:
- 1 x 5M (16ft) SM16703/WS2811 Pixel Addressable LED Strip (IP67 Waterproof Silicone Sleeve)
- 1 x UL listed 12V Power Supply
- 1 x Mini RF Remote Controller (non-addressable)
- Fixed clips for installation
Note: The mini controller requires a CR2025 battery, which is not included.

Image 2.1: Contents of the package, including the 5M LED strip on a spool, the 12V power supply, and the mini RF remote controller. A note indicates the remote battery (CR2025) is not included.
3. Specifications
Detailed technical specifications for the LED strip:
| Feature | Detail |
|---|---|
| IC Type | External SM16703 (WS2811 compatible) |
| LED Type | 5050 RGB LED |
| Working Voltage | 12V DC |
| LED Density | 60 LEDs/meter; 300 LEDs/5 meters |
| IC/LED Ratio | 1 IC per 3 LEDs (20 IC pixels/meter, 100 IC pixels/5 meters) |
| Color Order | B-R-G (Blue-Red-Green) |
| Cuttable Segments | Every 3 LEDs (one IC pixel) |
| Strip Width | 10mm |
| Waterproofing | IP67 Silicone Sleeve Sealed |
| Lifespan | >30,000 hours |
| Power Consumption | Approximately 0.2W per LED |
| Total Wattage | 60 watts (for 5M strip) |
| Material | Metal, Silicone, Vinyl |
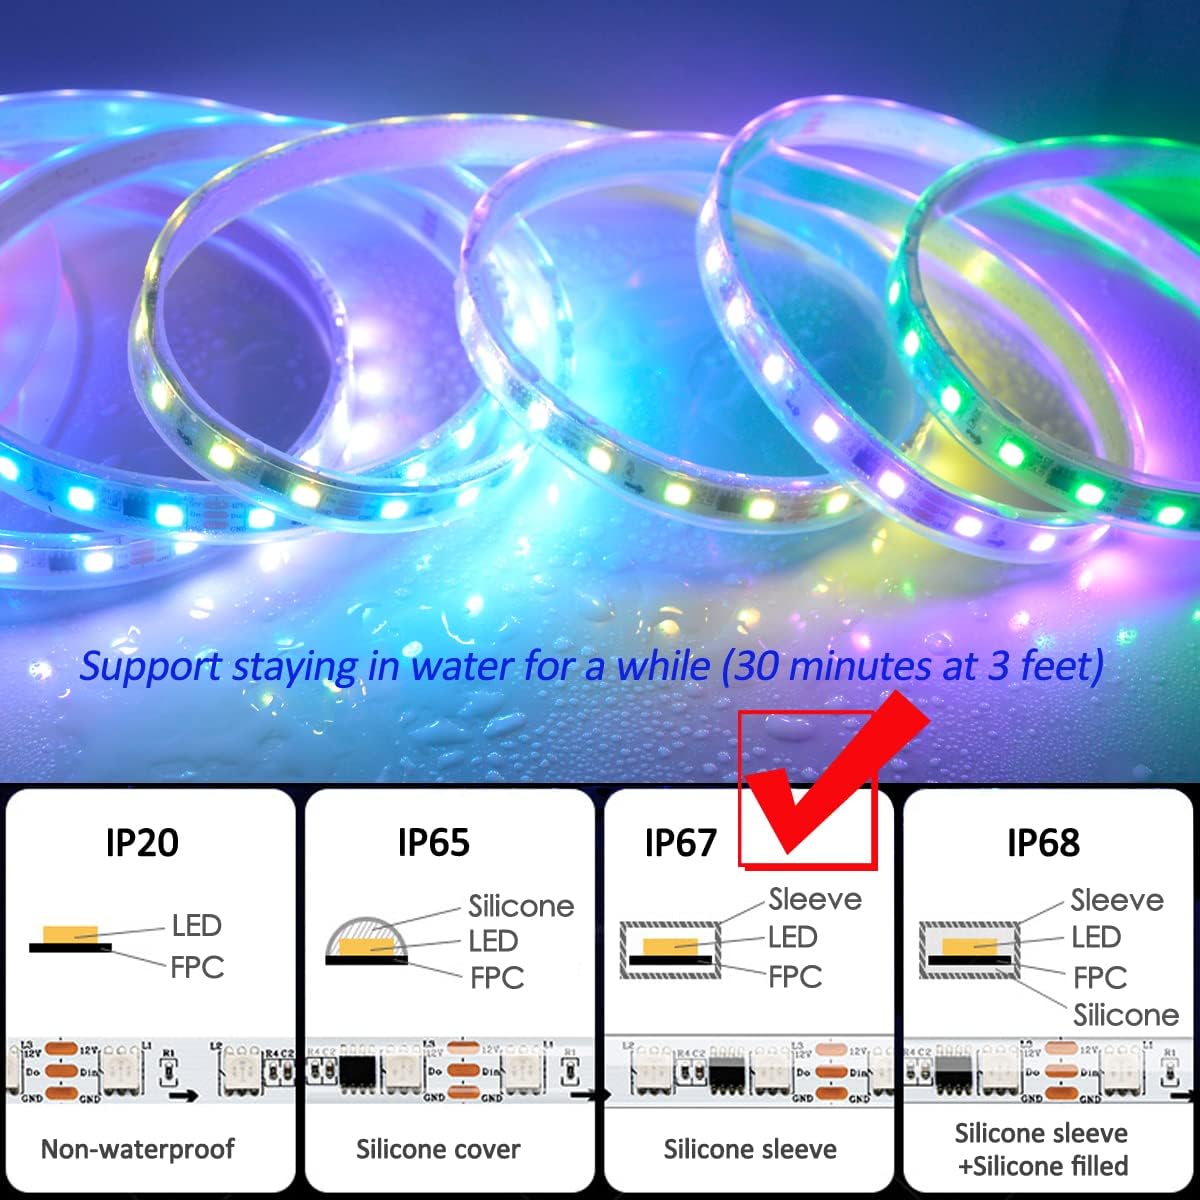
Image 3.1: A visual representation of the LED strip's specifications, including IC type, LED type, density, working voltage, and waterproofing level.
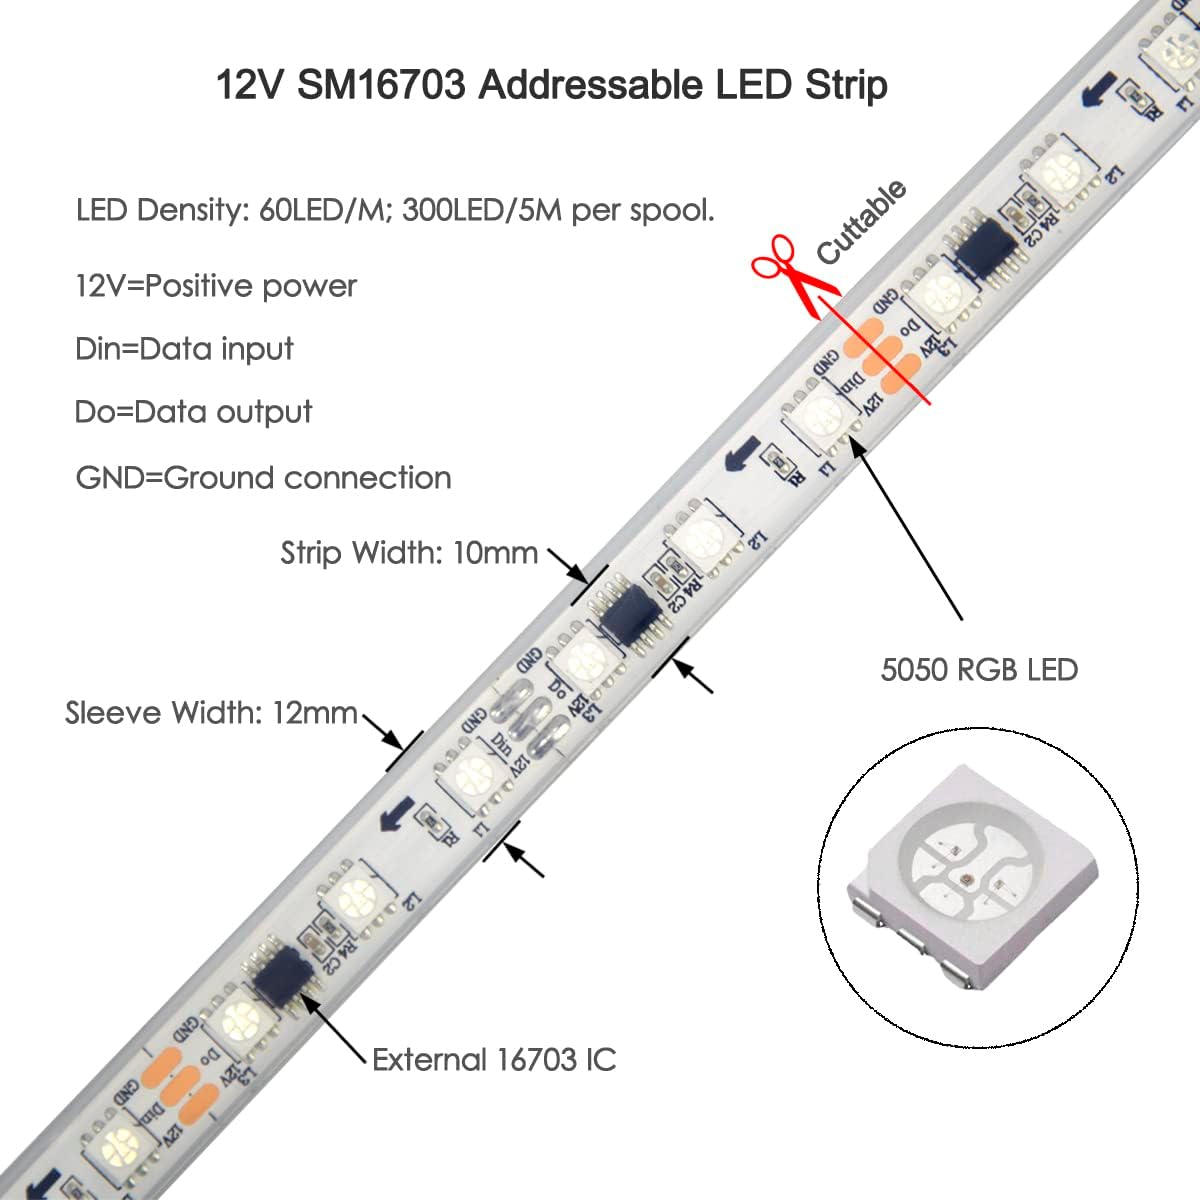
Image 3.2: Close-up view of the 12V SM16703 addressable LED strip, illustrating the LED density, cuttable sections, and the external 16703 IC. Labels indicate DIN (Data Input), DO (Data Output), GND (Ground), and 12V (Positive Power).
4. Setup and Installation
4.1 Connection Diagram
Follow the diagram below to connect the LED strip to the controller and power supply.

Image 4.1: Connection diagram showing the JST-3Pin Male Plug (Data Input) and JST-3Pin Female Plug (Data Output). It illustrates how the 16703 LED Strip connects to the 12V Controller (included) and the 12V Power Supply (included). Auxiliary power wires (black for ground, red for power) are shown for power injection.
4.2 Wiring Instructions
- Connect the 3-pin JST male connector from the LED strip to the corresponding female connector on the mini controller.
- Connect the mini controller to the 12V power supply.
- Plug the 12V power supply into a standard electrical outlet.
4.3 Power Injection
For optimal brightness and color consistency, especially over longer runs, power injection is recommended. The LED strip includes auxiliary power wires (black for ground, red for power) at both ends. For a 5-meter 12V LED strip, power injection is typically needed every 5 meters. If you extend the strip beyond 5 meters or notice dimming/color shifts towards the end of the strip, connect an additional 12V power source to these auxiliary wires.
4.4 Mounting
Use the provided fixed clips to secure the LED strip to your desired surface. Ensure the surface is clean and dry for proper adhesion if using adhesive-backed clips (not explicitly stated if adhesive, but common for clips).
5. Operation
5.1 Using the Included Mini Controller
The included mini RF remote controller is non-addressable. It allows for basic control of the LED strip, including:
- Turning the lights On/Off
- Adjusting brightness
- Selecting static solid colors
- Activating dynamic modes such as chasing, changing, flashing, fading, skipping, scanning, and scrolling effects.
5.2 Using Addressable Controllers (Sold Separately)
To unlock the full potential of individual pixel control and advanced lighting effects, an addressable controller is required. The SM16703 IC is compatible with various addressable controllers available on the market, including:
- Built-in Preset Pattern Controllers: Mini RF Remote Controller (advanced versions), SP105E, SP106E, SP107E, SP108E, SP110E, SP501E, etc.
- Programmable Controllers: Arduino, Raspberry Pi, T1000S, K1000C, etc.
When using an addressable controller, ensure it is configured for SM16703 or WS2811 IC type and the correct color order (B-R-G).
6. Maintenance and Care
6.1 Cleaning
To clean the LED strip, gently wipe it with a soft, damp cloth. Avoid using harsh chemicals or abrasive materials that could damage the silicone sleeve.
6.2 Waterproofing
The LED strip features an IP67 silicone sleeve, providing protection against dust and temporary immersion in water. It can withstand being submerged in water for approximately 30 minutes at a depth of up to 3 feet. This makes it suitable for outdoor use, but it is not designed for continuous underwater operation or high-pressure water exposure.

Image 6.1: Diagram illustrating different IP ratings for LED strips, highlighting the IP67 silicone sleeve protection which supports temporary water immersion.
6.3 Handling Precautions
- The LED strip is composed of many small electronic components. Avoid pressing or applying excessive force to the strip, especially when installing or cleaning.
- When operating, LED strips generate heat. Always unroll the strip from its spool before powering it on to prevent heat buildup and potential damage.
- If used outdoors, ensure the strip is installed in a location where it will not be subjected to heavy objects or snow accumulation that could compress it.
7. Troubleshooting
| Problem | Possible Cause | Solution |
|---|---|---|
| LED strip does not light up | No power, loose connection, faulty power supply/controller | Check all connections. Ensure power supply is plugged in and functional. Verify controller is receiving power. |
| Lights are dim or colors are inconsistent at the end of the strip | Voltage drop due to long run without power injection | Perform power injection using the auxiliary power wires at the end of the strip. |
| Mini remote controller not working | Battery depleted or not installed | Install a new CR2025 battery in the remote. Ensure correct polarity. |
| LED strip shows incorrect colors or patterns with an addressable controller | Incorrect IC type or color order configured in the controller software | Ensure your addressable controller is set to SM16703 or WS2811 IC type and the color order is B-R-G. |
| LED strip gets excessively hot | Operating while still coiled, poor ventilation | Always unroll the strip completely before powering on. Ensure adequate airflow around the strip. |
8. Safety Information
- Ensure all connections are secure before applying power.
- Do not exceed the specified 12V DC input voltage.
- Always disconnect power before performing any installation, maintenance, or troubleshooting.
- Keep the LED strip and power supply away from flammable materials.
- While the strip is IP67 waterproof, it is not intended for permanent underwater installation.
- Avoid bending the LED strip sharply, as this can damage the internal circuitry.
- Do not cut the LED strip at any point other than the designated cut marks.
9. Warranty and Support
For warranty information or technical support, please contact DealLED customer service. Specific warranty terms may vary and are typically provided at the point of purchase or on the official DealLED website.