
CONTROL INN CEDAC011MX
CONTROL INN Remote Control User Manual
For Continental Minisplit Model CEDAC011MX
1. Introduction
Thank you for choosing the CONTROL INN Remote Control, model CEDAC011MX. This remote is designed to provide convenient and reliable control for your Continental Minisplit air conditioning unit. This manual provides essential information for setup, operation, maintenance, and troubleshooting to ensure optimal performance.
Please read this manual thoroughly before using the remote control and retain it for future reference.
2. Safety Information
- Do not expose the remote control to direct sunlight, high temperatures, or high humidity.
- Avoid dropping the remote control or subjecting it to strong impacts.
- Keep the remote control away from water and other liquids.
- If the remote control will not be used for an extended period, remove the batteries to prevent leakage and damage.
- Dispose of used batteries according to local regulations. Do not mix old and new batteries, or different types of batteries.
3. Package Contents
Please check that the following items are included in your package:
- 1 x CONTROL INN Remote Control (Model CEDAC011MX)
- This user manual
Note: Batteries are not included and must be purchased separately.
4. Product Overview
The CONTROL INN CEDAC011MX remote control features an ergonomic design for comfortable handling and intuitive button placement for ease of use. The front panel includes a display screen and various function buttons, while the rear houses the battery compartment.
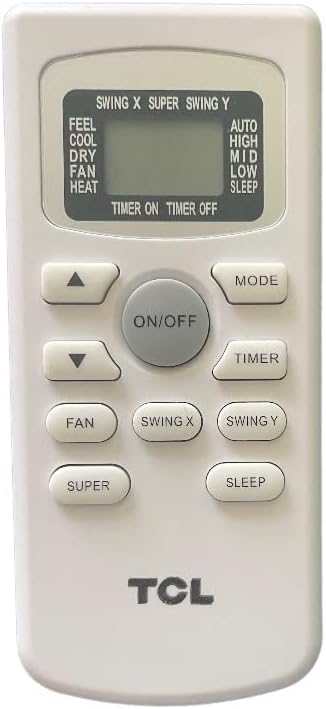
Figure 4.1: Front view of the remote control. Note: While the image displays a 'TCL' logo, this remote is compatible with Continental Minisplit CEDAC011MX as specified.

Figure 4.2: Angled view of the remote control, showing its profile and button arrangement.
4.1 Button Functions
| Button | Function |
|---|---|
| ON/OFF | Powers the Minisplit unit on or off. |
| MODE | Cycles through operating modes: COOL, DRY, FAN, HEAT. |
| FAN | Adjusts fan speed: AUTO, HIGH, MID, LOW. |
| TIMER | Sets the ON or OFF timer for the unit. |
| ▲ / ▼ | Adjusts temperature settings or navigates menu options. |
| SWING X | Controls horizontal airflow direction. |
| SWING Y | Controls vertical airflow direction. |
| SUPER | Activates rapid cooling or heating function. |
| SLEEP | Activates sleep mode for quiet operation and energy saving. |
5. Setup
5.1 Battery Installation
The remote control requires two AAA batteries (not included) for operation. Follow these steps to install them:
- Locate the battery compartment cover on the back of the remote control.
- Slide the cover downwards or press the latch and lift to open.
- Insert two new AAA batteries, ensuring the positive (+) and negative (-) terminals match the diagrams inside the compartment.
- Replace the battery compartment cover by sliding it back into place until it clicks securely.

Figure 5.1: Back view of the remote control with the battery compartment.
Important: If the remote control is not used for a long time, it's best to take out the batteries. When it is needed to replace the batteries, the two batteries should be both replaced. After the replacement, you can set the type of Cooling Only or Cooling & Heating.
5.2 Initial Use
This remote control is designed for quick synchronization with compatible Continental Minisplit units (model CEDAC011MX). No complex programming is typically required. Once batteries are installed, point the remote towards your Minisplit unit and press the ON/OFF button to test functionality.
6. Operating Instructions
6.1 Power On/Off
Press the ON/OFF button to turn the Minisplit unit on or off.
6.2 Selecting Operating Mode
Press the MODE button repeatedly to cycle through the available operating modes:
- COOL: For cooling the room.
- DRY: For dehumidifying the room.
- FAN: For circulating air without heating or cooling.
- HEAT: For heating the room (if supported by your Minisplit unit).
6.3 Adjusting Temperature
Use the ▲ (up arrow) and ▼ (down arrow) buttons to increase or decrease the desired temperature setting.
6.4 Adjusting Fan Speed
Press the FAN button repeatedly to select the desired fan speed: AUTO, HIGH, MID, or LOW.
6.5 Airflow Direction (Swing)
Press SWING X to adjust the horizontal airflow direction. Press SWING Y to adjust the vertical airflow direction. Pressing multiple times may cycle through different swing patterns or fixed positions.
6.6 Timer Functions
Press the TIMER button to set the unit to turn on (TIMER ON) or turn off (TIMER OFF) automatically after a set period. Use the ▲ and ▼ buttons to adjust the time. Confirm your setting by pressing the TIMER button again.
6.7 Special Functions
- SUPER: Activates a powerful mode for rapid cooling or heating. Press again to deactivate.
- SLEEP: Engages sleep mode, which typically adjusts temperature and fan speed for comfortable sleep and energy efficiency. Press again to deactivate.
7. Maintenance
7.1 Cleaning the Remote Control
Wipe the remote control with a soft, dry cloth. Do not use liquid cleaners, abrasive cleaners, or chemical solvents, as these may damage the surface or internal components.
7.2 Battery Replacement
When the remote control's range decreases or the display becomes dim, it is time to replace the batteries. Always replace both batteries simultaneously with new AAA batteries. Refer to Section 5.1 for battery installation instructions.
7.3 Storage
If the remote control will not be used for an extended period, remove the batteries to prevent potential leakage and corrosion. Store the remote in a cool, dry place away from direct sunlight.
8. Troubleshooting
| Problem | Possible Cause | Solution |
|---|---|---|
| Remote not responding | Dead or incorrectly installed batteries. Obstruction between remote and Minisplit. Remote out of range. | Replace batteries, ensuring correct polarity. Remove any obstructions. Move closer to the Minisplit unit. |
| Display is dim or blank | Low battery power. | Replace batteries. |
| Minisplit not responding to specific commands | Incorrect mode selected. Minisplit unit limitation. | Ensure the correct operating mode is selected. Refer to your Minisplit unit's manual for supported functions. |
9. Specifications
- Model: CEDAC011MX
- Brand: CONTROL INN
- Compatible Devices: Continental Minisplit Air Conditioners (specifically CEDAC011MX)
- Connectivity Technology: Infrared (IR)
- Power Source: 2 x AAA Batteries (not included)
- Design: Ergonomic and compact
10. Support
If you encounter issues not covered in this manual or require further assistance, please contact your retailer or the CONTROL INN customer support. For the most up-to-date support information, please visit the official CONTROL INN store on Amazon: CONTROL INN Store.
Related documentsCEDAC011MX


Ask a question about this manual
Ask about setup, troubleshooting, compatibility, parts, safety, or missing instructions. Manuals+ will review the question and use this page’s manual context to help answer it.