Totem Osprey
Totem Osprey Electric Mountain Bike User Manual
Model: Osprey
Introduction
Thank you for choosing the Totem Osprey Electric Mountain Bike. This manual provides essential information for the safe assembly, operation, and maintenance of your new electric bicycle. Please read this manual thoroughly before your first ride to ensure optimal performance and safety. Keep this manual for future reference.

Figure 1: Totem Osprey Electric Mountain Bike, showcasing its sleek design and robust frame.
Safety Information
Always prioritize safety when operating your electric bicycle. Failure to follow safety guidelines can result in serious injury or damage to the bike.
- Always wear a helmet that meets safety standards.
- Perform a pre-ride inspection before each use, checking brakes, tires, and battery.
- Familiarize yourself with local e-bike regulations and traffic laws.
- Do not ride under the influence of alcohol or drugs.
- Avoid riding in adverse weather conditions or on excessively rough terrain if you are not experienced.
- Ensure all quick releases and bolts are properly tightened before riding.
Setup and Assembly
Your Totem Osprey electric mountain bicycle is 85% pre-assembled. The following steps outline the final assembly process. Tools required for assembly are included with your purchase.
Unpacking
- Carefully remove the bike and all components from the packaging.
- Remove all protective packaging materials and zip ties.
- Inspect the bike for any visible damage that may have occurred during shipping. Contact customer support immediately if damage is found.
Handlebar Installation
- Loosen the bolts on the stem faceplate.
- Position the handlebar in the stem, ensuring it is centered.
- Tighten the stem faceplate bolts evenly to secure the handlebar.
Front Wheel Installation
- Align the front wheel with the fork dropouts.
- Ensure the brake rotor is correctly seated within the brake caliper.
- Insert the quick release skewer or axle through the hub and tighten securely.
Pedal Installation
- Identify the left (L) and right (R) pedals.
- The right pedal (R) threads clockwise into the right crank arm.
- The left pedal (L) threads counter-clockwise into the left crank arm.
- Tighten both pedals firmly with a wrench.
Seat Post Installation
- Insert the seat post into the seat tube.
- Adjust the seat height to a comfortable and safe riding position.
- Secure the seat post with the quick release lever or bolt. Ensure the minimum insertion mark is not visible.
Components Overview
Understanding the key components of your Totem Osprey e-bike will enhance your riding experience and maintenance efforts.

Figure 2: Key dimensions of the Totem Osprey Electric Mountain Bike, including handlebar height, stand over height, seat tube, reach, wheelbase, and total length. Recommended rider height is 5'4" - 6'5", with a maximum load capacity of 300 lbs.
Motor System
The Osprey is equipped with a 350W high-speed brushless motor, providing robust power for various terrains. It features a built-in overheat protection module for enhanced safety during demanding rides.
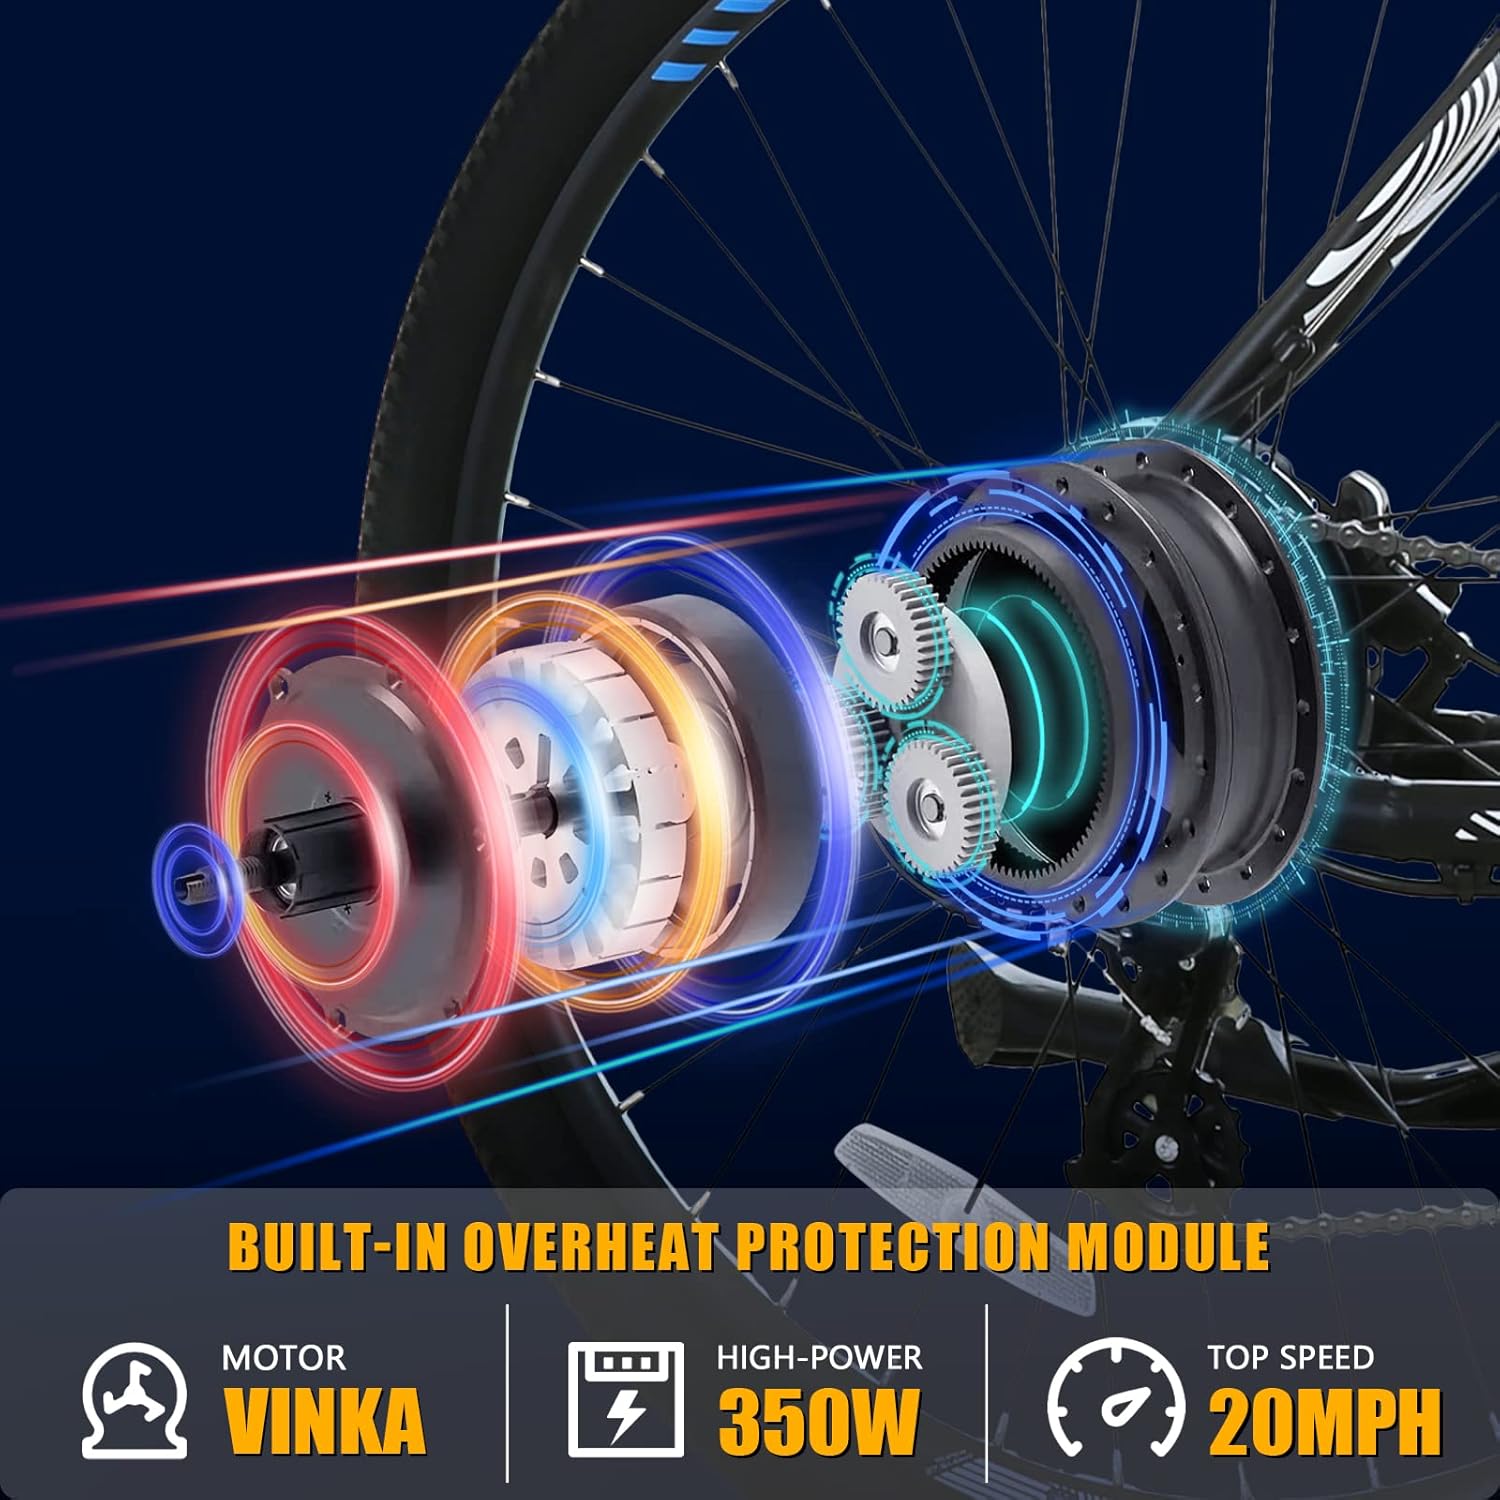
Figure 3: Diagram illustrating the internal components of the 350W brushless motor, highlighting its high-power output and integrated overheat protection module.
Battery
The bike features a removable 36V Lithium-Ion Battery with a 14Ah capacity, offering a range of 50-75 miles per charge. It integrates a smart battery management system for extended life and includes an anti-theft security lock.
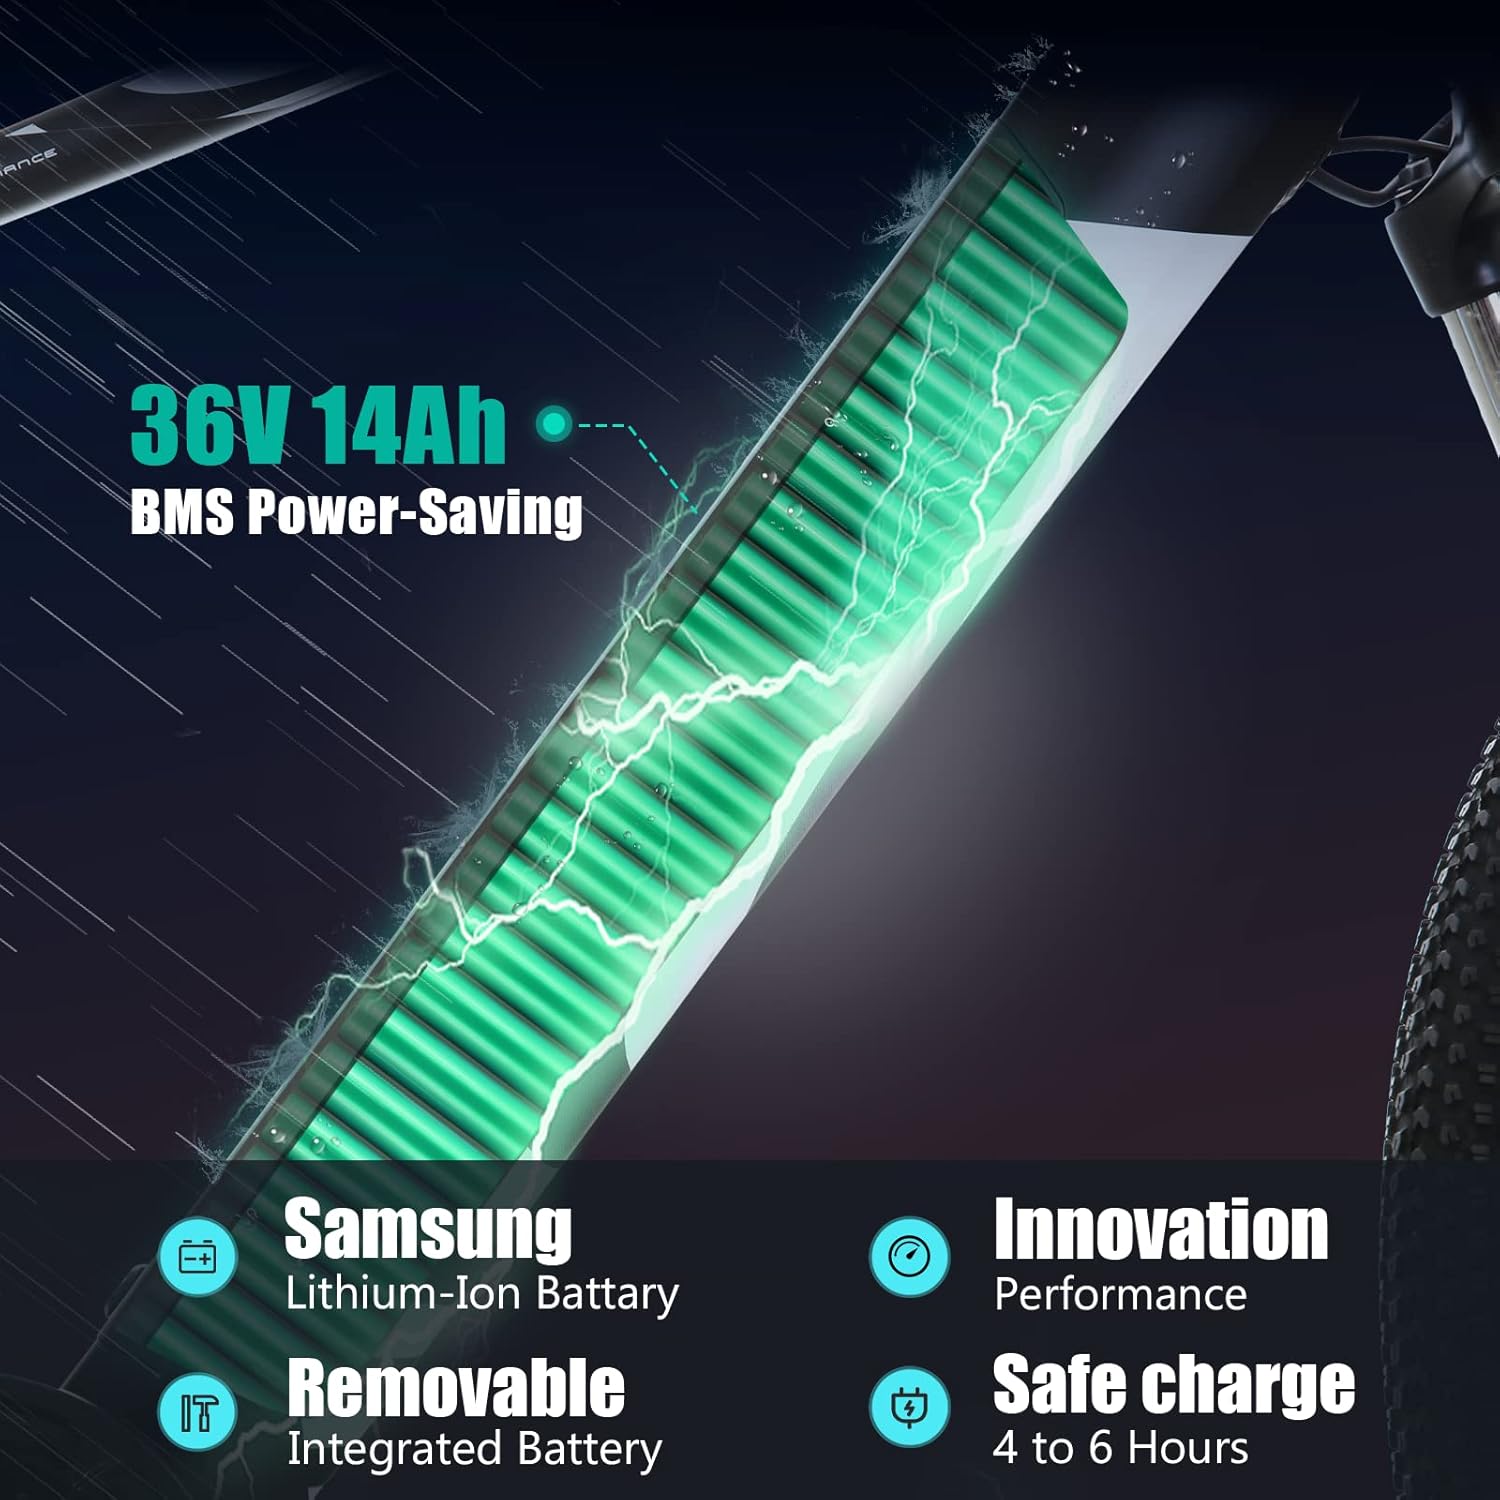
Figure 4: Visual representation of the 36V 14Ah Lithium-Ion Battery integrated within the bike frame, emphasizing its removable design and power-saving features.
Suspension System
Equipped with a professional Suntour XCT suspension fork featuring HLO (Hydraulic Lockout) technology, this system provides significant shock absorption and a smoother ride. The lockout feature allows for on-the-fly travel adjustment.

Figure 5: Close-up view of the Suntour XCT front suspension fork with its hydraulic lockout mechanism, illustrating its shock absorption capabilities.
Brakes and Gears
The bike features professional electric bicycle-grade hydraulic disc brakes for reliable stopping power in various conditions. The Shimano 3x8 (24-speed) gear system ensures accurate and smooth shifting across diverse road conditions.

Figure 6: Detailed view of the Logan hydraulic disc brake caliper and the Shimano 24-speed gear derailleur and cassette, indicating suitability for sand, city, and gravel roads.
Operating Instructions
Powering On/Off
- To power on the bike, press and hold the power button on the display unit.
- To power off, press and hold the power button again until the display turns off.
Pedal Assist System (PAS)
The Totem Osprey offers 5 levels of pedal assist. Use the '+' and '-' buttons on the control panel to adjust the assist level. Higher levels provide more motor assistance.
Charging the Battery
- The battery can be charged while installed on the bike or removed.
- Connect the charger to the battery charging port, then plug the charger into a standard wall outlet.
- A full charge typically takes 4-6 hours. The charger indicator light will change when charging is complete.
- Always use the original charger provided by Totem.
Shifting Gears
Use the Shimano shifters on the handlebars to change gears. Shift gears smoothly and avoid shifting under heavy load to prevent damage to the drivetrain. Practice shifting in a safe area before riding on varied terrain.
Braking
The hydraulic disc brakes provide strong and consistent stopping power. Apply both front and rear brakes simultaneously for optimal control and stopping distance. Avoid sudden, hard braking, especially with the front brake, to prevent skidding.
Maintenance
Regular maintenance is crucial for the longevity and safe operation of your e-bike.
- Tire Pressure: Check tire pressure before each ride. Recommended pressure is typically found on the tire sidewall.
- Brakes: Regularly inspect brake pads for wear and ensure brake levers feel firm. Adjust or replace as needed.
- Chain: Keep the chain clean and lubricated to ensure smooth shifting and prevent premature wear.
- Bolts and Fasteners: Periodically check all bolts and fasteners for tightness, especially on critical components like the handlebars, stem, wheels, and seat post.
- Battery Care: Store the battery in a cool, dry place. If storing for extended periods, charge it to 50-70% every few months.
- Cleaning: Clean the bike with a damp cloth and mild soap. Avoid high-pressure washing directly on electrical components.
Troubleshooting
This section addresses common issues you might encounter with your Totem Osprey e-bike.
| Problem | Possible Cause | Solution |
|---|---|---|
| Bike does not power on | Battery not charged; Battery not properly seated; Loose electrical connection. | Charge battery; Ensure battery is fully inserted and locked; Check all visible connections. |
| Motor not assisting | PAS level set to 0; Brake levers engaged; Sensor issue. | Increase PAS level; Release brake levers fully; Contact support if issue persists. |
| Brakes feel spongy or weak | Air in hydraulic line; Worn brake pads; Misaligned caliper. | Bleed brakes (professional recommended); Replace brake pads; Realign caliper. |
| Gears are not shifting smoothly | Derailleur out of adjustment; Dirty or dry chain; Bent hanger. | Adjust derailleur limits and cable tension; Clean and lubricate chain; Inspect hanger for damage. |
Specifications
| Feature | Detail |
|---|---|
| Bike Type | Electric Mountain Bike |
| Model Name | Osprey (also referred to as Victor) |
| Motor | 350W High-Speed Brushless Motor |
| Battery | 36V 14Ah Lithium-Ion (Samsung cells) |
| Range per Charge | 50-75 miles |
| Charging Time | 4-6 hours |
| Max Speed (Pedal Assist) | 20 MPH |
| Gears | Shimano 3x8 Speed (24-speed) |
| Brakes | Hydraulic Disc Brakes (Logan) |
| Suspension | Suntour XCT Front Suspension Fork with HLO |
| Frame Material | 6061 Aluminum |
| Wheel Size | 27.5 inches |
| Recommended Rider Height | 5'4" - 6'5" |
| Max Weight Capacity | 300 lbs |
| Item Weight | 57 Pounds |
| Included Components | Electric bike, Charger, User manual, Assembly tools |
Warranty and Support
Totem provides customer support and stands behind its products. For warranty information, technical assistance, or replacement parts, please contact Totem customer service.
- Refer to the warranty card included with your purchase for specific terms and conditions.
- For direct support, visit the official Totem website or contact their customer service department.
- Keep your purchase receipt as proof of purchase for warranty claims.
Ask a question about this manual
Ask about setup, troubleshooting, compatibility, parts, safety, or missing instructions. Manuals+ will review the question and use this page’s manual context to help answer it.