1. Introduction
This manual provides comprehensive instructions for the safe and efficient operation, maintenance, and troubleshooting of the ORIENTEK T49 FTTx Mini Fusion Splicer. The T49 is an advanced, active clad-alignment fusion splicer designed for FTTx applications, offering fast splicing and heating capabilities with a user-friendly 3.5-inch display.
2. Safety Information
Please read all safety warnings and instructions carefully before using the device to prevent injury or damage.
- Always operate the splicer in a clean, dry, and well-ventilated environment.
- Do not expose the device to extreme temperatures, humidity, or direct sunlight.
- Handle optical fibers with extreme care. Fiber shards are very sharp and can cause serious injury.
- Wear appropriate personal protective equipment (PPE), including safety glasses, when working with optical fibers.
- Ensure the power adapter and battery are correctly connected and used according to specifications.
- Do not attempt to open or repair the device yourself. Refer to qualified service personnel for repairs.
- Keep the splicing area free from dust and debris to ensure optimal performance.
- Be aware of the high voltage arc discharge during splicing. Keep hands and other body parts clear of the electrodes.
3. Package Contents
Verify that all items listed below are included in your package. If any items are missing or damaged, please contact your supplier.
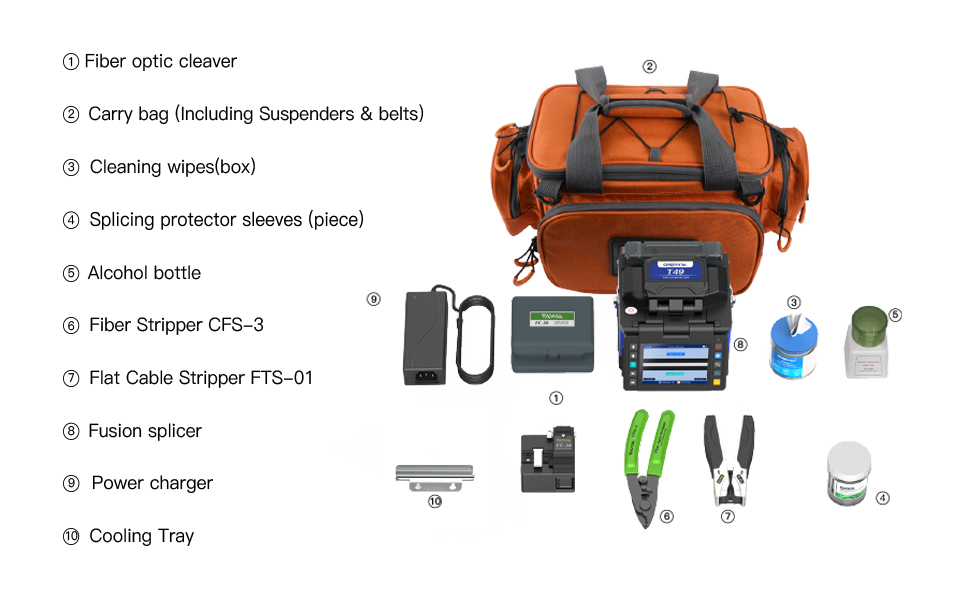
Image: A detailed view of the ORIENTEK T49 Fusion Splicer kit, showing all included accessories neatly arranged.
- Fiber Optic Cleaver (FC-20)
- Carry Bag (Including Suspenders & belts)
- Cleaning Wipes (box)
- Splicing Protector Sleeves (piece)
- Alcohol Bottle
- Fiber Stripper (CFS-3)
- Flat Cable Stripper (FTS-01)
- Fusion Splicer (ORIENTEK T49)
- Power Charger
- Cooling Tray
4. Product Overview and Features
The ORIENTEK T49 is a compact and efficient fusion splicer designed for various fiber optic applications, particularly FTTx. Its robust design and advanced features ensure reliable performance.

Image: The ORIENTEK T49 Fusion Splicer, emphasizing its fast splicing (8s) and fast heating (18s) capabilities.
- Fast Splicing: Achieves splicing in approximately 8 seconds.
- Fast Heating: Heats splice protection sleeves in approximately 18 seconds.
- Active Clad-Alignment: Ensures precise fiber alignment for low splice loss.
- 3.5-inch Display: Provides clear visibility of the splicing process.
- 3-in-1 Fiber Holder: Compatible with bare fiber, pigtail fiber, jump fiber, and flat fiber.
- Long Electrode Life: Electrodes are designed for approximately 5000 splices and are easily replaceable without tools.
- Portable Design: Lightweight and compact, suitable for aerial work and field applications.
- Double Cooling Tank: Enhanced capacity for efficient cooling of splice protection sleeves.
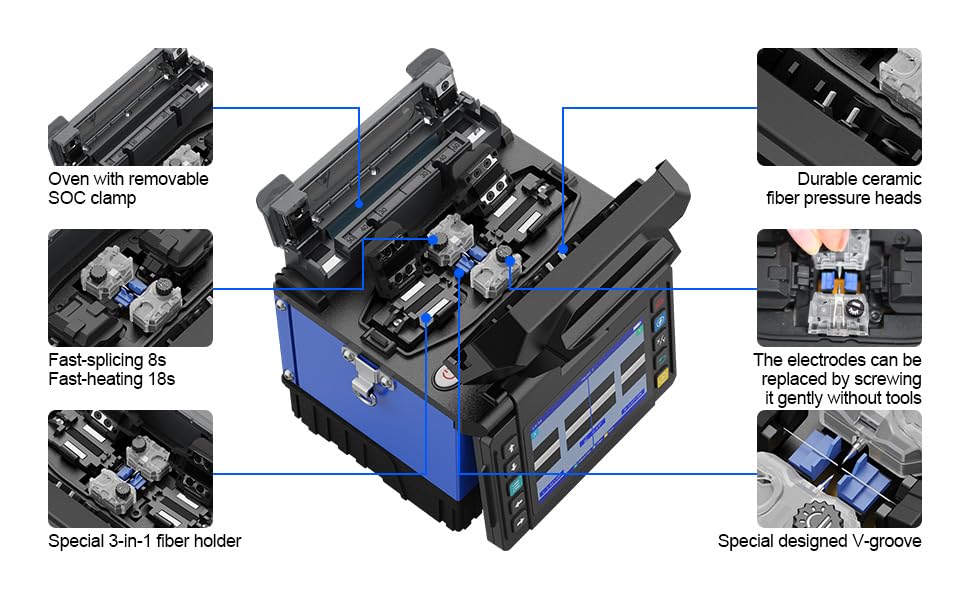
Image: An exploded view of the ORIENTEK T49, highlighting key internal features such as the oven with removable SOC clamp, durable ceramic fiber pressure heads, tool-free replaceable electrodes, special 3-in-1 fiber holder, and special designed V-groove.
The internal design of the T49 focuses on durability and ease of use. Key features include:
- Oven with removable SOC clamp.
- Durable ceramic fiber pressure heads.
- Electrodes can be replaced by screwing them gently without tools.
- Special 3-in-1 fiber holder.
- Special designed V-groove for precise fiber placement.
5. Setup
Before operating the ORIENTEK T49 Fusion Splicer, ensure proper setup for optimal performance and safety.
- Unpacking: Carefully remove all components from the carry bag.
- Power Connection: Connect the power charger to the splicer and a suitable power outlet. The device can also operate on its internal battery. Ensure the battery is sufficiently charged for field use.
- Placement: Place the splicer on a stable, clean, and level surface. For aerial work, utilize the provided carry bag with suspenders and belts for secure attachment.
- Preparation of Accessories:
- Prepare the fiber optic cleaver (FC-20) and fiber strippers (CFS-3, FTS-01).
- Ensure cleaning wipes and alcohol are readily available for fiber preparation.
- Have splice protector sleeves within reach.
- Initial Power On: Press the power button to turn on the splicer. The 3.5-inch display will illuminate.

Image: A person demonstrating the use of the ORIENTEK T49 Fusion Splicer with its carry bag and suspenders, illustrating its suitability for aerial work.
The design allows for a working platform setup, making it ideal for various work environments, including aerial installations.
6. Operating Instructions
Follow these steps for successful fiber fusion splicing using the ORIENTEK T49.
- Fiber Preparation:
- Strip the fiber coating using the appropriate fiber stripper (CFS-3 or FTS-01) to expose the bare fiber.
- Clean the bare fiber thoroughly with a lint-free wipe moistened with isopropyl alcohol.
- Place a splice protection sleeve onto one of the fibers before cleaving.
- Fiber Cleaving:
- Use the FC-20 fiber cleaver to achieve a precise, clean end-face on both fibers. Ensure the cleaved length is within the recommended range (8-20mm).
- A typical cleaved angle should be ≤0.5°.

Image: Detailed specifications of the FC-20 Fiber Cleaver, including typical blade life, cleaved angle, cleaved length, cladding diameter, and applicable fiber cable dimensions.
- Fiber Placement in Splicer:
- Open the splicer's lid and carefully place the prepared fibers into the V-grooves of the 3-in-1 fiber holder.
- Ensure the fiber ends are positioned correctly for automatic feeding and alignment. The 3-in-1 holder supports bare fiber, pigtail fiber, jump fiber, and flat fiber.

Image: Close-up of the 3-in-1 fiber holder, demonstrating its versatility for different optical fiber types ranging from 0.25mm to 3.0mm.

Image: Visual examples of bare fiber, pigtail fiber, jump fiber, and flat fiber correctly seated in the 3-in-1 fiber holder.
- Splicing Process:
- Close the splicer lid. The device will automatically begin the splicing process, including fiber alignment and arc discharge.
- Monitor the splicing process on the 3.5-inch display. The splicer will indicate successful splicing and estimated splice loss.
- The typical splicing time is 8 seconds.
- Heat Shrinking:
- Once splicing is complete, carefully remove the spliced fiber from the V-grooves.
- Slide the splice protection sleeve over the splice point.
- Place the fiber with the sleeve into the heating oven.
- Close the oven lid to initiate the heat shrinking process. The typical heating time is 18 seconds.

Image: Illustration of the double cooling tank feature, indicating twice the carrying capacity for cooling splice protection sleeves.
- Cooling: After heating, remove the fiber from the oven and place it on the cooling tray to allow the splice protection sleeve to cool and harden.
7. Maintenance
Regular maintenance ensures the longevity and optimal performance of your ORIENTEK T49 Fusion Splicer.
- Cleaning V-Grooves and Electrodes: Regularly clean the V-grooves and fiber clamps with a cotton swab moistened with alcohol to remove fiber debris.
- Electrode Replacement: The electrodes have a life of approximately 5000 splices. When the splice quality degrades or the splicer prompts, replace the electrodes. Electrodes can be replaced easily by screwing them gently without tools.
- Cleaning the Display: Use a soft, lint-free cloth to clean the 3.5-inch display. Do not use abrasive cleaners.
- Battery Care: Charge the battery fully before extended storage. If not used for a long period, charge the battery every 3 months to maintain its health. The splicer supports 120 splicing+heating cycles on a full charge.
- General Cleaning: Keep the exterior of the splicer clean and free from dust. Use a soft, dry cloth.
8. Troubleshooting
This section provides solutions to common issues you might encounter with your T49 Fusion Splicer.
| Problem | Possible Cause | Solution |
|---|---|---|
| High Splice Loss | Dirty fiber ends, poor cleave, worn electrodes, dirty V-grooves. | Clean fiber ends thoroughly. Re-cleave fibers. Replace electrodes. Clean V-grooves and fiber clamps. |
| Splicer not powering on | Low battery, faulty power adapter, loose connection. | Charge the battery. Check power adapter and connections. |
| Fiber not aligning | Dirty V-grooves, damaged fiber holder, incorrect fiber placement. | Clean V-grooves. Ensure fibers are correctly seated in the 3-in-1 holder. |
| Heating oven not working | Sleeve not properly placed, oven malfunction. | Ensure sleeve is fully inserted. Contact support if issue persists. |
9. Specifications
Technical specifications for the ORIENTEK T49 FTTx Mini Fusion Splicer.
| Feature | Detail |
|---|---|
| Model Number | T49-R |
| Splicing Time | 8 seconds (typical) |
| Heating Time | 18 seconds (typical) |
| Electrode Life | Approx. 5000 times (replaceable) |
| Display | 3.5 inch |
| Fiber Alignment | Active Clad-Alignment |
| Fiber Holder | Special 3-in-1 fiber holder (bare, pigtail, jump, flat fiber) |
| Battery Capacity | Supports 120 times of splicing + heating |
| Dimensions (Package) | 15 x 10 x 10 inches |
| Weight (Package) | 9.75 Pounds |
| Power Source | 1 Lithium Ion battery (included) |
| Manufacturer | Nanjing Orientek Optical Communication Limited |
10. Warranty & Support
ORIENTEK provides a comprehensive warranty for the T49 FTTx Mini Fusion Splicer.
- Warranty Policy: This product comes with a 3-year warranty policy. Please retain your proof of purchase for warranty claims.
- Technical Support: For technical assistance, troubleshooting beyond this manual, or warranty service, please contact ORIENTEK customer support or your authorized dealer.
- Online Resources: Visit the official ORIENTEK website for additional resources, FAQs, and software updates.