1. Introduction and Overview
The Plusivo DM501D is a compact digital multimeter designed for precise electrical measurements. It is an essential tool for electronics and electrical circuit debugging, capable of measuring AC/DC voltage, AC/DC current, resistance, capacitance, frequency, and temperature. Additionally, it features diode testing, continuity checks, and a Non-Contact Voltage (NCV) detector. This manual provides detailed instructions for safe and effective use of your DM501D multimeter.

Figure 1: Plusivo DM501D Digital Multimeter and included packaging.

Figure 2: Key components and controls of the DM501D Multimeter.
2. Setup
2.1 Battery Installation
The DM501D multimeter requires three (3) 1.5V AAA batteries for operation. To install or replace batteries:
- Ensure the multimeter is powered OFF.
- Locate the battery compartment cover on the back of the device.
- Use a screwdriver to open the battery compartment.
- Insert the AAA batteries, observing the correct polarity (+/-) as indicated inside the compartment.
- Replace the battery compartment cover and secure it with the screw.
2.2 Connecting Test Leads
Connect the test leads to the appropriate input jacks on the multimeter:
- Insert the black test lead into the 'COM' (Common) jack.
- For most measurements (Voltage, Resistance, Capacitance, Frequency, Diode, Continuity, Temperature), insert the red test lead into the 'VΩmA' jack.
- For high current measurements (up to 10A), insert the red test lead into the '10A' jack.
3. Operating Instructions
3.1 Safety Precautions
- Always ensure the correct function and range are selected before making measurements.
- Do not exceed the maximum input values for each range.
- Exercise caution when working with live circuits.
- Inspect test leads for damage before use.
3.2 Rotary Switch Functions
The rotary switch is used to select the desired measurement function:
- OFF: Powers off the multimeter.
- V~ (AC Voltage): Measures alternating current voltage.
- V- (DC Voltage): Measures direct current voltage.
- Ω (Resistance): Measures electrical resistance.
- Continuity/Diode: Checks for circuit continuity (with buzzer) and tests diodes.
- Hz/% (Frequency/Duty Cycle): Measures frequency and duty cycle.
- Capacitance: Measures capacitance.
- °C/°F (Temperature): Measures temperature using the included thermocouple.
- A~/A- (AC/DC Current): Measures alternating or direct current.
- NCV (Non-Contact Voltage): Detects the presence of AC voltage without direct contact.
3.3 Button Functions
- HOLD: Freezes the current reading on the display. Press again to release.
- FUNC/HZ: Toggles between different functions within a single rotary switch position (e.g., AC/DC voltage, diode/continuity, frequency/duty cycle).
- Backlight Button: Activates or deactivates the display backlight and flashlight.
3.4 Example Measurements
3.4.1 AC Voltage Measurement
To measure AC voltage:
- Set the rotary switch to 'V~'.
- Connect the black test lead to 'COM' and the red test lead to 'VΩmA'.
- Carefully touch the test probes to the points where you want to measure AC voltage.
- Read the value on the display.

Figure 3: Measuring AC voltage from a standard power outlet.
3.4.2 DC Voltage Measurement
To measure DC voltage:
- Set the rotary switch to 'V-'.
- Connect the black test lead to 'COM' and the red test lead to 'VΩmA'.
- Touch the black probe to the negative terminal and the red probe to the positive terminal of the DC source.
- Read the value on the display.
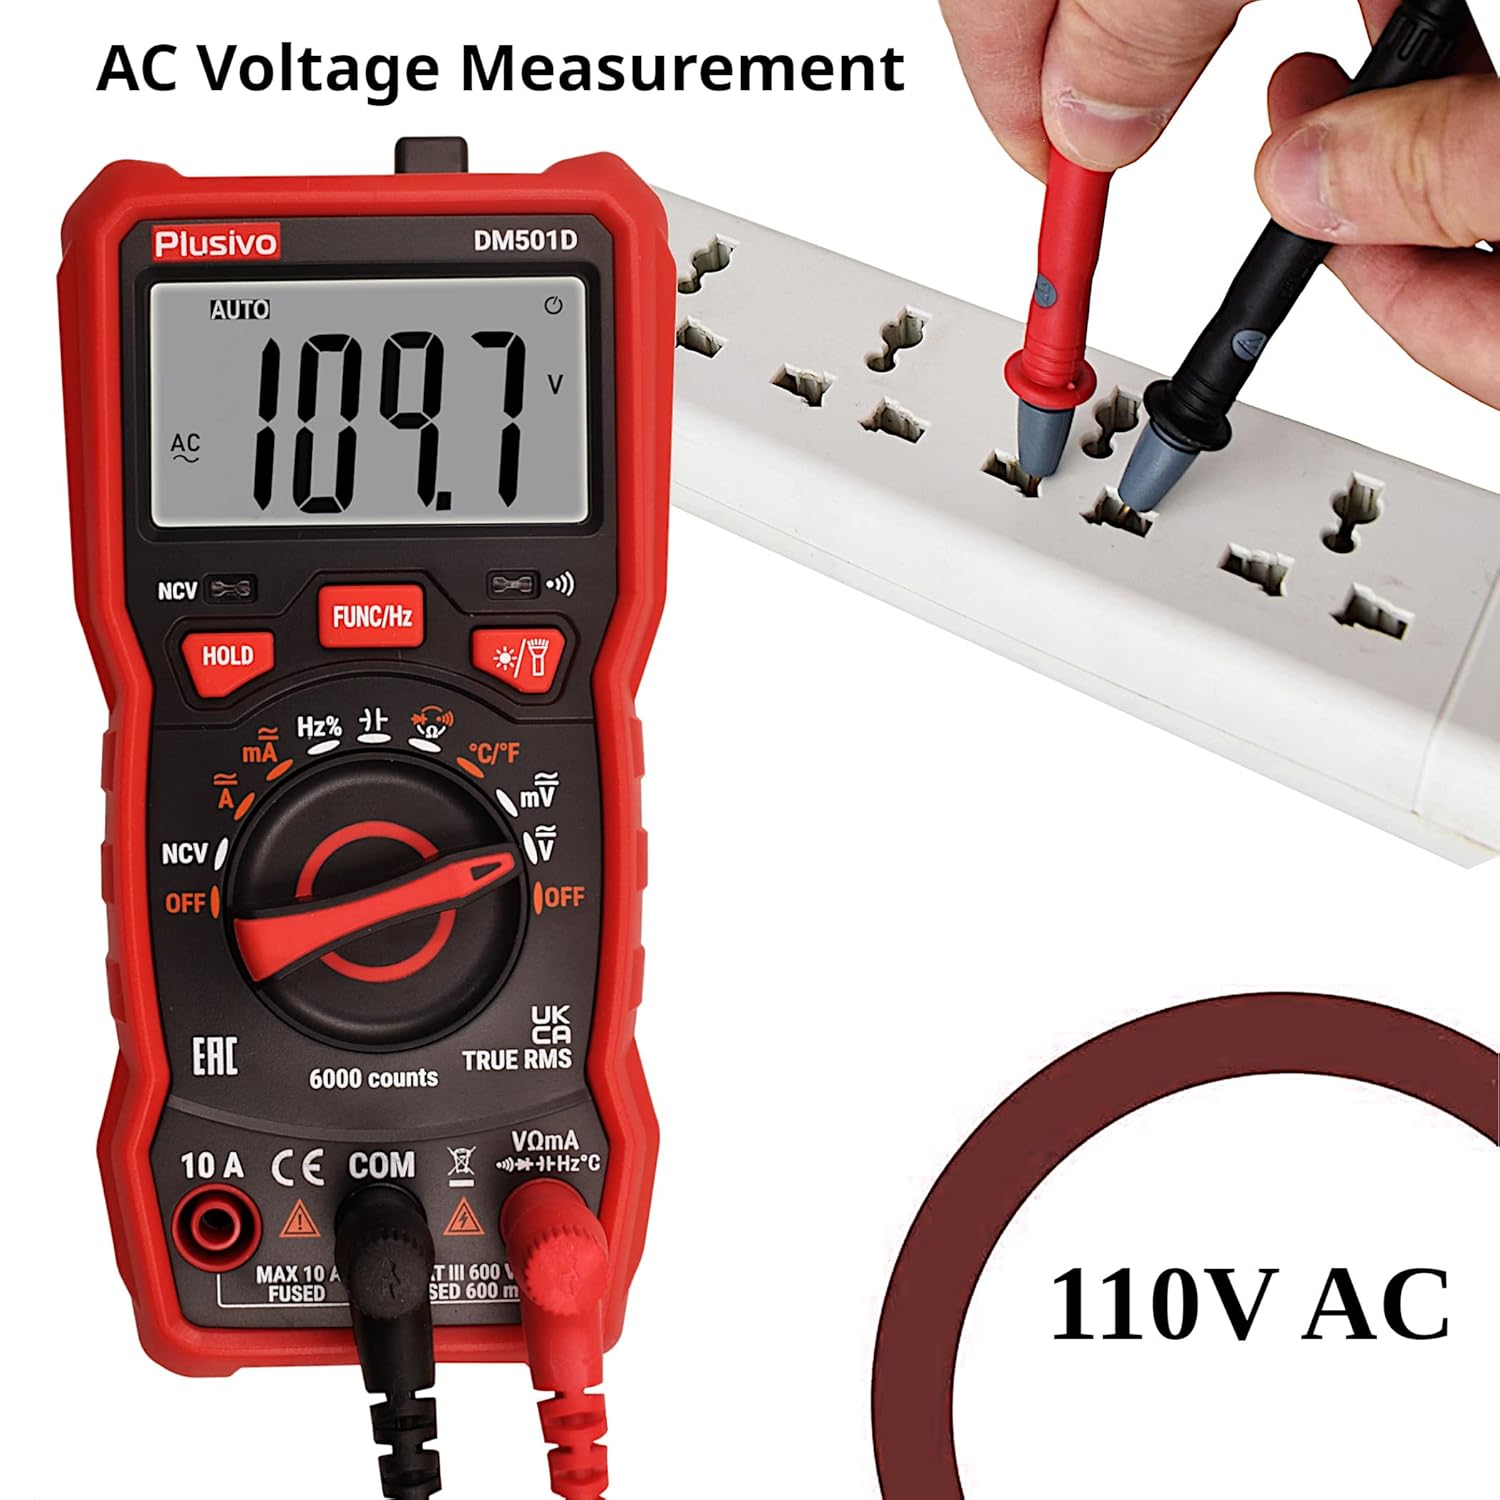
Figure 4: Measuring DC voltage from a battery.
3.4.3 Non-Contact Voltage (NCV) Detection
To use the NCV function:
- Set the rotary switch to 'NCV'.
- Move the top end of the multimeter (NCV sensing area) close to the conductor or outlet you suspect has AC voltage.
- The multimeter will emit an audible alarm and the NCV indicator will light up (yellow for low signal, red for high signal) if AC voltage is detected.

Figure 5: Using the NCV feature to detect live AC voltage.
3.4.4 Backlight and Flashlight
To activate the backlight or flashlight:
- Press the backlight button (usually marked with a lightbulb icon) to turn on the display backlight.
- Press and hold the backlight button to activate the built-in flashlight.

Figure 6: The multimeter's LCD backlight and flashlight in use.
4. Maintenance
4.1 Cleaning
To clean the multimeter, use a soft, damp cloth. Do not use abrasive cleaners or solvents. Ensure the device is powered off and disconnected from any circuits before cleaning.
4.2 Battery Replacement
When the low battery indicator appears on the display, replace the batteries as described in Section 2.1. Remove batteries if the device will not be used for an extended period to prevent leakage.
4.3 Fuse Replacement
If the multimeter fails to measure current or shows incorrect readings in current modes, the fuse may need replacement. Refer to the detailed instructions in the full product manual for fuse access and replacement procedures. Always use fuses of the specified type and rating.
5. Troubleshooting
- No Display/Power On: Check battery installation and ensure batteries are not depleted.
- 'OL' Display: Indicates an overload or out-of-range measurement. Select a higher range or verify the circuit.
- Incorrect Readings: Verify test lead connections, selected function, and range. Ensure batteries are not low.
- No Current Measurement: Check if the fuse is blown and replace if necessary (refer to Section 4.3).
6. Specifications
| Feature | Specification |
|---|---|
| Display | 6000 counts LED display |
| Sampling Rate | Approx. 3 times per second |
| DC Voltage | 600mV/6V/60V/600V ±(0.5%+5) |
| AC Voltage | 600mV/6V/60V/600V ±(1%+4) |
| DC Current | 60mA/600mA ±(1.2%+5), 10A ±(3%+5) |
| AC Current | 60mA/600mA ±(1.5%+5), 10A ±(3%+5) |
| Resistance | 600Ω - 60MΩ ±(0.8% readings+5 digits) |
| Frequency | 9.999Hz - 9.999MHz ±(1.5%+5) |
| Capacitance | 60nF-100mF ±(4.0%+5) |
| Temperature | -20°C ~ 1000°C / -4°F ~ 1832°F ±(1.0%+3) |
| Diode Test | Yes |
| Continuity Test | Yes (with Buzzer) |
| NCV Detector | Yes |
| Power Requirement | 3 x 1.5V AAA batteries |
| Working Environment | 0~40°C, relative humidity <80% |
| Dimensions (L x W x H) | 6.5 x 10 x 17.5 cm |
| Weight | 500 Grams |
7. Warranty and Support
The Plusivo DM501D Digital Multimeter is backed by a 30-day manufacturer's guarantee. For any technical assistance, questions, or support regarding your product, please refer to the contact information provided with your purchase or visit the official Plusivo website.