Introduction
This manual provides essential information for the safe and efficient operation, installation, and maintenance of your VEVOR 1100W Deep Well Submersible Pump. Please read these instructions thoroughly before installation and use to ensure proper function and to prevent injury or damage.
The VEVOR 1100W Deep Well Submersible Pump is designed for extracting water from deep wells, suitable for domestic, agricultural, and industrial applications. It features a robust stainless steel construction, a powerful copper motor, and a high flow rate for reliable water supply.
Safety Instructions
Always observe the following safety precautions to reduce the risk of electric shock, injury, or damage to the pump.
- Electrical Safety: Ensure the power supply matches the pump's voltage (230V / 50Hz). Always connect the pump to a properly grounded outlet. Do not operate the pump with damaged cables or plugs. Disconnect power before any maintenance or installation.
- Water Immersion: The pump must be fully submerged in water during operation to prevent overheating and damage. Do not run the pump dry or at low water levels.
- Installation: Ensure the well casing diameter is sufficient for the pump (minimum 10.2 cm / 4 inches). Securely attach the safety rope to prevent the pump from falling into the well.
- Operating Environment: The pump is designed for clean water. Avoid pumping liquids containing abrasive materials, flammable substances, or corrosive chemicals. Operating temperature range is 0 ℃ to 40 ℃.
- Children and Unauthorized Personnel: Keep children and unauthorized individuals away from the pump and its control box during operation.
- Overload Protection: The motor includes built-in overload protection. If the pump stops unexpectedly, check for blockages or abnormal conditions before restarting.
Product Overview and Components
The VEVOR 1100W Deep Well Submersible Pump is constructed from durable stainless steel, ensuring resistance to corrosion and rust. It features a powerful copper motor for stable and efficient performance.

Image: The VEVOR 1100W Deep Well Submersible Pump, showing the main pump unit, the external control box, a 20-meter safety rope, and a 20-meter electric cord. These are the primary components included with the pump.
Key components include:
- Submersible Pump Unit: The main body, made of stainless steel, housing the motor and impellers.
- External Control Box: Provides power control and motor protection.
- Electric Cable (20m): For connecting the pump to the control box.
- Safety Rope (20m): For lowering and retrieving the pump from the well.
- Brass Discharge Outlet (G2"): Durable outlet for water connection.
- Multiple Filtration Mesh: Integrated filter to prevent impurities from entering the pump.
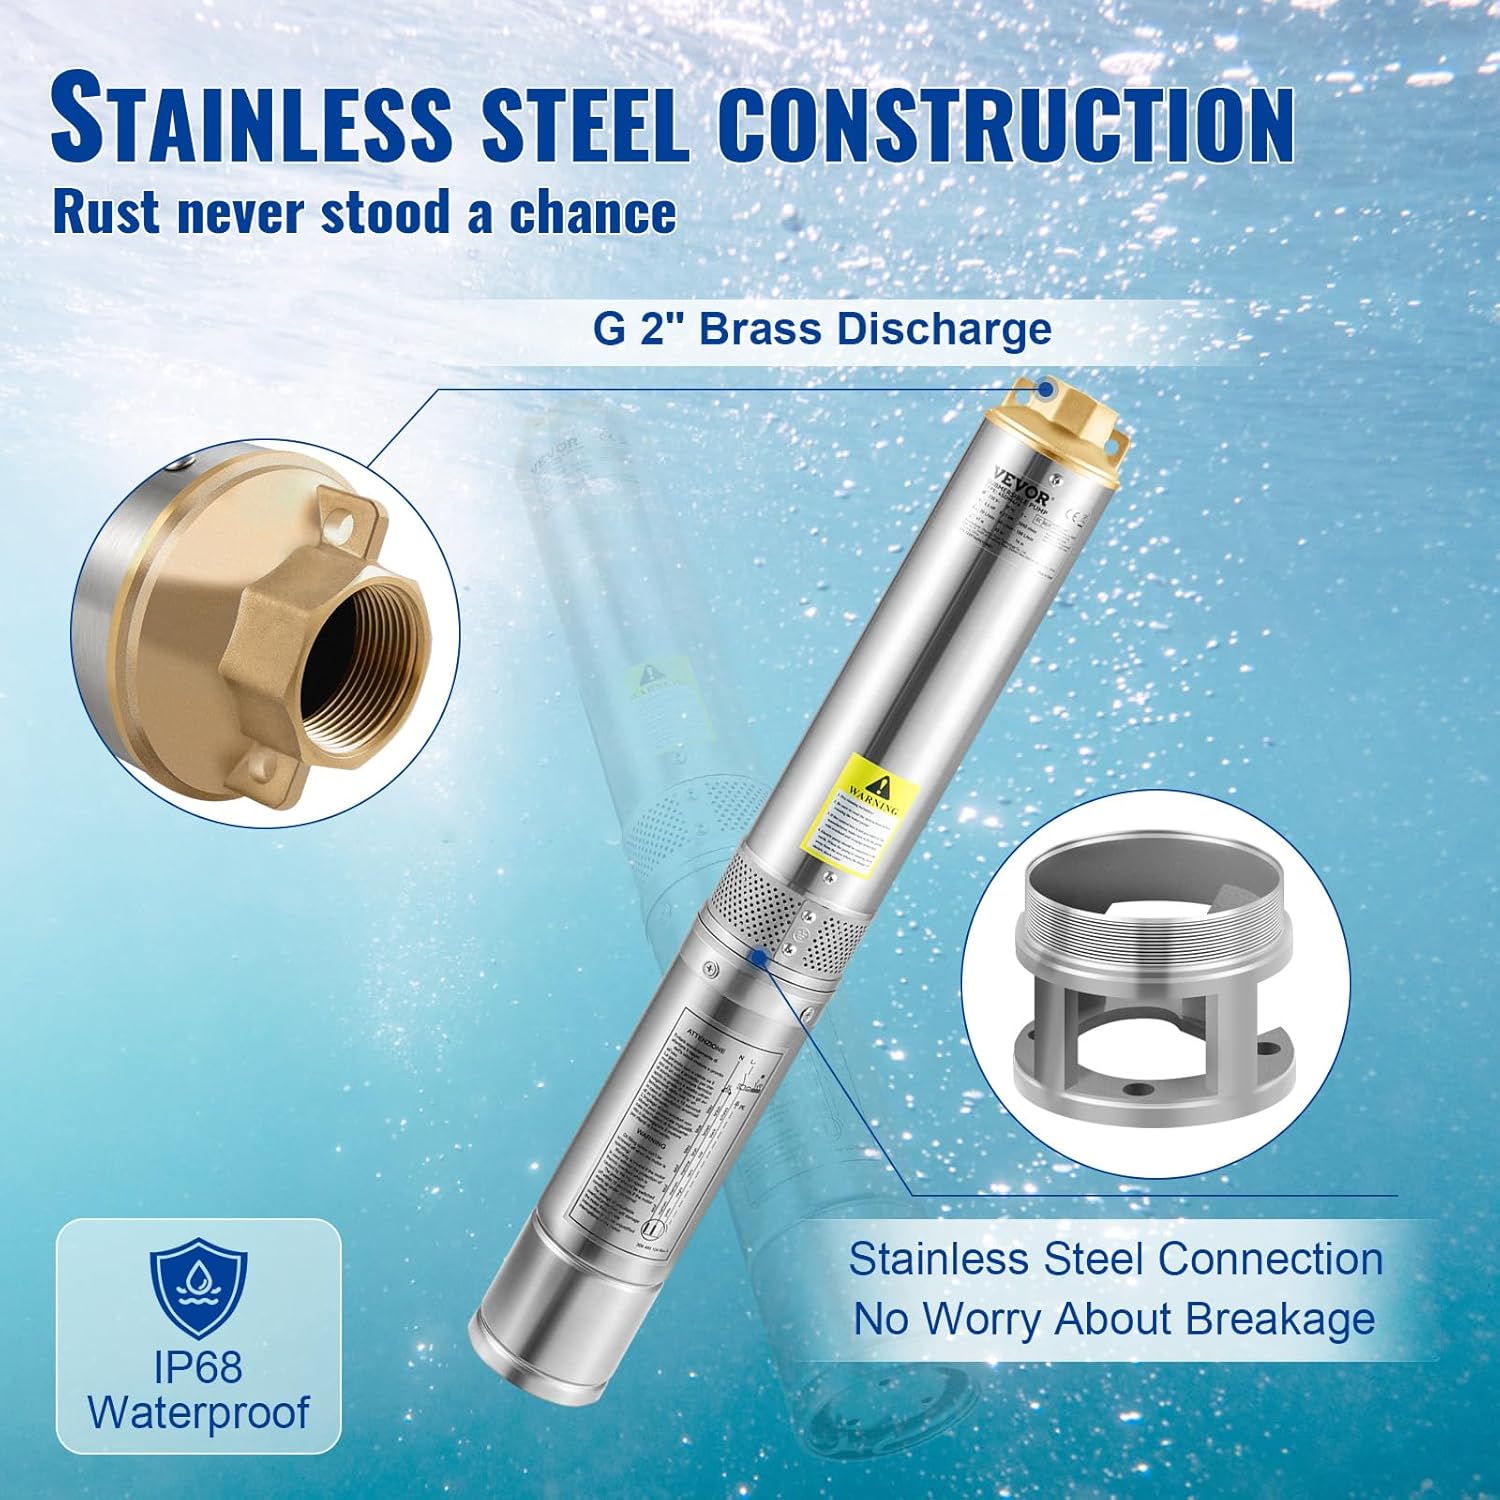
Image: A detailed view of the pump's construction, highlighting the G2 inch brass discharge outlet and the stainless steel body. The image also indicates an IP68 waterproof rating, signifying its suitability for continuous immersion.

Image: An internal view illustrating the pump's powerful copper motor. Key features shown are the high-precision rotor for stable operation and built-in overload protection for enhanced safety and motor longevity.
Specifications
| Feature | Specification |
|---|---|
| Model | 4SDM8/9 |
| Power | 1100 W |
| Voltage | 230 V / 50 Hz |
| Max. Flow Rate | 190 L/min |
| Max. Head Lift | 57 m |
| Sand Resistance | <5% |
| Pump Diameter | 10.2 cm (4 inches) |
| Outlet Size | G2" |
| Cable Length | 20 m |
| Impeller Stages | 9 |
| Max. Rotation Speed | 2850 rpm |
| Operating Temperature | 0 ℃ to 40 ℃ |
| Protection Rating | IP68 |
| Insulation Class | F |
| Material | Stainless Steel, Nylon |

Image: A chart detailing the pump's performance curve (Head vs. Flow) and key specifications such as power, voltage, max head, max flow, and sand resistance. Also shown are the physical dimensions of the pump unit, including its diameter and length.
Setup and Installation
Proper installation is crucial for the pump's performance and longevity.
- Well Preparation: Ensure the well is clear of debris and has a minimum diameter of 10.2 cm (4 inches). For newly drilled wells that may contain excessive granular sediments, consider adding a layer of gauze before the filter inlet for additional protection.
- Connecting Components: Connect the electric cable from the pump to the external control box. Ensure all connections are secure and waterproof.
- Safety Rope: Securely attach the provided 20-meter safety rope to the designated sling hole on the pump. This rope will be used to lower and retrieve the pump.
- Discharge Pipe: Connect a suitable discharge pipe (G2" connection) to the pump's outlet. It is highly recommended to install an additional check valve in the discharge line to prevent water backflow.
- Lowering the Pump: Carefully lower the pump into the well using the safety rope. Ensure the pump is fully submerged in water. The pump can be installed vertically or horizontally, but full immersion is critical.
- Control Box Placement: Position the external control box in a dry, protected area, away from direct moisture and sunlight.

Image: Illustrations demonstrating both vertical and horizontal installation methods for the submersible pump. A critical warning is included: DO NOT use it without water or at low water level to prevent burning.
Operation
Once installed, operating the pump is straightforward:
- Power On: Ensure the pump is fully submerged and all connections are secure. Switch on the power using the control box.
- Monitoring: Observe the water flow. The pump is designed for a maximum flow rate of 190 L/min and a maximum head lift of 57 m.
- Avoid Dry Running: Never operate the pump without water or at extremely low water levels. This can cause severe damage to the motor and impellers due to overheating. The built-in overload protection will activate if the motor overheats.
- Operating Temperature: Ensure the water temperature remains within the specified range of 0 ℃ to 40 ℃.

Image: A diagram depicting the submersible pump installed in a well, with water being pumped to the surface. It highlights the maximum flow rate of 190 L/min and a maximum head lift of 57 meters, demonstrating the pump's performance capabilities.
Maintenance
Regular maintenance helps ensure the longevity and efficient operation of your pump.
- Filter Cleaning: The pump features a multiple filtration mesh. Periodically inspect and clean the filter to prevent blockages and maintain optimal water flow. Disconnect power before cleaning.
- Cable Inspection: Regularly check the electric cable for any signs of damage, wear, or fraying. Replace damaged cables immediately.
- Well Condition: Ensure the well remains free of excessive sediment or debris that could clog the pump or reduce its efficiency.
- Winterization (if applicable): In freezing climates, if the pump is not in continuous use, consider removing it from the well and storing it in a frost-free environment to prevent ice damage.

Image: A detailed view of the pump's multiple filtration mesh, which is crucial for filtering impurities and ensuring clear water. The image also notes its sand resistance (<5%) and provides a tip to add gauze for new wells.
Troubleshooting
If you encounter issues with your pump, consider the following common troubleshooting steps:
- Pump Not Starting: Check the power supply and ensure the control box switch is in the 'ON' position. Verify that the circuit breaker has not tripped.
- Low Water Flow: Inspect the pump's filter mesh for blockages. Check the discharge pipe for kinks or obstructions. Ensure the well has sufficient water level.
- Pump Stops During Operation: This may indicate the overload protection has activated due to overheating or a blockage. Disconnect power, wait for the motor to cool, and check for any obstructions before restarting. Ensure the pump is fully submerged.
- Unusual Noise: Disconnect power immediately. This could indicate a foreign object in the impellers or a motor issue. Do not operate until the cause is identified and resolved.
For complex issues or repairs, it is recommended to contact a qualified technician or VEVOR customer support.
Warranty and Support
VEVOR provides a 10-year availability for spare parts for this product. For warranty claims, technical assistance, or to inquire about spare parts, please refer to the contact information provided with your purchase or visit the official VEVOR website.