PTP Pro Trucking Products K71048
Pro Trucking Products K71048 Brake Shoe Kit User Manual
Model: K71048
1. Introduction
This manual provides essential information for the proper installation, operation, and maintenance of the Pro Trucking Products K71048 12" x 2" Brake Shoe Kit. This kit is designed as a direct replacement for Dexter Electric Trailer Brakes, specifically replacing Dexter part number K71-048-00. Adhering to these instructions will help ensure the longevity and optimal performance of your trailer's braking system.
Product Features:
- Direct replacement for Dexter part number K71-048-00.
- Designed for 12" x 2" Dexter electric trailer brakes.
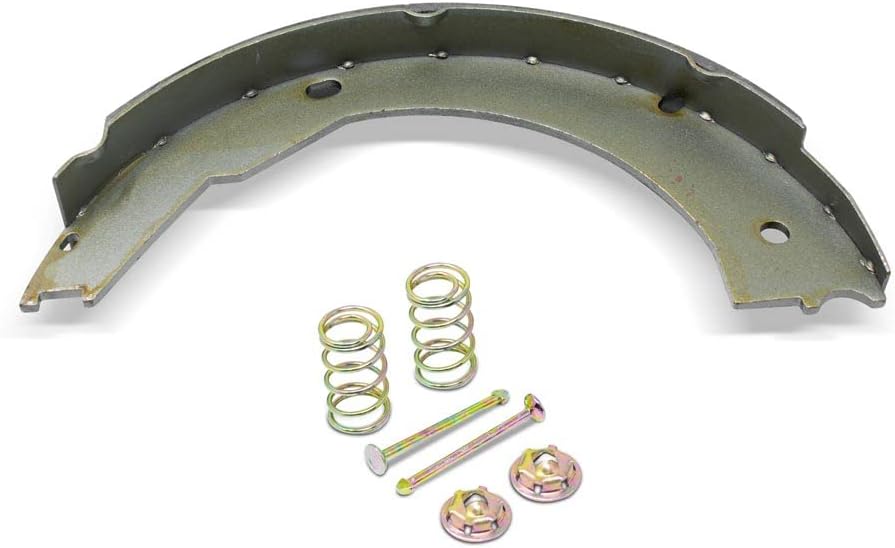
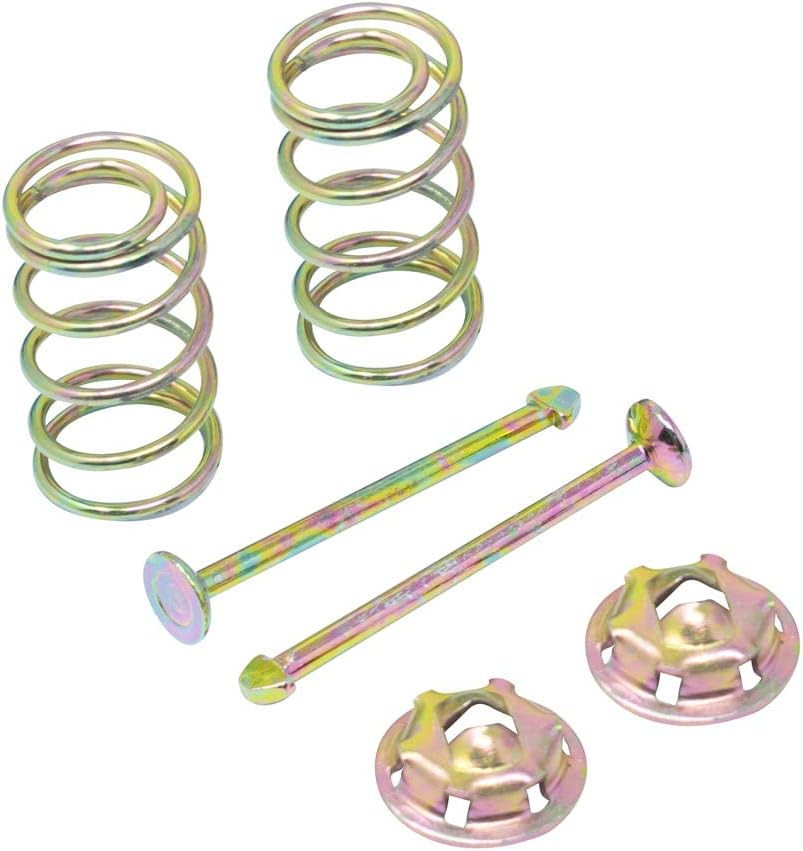
- Kit includes lined primary and secondary brake shoes, hold down pins, and springs for one wheel.

The Pro Trucking Products K71048 brake shoe kit provides the necessary components to service one wheel's electric trailer brake assembly. It includes the friction material (brake shoes) and the essential hardware for secure mounting and proper function.
2. Setup and Installation
Installation of brake components requires mechanical aptitude and adherence to safety protocols. If you are not confident in your ability to perform this installation, it is recommended to seek assistance from a qualified technician.
Safety Precautions:
- Always wear appropriate personal protective equipment (PPE), including safety glasses and gloves.
- Ensure the trailer is securely supported on jack stands on a level surface before beginning work. Do not rely solely on a jack.
- Disconnect the trailer battery before working on electric brake components.
- Refer to your trailer's specific service manual for detailed instructions on disassembling and reassembling the brake assembly.
Installation Steps (General Guide):
- Remove the wheel and tire assembly.
- Carefully remove the brake drum.
- Disconnect and remove the old brake shoes and associated hardware (springs, hold-down pins). Note the orientation of all components before removal.
- Inspect the brake backing plate, magnet, and other brake components for wear or damage. Replace any worn parts as necessary.
- Clean the backing plate thoroughly.
- Install the new brake shoes from the K71048 kit, ensuring correct orientation (primary and secondary shoes).
- Attach the new hold-down pins and springs, securing the shoes to the backing plate.
- Reinstall the brake drum and wheel assembly.
- Adjust the brakes according to the trailer manufacturer's specifications.
Proper installation of the springs and hold-down pins is crucial for the brake shoes to function correctly and remain securely in place during operation.
3. Operating Considerations
Once new brake shoes are installed, a break-in period is recommended to ensure optimal performance and longevity. This process allows the brake shoe lining to conform to the brake drum surface.
Brake Break-in Procedure:
- Drive the trailer at a moderate speed (e.g., 40 mph) on a safe, open road.
- Apply the trailer brakes (using the trailer brake controller, if equipped) firmly but not to the point of lock-up, reducing speed to about 20 mph.
- Release the brakes and drive for a short distance to allow them to cool.
- Repeat this process approximately 20-30 times.
- During this process, you may notice a slight odor or reduced braking effectiveness initially. This is normal.
After the break-in period, the brakes should provide consistent and effective stopping power. Always ensure your trailer brake controller is properly adjusted for balanced braking with your tow vehicle.
4. Maintenance
Regular inspection and maintenance of your trailer's braking system are crucial for safety and performance. Brake shoes are wear items and will require periodic replacement.
Inspection Schedule:
- Inspect brake shoes and drums at least annually or every 12,000 miles, whichever comes first.
- Check for adequate lining thickness. Replace shoes if the lining is worn down to 1/16 inch or less.
- Look for uneven wear, cracks, or contamination (oil, grease) on the brake lining.
- Inspect all springs and hold-down pins for corrosion, stretching, or damage. Replace any compromised hardware.
- Ensure the brake magnet is clean and free of debris, and that its surface is not excessively grooved.

Contaminated or excessively worn brake shoes can lead to reduced braking efficiency, increased stopping distances, and potential safety hazards. Prompt replacement is essential.
5. Troubleshooting
This section addresses common issues related to brake shoe performance. Always ensure proper installation and adjustment before troubleshooting.
| Symptom | Possible Cause | Solution |
|---|---|---|
| Reduced Braking Effectiveness | Worn brake shoes, improper adjustment, contaminated lining, glazed lining. | Inspect lining thickness and condition. Adjust brakes. Clean or replace contaminated/glazed shoes. |
| Squealing or Grinding Noise | Worn lining (metal-on-metal), foreign debris, glazed lining, improper installation. | Inspect for wear and debris. Replace worn shoes. Ensure proper installation and adjustment. |
| Brake Dragging / Overheating | Over-adjusted brakes, seized wheel cylinder (if hydraulic), damaged return springs. | Check brake adjustment. Inspect springs for proper function. Consult a professional if hydraulic issues are suspected. |
| Uneven Braking | Unevenly worn shoes, contaminated lining on one side, improper adjustment. | Inspect all brake shoes for consistent wear. Clean or replace as needed. Ensure even adjustment. |
If troubleshooting steps do not resolve the issue, or if you suspect a more complex problem with your trailer's braking system, it is advisable to consult a certified trailer mechanic.
6. Specifications
- Product Name: Pro Trucking Products K71048 Brake Shoe Kit
- Model Number: K71048 (Replaces Dexter K71-048-00)
- Brake Size: 12 inches x 2 inches
- Compatibility: Designed for Dexter Electric Trailer Brakes
- Kit Contents: Lined primary brake shoe, lined secondary brake shoe, 2 hold-down pins, 2 hold-down springs. (Components for one wheel)
- Item Weight: Approximately 4 pounds
- Manufacturer: Pro Trucking Products
7. Warranty and Support
Specific warranty details for the Pro Trucking Products K71048 Brake Shoe Kit are not provided in this manual. For information regarding product warranty, returns, or technical support, please contact the manufacturer, Pro Trucking Products, or the authorized seller from whom the product was purchased.
It is recommended to retain your proof of purchase for any warranty claims or support inquiries.
For general inquiries or assistance with installation, you may also refer to reputable automotive or trailer repair resources and certified technicians.