MOTPK L shape
MOTPK L-Shaped Gaming Desk with LED Lights
Model: L shape
Introduction
This manual provides detailed instructions for the assembly, operation, and maintenance of your MOTPK L-Shaped Gaming Desk. Please read all instructions carefully before beginning assembly and retain this manual for future reference. Ensure all components are present and undamaged before proceeding.
Safety Information
- Always assemble the desk on a soft, clean surface to prevent scratches.
- Ensure all screws and fasteners are securely tightened before use. Periodically check and re-tighten as necessary.
- Do not overload the desk. Refer to the specifications for weight limits.
- Keep small parts away from children during assembly to avoid choking hazards.
- Avoid placing hot items directly on the desk surface without protection.
- Do not stand or sit on the desk.
Package Contents
Before assembly, verify that all parts listed in the included hardware pack are present. If any parts are missing or damaged, contact customer support.
Typical components include:
- Desktop panels (L-shaped sections)
- Leg frames and support beams
- Monitor stand components
- Cup holder and headphone hook
- LED light strip and remote control
- Assembly hardware (screws, bolts, Allen wrench)
- Adjustable foot pads
Setup and Assembly
Assembly typically requires two people. Follow the numbered steps in the provided assembly diagram. Do not fully tighten screws until all components are loosely fitted.
Step 1: Unpack and Identify Parts
Carefully unpack all components and lay them out on a soft, clean surface. Identify each part by comparing it to the parts list in your package. Ensure you have all necessary tools, typically an Allen wrench (provided) and a screwdriver (not always provided).
Step 2: Assemble the Desk Frames
Begin by attaching the horizontal support beams to the vertical leg frames. Ensure the L-shape orientation is correct for your desired setup (left or right facing L-shape). Hand-tighten all screws initially.
Step 3: Attach Desktop Panels
Carefully place the desktop panels onto the assembled frames. Align the pre-drilled holes in the desktop with the holes in the frame. Secure the desktop panels using the provided screws. Once all panels are in place, fully tighten all screws on the frame and desktop.
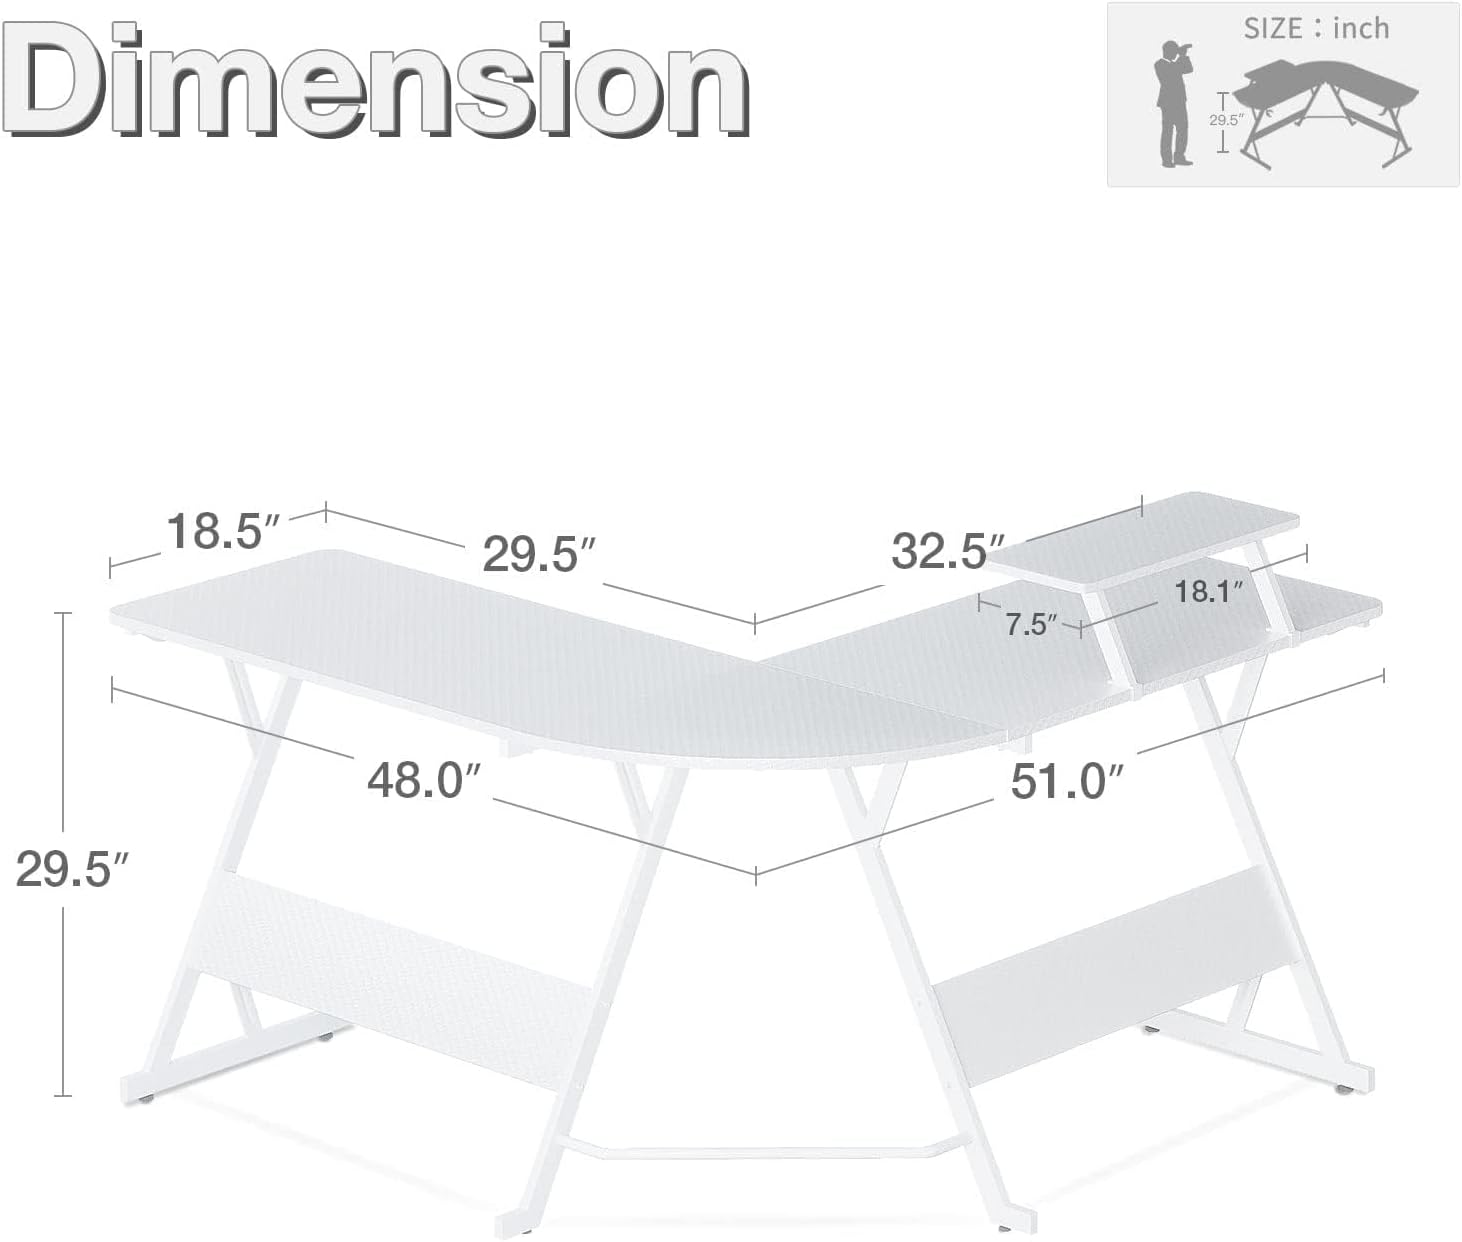
Image: Desk dimensions and layout for assembly reference.
Step 4: Install Monitor Stand
Attach the monitor stand to the designated area on the desktop. The stand typically uses screws to secure it to the desk surface. Ensure it is stable before placing a monitor on it.

Image: Monitor stand detail, providing elevated space for display and storage.
Step 5: Attach Accessories
Install the cup holder and headphone hook to the desired locations on the desk frame or desktop edges, as per the assembly diagram. These are typically designed for easy attachment.
Step 6: Install LED Lights
Adhere the LED light strip to the underside of the desk or along the edges as desired. Connect the light strip to the power adapter and the remote control receiver. Ensure the wiring is neatly managed to prevent tripping hazards.

Image: Fully assembled L-shaped gaming desk with LED lights activated, showcasing a typical setup.
Step 7: Adjust Foot Pads
Adjust the leveling foot pads at the bottom of the desk legs to ensure the desk is stable and level on uneven floors.
Operating Instructions
LED Lights Operation
Your MOTPK gaming desk is equipped with smart LED lights offering multiple colors and lighting modes. Use the provided remote control to operate the lights.
- Power Button: Press to turn the LED lights on or off.
- Color Selection: Use the color buttons on the remote to select from 7 available colors.
- Mode Selection: Cycle through 13 different lighting modes (e.g., static, flash, fade, strobe) using the mode buttons.
- Brightness Adjustment: Use the brightness up/down buttons to adjust the intensity of the lights.

Image: Detail of the LED light strip and remote control for various lighting effects.
Monitor Stand Usage
The elevated monitor stand helps improve ergonomics by raising your display to a more comfortable viewing height. Place your monitor securely on the stand. Avoid placing excessively heavy items on the stand that exceed its weight capacity.
Cup Holder and Headphone Hook
Utilize the integrated cup holder to keep beverages secure and prevent spills on your desk. The headphone hook provides a convenient storage location for your headphones, keeping them within reach and off the desktop.
Maintenance
Cleaning the Carbon Fiber Surface
The carbon fiber texture desktop is designed to be smooth and easy to clean. Use a soft, damp cloth with mild soap and water to wipe down the surface. Avoid abrasive cleaners or harsh chemicals that could damage the finish. Dry thoroughly with a clean cloth.
General Care
- Periodically check all screws and bolts to ensure they remain tight. Re-tighten as needed to maintain desk stability.
- Keep the desk away from direct sunlight and extreme temperature changes to prevent material degradation.
- Avoid dragging heavy objects across the desk surface to prevent scratches.
Troubleshooting
Desk is Wobbly
- Ensure all assembly screws are fully tightened.
- Adjust the leveling foot pads on the bottom of the legs to compensate for uneven flooring.
- Verify that the desk is assembled correctly according to the instructions.
LED Lights Not Working
- Check if the power adapter is securely plugged into a working outlet and the LED strip.
- Ensure the remote control has working batteries and is pointed directly at the receiver.
- Verify that all connections between the LED strip, receiver, and power adapter are secure.
Missing or Damaged Parts
If you discover any missing or damaged parts during unpacking or assembly, do not proceed with assembly. Contact MOTPK customer support immediately for assistance and replacement parts.
Specifications
| Feature | Detail |
|---|---|
| Brand | MOTPK |
| Model | L shape |
| Shape | L-Shape |
| Product Dimensions | 129.3D x 121.9W x 93.2H centimetres (51"L x 48"L x 18.5"W desktop) |
| Weight | 18.6 kg |
| Material Type | Wood (Desktop), Alloy Steel (Base) |
| Top Material Type | Carbon Fibre |
| Special Features | Adjustable (foot pads), LED Lights, Monitor Stand, Cup Holder, Headphone Hook |
| LED Lights | 7 colors, 13 lighting modes |
Warranty and Support
For warranty information, product support, or to order replacement parts, please contact MOTPK customer service through the retailer where the product was purchased or visit the official MOTPK website. Please have your model number (L shape) and purchase date available when contacting support.
Ask a question about this manual
Ask about setup, troubleshooting, compatibility, parts, safety, or missing instructions. Manuals+ will review the question and use this page’s manual context to help answer it.