Introduction
This instruction manual provides comprehensive guidance for the installation, operation, and maintenance of your Onisamt 3-Speed Universal Ceiling Fan Thermostatic Remote Control Kit, Model HD3/AC8.3. Please read this manual thoroughly before installation and use to ensure proper function and safety. This kit is designed to enhance the functionality of your ceiling fan with advanced control features.
Package Contents
Carefully unpack the contents and ensure all items are present and undamaged. The package should include:
- Thermostatic Remote Control
- Ceiling Fan Receiver
- Wire Nuts (6 pieces)
- Instruction Manual (this document)
Note: 2x 1.5V AAA batteries for the remote control are not included and must be purchased separately.
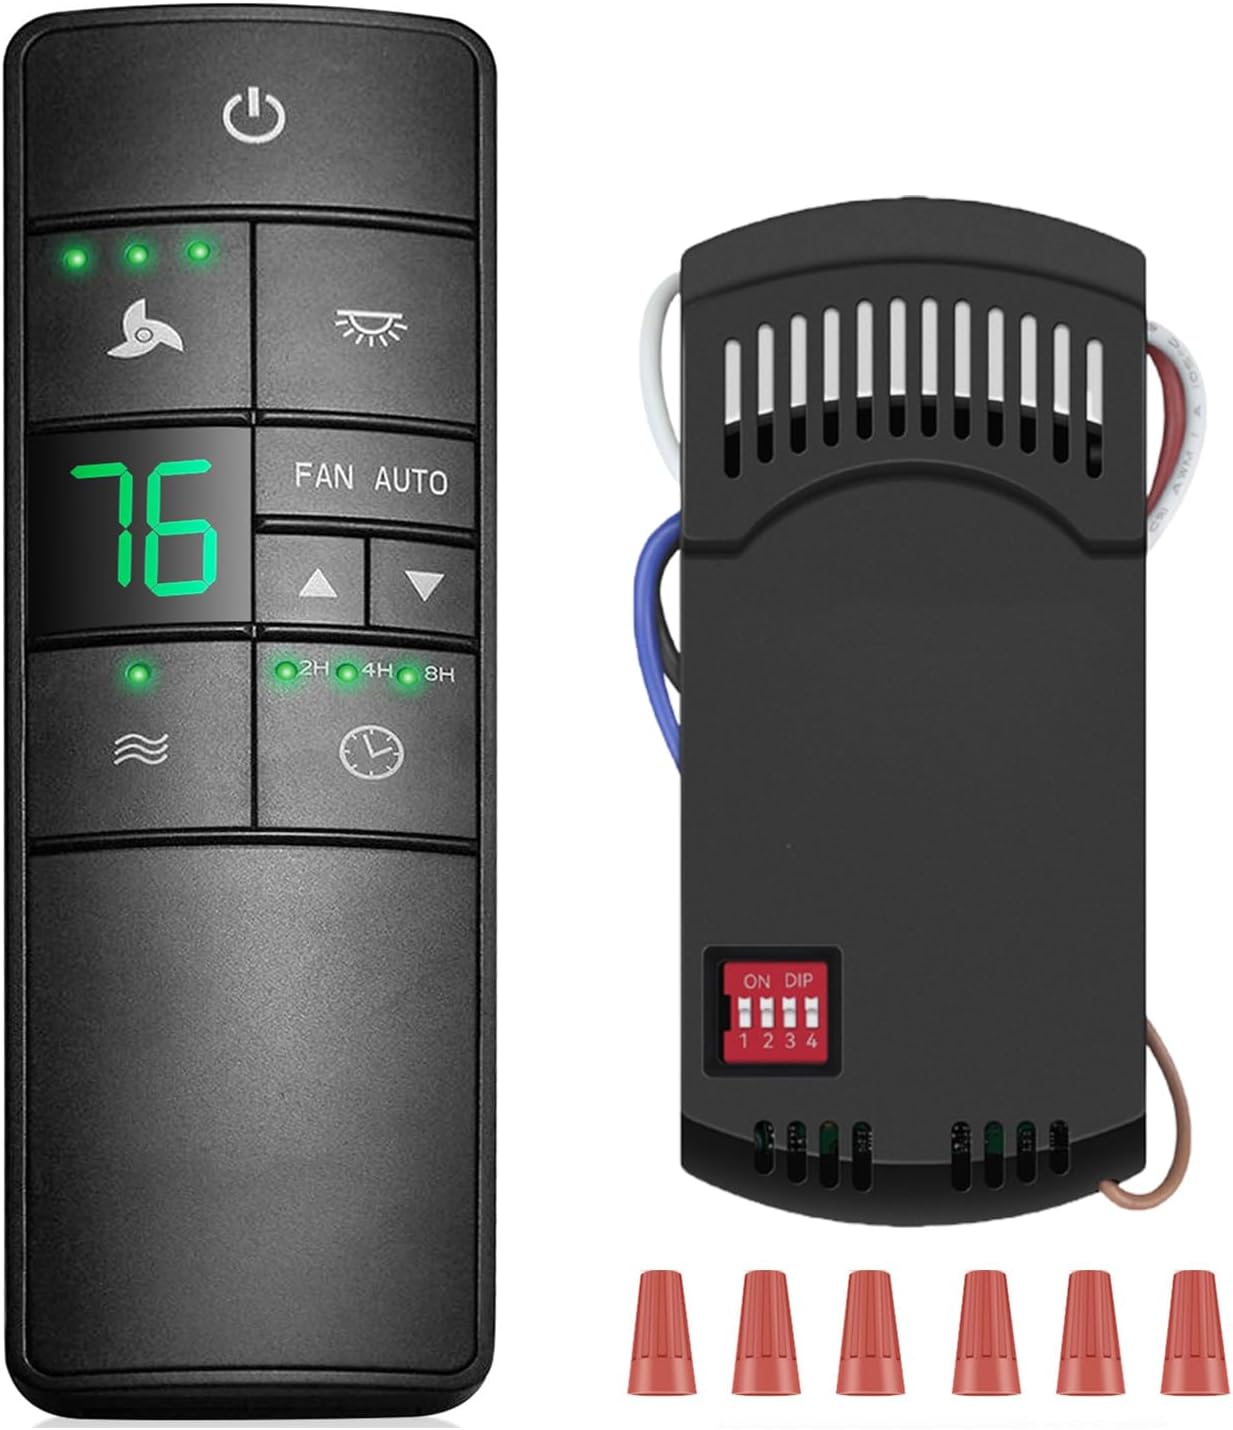
Image: The complete Onisamt HD3/AC8.3 remote control kit, including the remote, receiver, and wire nuts.
Compatibility
This HD3/AC8.3 universal thermostatic fan remote control kit is compatible with most 3-speed AC ceiling fans. It is suitable for various brands including Hampton Bay, Harbor Breeze, Hunter, Honeywell, Home Decorators Collection, Westinghouse, Fanimation, Craftmade, and Patriot. It replaces remotes with FCC ID/Model: 2AAZPHD3/HD3, KUJCE10320/TR222A, A25-TX031, 68108, 98108.
The dimming function is compatible with incandescent bulbs and dimmable LED/CFL lights. For non-dimmable LED/CFL lights, the dimmer will only support the on/off function. Flickering may occur when using the dimming function with some LED lights.
Important:
- Recommended for use with downrod fans.
- Not recommended for use with hugger fans.
- This remote control supports ceiling fans with a reversing function, but the remote control itself does not have a reversing button. The fan's physical reverse switch must be used.

Image: Visual representation of the remote kit's compatibility with different lighting types and a typical ceiling fan setup.

Image: Illustration demonstrating compatibility with ceiling fans that have a physical reverse switch for seasonal air circulation.
Setup and Installation
Safety Precautions
- Always disconnect power to the ceiling fan at the circuit breaker before beginning installation or maintenance.
- If you are unsure about wiring, consult a qualified electrician.
- Ensure all connections are secure and properly insulated.
Receiver Installation
- Disconnect Power: Turn off the power to the ceiling fan at the main circuit breaker. Verify power is off before proceeding.
- Access Wiring: Carefully remove the ceiling fan canopy to expose the wiring connections.
- Disconnect Existing Wiring: Disconnect the existing wiring from the ceiling fan. Note the color coding for re-connection.
- Set DIP Switches: Locate the DIP switches on the receiver. Set the switches to match the desired code. Ensure the remote control's DIP switches are set to the exact same code as the receiver. This prevents interference with other remote-controlled devices.
- Connect Receiver: Connect the receiver wires to the ceiling fan and household wiring using the provided wire nuts according to the wiring diagram below. The receiver's compact size (3.7 x 1.7 x 1 inches) is designed to fit within most fan canopies.
- Secure Receiver: Carefully tuck the receiver and all wiring into the fan canopy. Ensure no wires are pinched.
- Reattach Canopy: Securely reattach the ceiling fan canopy.
- Restore Power: Restore power at the circuit breaker.

Image: Step-by-step visual guide for disconnecting fan wiring and installing the receiver.

Image: Detailed wiring diagram illustrating the connection method for the receiver within the fan canopy.
Remote Control Battery Installation
The remote control requires two (2) AAA batteries. Open the battery compartment on the back of the remote and insert the batteries, observing the correct polarity (+/-). Close the compartment securely.
Operating Instructions
Familiarize yourself with the buttons on the remote control to utilize all available functions.

Image: A detailed overview of the remote control buttons and their corresponding functions.
- Power Button (⏻): Press to turn the fan On/Off. This button also activates the "walk away time delay" function.
- Fan Speed Buttons (⏚): Adjusts the fan speed between High, Medium, and Low.
- Light Control Button (💡): Turns the light On/Off. If a dimmable bulb is installed, press and hold to dim or brighten the light.
- FAN AUTO Button: Changes the fan's operating state between manual and automatic (thermostatic) mode.
- Temperature Adjustment Buttons (▲ / ▼): In automatic mode, use these buttons to set the desired room temperature for thermostatic control. The remote displays the actual or set temperature.
- Comfort Breeze Button (🌊): Activates the "Comfortable Breeze" function, which automatically adjusts the fan speed randomly to simulate a natural breeze effect.
- Timer Buttons (2H / 4H / 8H): Sets the fan and/or light to turn off automatically after 2, 4, or 8 hours. Press the corresponding button when the fan is on to activate the timer.
- Walk Away Time Delay Button (🕒): Activates a 30-second delay before the lights turn off, allowing you to leave the room before the lights extinguish.
Special Features
- Comfortable Breeze: This function simulates a natural breeze by randomly varying the fan speed, providing a more dynamic and comfortable airflow.
- Constant Temperature Control (Thermostatic Function): Set your desired room temperature using the remote. The fan will automatically turn on or off when the room temperature deviates by 1°C or 1°F from your set temperature, helping to maintain a consistent environment.
- Light Dimmer: Provides adjustable light intensity for compatible bulbs (incandescent and dimmable LED/CFL). For non-dimmable bulbs, it functions as a simple on/off switch.
- Timer Settings: Offers convenient 2, 4, and 8-hour timer options for both the fan and light, allowing for automatic shut-off.
- Walk Away Time Delay: A 30-second delay function for the lights, providing a brief period to exit the room before the lights turn off.
Maintenance
Remote Control
- Battery Replacement: Replace the two AAA batteries when the remote's range decreases or if the display becomes dim. Always use new batteries and dispose of old ones responsibly.
- Cleaning: Wipe the remote control with a soft, dry cloth. Do not use abrasive cleaners or allow moisture to enter the remote.
Receiver
- The receiver is designed for maintenance-free operation once installed.
- If access is required, ensure power is disconnected at the circuit breaker before opening the fan canopy.
Troubleshooting
| Problem | Possible Cause | Solution |
|---|---|---|
| Fan/Light does not respond to remote. | No power to fan; Dead batteries in remote; Incorrect DIP switch setting; Receiver not wired correctly. | Check circuit breaker; Replace remote batteries; Ensure remote and receiver DIP switches match; Verify wiring connections. |
| Light flickers when dimming. | Non-dimmable LED/CFL bulb; Incompatible dimmable bulb. | Replace with a fully dimmable LED/CFL bulb or an incandescent bulb. |
| Remote range is poor. | Low remote battery; Obstruction between remote and receiver. | Replace remote batteries; Ensure clear line of sight or reduce distance. |
| Thermostatic control not working as expected. | Incorrect temperature setting; Fan AUTO mode not activated. | Adjust the set temperature; Ensure FAN AUTO button is pressed to engage automatic mode. |
Specifications
- Model Number: HD3/AC8.3
- Item Weight: 7.8 ounces
- Product Dimensions (Remote): Approximately 5.9 x 1.7 x 0.79 inches (15cm x 4.5cm x 2cm)
- Product Dimensions (Receiver): Approximately 3.7 x 1.7 x 1 inches (9.4cm x 4.3cm x 2.5cm)
- Batteries: 2 AAA batteries (not included)
- Color: Black
- Power Source: Battery Powered (remote)
- Mounting Type: Downrod Mount (for fan compatibility)
- Switch Style: Remote
- Certification: FCC
- Special Features: 3-Speed AC Ceiling Fan Control, Thermostatic Control, Timer, Light Dimmer, Universal Compatibility
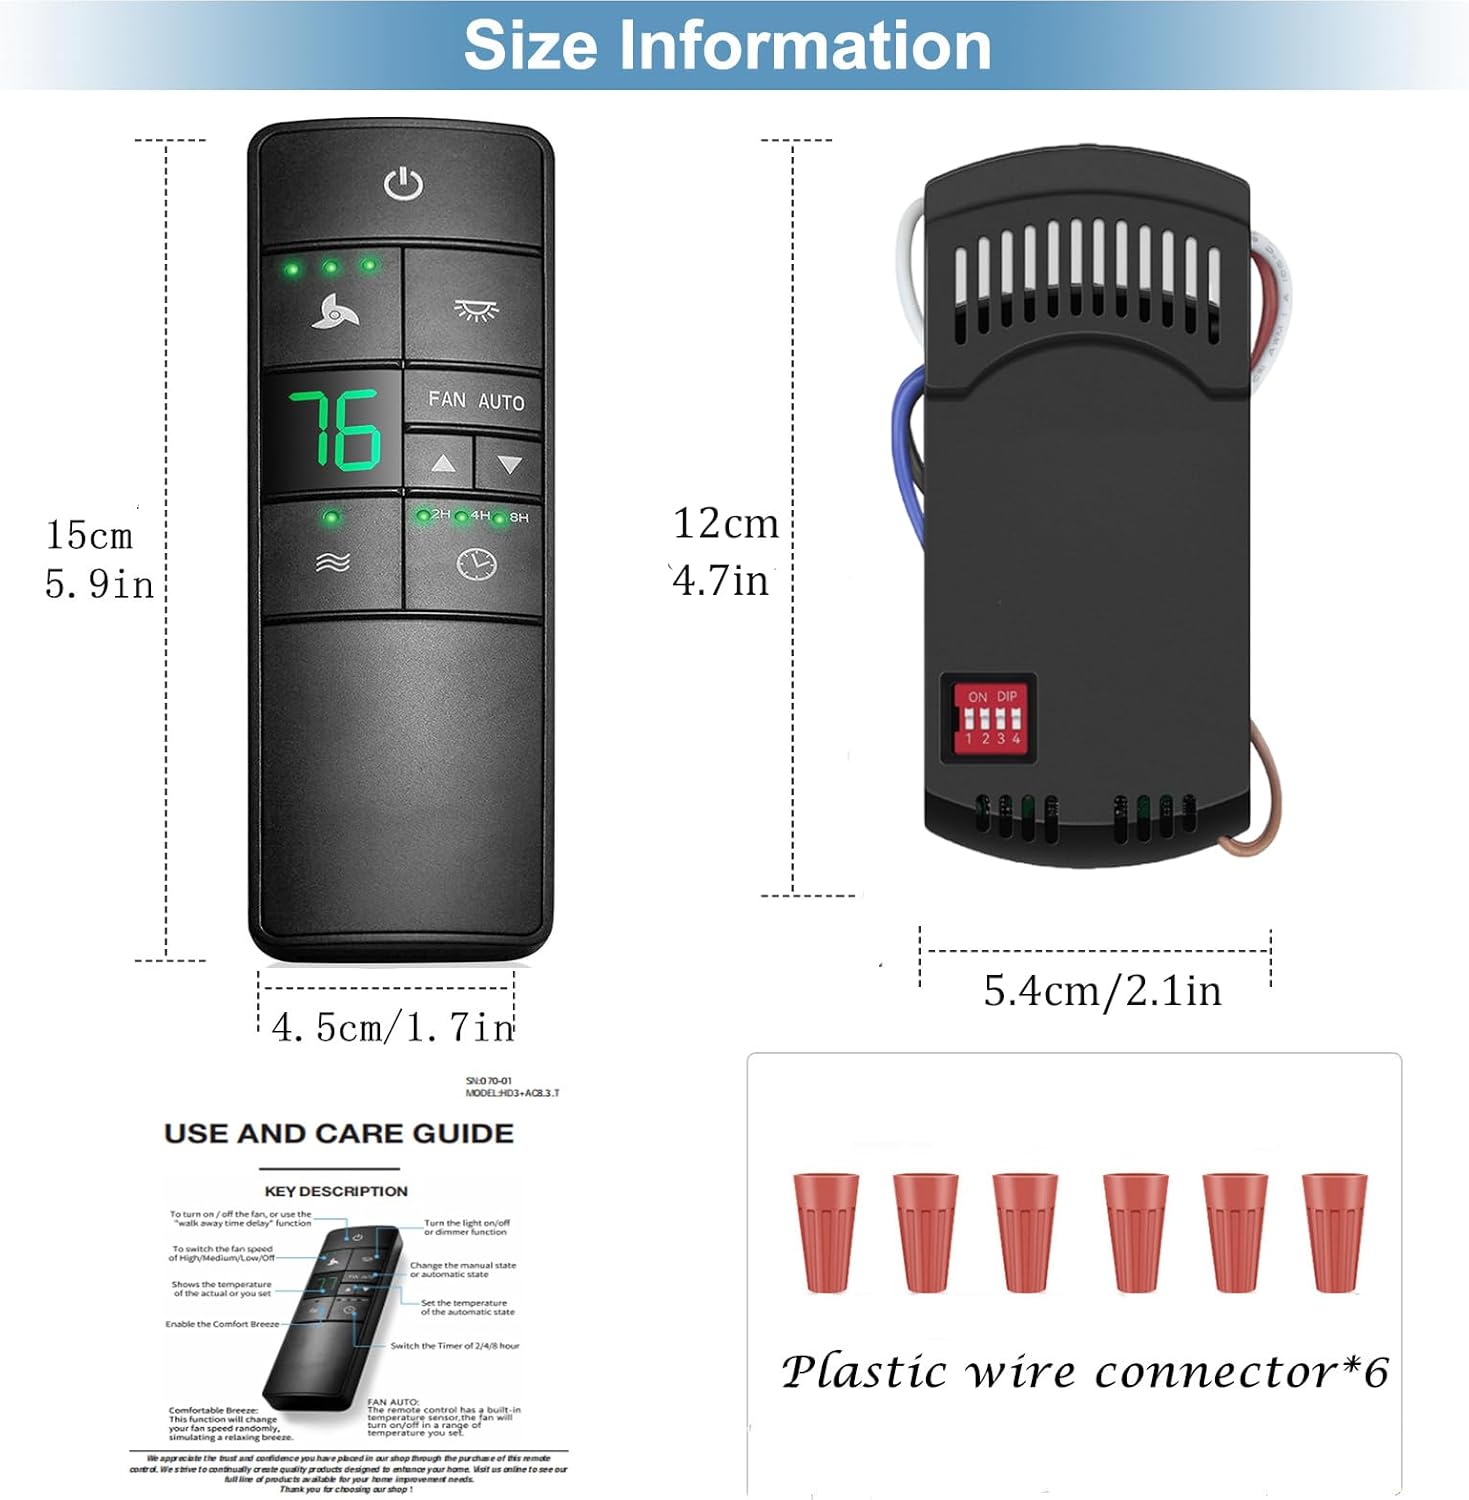
Image: Dimensions of the remote control and receiver for installation planning.
Warranty and Support
This Onisamt product comes with a 12-month warranty from the date of purchase. This warranty covers manufacturing defects under normal use. It does not cover damage resulting from misuse, accident, unauthorized modification, or improper installation.
For warranty claims, technical support, or any questions regarding your Onisamt 3-Speed Universal Ceiling Fan Thermostatic Remote Control Kit, please contact the manufacturer or your retailer. Please have your purchase information and model number (HD3/AC8.3) available when contacting support.