1. Product Overview
The OBDResource BM210 LED Battery Monitor Meter is designed to accurately measure and display the remaining charge of various battery types, including lead-acid, lithium-ion, and lithium iron phosphate batteries. It supports a wide range of voltages from 12V to 72V, making it suitable for golf carts, motorcycles, electric vehicles, lawn mowers, and other battery-powered equipment. The meter features a 10-segment LED bar graph for clear capacity indication and includes protection against reverse connections.

Figure 1: Product dimensions and wide compatibility with various vehicles like golf carts, Club Cars, electric vehicles, EZGO, and stacking machines.
2. Setup
2.1 DIP Switch Voltage Setting
Before connecting the battery monitor, it is crucial to set the DIP switch to match the voltage of your battery system. The device supports 12V, 24V, 36V, 48V, 60V, and 72V. Refer to the table below and the diagram to correctly configure the DIP switch. An incorrect setting will not damage the device but will prevent it from displaying the correct voltage.

Figure 2: DIP switch configuration for different battery voltages. "Down" is "1" and "Up" is "0".
Use a small tool, such as a flat-head screwdriver, to toggle the switches up or down according to your battery's voltage. For example, for a 48V system, the logic level is "0-0-1" (Switch 3: Up, Switch 2: Up, Switch 1: Down).
Video 1: Demonstrates how to adjust the DIP switch settings on the battery monitor to match the corresponding voltage. This video also shows the product components and basic wiring.
Video 2: Provides a visual guide on setting the DIP switches for various voltages (12V, 24V, 36V, 48V, 60V, 72V) and connecting the battery monitor.
2.2 Wiring Connection
The battery capacity gauge offers two wiring connection methods:
- Direct Connection (+/-c connection): Connect the battery monitor directly to the battery terminals. In this configuration, the LED lights will always be on when connected to the battery.
- Key Switch Connection (+/-c connection with switch): Connect the battery monitor through a key switch. This allows the LED lights to be turned off when the vehicle is not in use, conserving battery power.
Simply connect the battery; no external power supply is required. The device is plug-and-play.

Figure 3: Wiring diagrams illustrating direct connection (LED always on) and key switch connection (LED can be turned off).
2.3 Installation
The BM210 battery monitor can be installed in two ways:
- With Slot: If your vehicle has a pre-cut slot (e.g., 37x25 mm or 1.5x1 inch), the monitor can be inserted directly into it.
- Without Slot: If no slot is available, the device can be mounted by drilling a precise panel cutout or simply hung in a suitable location.
When wiring, ensure the device is stable to prevent short circuits caused by crossed wires.
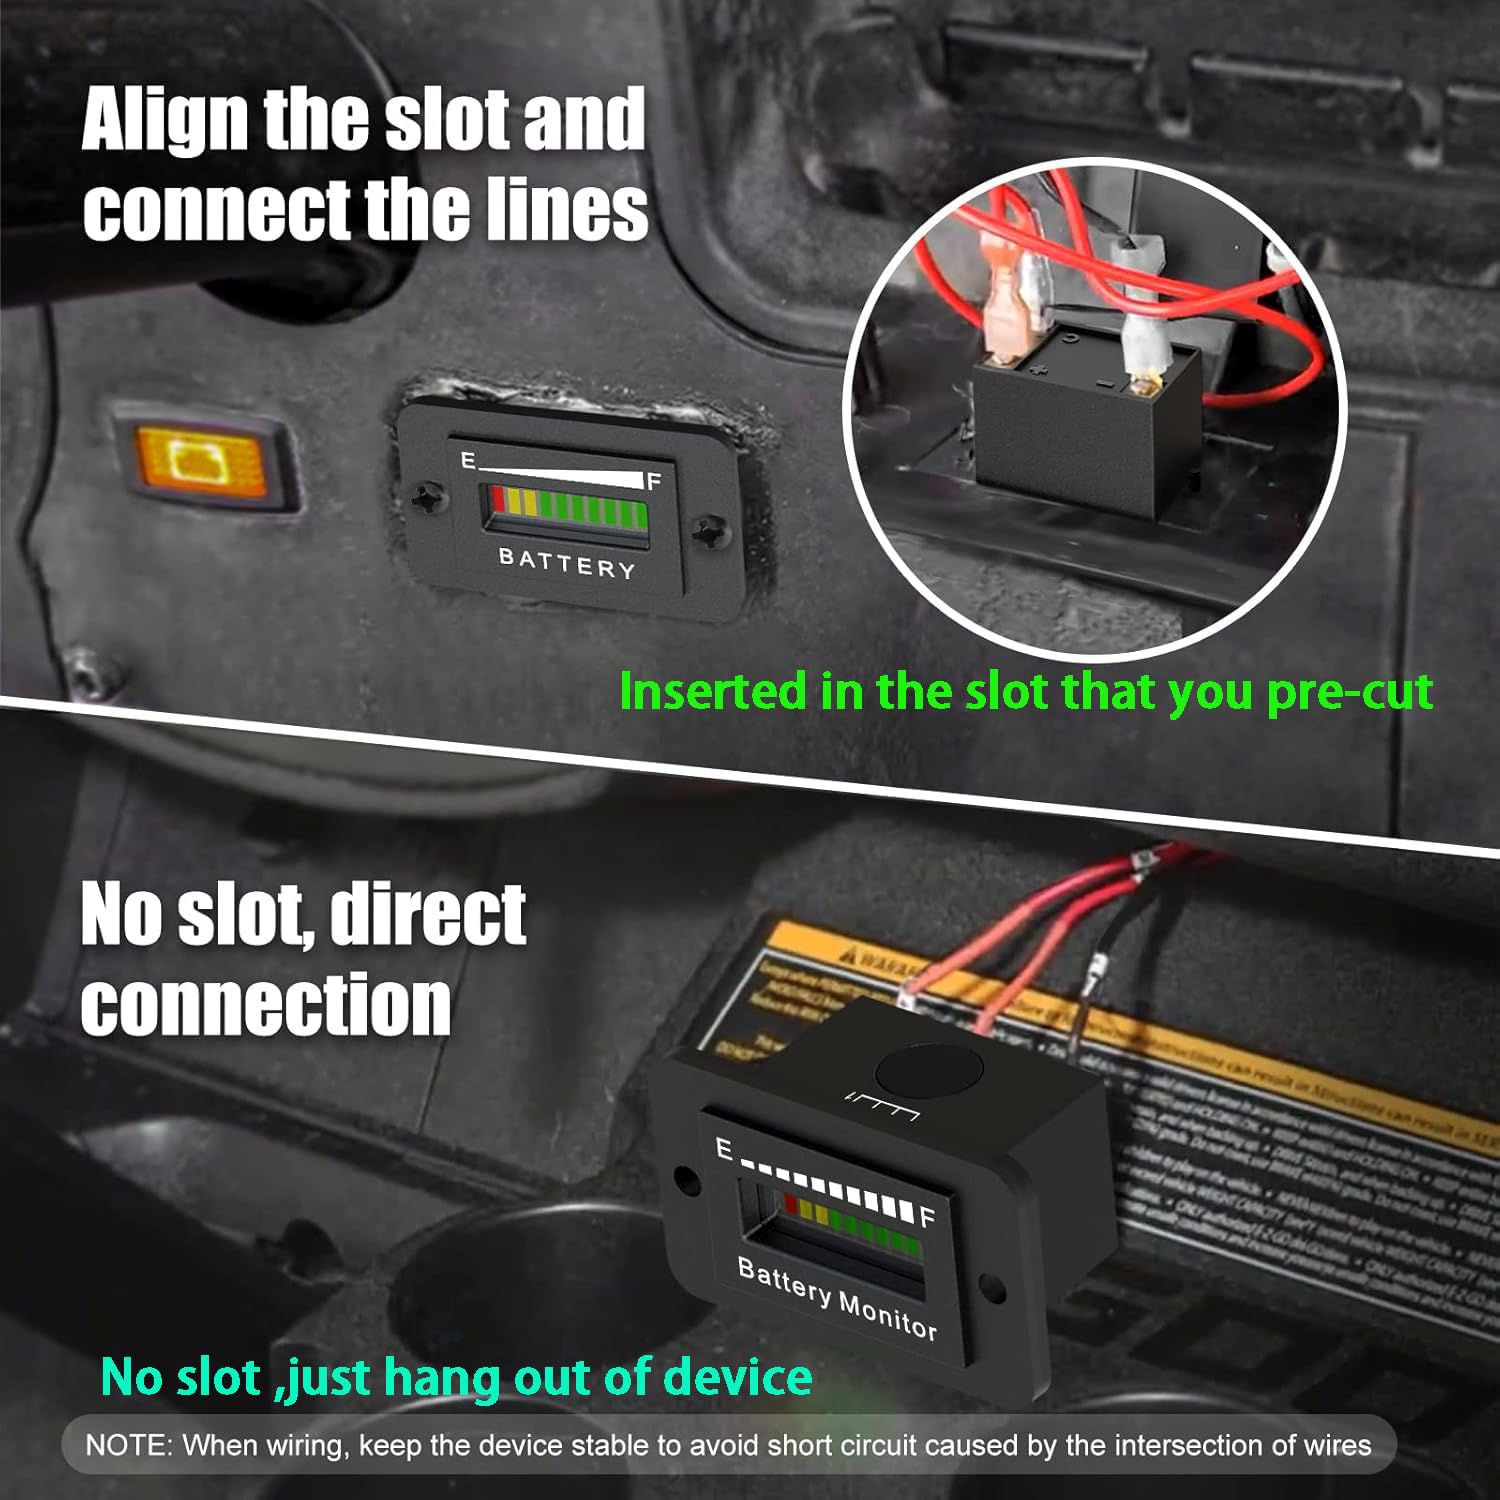
Figure 4: Visual guide for installing the battery monitor into an existing slot or mounting it without a slot.
3. Operating Instructions
3.1 LED Bar Display
The battery monitor features a 10-segment LED bar graph to indicate battery capacity. The display consists of 1 red LED, 2 yellow LEDs, and 7 green LEDs. Each segment represents approximately 10% of the battery's capacity.
- 1 Red LED: Indicates very low charge (approx. 10%), requiring immediate charging.
- 2 Yellow LEDs: Indicate low charge (approx. 20-30%), recommending a charge soon.
- 7 Green LEDs: Indicate sufficient to full charge (approx. 40-100%).

Figure 5: Interpretation of the 10-segment LED display, showing charge levels from 10% (red) to 100% (green).
3.2 Initialization and Refresh Rate
Upon power-on, all LED lights will flash three times, indicating successful initialization. The meter will then automatically identify and display the current battery level. The battery indicator refreshes every 10 seconds to provide updated information.
3.3 Operating Voltage Reference Table
The following table provides detailed voltage thresholds for each LED segment across different battery voltages. This helps in understanding the precise charge level indicated by the display.

Figure 6: Detailed operating voltage table for various battery systems and corresponding LED display states.
4. Maintenance
The BM210 battery monitor is designed for durability and minimal maintenance.
- Waterproof Rating: The device has an IP65 waterproof rating, protecting it from dust and low-pressure water jets.
- Reverse Polarity Protection: The monitor is equipped with reverse connection protection, meaning it will not be damaged if the positive and negative poles are accidentally connected incorrectly during wiring. However, always ensure correct wiring for proper function.
- Low Power Consumption: The unit features an automatic sleep mode to ensure low power consumption, extending the life of your battery.
- Heat Resistance: Designed to withstand various operating temperatures.

Figure 7: Key protection and efficiency features of the BM210 battery monitor.
5. Troubleshooting
- Incorrect Voltage Display: If the meter displays an incorrect voltage or does not function as expected, verify that the DIP switch settings match the actual voltage of your battery system. Refer to Section 2.1 for correct configuration. Resetting the DIP switch to the correct value will resolve the issue.
- LED Lights Not Flashing on Power-On: If the LED lights do not flash three times upon initial power-on, it indicates that the initialization failed. Please power off the device and then power it on again. Ensure all connections are secure.
- No Display: Check all wiring connections to ensure they are secure and correctly connected to the battery terminals. Confirm the battery has sufficient charge to power the monitor.
6. Specifications
| Feature | Specification |
|---|---|
| Brand | OBDResource |
| Model | BM210 |
| Compatible Voltages | 12V, 24V, 36V, 48V, 60V, 72V (selectable via DIP switch) |
| Battery Types | Lead-Acid, Lithium-ion, Lithium Iron Phosphate (3-15 series) |
| Display Type | 10-segment LED bar graph (1 red, 2 yellow, 7 green) |
| Refresh Rate | Every 10 seconds |
| Waterproof Rating | IP65 |
| Protection Features | Reverse Connection Protection, Overload Protection |
| Power Consumption | Low (with automatic sleep) |
| Dimensions | 2.48 x 2.05 x 1.81 inches (approx.) |
| Included Components | Battery monitor, installation accessories (screws, connectors) |
7. Warranty and Support
OBDResource is committed to providing quality products and customer satisfaction. This product comes with free installation accessories and technical support.
If you encounter any issues during the purchase or use of the BM210 LED Battery Monitor Meter, please contact our customer support team for assistance. We are dedicated to resolving any problems you may experience.
For support, please visit the OBDResource Store on Amazon or contact us through the platform where you made your purchase.


