RHYTHM 8RZ234SR04
RHYTHM D234 8RZ234SR04 Radio Alarm Clock User Manual
Model: 8RZ234SR04
1. Introduction
Thank you for purchasing the RHYTHM D234 8RZ234SR04 Radio Alarm Clock. This digital alarm clock features a radio-controlled timekeeping function, an electronic sound alarm with snooze, a thermometer, a hygrometer, and a calendar display. Its compact design and clear LCD make it suitable for various indoor environments. Please read this manual thoroughly before use to ensure proper operation and to maximize the clock's features.
2. Safety Information
- Do not expose the unit to extreme temperatures, direct sunlight, or high humidity.
- Avoid dropping the unit or subjecting it to strong impacts.
- Do not attempt to disassemble or modify the unit. This will void the warranty.
- Keep batteries out of reach of children. If swallowed, seek immediate medical attention.
- Dispose of used batteries according to local regulations.
- Use only the specified battery type (AA batteries).
3. Package Contents
Ensure all items are present in the package:
- RHYTHM D234 8RZ234SR04 Radio Alarm Clock
- User Manual (this document)
4. Product Overview
The RHYTHM D234 8RZ234SR04 features a clear LCD display and easily accessible front-facing control buttons for intuitive operation.
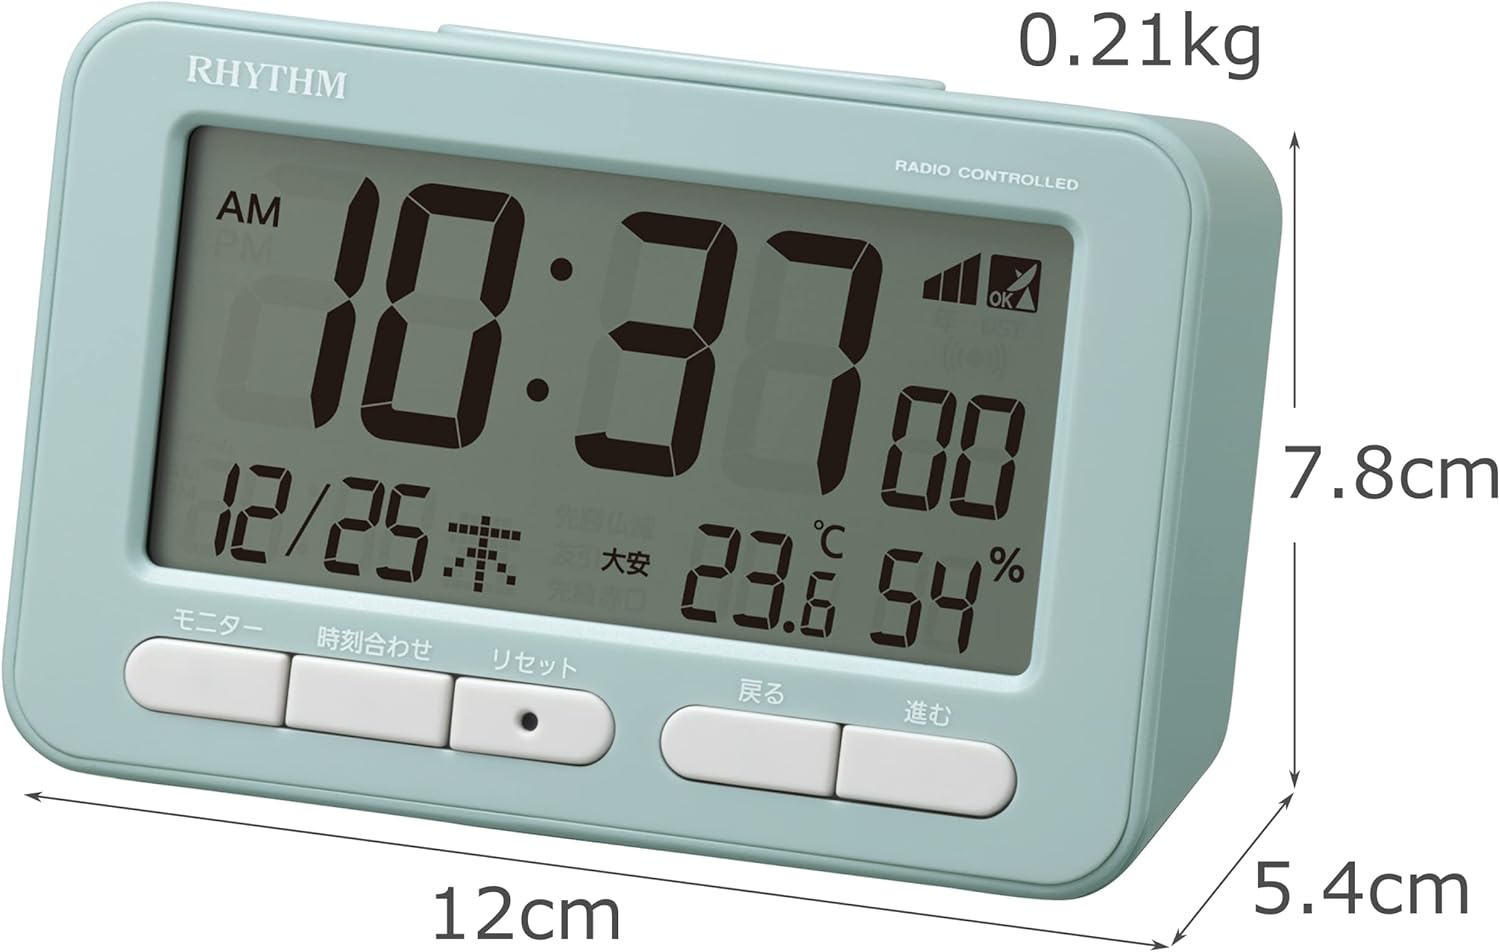
Figure 4.1: Front view of the RHYTHM D234 8RZ234SR04 Radio Alarm Clock, showing its dimensions (7.8cm H x 12cm W x 5.4cm D) and weight (0.21kg).

Figure 4.2: Detailed view of the clock's large LCD display and the front control buttons, including 'Monitor', 'Time Set', 'Reset', 'Back', and 'Forward'.
Display Information:
- Time: Displays current time in AM/PM or 24-hour format.
- Date: Shows month, day, and day of the week.
- Temperature: Displays current ambient temperature in Celsius.
- Humidity: Shows current ambient humidity percentage.
- Radio Wave Reception Indicator: Indicates signal strength.
- Alarm ON/OFF Indicator: Shows if the alarm is active.
Control Buttons:
- MONITOR: Activates backlight or cycles display modes.
- TIME SET: Enters time/date setting mode.
- RESET: Resets the clock to factory defaults.
- BACK (<): Adjusts settings backward.
- FORWARD (>): Adjusts settings forward.
- SNOOZE/LIGHT: Activates snooze during alarm or backlight when pressed.
5. Setup
5.1 Battery Installation
- Open the battery compartment cover located on the back of the clock.
- Insert two (2) AA batteries (not included) according to the polarity indicators (+ and -) inside the compartment.
- Close the battery compartment cover securely.
5.2 Initial Power On and Radio Wave Reception
Upon battery installation, the clock will automatically attempt to receive radio time signals to set the correct time and date. This process may take several minutes.

Figure 5.1: Illustration of radio wave time signal reception from two transmission stations, ensuring accurate timekeeping.
- Place the clock near a window for optimal signal reception.
- Avoid placing it near electronic devices that may cause interference (e.g., TVs, computers, mobile phones).
- A signal strength indicator will appear on the display during reception. Once synchronized, the indicator will show a stable signal.
6. Operating Instructions
6.1 Manual Time and Date Setting
If radio signal reception is poor or unavailable, you can set the time and date manually:
- Press and hold the TIME SET button until the time display starts flashing.
- Use the BACK (<) and FORWARD (>) buttons to adjust the hour. Press TIME SET to confirm and move to minutes.
- Repeat the process for minutes, year, month, and day.
- Press TIME SET one last time to exit the setting mode.
6.2 Setting the Alarm
- Press the ALARM SET button (usually located on the side or back, if not on front, refer to product diagram). The alarm time will flash.
- Use the BACK (<) and FORWARD (>) buttons to set the desired alarm hour. Press ALARM SET to confirm.
- Adjust the minutes using the BACK (<) and FORWARD (>) buttons. Press ALARM SET to confirm and exit.
- To activate/deactivate the alarm, press the ALARM ON/OFF switch or button. An alarm icon will appear/disappear on the display.
6.3 Using the Snooze Function
When the alarm sounds, press the large SNOOZE/LIGHT button on the top of the clock. The alarm will pause for approximately 5 minutes and then sound again. This can be repeated multiple times.
6.4 Display Modes and Backlight
The clock continuously displays time, date, temperature, and humidity. To temporarily illuminate the display, press the SNOOZE/LIGHT button. The backlight will activate for a few seconds.

Figure 6.1: The clock's display illuminated by its backlight, showing time, date, temperature, and humidity clearly in low light conditions.
6.5 12/24 Hour Format
To switch between 12-hour (AM/PM) and 24-hour formats, locate the 12/24H button (often on the back or side) and press it. The display will change accordingly.
7. Maintenance
7.1 Cleaning
Wipe the clock with a soft, dry cloth. Do not use abrasive cleaners, solvents, or spray directly onto the unit, as this may damage the finish or internal components.
7.2 Battery Replacement
When the display becomes dim or the clock functions irregularly, it is time to replace the batteries. Follow the battery installation steps in Section 5.1. Replace both batteries simultaneously with new ones of the same type.
8. Troubleshooting
| Problem | Possible Cause | Solution |
|---|---|---|
| No display or dim display | Dead or incorrectly inserted batteries. | Replace batteries with new AA batteries, ensuring correct polarity. |
| Incorrect time/date | Poor radio signal reception or manual setting error. | Move the clock to a location with better signal. Perform manual time setting if necessary. |
| Alarm does not sound | Alarm is not activated or set incorrectly. | Ensure the alarm is turned ON and the alarm time is set correctly. |
| Temperature/Humidity readings seem inaccurate | Unit placed near heat/cold sources or in extreme conditions. | Relocate the clock to a stable indoor environment away from direct heat, cold, or moisture. Allow time for readings to stabilize. |
9. Specifications
- Model Number: 8RZ234SR04
- Dimensions: 7.8 cm (H) x 12 cm (W) x 5.4 cm (D)
- Weight: Approximately 0.21 kg (7.5 oz)
- Power Source: 2 x AA batteries (sold separately)
- Movement: Radio-controlled (Automatic time synchronization)
- Display Type: LCD
- Alarm: Electronic sound, 4-level volume change, with Snooze function
- Thermometer Range: -9.9°C to 50°C
- Hygrometer Range: 20% to 95%
- Calendar: Programs until December 31, 2099
- Material: Plastic
- Mounting Type: Tabletop
- Special Features: Backlight, 12/24-hour display option
10. Warranty and Support
For warranty information and customer support, please refer to the documentation provided at the time of purchase or contact your local RHYTHM distributor. Keep your purchase receipt as proof of purchase for any warranty claims.
Ask a question about this manual
Ask about setup, troubleshooting, compatibility, parts, safety, or missing instructions. Manuals+ will review the question and use this page’s manual context to help answer it.