1. Introduction
This manual provides detailed instructions for the setup, operation, and maintenance of your La Crosse Technology WS6204 Radio-Controlled Weather Station. This device offers precise indoor and outdoor temperature and humidity readings, a radio-controlled clock, calendar, weather forecasts, and frost alerts.
1.1 Package Contents
- 1 x WS6204 Main Weather Station Unit
- 3 x Wireless Thermo/Hygro Sensors
- 1 x Power Adapter (for main unit)
- 1 x User Manual (this document)
2. Safety Information
- Do not expose the main unit to extreme temperatures, direct sunlight, or moisture.
- The outdoor sensors are designed for outdoor use but should be protected from direct rain and snow for extended longevity.
- Use only the specified power adapter for the main unit.
- Ensure correct battery polarity when inserting batteries into both the main unit and sensors.
- Dispose of used batteries responsibly according to local regulations.
- Do not attempt to disassemble or repair the device. Contact qualified personnel for service.
3. Setup
3.1 Main Unit Setup
- Insert 3 x AAA batteries (not included) into the battery compartment of the main unit, observing correct polarity.
- Connect the provided power adapter to the main unit's AC 5V port and plug it into a wall outlet. The display will illuminate.
- Place the main unit on a stable, flat surface or mount it on a wall using the integrated stand/hanging hole.
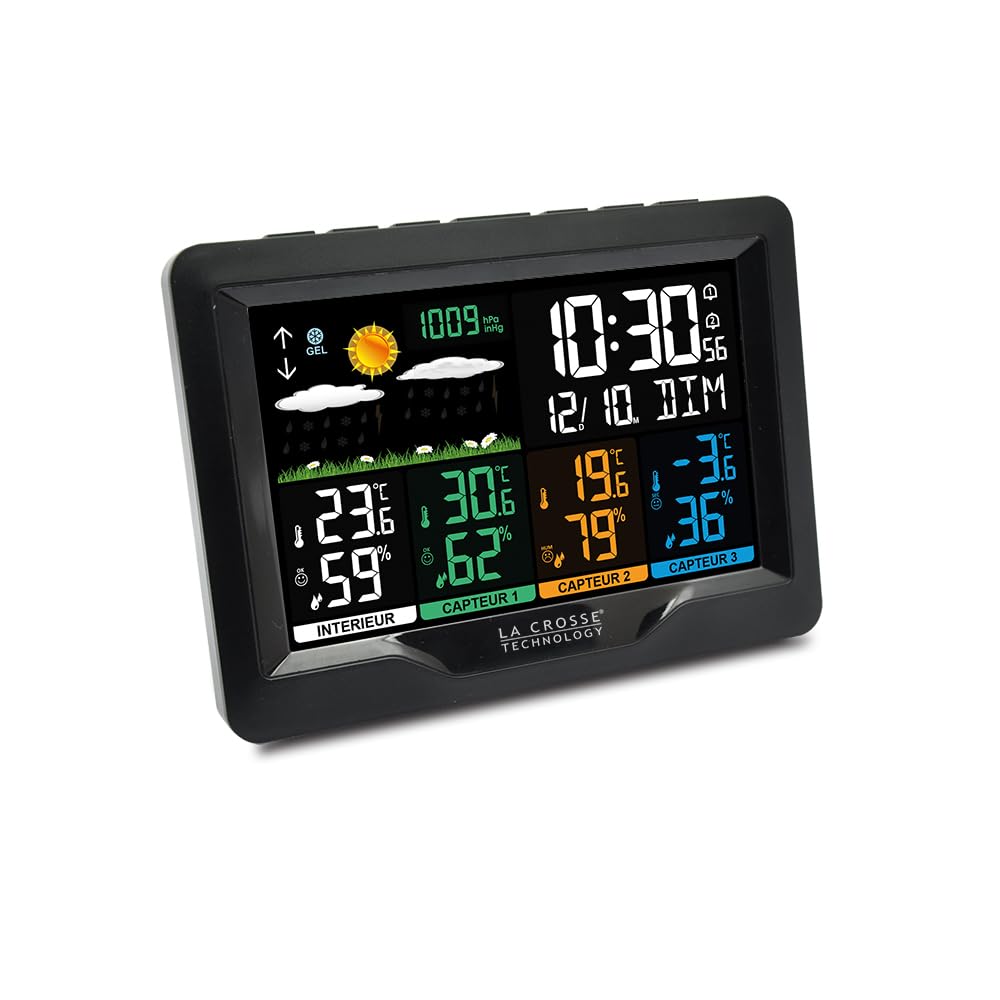
Image 1: Front view of the main weather station unit, displaying time, date, indoor/outdoor temperatures, humidity, and weather forecast icons.

Image 2: Rear view of the main weather station unit, highlighting control buttons (SNOOZE, CH, LUM/SNZ, MEM, ALARME, REG) and the AC 5V power input.
3.2 Wireless Sensor Setup
- For each of the three wireless sensors, open the battery compartment and insert 2 x AA batteries (not included), ensuring correct polarity.
- Select a channel (1, 2, or 3) for each sensor using the small switch inside the battery compartment. Ensure each sensor uses a unique channel.
- Close the battery compartments securely.
- Place the sensors outdoors in a shaded, dry location, protected from direct precipitation and sunlight, to ensure accurate readings. The maximum transmission range is approximately 100 meters (330 feet) in open air.

Image 3: The La Crosse Technology WS6204 Weather Station, showing the main display unit alongside its three corresponding wireless thermo/hygro sensors, each labeled with a channel number.
3.3 Initial Synchronization
After powering on the main unit and sensors, the main unit will automatically begin searching for the radio-controlled time signal (DCF77) and the wireless sensors (433 MHz frequency). This process may take several minutes, or up to an hour for the time signal. Ensure the main unit is placed away from potential interference sources like TVs or computers during initial setup.
- The main unit will display an antenna icon when searching for the time signal. Once received, the icon will become solid.
- The outdoor temperature and humidity readings for each sensor will appear on the display as they connect. If a sensor does not connect, ensure it is within range and its batteries are correctly installed. You may need to press the 'CH' button on the main unit to manually search for sensors.
3.4 Manual Time and Date Setting
If the radio-controlled time signal is not received, or if you wish to set the time manually:
- Press and hold the SET button (if available, otherwise refer to the back panel image for specific button names like 'SNOOZE' or 'MEM' which might double as SET in some modes) for a few seconds to enter time setting mode.
- Use the +/- buttons to adjust values and the SET button to confirm and move to the next setting (e.g., Hour, Minute, Year, Month, Day, 12/24 Hour Format).
- Press the SET button again to exit the setting mode.
4. Operating Instructions
4.1 Display Overview
The main unit's display is divided into several sections, providing comprehensive weather and time information:
- Time and Date: Displays the current time, day of the week, and calendar.
- Indoor Temperature & Humidity: Current readings for the main unit's location.
- Outdoor Temperature & Humidity (Sensors 1, 2, 3): Readings from the three wireless sensors.
- Weather Forecast: Icons indicating predicted weather conditions (sunny, partly cloudy, cloudy, rainy, snowy).
- Frost Alert: An icon or indicator will appear when outdoor temperatures approach freezing.
- Comfort Indicator: A visual representation of indoor comfort levels based on temperature and humidity.
- Battery Low Indicator: Icons for both the main unit and sensors will alert you when batteries need replacement.
4.2 Button Functions
Refer to the back of the main unit (Image 2) for button locations:
- SNOOZE / LIGHT: Press to activate backlight (if running on batteries) or snooze the alarm.
- CH (Channel): Press to cycle through the outdoor sensor displays (Sensor 1, 2, 3, or auto-scroll). Press and hold to manually search for sensors.
- MEM (Memory): Press to view maximum and minimum recorded temperature/humidity values. Press and hold to clear records.
- ALARM: Press to view alarm time. Press and hold to enter alarm setting mode.
- REG (Register/Set): Used for entering settings mode or confirming selections.
- +/- (Up/Down): Used to adjust values in setting modes.
4.3 Setting the Alarm
- Press and hold the ALARM button until the alarm time flashes.
- Use the +/- buttons to set the desired alarm hour. Press ALARM to confirm.
- Use the +/- buttons to set the desired alarm minute. Press ALARM to confirm and exit.
- To activate/deactivate the alarm, press the ALARM button briefly. An alarm icon will appear/disappear on the display.
4.4 Viewing Min/Max Records
The station records the minimum and maximum temperature and humidity values for both indoor and each outdoor sensor.
- Press the MEM button repeatedly to cycle through: Current values → Maximum values → Minimum values.
- To clear the recorded Min/Max values, press and hold the MEM button while viewing the records.
4.5 Weather Forecast
The weather station predicts weather conditions for the next 12-24 hours based on changes in atmospheric pressure. The forecast is represented by graphical icons (e.g., sunny, cloudy, rainy). This is a prediction and may not always match actual weather conditions.
4.6 Frost Alert
When the outdoor temperature drops to a certain threshold (typically between -1°C and +2°C or 30°F and 36°F), a frost alert icon will appear on the display, indicating potential icy conditions.
5. Maintenance
5.1 Battery Replacement
- When the low battery indicator appears for the main unit or a specific sensor, replace all batteries in that unit with new ones of the same type (AAA for main unit, AA for sensors).
- Always replace all batteries in a unit at the same time.
- After replacing sensor batteries, you may need to press the 'CH' button on the main unit to re-establish connection.
5.2 Cleaning
Wipe the main unit and sensors with a soft, damp cloth. Do not use abrasive cleaners or solvents, as these may damage the display or casing.
6. Troubleshooting
| Problem | Possible Cause | Solution |
|---|---|---|
| No outdoor sensor reading (---) | Sensor out of range, low batteries, incorrect channel, interference. | Move sensor closer to main unit. Replace sensor batteries. Ensure sensor channel matches display channel. Press 'CH' button to re-scan. Avoid placing near electronic devices. |
| Time not synchronizing (radio-controlled) | Weak signal, interference, incorrect time zone setting (if applicable). | Relocate main unit near a window, away from electronic devices. Allow up to 24 hours for signal acquisition. Manually set time if necessary. |
| Inaccurate temperature/humidity readings | Sensor exposed to direct sunlight/rain, poor ventilation, proximity to heat/cold sources. | Relocate sensors to a shaded, well-ventilated area, protected from direct weather elements. Ensure main unit is not near heat sources or vents. |
| Display is dim or blank (on battery power) | Low batteries, backlight timeout. | Replace main unit batteries. Press the 'SNOOZE/LIGHT' button to activate the backlight. For continuous backlight, use the power adapter. |
7. Specifications
- Model: WS6204
- Brand: La Crosse Technology
- Main Unit Power: 3 x AAA batteries (not included) or AC 5V power adapter (included)
- Sensor Power: 2 x AA batteries per sensor (not included)
- Transmission Frequency: 433 MHz
- Transmission Range: Up to 100 meters (330 feet) in open air
- Time Synchronization: Radio-controlled (DCF77)
- Material: Plastic
- Color: Black
- Package Dimensions: 17.2 x 12.8 x 8.6 cm
- Package Weight: 600 grams
- Manufacturer: La Crosse Technology
- Country of Origin: China
8. Warranty and Support
La Crosse Technology products are designed for reliability and performance. For warranty information, technical support, or service inquiries, please refer to the warranty card included with your product or visit the official La Crosse Technology website. Keep your purchase receipt as proof of purchase.