1. Introduction
This manual provides essential information for the safe operation, maintenance, and setup of your King Canada KC-902C 9" Wood Bandsaw with Laser and King Canada KC-705L-6 4" x 36" Belt and 6" Disc Sander. Please read and understand all instructions before using the tools to ensure personal safety and optimal performance.
The KC-902C 9" Wood Bandsaw is designed for cutting curves and compound angles on wood materials. It features a laser guide system for precise cuts, a 0-45 degree tilting table, hinged doors for blade access, a built-in brush for drive wheel cleaning, and a rack and pinion height adjustment system with an adjustable work light.
The KC-705L-6 4" x 36" Belt and 6" Disc Sander is equipped with a sealed ball bearing motor, adjustable tilting tables, and an easy belt tracking system. It is suitable for various finishing operations including sanding, surfacing, grinding, cleaning, and deburring on wood, metal, and plastic.
2. Safety Information
Always wear appropriate personal protective equipment (PPE) including safety glasses, hearing protection, and dust masks when operating these tools. Ensure the work area is clean, well-lit, and free from obstructions. Keep children and bystanders away from the operating machinery. Disconnect power before making adjustments or performing maintenance. Always use the correct blade/belt for the material being cut or sanded. Secure workpieces firmly to prevent movement during operation.
3. Components Overview
3.1 King Canada KC-902C 9" Wood Bandsaw
- Blade Tension Knob: Adjusts blade tension for optimal cutting.
- Blade Guides: Supports the blade during operation.
- Work Table: Provides a stable surface for material. Tilts 0-45 degrees.
- Miter Gauge: Used for accurate angle cuts.
- Rip Fence: Guides material for straight cuts.
- Laser Guide: Projects a line for precise cutting.
- Work Light: Illuminates the cutting area.
- On/Off Switch: Controls power to the bandsaw.
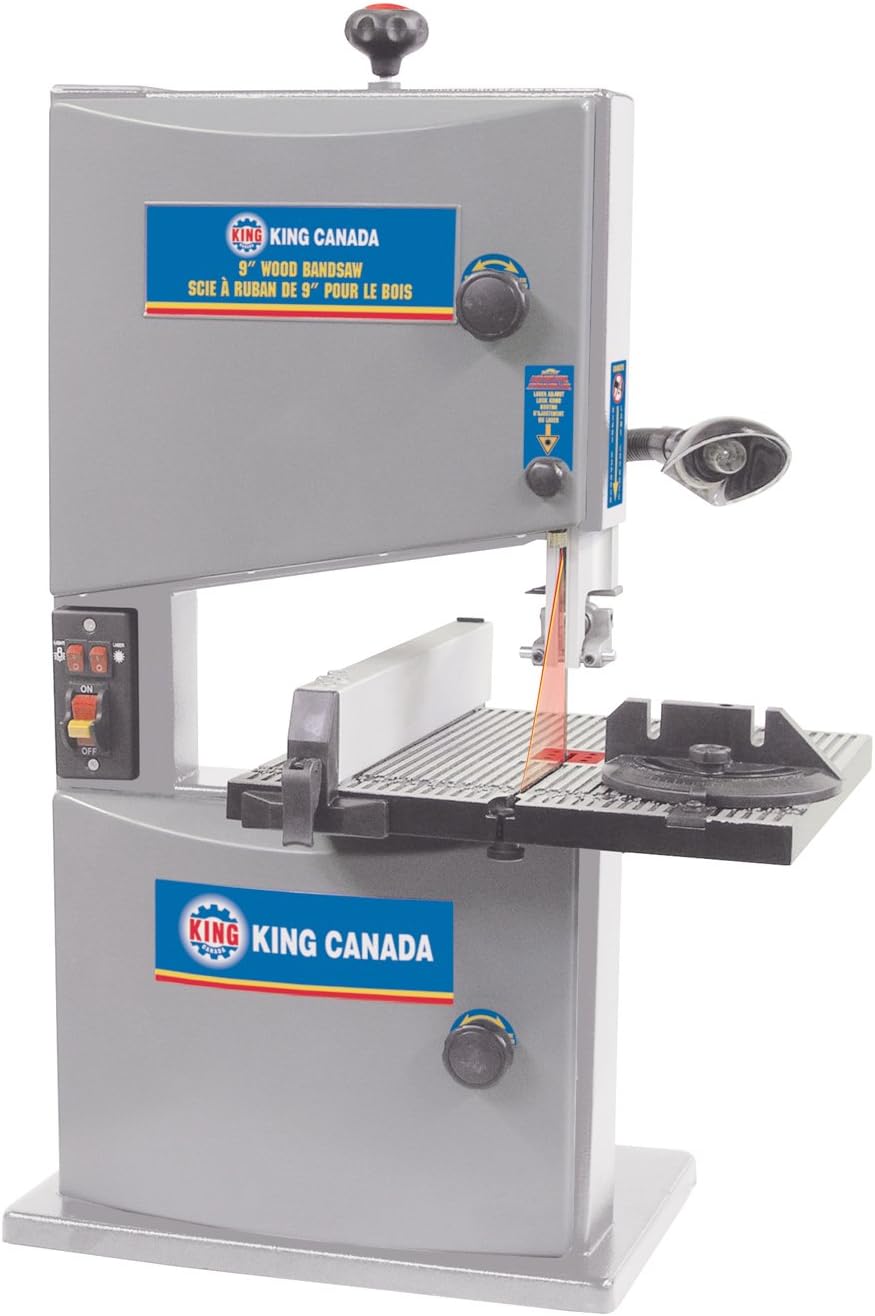
Figure 1: King Canada KC-902C 9-inch Wood Bandsaw with Laser. This image shows the overall structure of the bandsaw, highlighting its main components such as the blade, work table, and control panel.

Figure 2: Close-up view of the bandsaw blade area, showing the blade guides and the table insert.

Figure 3: Detailed view of the bandsaw's laser guide system, which projects a line onto the workpiece for accurate cutting.
3.2 King Canada KC-705L-6 4" x 36" Belt and 6" Disc Sander
- Belt Sander: 4" x 36" abrasive belt for sanding.
- Disc Sander: 6" abrasive disc for sanding.
- Work Tables: Adjustable tables for both belt and disc sanding.
- Belt Tracking Knob: For easy adjustment of the sanding belt.
- On/Off Switch: Controls power to the sander.

Figure 4: King Canada KC-705L-6 4" x 36" Belt and 6" Disc Sander. This image displays the combined belt and disc sander unit.

Figure 5: Close-up of the sander's adjustable tilting table, allowing for angled sanding operations.

Figure 6: Detailed view of the belt tracking system on the sander, designed for quick and easy belt changes.
4. Setup
4.1 Bandsaw Setup (KC-902C)
- Unpacking: Carefully remove the bandsaw from its packaging and inspect for any damage.
- Mounting: Securely mount the bandsaw to a stable workbench using appropriate fasteners.
- Blade Installation: Refer to the detailed blade installation instructions in the separate bandsaw manual. Ensure the blade is correctly tensioned and tracked.
- Table Adjustment: Adjust the work table to the desired angle (0-45 degrees) for your cutting needs.
- Laser and Work Light: Ensure the laser guide and work light are functional and properly aligned.
4.2 Sander Setup (KC-705L-6)
- Unpacking: Remove the sander from its packaging and check for any damage.
- Mounting: Place the sander on a stable, level surface. It can be bolted down for added stability during heavy use.
- Belt/Disc Installation: Install the appropriate sanding belt and disc. Use the easy belt tracking system to center the belt.
- Table Adjustment: Adjust the tilting tables to the desired angle for your sanding tasks.
5. Operating Instructions
5.1 Bandsaw Operation (KC-902C)
- Material Preparation: Mark your cutting line clearly on the workpiece.
- Adjustments: Set the blade height, table tilt, and use the rip fence or miter gauge as needed for your cut.
- Power On: Turn on the bandsaw. Allow the blade to reach full speed before beginning the cut.
- Cutting: Guide the workpiece slowly and steadily into the blade. Use the laser guide for accuracy. Avoid forcing the material.
- Curves and Compound Angles: The bandsaw is ideal for intricate curve cutting and precise compound angles.
5.2 Sander Operation (KC-705L-6)
- Material Preparation: Ensure the workpiece is clean and free of loose debris.
- Power On: Turn on the sander.
- Sanding: Apply light, even pressure to the workpiece against the moving belt or rotating disc. Move the workpiece consistently to avoid uneven sanding or burning.
- Angle Sanding: Utilize the adjustable tilting tables for precise angle sanding.
- Applications: Use for sanding, surfacing, grinding, cleaning, and deburring various materials.
6. Maintenance
6.1 General Maintenance
- Cleaning: Regularly clean dust and debris from both tools, especially around moving parts and ventilation openings. The bandsaw has a built-in brush for the drive wheel.
- Lubrication: Lubricate moving parts as recommended in the individual product manuals.
- Inspection: Periodically inspect power cords, switches, and all components for wear or damage. Replace worn parts immediately.
6.2 Bandsaw Blade Replacement (KC-902C)
Always disconnect power before changing the blade. Release blade tension, open the hinged doors, carefully remove the old blade, and install the new blade ensuring teeth are pointing downwards towards the table. Re-tension the blade and adjust tracking before closing the doors and resuming operation.
6.3 Sander Belt and Disc Replacement (KC-705L-6)
Disconnect power. Follow the instructions in the sander manual for releasing tension and replacing the sanding belt. For the disc, remove the old disc and apply a new adhesive-backed disc, ensuring it is centered. Re-tension the belt and check tracking before use.
7. Troubleshooting
- Tool not starting: Check power connection, ensure switches are in the ON position, and verify no safety interlocks are engaged.
- Poor cutting/sanding performance: Inspect blades/belts for dullness or damage and replace if necessary. Ensure proper tension and tracking.
- Excessive vibration or noise: Check for loose components, worn bearings, or improper blade/belt installation.
- Uneven cuts/sanding: Verify table and fence/miter gauge are properly aligned and secured.
For issues not covered here, consult the detailed troubleshooting section in the full product manual or contact King Canada customer support.
8. Specifications
8.1 King Canada KC-902C 9" Wood Bandsaw
- Model Number: KC-902C
- Blade Length: 9 Inches
- Cutting Angle: 45 Degrees (tilting table)
- Power Source: Corded Electric
- Voltage: 120 Volts
- Product Dimensions: 91.4L x 15.2W x 10.2H Centimetres
- Surface Recommendation: Wood
- Special Feature: Laser, Work Light, Lightweight
8.2 King Canada KC-705L-6 4" x 36" Belt and 6" Disc Sander
- Model Number: KC-705L-6 (implied from product title, not explicitly in specifications list)
- Motor: Sealed ball bearing construction
- Belt Size: 4" x 36"
- Disc Size: 6"
- Features: Adjustable tilting tables, easy belt tracking system
9. Warranty and Support
For warranty information, technical support, or to order replacement parts, please refer to the official King Canada website or contact their customer service department. Keep your purchase receipt as proof of purchase for warranty claims.