1. Introduction
Welcome to the MINISFORUM EliteMini TH80 Mini PC user manual. This document provides essential information for the proper setup, operation, maintenance, and troubleshooting of your new Mini PC. Please read this manual thoroughly before using the device to ensure optimal performance and longevity.
The MINISFORUM EliteMini TH80 is a compact and powerful Mini PC featuring an Intel Core i7-11800H processor, 32GB RAM, and a 512GB PCIe SSD, designed for a wide range of computing tasks from office work to multimedia consumption.
Video: Overview of the MINISFORUM EliteMini TH80 Mini PC, highlighting its compact design and key features.
2. Product Overview
The EliteMini TH80 is engineered for efficiency and connectivity, offering a robust set of ports and internal components to meet diverse computing needs.
2.1. Key Features
- Processor: Intel Core i7-11800H (8 Cores/16 Threads, up to 4.60 GHz)
- Graphics: Intel UHD Graphics (integrated)
- Memory: 32GB DDR4 3200MHz RAM (Dual Channel, upgradeable to 64GB)
- Storage: 512GB PCIe SSD (upgradeable with 2x M.2 2280 NVMe SSD slots, one supporting PCIe 4.0)
- Connectivity: Wi-Fi 6E, Bluetooth 5.2, RJ45 2.5 Gigabit Ethernet
- Video Output: HDMI, DisplayPort, USB-C (supports up to 3 monitors simultaneously at 4K@60Hz)
2.2. Ports and Connectors

Image: Detailed diagram illustrating the various ports available on the front and rear panels of the EliteMini TH80.
Front Panel:
- 1x USB-C (Full-function, supports DisplayPort Alt Mode for video output)
- 1x USB 3.2 Gen2 Type-A Port
- 1x 3.5mm Headphone Jack
- 1x Power Light
Rear Panel:
- 4x USB 3.2 Gen2 Type-A Ports
- 1x RJ45 2.5 Gigabit Ethernet Port
- 1x HDMI Port (4K@60Hz)
- 1x DisplayPort (4K@60Hz)
- 1x 3.5mm Microphone Jack
- 1x 3.5mm Combo Jack
- 1x DC 19V Power Input
- 1x Power Button
- 1x Clear CMOS Button
- 1x Kensington Lock Slot
3. Setup
Follow these steps to set up your MINISFORUM EliteMini TH80 Mini PC:
- Connect Display: Connect your monitor(s) to the Mini PC using the HDMI, DisplayPort, or USB-C video output ports.
- Connect Peripherals: Plug in your keyboard, mouse, and any other USB devices into the available USB ports.
- Connect Network: For wired internet, connect an Ethernet cable to the RJ45 port. For wireless, ensure Wi-Fi is enabled in Windows settings after initial setup.
- Connect Power: Plug the power adapter into the DC 19V input port on the Mini PC, then plug the power cable into a wall outlet.
- Power On: Press the power button on the rear panel to turn on the Mini PC.
The system will boot into Windows 11 Pro. Follow the on-screen instructions for initial Windows setup.
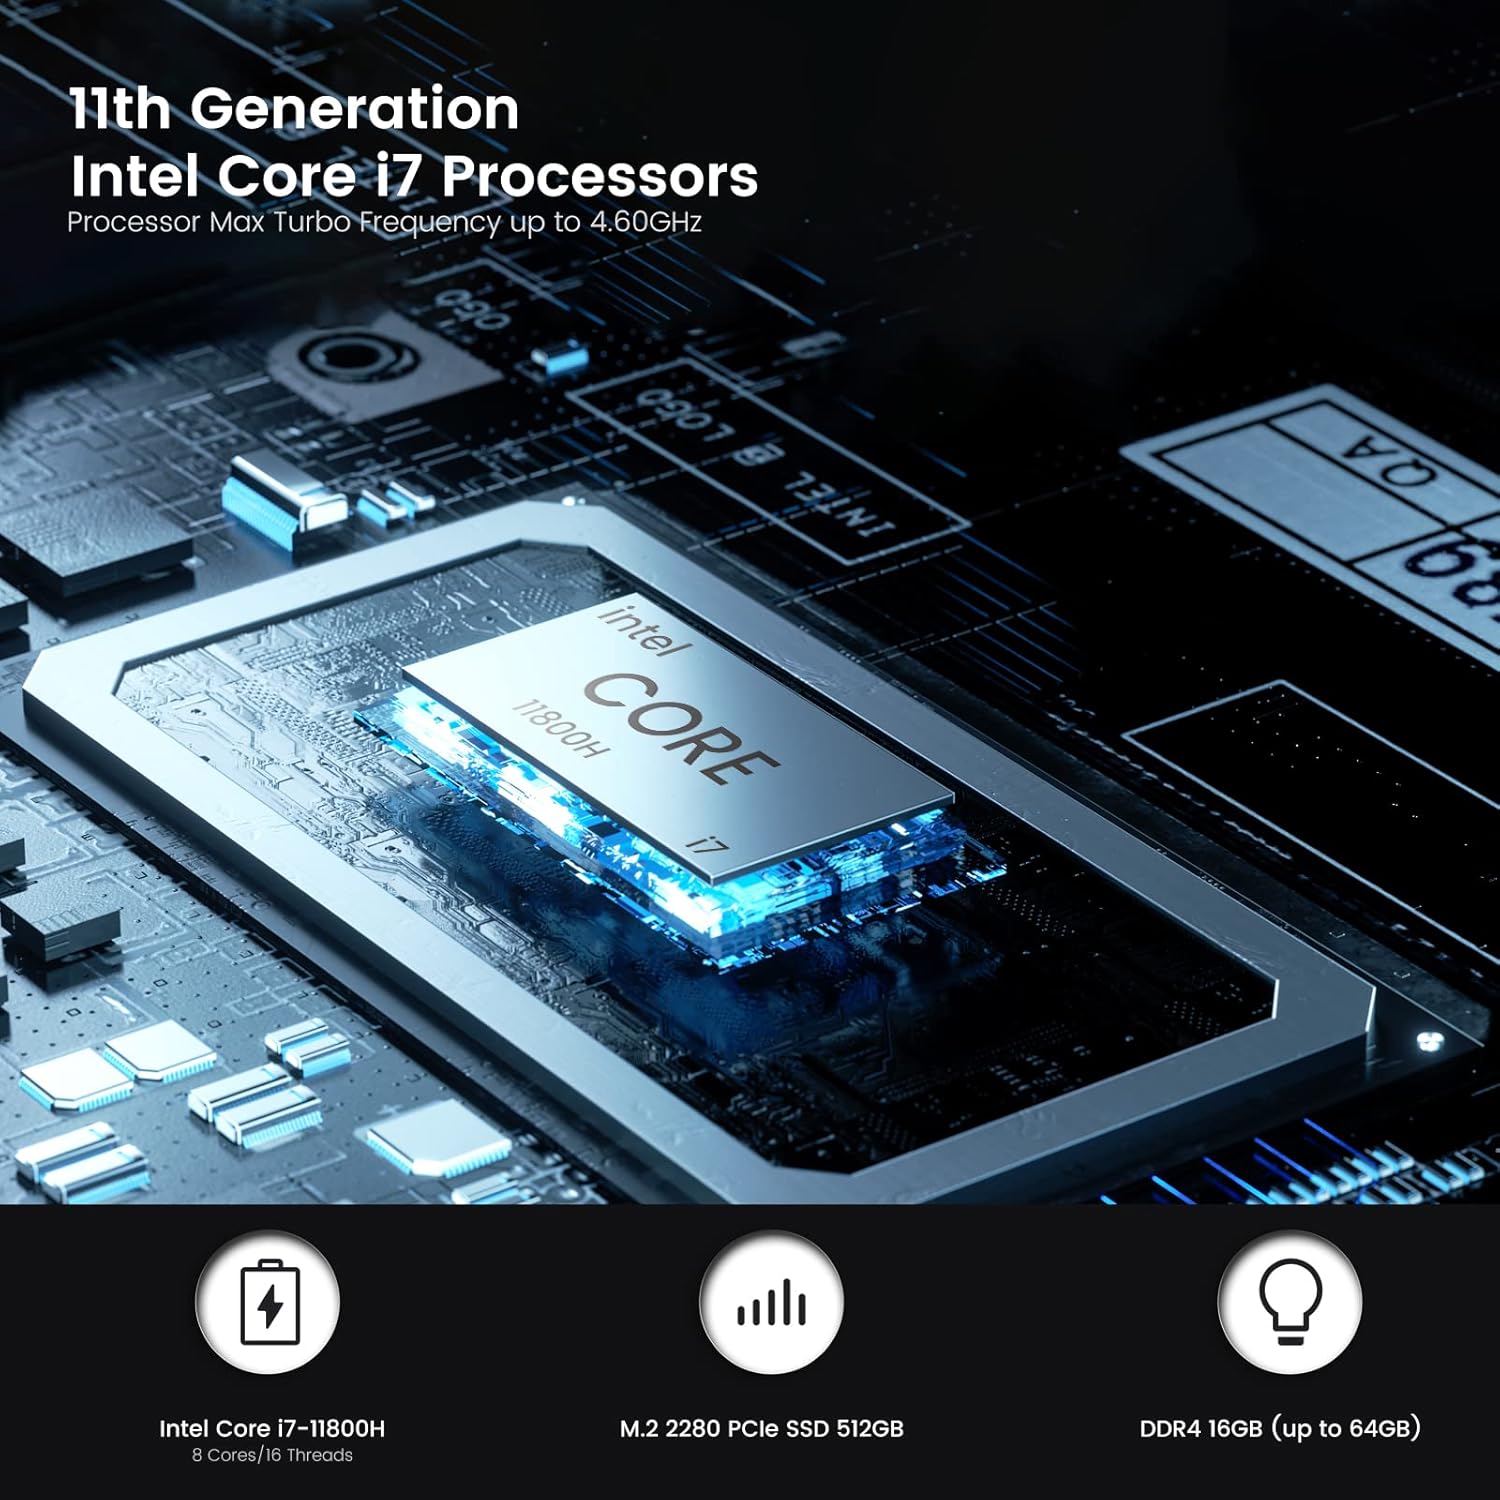
Image: Contents of the MINISFORUM EliteMini TH80 package, showing the Mini PC, power supply, HDMI cable, and VESA mounting bracket.
4. Hardware Installation and Upgrade
The EliteMini TH80 offers flexibility for upgrading RAM and storage. Always ensure the device is powered off and unplugged before performing any hardware modifications.
4.1. Upgrading RAM
The Mini PC supports up to 64GB of DDR4 3200MHz RAM across two SODIMM slots. To access the RAM slots, you may need to remove the bottom cover and potentially the cooling fan assembly.
4.2. Upgrading SSD Storage
The device includes two M.2 2280 NVMe SSD slots, with one supporting PCIe 4.0 for faster read/write speeds. You can install an additional SSD or replace the existing one up to 2TB capacity.

Image: An exploded diagram illustrating the internal components and upgrade points for RAM and M.2 SSDs within the EliteMini TH80.
Video: Demonstration of installing an M.2 SSD into a similar MINISFORUM Mini PC model (TH60), providing a visual guide for the process.
5. Operating Instructions
Your EliteMini TH80 comes pre-installed with Windows 11 Pro, offering a familiar and user-friendly operating environment.
5.1. Multi-Monitor Setup
The Mini PC supports connecting up to three monitors simultaneously, allowing for an expansive workspace. Use the HDMI, DisplayPort, and front USB-C (with DisplayPort Alt Mode support) for video output. Ensure your monitors are set to the correct input source.

Image: An example of a triple-monitor setup connected to the EliteMini TH80, demonstrating its capability for multi-display configurations and 4K video streaming.
Video: Demonstrates the TH80's capability to output video at a maximum resolution of 4K60Hz, suitable for high-resolution displays.
5.2. General Usage
The EliteMini TH80 is suitable for various applications, including:
- Office productivity (documents, spreadsheets, presentations)
- Web browsing and online content consumption
- 4K video playback and streaming
- Light gaming and emulation
- Home theater PC (HTPC) applications

Image: A visual representation of diverse applications for the EliteMini TH80, from professional tasks to entertainment.
6. Performance Overview
The Intel Core i7-11800H processor with integrated Intel Iris Xe Graphics provides solid performance for daily tasks and multimedia.

Image: Visual representation of the Intel Core i7-11800H processor, highlighting its 11th Generation architecture and core specifications.
6.1. Benchmarks
Performance benchmarks indicate strong multi-core capabilities suitable for demanding applications.
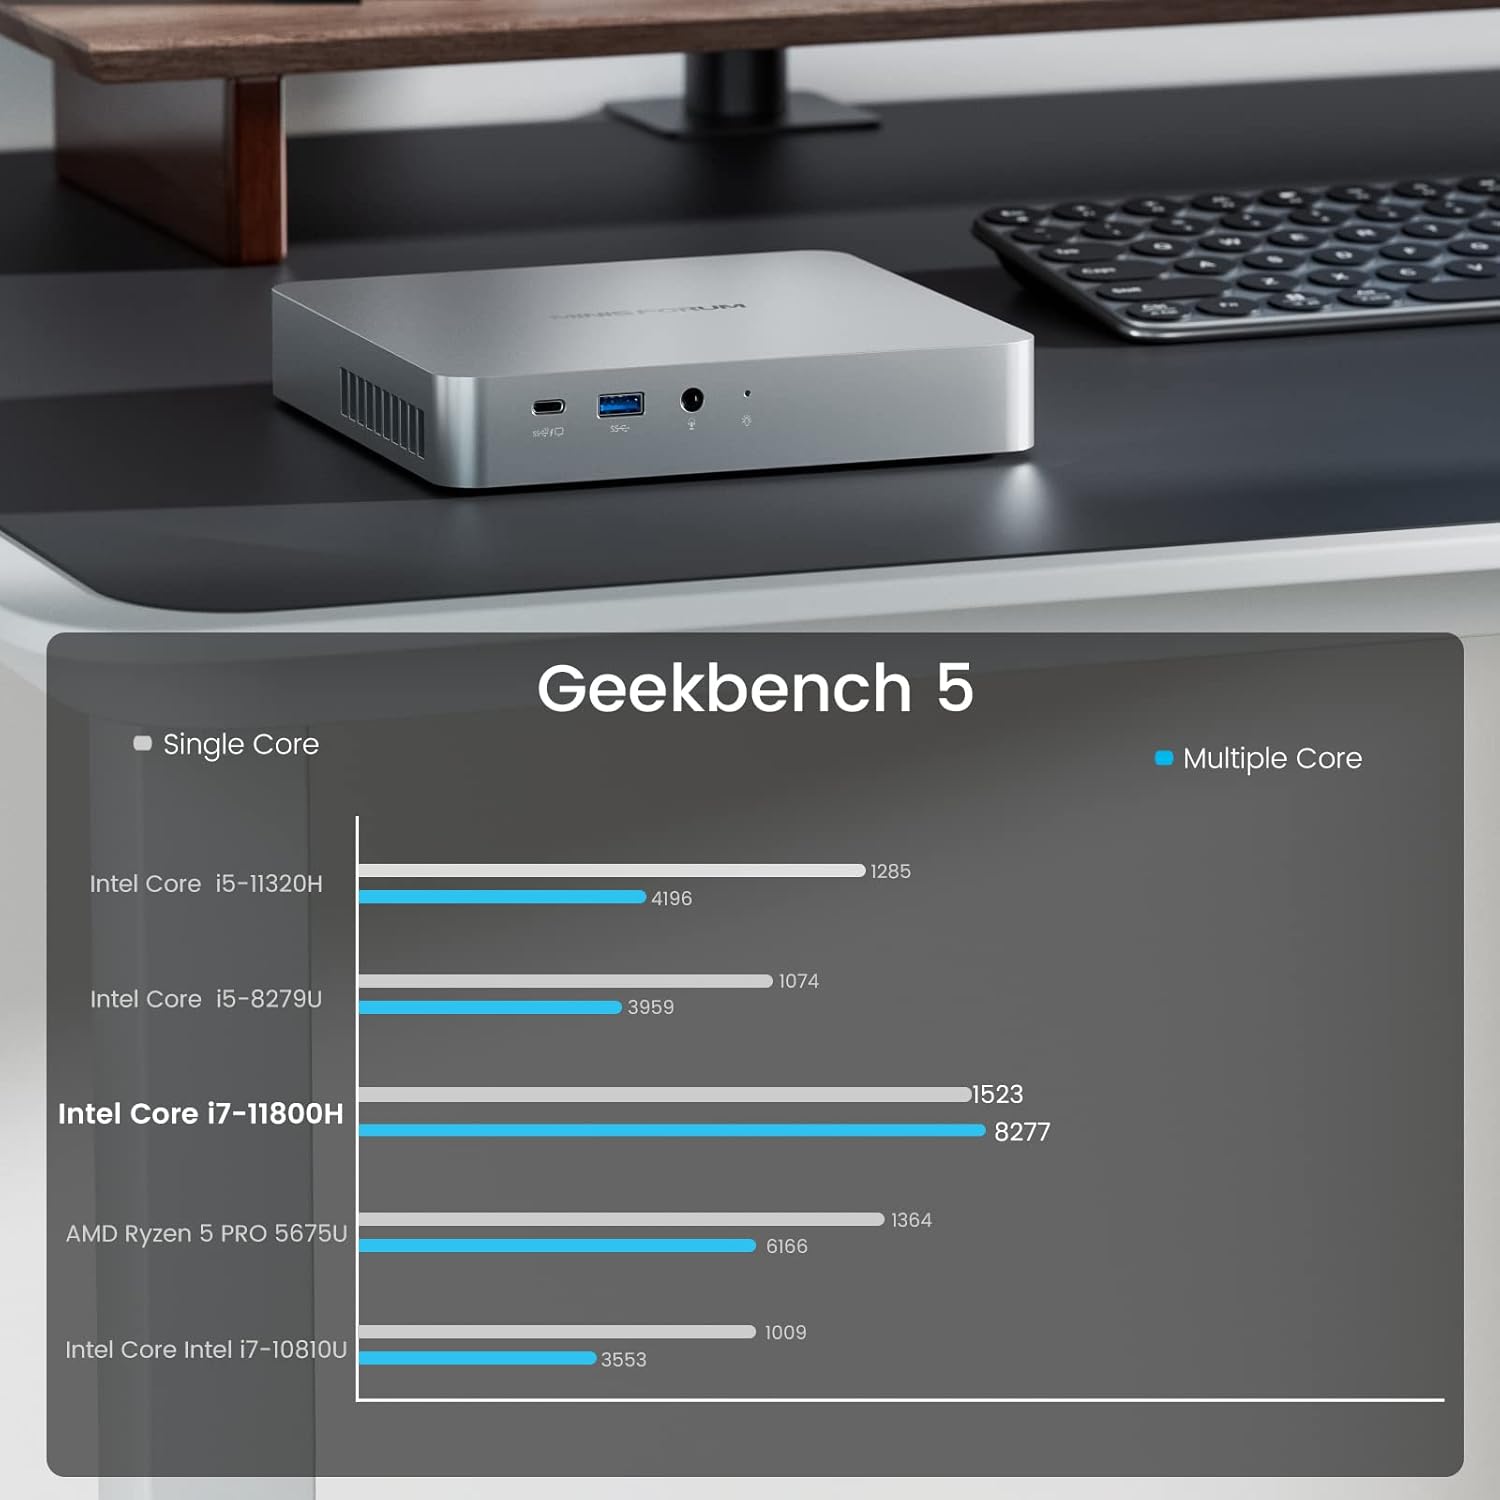
Image: Geekbench 5 scores for the Intel Core i7-11800H, demonstrating its single-core and multi-core performance relative to other CPUs.
6.2. Gaming and Emulation
While not a dedicated gaming machine, the EliteMini TH80 can handle many older and less graphically intensive games, as well as various emulation platforms, at playable frame rates, especially at 720p or 1080p with adjusted settings.
Video: A comprehensive review of the TH80 Mini PC, including demonstrations of its gaming capabilities across various titles and emulation performance.
7. Power Consumption
The EliteMini TH80 is designed with energy efficiency in mind. Power consumption varies based on usage:
- Idle: Approximately 11 Watts
- Web Browsing/4K Video Playback: Approximately 22 Watts
- Average Gaming: Approximately 41 Watts
These figures represent the total system power draw from the wall, not just the CPU.
8. Specifications
Detailed technical specifications for the MINISFORUM EliteMini TH80 Mini PC:

Image: A comprehensive table detailing the specifications of the MINISFORUM EliteMini TH80, including processor, GPU, memory, storage, and connectivity options.
| Feature | Specification |
|---|---|
| Brand | MINISFORUM |
| Operating System | Windows 11 Pro |
| CPU Model | Intel Core i7-11800H |
| CPU Speed | Up to 4.6 GHz |
| Graphics Coprocessor | Intel UHD Graphics 630 (Integrated) |
| Memory Storage Capacity | 512 GB PCIe SSD |
| RAM Memory Installed Size | 32 GB DDR4 3200MHz (Dual Channel) |
| RAM Memory Maximum Size | 64 GB |
| Wireless Technology | Wi-Fi 6E, Bluetooth 5.2 |
| Video Output Interface | HDMI, DisplayPort, USB-C |
| Total USB Ports | 5 (1x USB-C, 4x USB 3.2 Gen2 Type-A) |
| Ethernet | RJ45 2.5 Gigabit |
| Cooling Method | Air |
| Color | Black |
9. Troubleshooting
If you encounter issues with your Mini PC, refer to the following common troubleshooting steps:
- No Power: Ensure the power adapter is securely connected to both the Mini PC and a working power outlet. Check the power light indicator.
- No Display: Verify that the monitor cable is correctly connected to both the Mini PC and the monitor. Ensure the monitor is powered on and set to the correct input source. Try a different video port or cable.
- No Internet Connection: For wired connections, check the Ethernet cable and router. For Wi-Fi, ensure the Wi-Fi adapter is enabled in Windows settings and connected to the correct network.
- System Unresponsive: Press and hold the power button for 5-10 seconds to force a shutdown, then restart the device.
- Slow Performance: Check for background applications consuming resources. Ensure Windows and drivers are up to date. Consider upgrading RAM or SSD if performance issues persist.
- Clear CMOS: If experiencing boot issues or incorrect BIOS settings, use the Clear CMOS button on the rear panel (refer to the port diagram for location).
10. Maintenance
Regular maintenance helps ensure the longevity and optimal performance of your Mini PC:
- Cleaning: Periodically clean the exterior of the Mini PC with a soft, dry cloth. Use compressed air to clear dust from ventilation grilles to prevent overheating. Ensure the device is powered off and unplugged before cleaning.
- Software Updates: Keep your Windows operating system, drivers, and applications updated to the latest versions for security and performance improvements.
- Data Backup: Regularly back up important data to an external drive or cloud storage to prevent data loss.
- Environmental Conditions: Operate the Mini PC in a well-ventilated area, away from direct sunlight, heat sources, and excessive moisture.
11. Warranty and Support
For warranty information, technical support, or service inquiries, please refer to the official MINISFORUM website or contact their customer service directly. Keep your purchase receipt as proof of purchase for warranty claims.