ALONEFIRE PL500
ALONEFIRE PL500 Clip-on Light Instruction Manual
Model: PL500 | Brand: ALONEFIRE
Introduction
Thank you for choosing the ALONEFIRE PL500 Clip-on Light. This versatile and compact light is designed for convenience and hands-free illumination in various situations. With its strong magnetic attachment and multiple light modes, it's an essential accessory for professionals, outdoor enthusiasts, and anyone needing reliable portable lighting.

The ALONEFIRE PL500 Clip-on Light, showcasing its compact and ergonomic design.
Product Features
- Strong Magnetic Ends: Equipped with two powerful magnetic ends, the light securely attaches to metal surfaces or thin fabrics, ensuring it stays in place during use.
- Multiple Light Modes: Easily switch between three distinct modes: warm light, red light, and flashing red light, to suit different needs and environments.
- USB Rechargeable: Conveniently recharge the built-in battery using any standard USB port from a computer, power adapter, laptop, or car charger.
- Optimal Brightness: Provides 20 lumens of bright white light, suitable for dark environments without being overly intense.
- Versatile Application: Ideal for use as nurse badge accessories, for night shifts, or clipped onto shirts, pants, caps, backpacks, dog collars, and more.
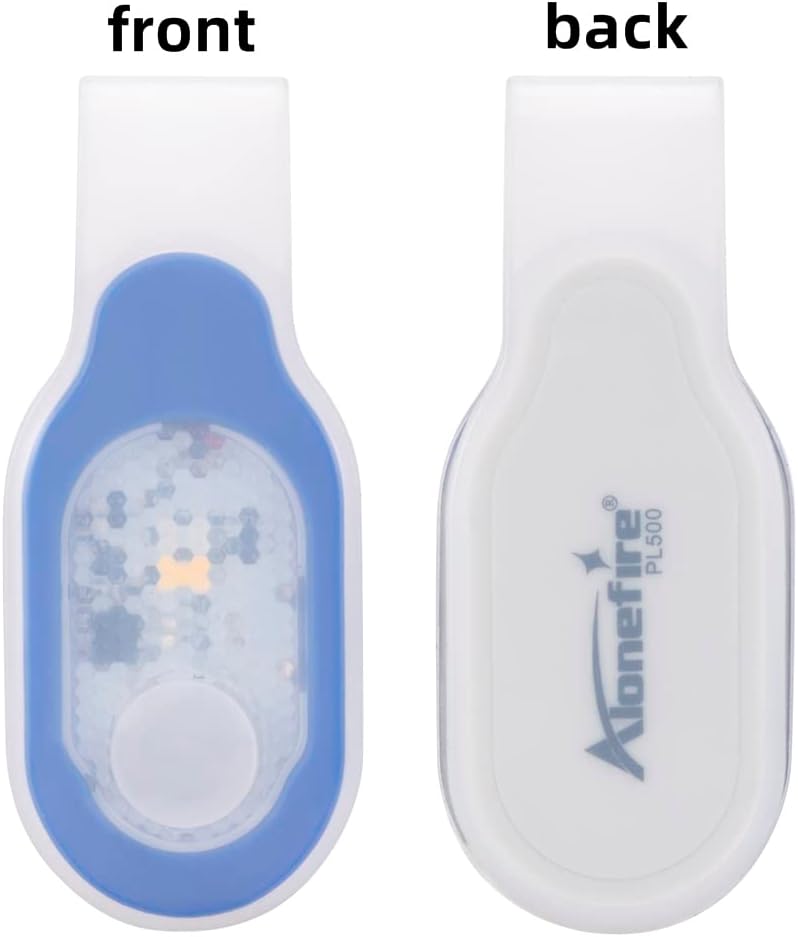
Front and back view of the ALONEFIRE PL500, highlighting the magnetic attachment point on the back.

The ALONEFIRE PL500 demonstrating its white and red light modes in different usage scenarios.

The ALONEFIRE PL500 securely clipped onto a denim jacket, demonstrating its hands-free utility.
What's in the Box
Upon opening your ALONEFIRE PL500 package, you will find the following items:
- ALONEFIRE PL500 Clip-on Light
- USB Charging Cord
- Keychain Light (Bonus Item)

The complete contents of the ALONEFIRE PL500 package, including the light, charging cable, and bonus keychain light.
Setup
Before first use, it is recommended to fully charge your ALONEFIRE PL500 Clip-on Light. To do this, you will need to remove the light unit from its silicone outer shell. This process is straightforward:
- Gently peel back the silicone shell from one end of the light unit.
- Slide the light unit completely out of the silicone casing.
- Locate the micro-USB charging port on the side of the light unit.
- Connect the provided USB charging cable to the light unit and a power source.
Once charged, reinsert the light unit into the silicone shell, ensuring it is properly seated and protected.
Operating Instructions
The ALONEFIRE PL500 features a simple one-hand operation push button switch to control its functions.
- Turning On/Off: Press the button once to turn the light on. Press and hold the button for a few seconds to turn the light off.
- Changing Modes: While the light is on, press the button repeatedly to cycle through the three available modes: warm light, red light, and flashing red light.

A hand demonstrating how to press the button on the ALONEFIRE PL500 to cycle through light modes.

A visual comparison showing the difference between warm light and white light emitted by the ALONEFIRE PL500.
Charging the Device
The ALONEFIRE PL500 is equipped with a rechargeable battery for extended use. Follow these steps to charge your device:
- Remove the light unit from its silicone shell. This is crucial for accessing the charging port.
- Insert the micro-USB end of the provided charging cable into the charging port on the light unit.
- Connect the USB-A end of the cable to a compatible power source (e.g., computer USB port, wall adapter, power bank).
- The indicator light on the unit will turn red while charging and will turn off or change color (depending on the model) when fully charged.
- Once charging is complete, disconnect the cable and carefully reinsert the light unit into its silicone shell.

The ALONEFIRE PL500 light unit detached from its silicone casing, ready for USB charging.
Note: There are no official seller videos available for embedding that demonstrate the charging process. The instructions above provide a detailed guide.
Maintenance
To ensure the longevity and optimal performance of your ALONEFIRE PL500 Clip-on Light, follow these maintenance guidelines:
- Cleaning: Wipe the light and its silicone shell with a soft, damp cloth. Avoid using harsh chemicals or abrasive materials that could damage the surface.
- Battery Care: To extend battery life, charge the light promptly when its brightness diminishes. Avoid completely draining the battery before recharging.
- Storage: Store the light in a cool, dry place away from direct sunlight and extreme temperatures when not in use for extended periods.
Troubleshooting
If you encounter any issues with your ALONEFIRE PL500, refer to the following common troubleshooting tips:
- Light Not Turning On:
- Ensure the battery is charged. Connect it to a power source and check the charging indicator.
- Press and hold the power button for a few seconds to ensure it's not just a quick press.
- Light Not Charging:
- Verify that the light unit is fully removed from the silicone shell before attempting to charge.
- Check the USB cable for any damage and ensure it's securely connected to both the light and the power source.
- Try a different USB port or power adapter.
- Light is Dim:
- The battery level is likely low. Recharge the device fully.
Specifications
| Feature | Detail |
|---|---|
| Model Number | PL500 |
| Color | Blue_White Light |
| Power Source | Battery Powered |
| Light Source Type | LED |
| Material | ABS |
| White Brightness | 20 Lumens |
| Battery Cell Composition | Lithium Ion |
| Runtime | 5 hours |
| Product Dimensions (L x W x H) | 3.15" x 0.78" x 1.38" (79mm x 19mm x 34mm) |
| Item Weight | 0.634 ounces (0.02 Kilograms) |
| Water Resistance Level | Not Water Resistant |
| Special Features | Adjustable Light Modes, Durable, Lightweight, Magnetic, Rechargeable |

Detailed dimensions of the ALONEFIRE PL500 for reference.
Warranty and Support
The ALONEFIRE PL500 Clip-on Light comes with a Full Warranty, ensuring peace of mind regarding your purchase. For any questions, technical support, or warranty claims, please refer to the contact information provided with your product packaging or visit the official ALONEFIRE website. Keeping your purchase receipt is recommended for warranty purposes.
Ask a question about this manual
Ask about setup, troubleshooting, compatibility, parts, safety, or missing instructions. Manuals+ will review the question and use this page’s manual context to help answer it.