1. Introduction
This manual provides detailed instructions for the installation and operation of your BUNGPUNG 4K@60Hz HDMI ARC/eARC Audio Extractor Adapter. This device is designed to convert HDMI audio to ARC/eARC audio (such as Dolby Atmos) from an HDMI source to eARC/ARC sound systems. It can also convert ARC/eARC audio from an ARC-enabled TV to AV receivers. The adapter supports various audio formats including LPCM, Dolby True HD, and DTS-HD Master Audio, making it suitable for connecting soundbars like SONOS ARC, Bose 500/700/900, and other eARC/ARC AV receivers.
2. Key Features
- HDMI ARC/eARC Audio Conversion: Converts HDMI audio to ARC/eARC audio (e.g., Dolby Atmos) for sound systems, and ARC/eARC audio from TV to AV receivers.
- Wide Audio Format Support: Compatible with LPCM, Dolby Digital/Plus/EX, Dolby True HD, DTS, DTS-EX, DTS-96/24, DTS High Res, DTS-HD Master Audio, DSD.
- High Video Resolution: Supports up to 4K@60Hz video resolution.
- High Bandwidth: 18Gbps HDMI 2.0b compliant.
- Content Protection: HDCP 2.3 compliant.
- High Dynamic Range: Supports HDR.
- Consumer Electronics Control: CEC compliant for integrated control.
- Durable Construction: Features a durable metal body for rapid heat absorption and dissipation, reducing EMI/RFI noise interference.
- Easy Installation: Compact size and plug-and-play installation.
- Stable Power: Independent power supply for stable operation.
3. Package Contents
The package typically includes:
- BUNGPUNG 4K@60Hz HDMI ARC/eARC Audio Extractor Adapter (Model: BP-HDC-SWB11A)
- DC 5V Power Adapter
- User Manual
4. Product Overview and Connections
Familiarize yourself with the device's ports and indicators.
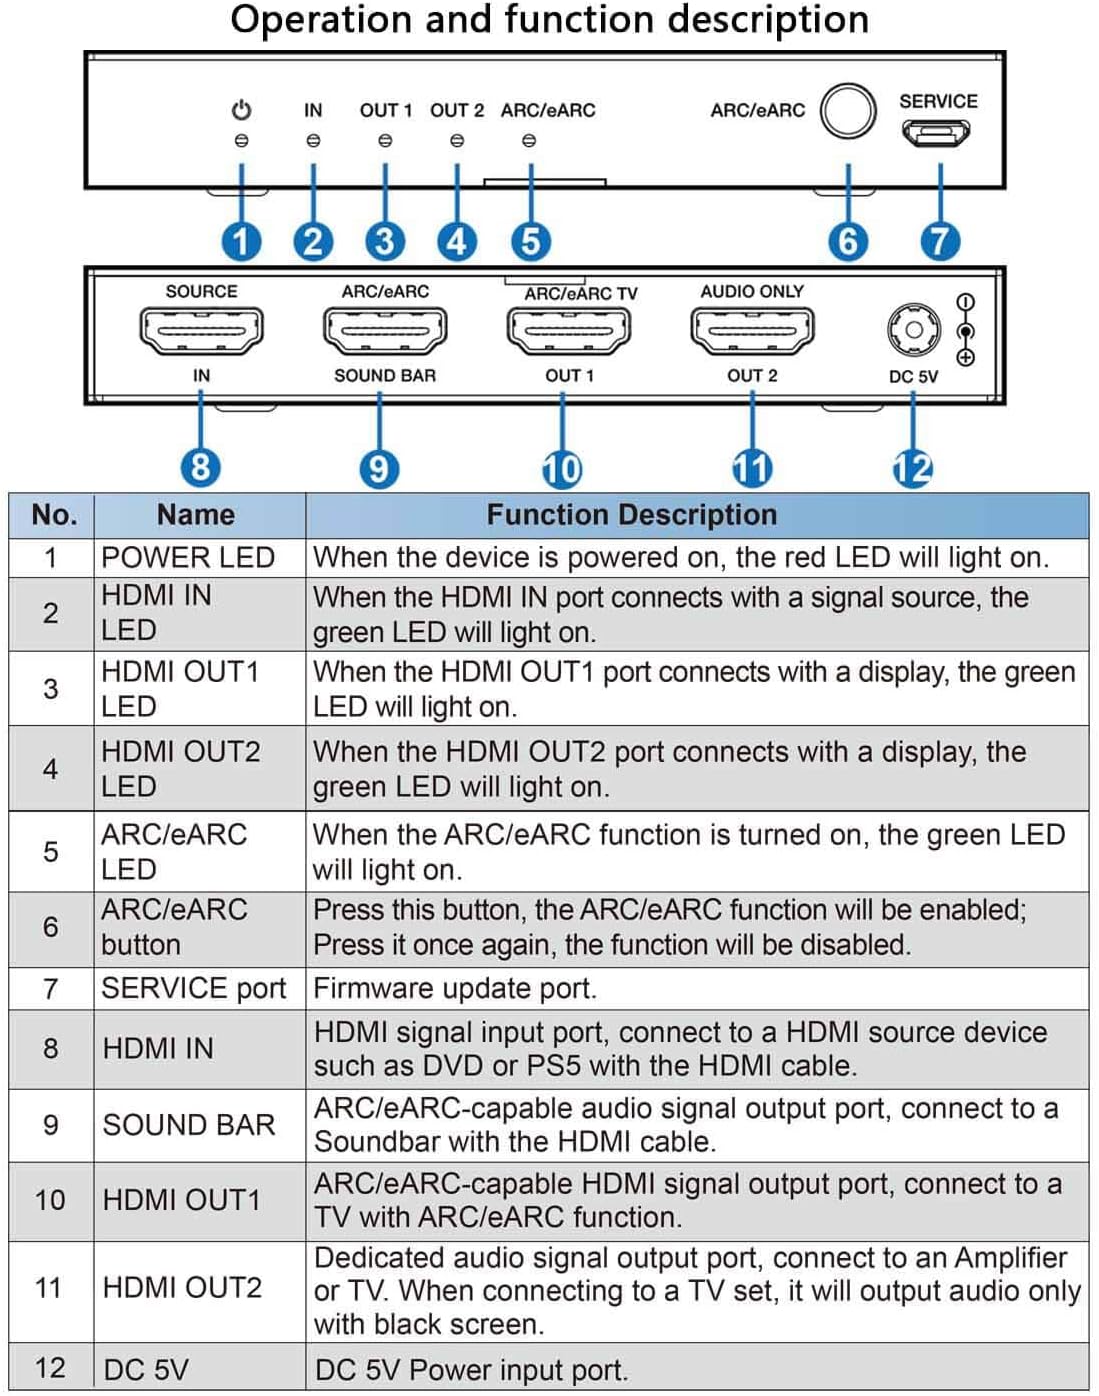
| No. | Name | Function Description |
|---|---|---|
| 1 | POWER LED | When the device is powered on, the red LED will light on. |
| 2 | HDMI IN LED | When the HDMI IN port connects with a signal source, the green LED will light on. |
| 3 | HDMI OUT1 LED | When the HDMI OUT1 port connects with a display, the green LED will light on. |
| 4 | HDMI OUT2 LED | When the HDMI OUT2 port connects with a display, the green LED will light on. |
| 5 | ARC/eARC LED | When the ARC/eARC function is turned on, the green LED will light on. |
| 6 | ARC/eARC button | Press this button, the ARC/eARC function will be enabled; Press it once again, the function will be disabled. |
| 7 | SERVICE port | Firmware update port. |
| 8 | HDMI IN | HDMI signal input port, connect to a HDMI source device such as DVD or PS5 with the HDMI cable. |
| 9 | SOUND BAR | ARC/eARC-capable audio signal output port, connect to a Soundbar with the HDMI cable. |
| 10 | HDMI OUT1 | ARC/eARC-capable HDMI signal output port, connect to a TV with ARC/eARC function. |
| 11 | HDMI OUT2 | Dedicated audio signal output port, connect to an Amplifier or TV. When connecting to a TV set, it will output audio only with black screen. |
| 12 | DC 5V | DC 5V Power input port. |
5. Setup and Installation
Follow these steps to set up your HDMI ARC/eARC Audio Extractor Adapter:
- Connect HDMI Source: Connect your HDMI source device (e.g., Blu-ray player, game console) to the "HDMI IN" port on the adapter using a high-quality HDMI cable.
- Connect Display (Optional): Connect your TV or monitor to the "HDMI OUT1" port on the adapter using a high-quality HDMI cable. This port supports ARC/eARC functionality.
- Connect Soundbar/AV Receiver:
- If using an ARC/eARC compatible soundbar/AV receiver, connect it to the "SOUND BAR" port on the adapter using an HDMI cable.
- If using a non-ARC/eARC compatible audio amplifier or TV for audio only, connect it to the "HDMI OUT2" port. Note that this port outputs audio only with a black screen if connected to a TV.
- Power On: Connect the provided DC 5V power adapter to the "DC 5V" port on the adapter and plug it into a power outlet. The POWER LED will light up.
- Enable ARC/eARC (if needed): If your setup requires ARC/eARC functionality, press the "ARC/eARC" button on the adapter to enable it. The ARC/eARC LED will light up.
Connection Diagrams:

When the ARC/eARC function is OFF, the adapter converts HDMI audio from your source device to the soundbar and also outputs HDMI audio to a display (if connected). No TV connection is required for this mode.
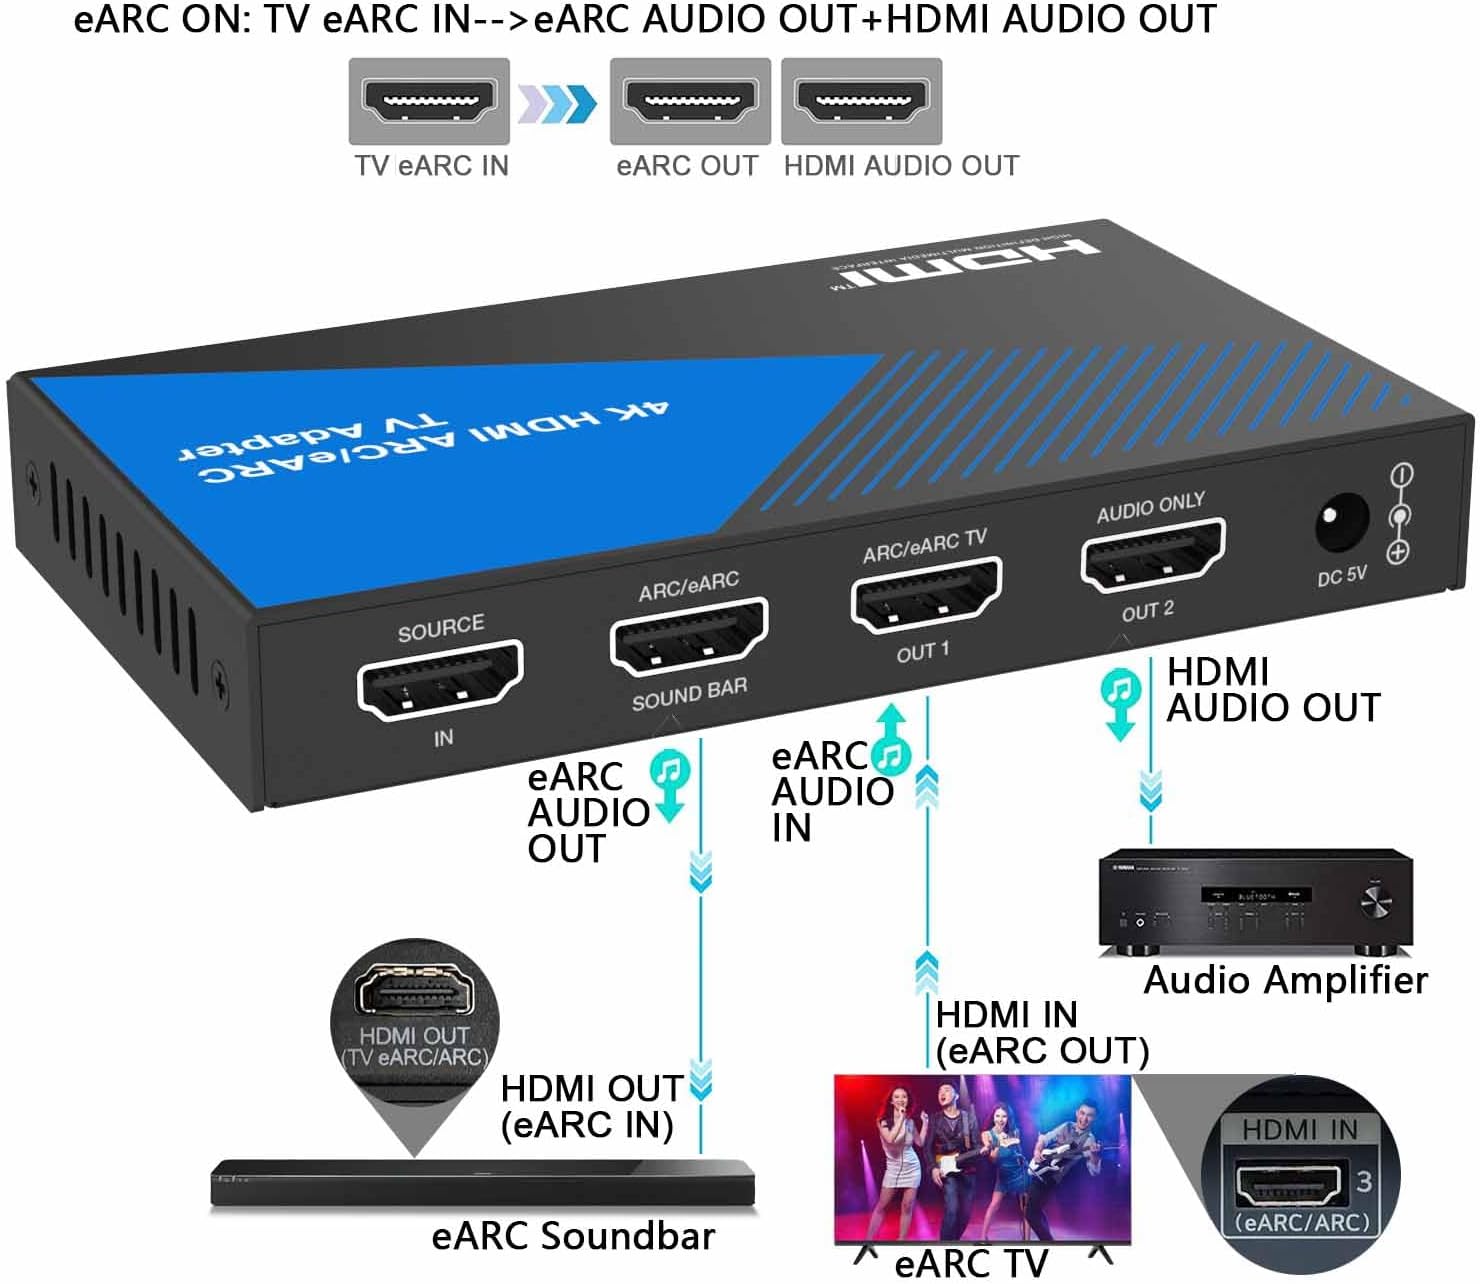
When the ARC/eARC function is ON, the adapter takes ARC/eARC audio from your TV and outputs it to the soundbar, while also providing HDMI audio output. No separate HDMI source device is required for this mode.

Setup Video Guides:
6. Operating Instructions
Once the device is set up, operating it is straightforward:
- Power On All Devices: Ensure all connected devices (HDMI source, TV, soundbar/AV receiver) are powered on.
- Verify LEDs: Check the LEDs on the adapter (POWER, HDMI IN, HDMI OUT1/OUT2, ARC/eARC) to ensure proper signal detection and connection status as described in the Function Description Table.
- Toggle ARC/eARC Function: Use the "ARC/eARC" button to switch between HDMI audio extraction (ARC/eARC OFF) and TV ARC/eARC audio extraction (ARC/eARC ON) modes, depending on your desired audio routing.
- Enjoy Audio and Video: Your audio and video signals should now be routed correctly through your connected devices.
7. Troubleshooting
If you encounter issues, try the following:
- No Power: Ensure the DC 5V power adapter is securely connected to both the adapter and a working power outlet. Check the POWER LED.
- No Video/Audio:
- Verify all HDMI cables are securely connected to the correct ports.
- Check the HDMI IN/OUT LEDs on the adapter to confirm signal detection.
- Ensure your TV/monitor and sound system are set to the correct input source.
- Try bypassing the adapter to confirm the source and display devices are working independently.
- ARC/eARC Not Working:
- Ensure the ARC/eARC function is enabled on the adapter (ARC/eARC LED should be green).
- Verify that your TV and soundbar/AV receiver both support ARC/eARC and that the feature is enabled in their respective settings.
- Use high-quality HDMI cables that support ARC/eARC.
- Audio Quality Issues:
- Ensure all devices are compatible with the selected audio format.
- Check the audio settings on your source device and TV to ensure they are outputting the desired format.
8. Specifications
| Feature | Detail |
|---|---|
| Product Dimensions | 4.72 x 2.76 x 0.63 inches |
| Item Model Number | BP-HDC-SWB11A |
| Video Resolution Support | Up to 4K@60Hz |
| HDMI Version | HDMI 2.0b |
| Bandwidth | 18Gbps |
| HDCP Compliance | HDCP 2.3 |
| HDR Support | Yes |
| CEC Support | Yes |
| Audio Formats | LPCM, Dolby Digital/Plus/EX, Dolby True HD, DTS, DTS-EX, DTS-96/24, DTS High Res, DTS-HD Master Audio, DSD |
| Power Supply | DC 5V |
| Housing Material | Metal |

9. Warranty and Support
This product is covered by a one-year warranty from the date of purchase. If you have any questions about compatibility or initial defects, please feel free to contact BUNGPUNG customer support.