AYEASY 001-DBR
AYEASY 67-inch Home Office Computer Desk Instruction Manual
Model: 001-DBR
Introduction
This manual provides detailed instructions for the assembly, operation, and maintenance of your AYEASY 67-inch Home Office Computer Desk, Model 001-DBR. Please read this manual thoroughly before assembly and use to ensure proper function and longevity of your product.
Safety Information
- Ensure all parts are present and undamaged before assembly. Do not proceed with assembly if any parts are missing or damaged.
- Assemble the desk on a soft, clean surface to prevent scratches.
- Tighten all screws and bolts securely, but do not overtighten.
- Keep small parts away from children during assembly.
- Do not exceed the maximum weight capacity of the desk surfaces and shelves.
- Ensure the power strip is connected to a grounded outlet. Do not overload the power strip.
Package Contents
Before beginning assembly, verify that all components listed below are present in your package. Refer to the assembly diagram for visual identification of parts.
- Desk panels (various sizes)
- Metal frame components
- Monitor stand components
- Removable drawer with wheels
- Integrated power strip with 3 AC outlets and 2 USB ports
- Assembly hardware (screws, bolts, Allen wrench)
- Instruction manual
Setup and Assembly
Assembly typically requires two people. All necessary tools are included. Follow the numbered steps in the provided assembly diagram.
Step 1: Unpack and Identify Parts
Carefully unpack all components and lay them out on a clean, soft surface. Compare each part to the parts list in the separate assembly diagram to ensure everything is accounted for.
Step 2: Assemble the Main Frame
Begin by connecting the main metal frame components using the provided screws and Allen wrench. Ensure all connections are snug but do not fully tighten until the entire frame is assembled.
Step 3: Attach Desk Panels and Shelves
Secure the main desktop panel, side shelves, and the monitor stand shelf to the assembled frame. Use the designated screws for each panel. The monitor shelf is designed to elevate your screen for ergonomic viewing.

Image 1: Detailed assembly diagram showing all components and their dimensions. This image illustrates the overall structure and individual measurements of the desk, including the main desktop, monitor shelf, side shelves, and the removable drawer.
Step 4: Install the Integrated Power Strip
Carefully place the integrated power strip into its designated recessed slot on the desktop. Ensure it is flush with the surface. Connect the power cord to a wall outlet after the desk is fully assembled and positioned.

Image 2: Close-up view of the integrated recessed power strip with AC outlets and USB charging ports, and the scrollable drawer. This image highlights the convenience features for charging devices and flexible storage.
Step 5: Assemble and Insert the Removable Drawer
Assemble the drawer components according to the diagram. The drawer is designed with mobile wheels for easy movement and does not require traditional rails. Once assembled, place it into its designated space under the printer shelf.

Image 3: View of the AYEASY desk showcasing the removable drawer and the dedicated shelf for a printer. This image demonstrates the storage capabilities and organization options.
Step 6: Final Tightening and Placement
Once all components are in place, go back and fully tighten all screws and bolts. Position the desk in its desired location. Ensure the desk is stable and level before placing any equipment on it.
Operating Instructions
Using the Integrated Power Strip
The desk includes a built-in power strip with 3 standard AC outlets and 2 USB charging ports. To use, plug the desk's main power cord into a grounded wall outlet. You can then plug in your computer, monitor, phone, tablet, or other electronic devices directly into the desk's power strip for convenient access.
- AC Outlets: For standard electronic devices.
- USB Ports: For charging smartphones, tablets, and other USB-powered devices.
Caution: Do not exceed the maximum power rating of the integrated power strip. Avoid plugging in high-power appliances that may draw excessive current.
Utilizing Storage Features
The AYEASY desk offers various storage solutions to organize your workspace:
- Monitor Shelf: Elevates your monitor(s) to an ergonomic viewing height, reducing neck and back strain. The space underneath can be used for small items or to tuck away a keyboard when not in use.
- Side Shelves: Provide additional space for books, office supplies, decorative items, or a CPU tower.
- Printer Shelf: A dedicated area for your printer, keeping it within easy reach.
- Removable Drawer: This large drawer, equipped with wheels, can be freely moved to any accessible location. It is suitable for storing files, documents, and other office essentials.
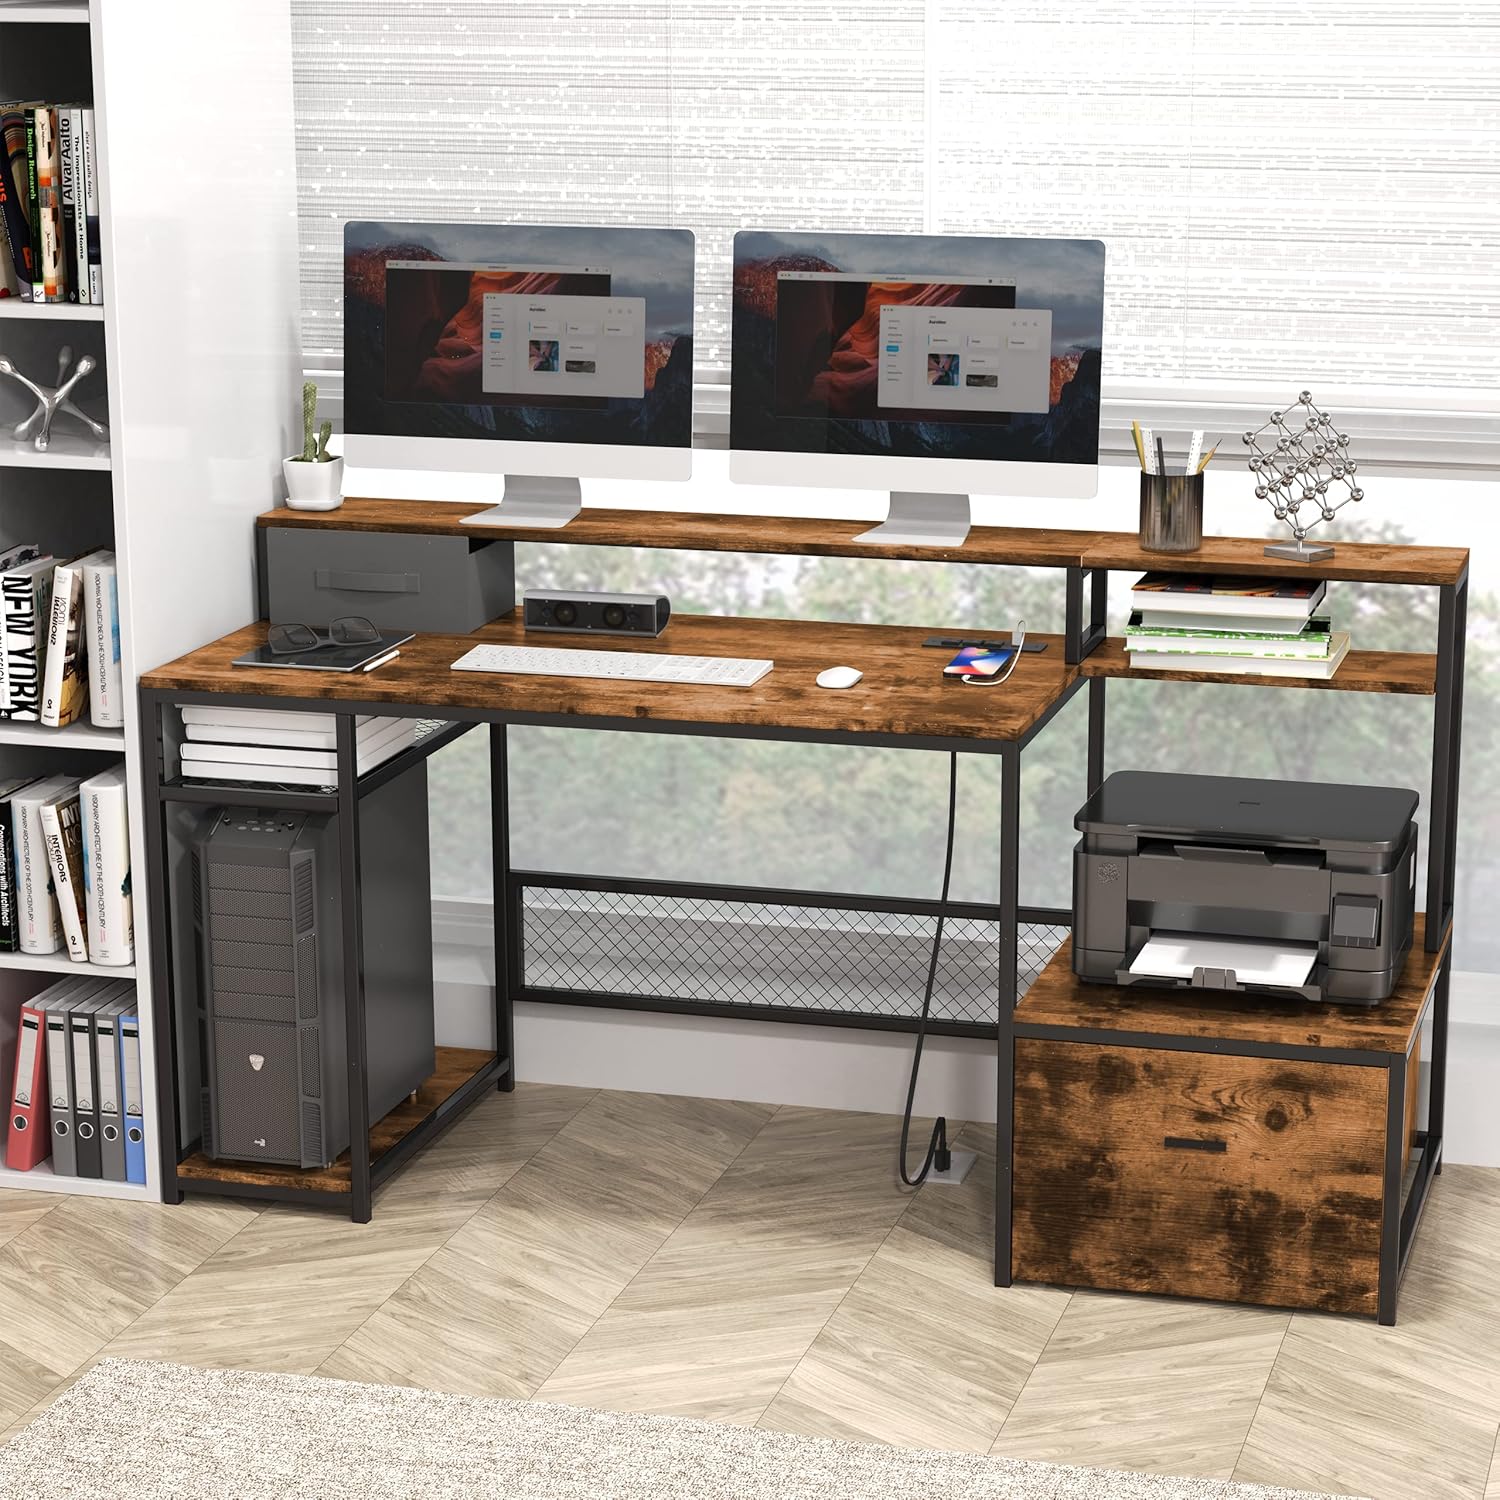
Image 4: The AYEASY desk fully set up in a home office environment, demonstrating its capacity for dual monitors, a CPU tower, a printer, and various office supplies. This image highlights the desk's functional design and ample storage.

Image 5: A detailed view of the desk's storage capabilities, showing space for a CPU tower, a printer on its dedicated shelf, and the large removable drawer used for file storage. This image emphasizes the practical organization features.

Image 6: An illustration demonstrating the ergonomic benefits of the monitor shelf, showing how it helps maintain correct posture and reduces neck strain compared to a lower monitor position.
Maintenance
- Cleaning: Wipe surfaces with a soft, damp cloth. Avoid harsh chemicals or abrasive cleaners that may damage the finish.
- Spills: Clean up spills immediately to prevent water damage to the MDF panels.
- Hardware: Periodically check all screws and bolts to ensure they remain tight. Retighten if necessary.
- Power Strip: Ensure the power strip remains free of dust and debris. Do not attempt to disassemble or repair the power strip yourself.
Troubleshooting
| Problem | Possible Cause | Solution |
|---|---|---|
| Desk is wobbly. | Loose screws or uneven floor. | Check and tighten all assembly screws. Adjust leveling feet if present, or place shims under the legs on an uneven floor. |
| Power strip not working. | Not plugged into wall outlet, wall outlet not active, or power strip overloaded. | Ensure the desk's power cord is securely plugged into a functional wall outlet. Check the wall outlet with another device. Reduce the number of devices plugged into the power strip. |
| Drawer difficult to move. | Obstruction, uneven surface, or carpet. | Check for any items blocking the drawer's movement. Ensure the floor surface is smooth. On carpeted surfaces, movement may be restricted; consider a desk mat. |
| Missing parts during assembly. | Packaging error. | Contact AYEASY customer support with your purchase details and the specific missing parts. |
Specifications
| Feature | Detail |
|---|---|
| Brand | AYEASY |
| Model Number | 001-DBR |
| Color | Rustic Brown |
| Material | Engineered Wood (MDF), Metal Frame |
| Overall Dimensions (L x D x H) | 67 inches (170.18 cm) x 23 5/8 inches (60 cm) x 35 1/2 inches (90 cm) |
| Item Weight | 93 lbs (approx. 42.2 kg) |
| Power Strip | 3 AC Outlets, 2 USB Charging Ports |
| Special Features | Monitor Riser, Removable Drawer with Wheels, Printer Shelf, CPU Stand Area |
| Assembly Required | Yes |
Note: Dimensions are approximate and may vary slightly.
Warranty and Support
AYEASY is committed to providing quality products and customer satisfaction. While specific warranty details are not provided in the product description, the manufacturer states they offer professional service and lifetime customer support.
If your item arrives damaged, scratched, or with missing parts, or if you have any questions regarding your AYEASY desk, please contact AYEASY customer support directly. They aim to respond within 24 hours and provide solutions such as free replacements or full refunds for eligible issues.
For support, please refer to the contact information provided with your purchase or on the official AYEASY website.
Ask a question about this manual
Ask about setup, troubleshooting, compatibility, parts, safety, or missing instructions. Manuals+ will review the question and use this page’s manual context to help answer it.